background image

e-18

speakers

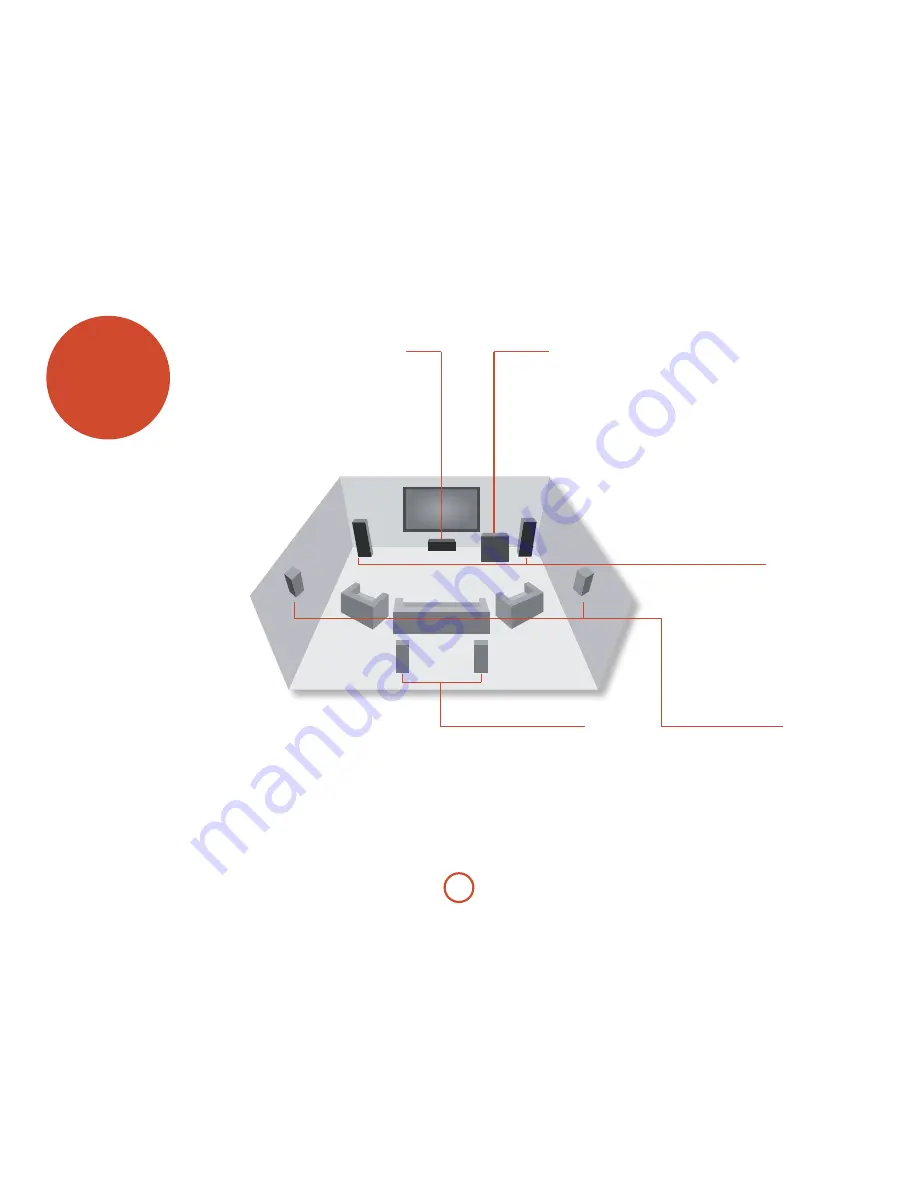
The AVr360 allows you to connect up to seven speakers 

and an active subwoofer in the main system. The output 

channels correspond to speakers installed in the front 

left, centre, front right, surround left, surround right, 

surround back left, surround back right and an active 

subwoofer.

The configuration and placement of your speakers 

is very important

. All speakers, with the exception of 

the subwoofer, should be arranged around your normal 

viewing/listening position. The subwoofer should be 

placed in a position which gives an even frequency 

response in all listening positions. Incorrect placement 

leads to bass boom in some areas. Often the only 

way to find a good position for your subwoofer is by 

experimentation. A good place to start experimenting 

is close to a wall but at least 1m away from any corners. 

You can also consult your subwoofer handbook for 

placement suggestions.

Front left and right

Position your front left and right speakers to 

achieve a good stereo image for normal musical 

reproduction as well as for the multichannel 

modes. If they are placed too close together there 

will be a lack of spaciousness; if they are placed 

too far apart a stereo image will appear to have a 

large ‘hole’ in the middle and will be presented in 

two halves. If there is no practical alternative to 

placing the speakers widely apart, this effect can 

be overcome in music reproduction by using the 

centre sound extraction from the left and right 

speakers (see Dolby Pro Logic II Music mode).

centre

The centre speaker allows for a more realistic 

reproduction of dialogue. The centre speaker 

should have a similar tonal balance to the front 

left and right speakers and be positioned at a 

similar height.

Surround left and right

The surround left and right speakers reproduce 

the ambient sound and effects present in a 

multichannel home cinema system and should be 

installed slightly higher than the listener’s ears.

Surround back left and right

The surround back left and right speakers 

are used to add extra depth and better 

sound localisation and should be installed 

approximately one metre higher than the 

listener’s ears. Place the two surround 

back speakers such that there is an arc of 

approximately 150 degrees between each 

surround back speaker and the centre speaker. 

The surround back speakers should face the front 

of the room as shown in the diagram to provide 

the largest ‘sweet spot’.

Subwoofer

A subwoofer will greatly improve the bass performance of 

your system. This is useful for reproducing special cinema 

effects, especially where a dedicated LFE (Low Frequency 

Effects) channel is available, as with many discs encoded 

with Dolby or DTS technologies.
More than one subwoofer unit may be required for larger 

installations, particularly in rooms of a timber frame 

construction. Multiple subwoofers need care in placement 

because there may be cancellation effects between the 

units and you may require expert advice.

Summary of Contents for fmj AVR360

Page 1: ...AVR360 Handbook AVR surround amplifier English...

Page 2: ...are for use by qualified service personnel only To reduce the risk of electric shock do not perform any servicing other than that contained in the operating instructions unless you are qualified to d...

Page 3: ...stalled in a rack Handle the power cord carefully Hold the plug when unplugging the cord Keep the unit free from moisture water and dust Unplug the power cord when not using the unit for long periods...

Page 4: ...E 4...

Page 5: ...development team Contents Safety E 2 Welcome E 5 Before you begin E 6 Rear Panel Connectors E 9 Audio Video Connections E 10 Connection Guide E 14 Radio Connectors E 16 Other Connectors E 17 Speakers...

Page 6: ...ts are also capable of generating video signals the AVR360 includes broadcast quality switching for HDMI Composite S Video RGB and Component video signals BD Audio and SACD can be connected via the mu...

Page 7: ...The AVR360 can be switched into standby mode using the 2 button on the CR102 remote control While in standby mode the front panel LED will glow red and power consumption is less than 0 5 Watts While...

Page 8: ...bove copyright notice this list of conditions and the following disclaimer Redistributions in binary form must reproduce the above copyright notice this list of conditions and the following disclaimer...

Page 9: ...rect mains cable here The AVR360 is configured for 220V 240V 50Hz power only Video connectors Component S Video and Composite connectors see page E 11 Zone 2 connection see page E 11 Digital connector...

Page 10: ...connection between AVR360 and the source Making connections Wherever possible connect both the analogue and digital outputs of digital sources This enables use of a digital input for the main zone an...

Page 11: ...e same named input as the RGB signals The AVR360 is also compatible with Sync on Green or RGsB signals RGB video outputs on source equipment are often on SCART connectors You will need to use a SCART...

Page 12: ...outputs All pre amplifier analogue outputs are buffered have a low output impedance are at line level and follow the Zone 1 volume control setting They are able to drive long cables or several inputs...

Page 13: ...E 13 English...

Page 14: ...channels In each case use the audio inputs labelled BD on the AVR360 Satellite receiver A satellite receiver is connected in the same way as a BD player with the same order of preference according to...

Page 15: ...power on the irDock slot in your iPod and select iPod as the source Note that the default input is VCR but this can be changed in the General Setup menu Navigating through music and podcasts on your i...

Page 16: ...d use tacks or adhesive tape to secure the aerial in a T shape but note that no tacks should come into contact with the internal wire of the aerial When installed and receiving DAB check the signal st...

Page 17: ...to switch on and off compatible pieces of home entertainment equipment for example you could set up a trigger to turn on your television and BD player whenever the AVR360 was switched on There are tw...

Page 18: ...come in music reproduction by using the centre sound extraction from the left and right speakers see Dolby Pro Logic II Music mode Centre The centre speaker allows for a more realistic reproduction of...

Page 19: ...p the front left and right speakers remove the metal strips from the speaker terminals Connect the woofer or LF terminals to the FL and FR terminals on the AVR360 Connect the tweeter or HF terminals t...

Page 20: ...Channel ARC from an HDMI 1 4 compliant display Use this with an HDMI 1 4 compliant television using internal TV tuners These sources are market dependent and may not be available on your AVR360 Most...

Page 21: ...xtended Menu allowing you to perform the following Restore to factory defaults This option allows you to restore all settings on your AVR360 to the defaults that it left the factory with Change remote...

Page 22: ...ected to the corresponding input or internal input Unused sources can be prevented from being selected in the setup menu Menu Selects the Setup menus on the on screen display OSD OK Used to enter sele...

Page 23: ...input jack on the rear panel is available Please consult your dealer for further information Remote operation may become unreliable if strong sunlight or fluorescent light is shining on the remote se...

Page 24: ...tteries as soon as possible Device Mode Source keys As the CR102 can control your AVR360 as well as a range of other equipment many of the buttons have more than one function depending on the device m...

Page 25: ...search for the code for another device follow the instructions above but press the appropriate device key instead of a during step 2 Method 2 Library search This section describes another way to progr...

Page 26: ...ecrease and increase AVR360 volume DIRECT Stereo direct on off Provides a direct analogue path from the analogue inputs to the left and right front outputs Switches off any surround processing modes a...

Page 27: ...BD players HOME o Changes Audio decode format Dolby Digital DTS etc Shift o displays the Memory function Bookmarks INFO b Cycles through BD subtitle language options if available Shift b displays STA...

Page 28: ...ite and Cable set top boxes b Blue Duplicates function of BLUE key for some Satellite and Cable set top boxes AV Device Mode The a Device Mode button configures the CR102 to control the functions of a...

Page 29: ...Duplicates function of Yellow key if used b Blue Duplicates function of Blue key if used PVR Device Mode The v Device Mode button configures the CR102 to control the functions of a video recorder or...

Page 30: ...igates track listings if supported by the player OK selects the currently highlighted track if supported by the player M Changes the time display modes on Arcam CD player U not used D Cycles through t...

Page 31: ...E 31 English...

Page 32: ...ltered away from these Small speakers and redirected to Large speakers or the subwoofer if present A frequency of 80Hz is often a good starting point however you will probably have to experiment with...

Page 33: ...p without storing the settings The Auto Speaker Setup function is found within the Setup menus see page E 36 By default Room EQ is not applied to any of the source inputs You should enable Room EQ on...

Page 34: ...t resolutions until the picture returns Navigating the setup menu using the remote control The setup menu can be navigated by using the cursor arrow keys on the remote control This is by far the easie...

Page 35: ...ng the entire function of Dolby Volume to Off as volume related frequency response processing is still active See Dolby volume on page E 42 for more information DV Calib Offset The Calibration Offset...

Page 36: ...he Video Inputs menu if applicable Audio Compression Allows selection of compression which is ideal for late night listening The compression effect increases the volume of the quiet passages and decre...

Page 37: ...you do not have a subwoofer you will be forced to set your front speakers to Large Crossover Freq This is the frequency at which loudspeakers set as Small start to redirect bass signals to the Subwoo...

Page 38: ...by the connected display device are greyed out and cannot be selected Preferred sets the output resolution to be the preferred resolution that is requested by the display device This is often the hig...

Page 39: ...f the last used possibly very loud volume exceeds this value Zone 2 format Selects the video format used for the Zone 2 composite video output PAL is mostly used in Europe and NTSC is mostly used in N...

Page 40: ...used for movies music and video games it is recommended that the correct decoding mode for your source material is used to obtain best results Movie mode This is intended for use with cinematic materi...

Page 41: ...be used in this mode For DTS sources DTS 5 1 Less common than the Dolby Digital format but generally recognised within the audio industry as being of superior sound quality DTS 5 1 delivers surround...

Page 42: ...irect or on the analogue multi channel input Dolby Volume can even be applied to processing of stereo signals e g PLII Music or when down mixing a digital multi channel source e g Dolby Digital 5 1 do...

Page 43: ...E 43 English...

Page 44: ...ly includes the radio station name the music or speech genre as well as additional information related to the current programme On music stations this is often information on the currently playing tra...

Page 45: ...it using the Band C keys and press E to navigate the contents of the USB device Navigate through folders using the B C D and E keys to a music file and press the OK key to play the file Internet radi...

Page 46: ...only signals obtained by the AVR360 from the analogue audio and Composite video inputs The analogue inputs are required because there is no analogue to digital digital to analogue or DSP processing av...

Page 47: ...E 47 English Zone 1 Multi room connection guide Zone 2...

Page 48: ...he CR102 press the Device Mode key followed by the function key In this example you d press a followed by Shifted Learning You can assign a learned function to a CR102 key without sacrificing its orig...

Page 49: ...e U functionality on the D key repeat the above process again but swap over the D and U key presses in the example Note that the function that is copied over to the new key is always the original func...

Page 50: ...ng one of the methods described at the start of this guide Here are the factory default settings Device Mode Default status Default Arcam codes dvd Locked 0762 SAT Unlocked 1205 AV Unlocked 0586 TUN L...

Page 51: ...de e g restore SAT S 9 9 2 z z Locking unlocking a mode e g DVD mode d S 9 8 2 i e two blinks for lock d S 9 8 2 i e four blinks for unlock Cancel all volume punch through S 9 9 3 Restore volume punch...

Page 52: ...ay mode if appropriate you have the AVR360 in a video resolution that is compatible with the connection you are using and with your display device For example composite video is only capable of carryi...

Page 53: ...ce where the interference is coming from Switch off each source component in turn then any other equipment Most electronic equipment does generate low levels of interference try re arranging cabling f...

Page 54: ...dance 5 General Mains voltage 220 240V 50Hz Power consumption maximum 1kW Thermal dissipation approx 3400 BTU hour Power consumption idle typical 100W Thermal dissipation approx 340 BTU hour Power con...

Page 55: ...parts and labour costs The warranty does not cover transportation costs at any time Claims under guarantee This equipment should be packed in the original packing and returned to the dealer from whom...

Reviews: