


2
3
Warning
We build all ARC Audio products to play at high volumes for extended periods of
time. Your ears however are not designed for high volume listening. This product
can easily generate volumes that can permanently damage your hearing. We urge
you to limit your exposure to very high volume sound.
You may also find your state has laws governing the volume of an audio system in a
car. Please be aware of all local and state laws in you area.
A properly tuned and operated audio system will deliver years of enjoyment when
used properly.
Installation Instructions
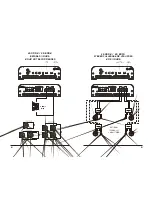
ARC Audio KAR Series Amplifiers are designed for easy installation in your vehicle. To
ensure proper operation of your new purchase, please follow the suggestions we
have listed below:
Warning
Please check the suitability of the installation location before you begin. Do not cut any of
the car’s structure. Pay close attention to what is behind the panels or carpet. Often the
manufacture will hide wires, computers or other electronic devices in the exact areas you
wish to install in.
If you do not have experience with automotive electrical and mechanical systems contact
a professional installer. Paying a qualified installer is almost always cheaper then paying
a dealership to repair your car.
Locating the Amplifier
The amplifiers must be securely mounted to a solid surface. Please select a dry
location in the trunk or passenger compartment only. Do not mount the amplifier to
any area that may have excessive vibration (like the subwoofer box). Position the
amplifier in an area that receives sufficient airflow for proper heat dissipation.
Thank you for purchasing an ARC Audio Hi-Performance Amplifier.
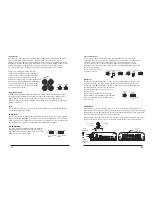
This ARC Audio amplifier uses a Full Range Class H architecture that significantly
improves efficiently without compromise to the sound quality. Don’t be fooled by the
small size. Class H amplifiers make more power for there size then traditional designs
and offer much lower THD and higher Damping factors then Full Range Class D
designs.
ARC Audio...
SOLID CONSTRUCTION for SOUND Car Audio Systems.
Setting the Gains
So you're worried that your 8 Volt output head unit will be too much for the
ARC Audio's 4 Volt input stage.
Don't Be
ARC Audio Amplifiers input stage is rated to 4 volts RMS @ 1KHz without
clipping.
Music is very dynamic. Nothing like a 1KHz test tone. It would be rare to see a
peak as high as a test tone. Furthermore, your head unit produces its output at
full volume but when you tune your system you always set the head unit to
70% of maximum volume.
Supplying Enough Power
The Laws of Nature
Your amplifier Does NOT make power. It converts power, or current, from your
cars electrical system and turns it into a high power musical energy. If the amp
can't get all the power it needs it will not produce its full output. Your ARC
Audio amplifier will produce Full output for longer then other amps on the
market today. If the Voltage or Current drops too low even our amplifiers will
drop below their rated output. Make sure your vehicle charging system is in
good working order. Any Hi-Performance audio amplifier will increase the
demand on your alternator and battery. If you are unsure have your charging
system tested by a professional technician.
The Ground!!!
Warning: Read this Carefully
The ground wire should be connected directly to the chassis of your vehicle.
Find a clear location close to the amplifier and remove all the paint and sound
deadener. Use a #10 or larger screw to secure it. Never use seatbelt bolts for
grounding.
Remember, the ground must carry the same high current as the positive power
wire.
To reduce the risk of noise, run all signal cables away from any vehicle or power
supply wiring.
Running the Cables
Carefully run the power and signal cables through the passenger compartment
of the vehicle. Always use a rubber grommet to prevent the power wire from
shorting and to reduce the risk of fire. A 4 gauge or larger wire should be used
for power and ground connections. We recommend a fuse be installed on the
power wire within 18 inches of the battery for safety.