background image


L-COM, INC.   45 BEECHWOOD DRIVE   NORTH ANDOVER, MA 01845    

WWW.L-COM.COM   E-MAIL: [email protected]   PHONE: 1-800-343-1455   FAX: 1-978-689-9484 

© L-com, Inc. All Rights Reserved. L-com Global Connectivity and the L-com logo are registered marks. 


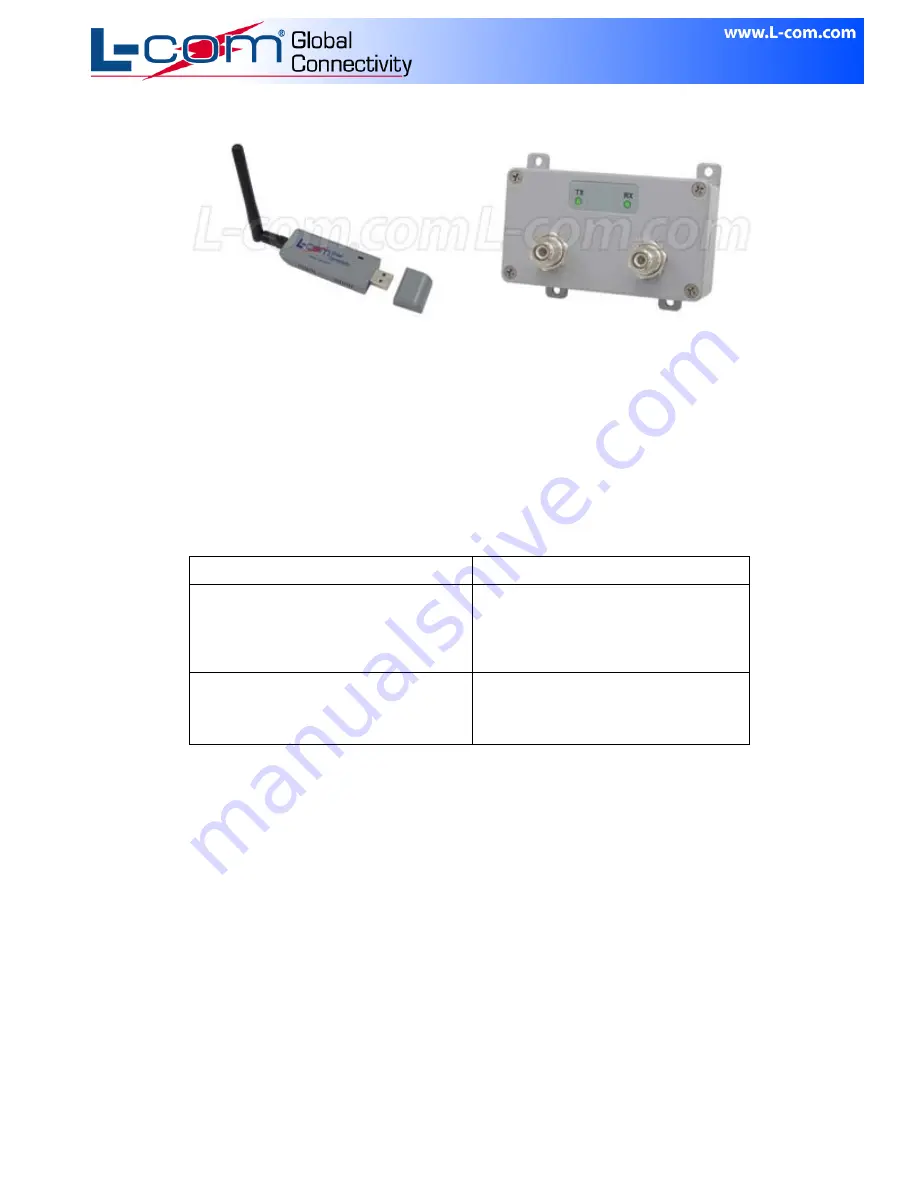
HAKIT-RTG Series Certified Amplifier Kit 

User Manual 


Models FCC 

ID 

HAKIT-RTGU-250 

HAKIT-RTGIU-250 

HAKIT-RTGU-500 

HAKIT-RTGIU-500 

MYF-LCUSB 

HAKIT-RTGXU-1000 

HAKIT-RTGXIU-1000 

MYF-LCUSBX 


(For 802.11b/g Wireless Networks) 


Revision:  A  / Date: 03/10 

Summary of Contents for HAKIT-RTG Series

Page 1: ...com Inc All Rights Reserved L com Global Connectivity and the L com logo are registered marks HAKIT RTG Series Certified Amplifier Kit User Manual Models FCC ID HAKIT RTGU 250 HAKIT RTGIU 250 HAKIT RTGU 500 HAKIT RTGIU 500 MYF LCUSB HAKIT RTGXU 1000 HAKIT RTGXIU 1000 MYF LCUSBX For 802 11b g Wireless Networks Revision A Date 03 10 ...

Page 2: ...cate the receiving antenna Increase the separation between the equipment and receiver Connect the equipment into an outlet on a circuit different from that to which the receiver is connected Consult the dealer or an experienced radio TV technician for help Regulatory information Disclaimers Installation and use of this Wireless LAN device must be in strict accordance with the instructions included...

Page 3: ...there is a minimum required separation distance of 20 cm from users Non Amplified Systems For non amplified systems simply attach the antenna into the antenna port on the USB adapter and proceed to USB Adapter Installation section Indoor Amplified Systems Amplifier connections are clearly labeled on the amplifier unit as shown below 1 Connect the Antenna to the Amplifier output labeled ANTENNA 2 C...

Page 4: ...stems Amplifier connections are clearly labeled on the amplifier unit as shown below 1 Connect the Antenna to the Amplifier output labeled ANTENNA 2 Connect the DC Injector output labeled TO AMPLIFIER to the Amplifier input labeled RADIO 3 Connect the Radio to the DC Injector input labeled RADIO using a pigtail cable 4 Plug the AC Adapter into the DC Injector s DC power jack and wall outlet Procee...

Page 5: ...CUSB 02 has good capability in anti jamming and supports WEP TKIP AES WPA and WPA2 encryption which prevents outside intrusion protecting your personal information from being exposed Featuring high performance transmission rate simple installation and adaptability as well as strong security the WLAN LCUSB 02 is the perfect solution for small office and home needs System Requirements Recommended sy...

Page 6: ... com logo are registered marks Installation This chapter describes how to install the driver and utility of the WLAN LCUSB 02 The following procedure is illustrated in Windows XP Installation Guide Step 1 Find the setup file named WLAN LCUSB 02 exe on the included CD and then double click on it to start the installation The page shown in the following figure appears Then click Next to continue ...

Page 7: ... COM PHONE 1 800 343 1455 FAX 1 978 689 9484 L com Inc All Rights Reserved L com Global Connectivity and the L com logo are registered marks Be sure Driver Files are checked and click Next to continue Step 2 Select a destination folder for installation files Then click Next to continue ...

Page 8: ...R MA 01845 WWW L COM COM E MAIL SALES L COM COM PHONE 1 800 343 1455 FAX 1 978 689 9484 L com Inc All Rights Reserved L com Global Connectivity and the L com logo are registered marks Step 3 Click Next to continue Step 4 Click Next to continue ...

Page 9: ...455 FAX 1 978 689 9484 L com Inc All Rights Reserved L com Global Connectivity and the L com logo are registered marks Step 5 The following warning will appear Click the Continue Anyway button to continue the installation Step 6 After the installation has been completed click Finish to exit the setup wizard ...

Page 10: ... Reserved L com Global Connectivity and the L com logo are registered marks Step 7 Driver Installation Step 8 1 After step 7 plug the USB adapter into any open USB slot on computer The page shown in the following figure appears within seconds Select Install the software automatically and click Next to continue The drivers will then begin to install ...

Page 11: ...5 FAX 1 978 689 9484 L com Inc All Rights Reserved L com Global Connectivity and the L com logo are registered marks Step 8 2 The following warning will appear Click the Continue Anyway button to continue the installation Step 8 3 After the installation has been completed click Finish to exit the setup wizard ...

Page 12: ...eless LAN Utility from the menu Step 2 Follow the Install Shield Wizard to uninstall the utility software and driver from your PC Configuration The WLAN LCUSB 02 can be configured by its utility in Windows 2000 XP Vista or Windows 7 This chapter describes how to configure your wireless adapter for wireless connectivity with trustable data security encryption features The configuration procedures i...

Page 13: ...L com Inc All Rights Reserved L com Global Connectivity and the L com logo are registered marks Connection status page of Main User Interface UI This page shows the connection status information such as SSID Channel and so on Site Survey Page of Main UI This page shows Site Survey information Users may select one AP to connect to ...

Page 14: ...s Reserved L com Global Connectivity and the L com logo are registered marks The Button Advanced Scan will show more information including channel as in the following picture The Rescan Button will refresh information in the list To select an AP click the Join button Note You will be only able to connect to an Access Point that is set to Channel 6 ...

Page 15: ... 978 689 9484 L com Inc All Rights Reserved L com Global Connectivity and the L com logo are registered marks After selecting an AP the user must choose Authentication Mode Encryption Mode and Network Key to connect to the AP selected After those fields are filled in click the Finish button to start connect progress ...

Page 16: ...LES L COM COM PHONE 1 800 343 1455 FAX 1 978 689 9484 L com Inc All Rights Reserved L com Global Connectivity and the L com logo are registered marks Profile Configuration Page of Main UI On this page the user can Add Delete Edit Activate a Profile and use WPS to Connect an AP ...

Page 17: ...COM E MAIL SALES L COM COM PHONE 1 800 343 1455 FAX 1 978 689 9484 L com Inc All Rights Reserved L com Global Connectivity and the L com logo are registered marks Add a Profile Enter Profile Name SSID and select Network Type on this page and click the Next button ...

Page 18: ...9484 L com Inc All Rights Reserved L com Global Connectivity and the L com logo are registered marks Select Authentication Mode Encryption Mode and enter Network Key in on this page and click the Next button if this information is not required just use the default configurations then click the Finish button to start connect ...

Page 19: ... 01845 WWW L COM COM E MAIL SALES L COM COM PHONE 1 800 343 1455 FAX 1 978 689 9484 L com Inc All Rights Reserved L com Global Connectivity and the L com logo are registered marks Select to Specify IP Address or Obtain an IP Address automatically ...

Page 20: ...ALES L COM COM PHONE 1 800 343 1455 FAX 1 978 689 9484 L com Inc All Rights Reserved L com Global Connectivity and the L com logo are registered marks If selecting an IP address fill in the required information Check with your network administrator for IP address information ...

Page 21: ...1845 WWW L COM COM E MAIL SALES L COM COM PHONE 1 800 343 1455 FAX 1 978 689 9484 L com Inc All Rights Reserved L com Global Connectivity and the L com logo are registered marks For advance settings the Default is recommended Click Next to continue ...

Page 22: ...OM COM E MAIL SALES L COM COM PHONE 1 800 343 1455 FAX 1 978 689 9484 L com Inc All Rights Reserved L com Global Connectivity and the L com logo are registered marks Click Finish to return to the Profile Configuration page of Main UI A profile has been created ...

Page 23: ...arks Additional options on this page include Delete a Profile Please select a profile and click the Delete button The Profile will be deleted Edit a Profile Please select a profile and click the Edit button You can then edit the parameters of the profile Activate a Profile Please select a profile and click the ActiVate button This will activate the selected profile WPS Please refer to the next sec...

Page 24: ...55 FAX 1 978 689 9484 L com Inc All Rights Reserved L com Global Connectivity and the L com logo are registered marks WPS Configuration WPS Configuration has three methods PBC PIN code Enrollee Registrar Select WPS Wi Fi Protected Setup For Enrollee setup select Join a WLAN Enrollee and click the Next button ...

Page 25: ...nectivity and the L com logo are registered marks If PBC mode is selected click Next The user must now press the AP s WPS button within 2 minutes This will start the normal WPS process If Client PIN mode is selected remember the PIN code 48913508 Click the Next button to continue User must input the PIN Code into the AP within 2 minutes The WPS process will be start normally ...

Page 26: ... COM COM PHONE 1 800 343 1455 FAX 1 978 689 9484 L com Inc All Rights Reserved L com Global Connectivity and the L com logo are registered marks If user selects Configure AP Registrar mode Please select the AP and input AP s PIN code in the AP s PIN field and click the Next button ...

Page 27: ... MAIL SALES L COM COM PHONE 1 800 343 1455 FAX 1 978 689 9484 L com Inc All Rights Reserved L com Global Connectivity and the L com logo are registered marks On this page the user can configure the AP s information Then click the Next button The WPS Progress will start ...

Reviews: