FastSCAN
47
4. Start the
FastSCAN
TM
program (if you are running Windows 2000 or XP then
you must have at least Power User privileges).
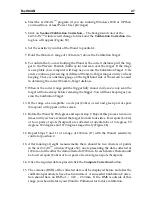
5. Click on
Scanner/Calibration Correction...
. The background color of the
FastSCAN
TM
window will change to black and the
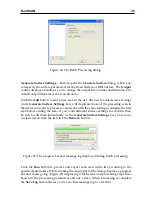
Calibration Correction
dia-
log box will appear (Figure 30).
6. Set the sensitivity control of the Wand to position 1.
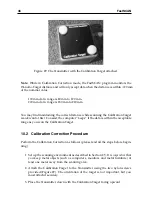
7. Hold the Wand at a range of 100 mm (4”) above the Calibration Target.
8. To confirm that you are holding the Wand at the correct distance pull the trig-
ger to the Preview Position (halfway in) and scan over the target. If the range
is acceptable your computer will beep as you scan the Calibration Target. Oth-
erwise continue previewing at different Wand-to-Target ranges until you hear
beeping. There is a distance gauge on the right hand side of the screen to assist
in obtaining the correct Wand-to-Target distance.
9. When at the correct range pull the trigger fully in and
slowly and evenly
scan the
target with one sweep before releasing the trigger. You will hear beeping as you
scan the Calibration Target.
10. If the range was acceptable a red spot (Cobra) or red and green pair of spots
(Scorpion) will appear on the screen.
11. Rotate the Wand by 90 degrees and repeat step 9. Repeat this process two more
times until you have scanned the target from all four sides. Four spots (Cobra)
or four pairs of spots (Scorpion) are collected at orientations of 0 degrees, 90
degrees, 180 degrees and 270 degrees respectively (Figure 28).
12. Repeat Steps 9 and 11 at a range of 200 mm (8”) with the Wand’s sensitivity
control at position 2.
13. After making all eight measurements there should be two clusters of points
in the
FastSCAN
TM
window (Figure 30): one representing the data collected at
100 mm and the other the data collected at 200 mm. In each cluster, there should
be four red spots (Cobra) or four pairs of red and green spots (Scorpion).
14. Once the required data is present click the
Compute Correction
button.
15. The variance (RMS) of the collected data will be displayed before and after the
calibration parameters have been calculated. A successful Calibration Correc-
tion should have an RMS of
<
0.20
−
0.30 mm. If the RMS is outside of this
range you should return your Wand to Polhemus for factory calibration.


