background image

6

Deutsch

5. Betriebsmodi
5.1. 720p Video-Modus

Gehen Sie wie folgt vor, wenn Sie eine Aufnahme in 720p vornehmen möchten:

1. 

Drücken Sie die ON/OFF-Taste für ca. 1-2 Sekunden, um die Kamera ein-

zuschalten. Die blaue LED leuchtet durchgehend im Standby-Modus.

2. 

Drücken Sie die ON/OFF-Taste kurz, um die 720p-Aufnahme zu starten. 

Das blaue Licht blinkt dreimal und es handelt sich um ein 720p-Video. 

Das Licht wird während der Aufnahme nicht angezeigt. 

3. 

Drücken Sie die ON/OFF-Taste erneut, um die Aufnahme zu beenden und  

zu dem dauerhaften blauen Licht zurückzukehren. 

Achtung! Die Aufnahme kann nur manuell beendet werden!

5.2. 1080p Video-Modus

Gehen Sie wie folgt vor, wenn Sie eine Aufnahme in 1080p vornehmen möch

-

ten:

1. 

Drücken Sie die ON/OFF-Taste für ca. 1-2 Sekunden, um die Kamera ein-

zuschalten. Die blaue LED leuchtet durchgehend im Standby-Modus.

2. 

Drücken Sie im Standby-Modus (blaues Licht leuchtet dauerhaft) die 

MODE-Taste kurz, um die 1080p-Aufnahme auszuwählen. Das blaue und 

rote Licht leuchten. 

3. 

Drücken Sie die ON/OFF-Taste, um die 1080p-Aufnahme zu starten. Das 

blaue Licht leuchtet, während das rote 3x blinkt. Im Anschluss erlöschen 

beide Lichter während der Aufnahme. 

4. 

Drücken Sie die ON/OFF-Taste erneut, um die Aufnahme zu beenden und 

zu dem dauerhaften blauen und roten Licht zurückzukehren. 

Achtung! Die Aufnahme kann nur manuell beendet werden! Ein Aufnahmeseg-

ment in der 1080p Auflösung dauert ca. 5 Minuten.

Summary of Contents for 303956/20191029SZ262

Page 1: ...MINI CAMERA Mod Nr 303956 20191029SZ262 User Manual ...

Page 2: ...2 Deutsch Table of contents 1 Deutsch 3 2 English 12 3 Français 21 4 Italiano 30 5 Español 39 ...

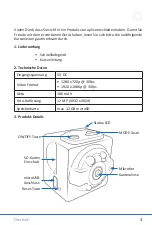
Page 3: ...urzanleitung aufmerksam durch 1 Lieferumfang Schnellladegerät Kurzanleitung 2 Technische Daten 3 Produkt Details Eingangsspannung 5V DC Video Format 1280 x 720p 30fps 1920 x 1080p 30fps Akku 180 mAh Foto Auflösung 12 MP 4032 x 3024 Speicherkarte max 32 GB microSD ON OFF Taste SD Karten Einschub microUSB Anschluss Reset Taste Status LED MODE Taste Mikrofon Kameralinse ...

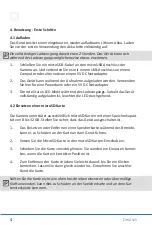
Page 4: ...s Gerät vollständig aufgeladen ist leuchtet die LED durchgehend 4 2 Einsetzen einer microSD Karte Die Kamera unterstützt ausschließlich microSD Karten mit einer Speicherkapazi tät von 8 bis 32 GB Stellen Sie sicher dass das Gerät ausgeschaltet ist 1 Das Einsetzen oder Entfernen einer Speicherkarte während des Betriebs kann es zu Schäden an der Karte und am Gerät führen 2 Setzen Sie die MicroSD Kar...

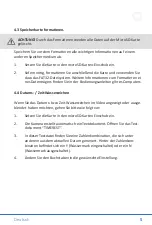
Page 5: ...inden Sie in der Bedienungsanleitung Ihres Computers 4 4 Datums Zeit Wasserzeichen Wenn Sie das Datums bzw Zeit Wasserzeichen im Video angezeigt oder ausge blendet haben möchten gehen Sie bitte wie folgt vor 1 Setzen Sie die Karte in den microSD Karten Einschub ein 2 Die Kamera erstellt automatisch ein Textdokument Öffnen Sie das Text dokument TIMEREST 3 In dieser Textdatei finden Sie eine Zahlenk...

Page 6: ...werden 5 2 1080p Video Modus Gehen Sie wie folgt vor wenn Sie eine Aufnahme in 1080p vornehmen möch ten 1 Drücken Sie die ON OFF Taste für ca 1 2 Sekunden um die Kamera ein zuschalten Die blaue LED leuchtet durchgehend im Standby Modus 2 Drücken Sie im Standby Modus blaues Licht leuchtet dauerhaft die MODE Taste kurz um die 1080p Aufnahme auszuwählen Das blaue und rote Licht leuchten 3 Drücken Sie...

Page 7: ...e Kamera ein zuschalten Die blaue LED leuchtet durchgehend im Standby Modus 2 Drücken und halten Sie im Standby Modus blaues Licht leuchtet dau erhaft die Taste ON OFF ca 2 Sekunden lang gedrückt Das rote Licht blinkt zweimal und das Infrarot Nachtsichtlicht wird eingeschaltet um die Nachtsichtaufnahme zu ermöglichen 6 2 Infrarotlichter Aus 1 Drücken Sie die ON OFF Taste für ca 1 2 Sekunden um die...

Page 8: ...ste um den Bewegungserkennungsmodus zu beenden 7 2 1080p Bewegungserkennung 1 Drücken Sie die ON OFF Taste für ca 1 2 Sekunden um die Kamera ein zuschalten Die blaue LED leuchtet durchgehend im Standby Modus 2 Drücken Sie im Standby Modus blaues Licht leuchtet dauerhaft die MODE Taste kurz um die 1080p Aufnahme auszuwählen Das blaue und rote Licht leuchten 3 Drücken und halten Sie im 1080p Modus b...

Page 9: ...t ist nicht für den Betrieb im freien zugelassen verwenden Sie es nur im Trockenen Schützen Sie es vor hoher Luftfeuchtigkeit Wasser und Schnee Halten Sie das Gerät von hohen Temperaturen fern Setzen Sie das Gerät keinen plötzlichen Temperaturwechseln oder starken Vibrationen aus da dies die Elektronikteile beschädigen könnte Prüfen Sie vor der Verwen dung das Gerät auf Beschädigungen Das Gerät so...

Page 10: ...etriebsanleitung oder und der Verpackung weist auf diese Bestimmungen hin Mit dieser Art der Stofftrennung Verwertung und Entsorgung von Altgeräten leisten Sie einen wichtigen Beitrag zum Schutz unserer Umwelt 12 Hinweise zur Batterieentsorgung Im Zusammenhang mit dem Vertrieb von Batterien oder mit der Lieferung von Geräten die Batterien enthalten ist der Anbieter verpflichtet den Kunden auf folg...

Page 11: ...0191029SZ262 in Übereinstimmung mit den grundlegenden Anforderungen und den übrigen einschlägigen Bestimmungen befindet Eine vollständige Konformitätserklärung erhalten Sie bei WD Plus GmbH Wohlenbergstraße 16 30179 Hannover WEEE Richtlinie 2012 19 EU WEEE Register Nr DE 67896761 ...

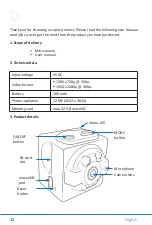
Page 12: ...have purchased 1 Scope of delivery Mini camera User manual 2 Technical data 3 Product details Input voltage 5V DC Video format 1280 x 720p 30fps 1920 x 1080p 30fps Battery 180 mAh Photo resolution 12 MP 4032 x 3024 Memory card max 32 GB microSD ON OFF button SD card slot microUSB port Reset button Status LED MODE button Microphone Camera lens ...

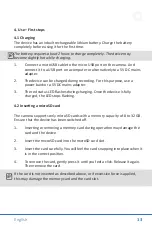
Page 13: ...he red status LED flashes during charging Once the device is fully charged the LED stops flashing 4 2 Inserting a microSD card The camera supports only microSD cards with a memory capacity of 8 to 32 GB Ensure that the device has been switched off 1 Inserting or removing a memory card during operation may damage the card and the device 2 Insert the microSD card into the microSD card slot 3 Insert ...

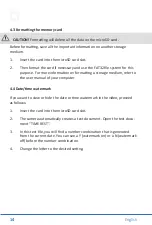
Page 14: ...n on formatting a storage medium refer to the user manual of your computer 4 4 Date time watermark If you want to view or hide the date or time watermark in the video proceed as follows 1 Insert the card into the microSD card slot 2 The camera automatically creates a text document Open the text docu ment TIME REST 3 In this text file you will find a number combination that is generated from the cu...

Page 15: ...ped manually 5 2 1080p Video mode Proceed as follows if you want to record in 1080p 1 Press the ON OFF button for about 1 2 seconds to switch on the camera The blue LED glows continuously in standby mode 2 Press the MODE button briefly in standby mode blue light glowing con tinuously to select 1080p recording The blue and red light start glowing 3 Press the ON OFF button to start the 1080p recordi...

Page 16: ...conds to switch on the camera The blue LED glows continuously in standby mode 2 Press and hold the ON OFF button for about 2 seconds in standby mode blue light glows continuously The red light flashes twice and the infra red night vision light is switched on to enable night vision recording 6 2 Infrared lights Off 1 Press the ON OFF button for about 1 2 seconds to switch on the camera The blue LED...

Page 17: ...full Press any button to cancel the motion detection mode 7 2 1080p motion detection 1 Press the ON OFF button for about 1 2 seconds to switch on the camera The blue LED glows continuously in standby mode 2 Press the MODE button briefly in standby mode blue light glowing con tinuously to select 1080p recording The blue and red light start glowing 3 Press and hold the MODE button for about 3 second...

Page 18: ...The device is not approved for outdoor use Therefore please use it only in dry surroundings Protect it from high humidity water and snow Do not expose the device to high temperatures Do not expose the device to sudden changes in temperature or strong vibrations as this could damage the electronic components Check the device for any damage before using it The device should not be used if it was sub...

Page 19: ...n the user manual or and on the packaging refers to these regulations With this manner of sorting recycling and disposal of used devices you make an important contribution towards protecting our environment 12 Instructions for battery disposal In conjunction with the sale of batteries along with the supply of devices that include batteries the supplier is obliged to point out the following to the ...

Page 20: ...devices 303956 20191029SZ262 complies with the fundamental requirements and all other relevant stipulations A com plete conformity statement can be obtained from WD Plus GmbH Wohlenbergstraße 16 30179 Hanover WEEE directive 2012 19 EU WEEE Register no DE 67896761 ...

Page 21: ...Contenu de la livraison Mini caméra Mode d emploi 2 Caractéristiques techniques 3 Particularités du produit Tension d entrée 5 V CC Format vidéo 1280 x 720p 30fps 1920 x 1080p 30fps Batterie 180 mAh Résolution photo 12 MP 4032 x 3024 Carte mémoire max 32 Go microSD Touche ON OFF Fente cartes SD Port microUSB Touche Reset LED d état Touche MODE Microphone Objectif de caméra ...

Page 22: ...que l appareil est complètement chargé la LED reste allumée en permanence 4 2 Insertion d une carte microSD La caméra prend en charge exclusivement les cartes microSD avec une capacité mémoire de 8 à 32 Go Assurez vous que l appareil est éteint 1 L insertion ou le retrait d une carte mémoire pendant le fonctionnement peuvent endommager la carte et l appareil 2 Insérez la carte microSD dans la fent...

Page 23: ...e d un support de données dans le mode d emploi de votre ordinateur 4 4 Filigrane date heure Si vous souhaitez afficher ou masquer le filigrane de date ou d heure dans la vidéo veuillez procéder comme suit 1 Insérez la carte dans la fente à cartes microSD 2 La caméra génère automatiquement un document texte Ouvrez le docu ment texte TIMEREST 3 Dans ce fichier texte vous trouvez une combinaison de ...

Page 24: ...e vidéo 1080p Veuillez procéder comme suit si vous souhaitez effectuer une prise en 1080p 1 Appuyez sur la touche ON OFF pendant env 1 2 secondes pour allumer la caméra La LED rouge s allume en permanence en mode veille 2 Appuyez brièvement sur la touche MODE en mode veille la lumière bleue reste allumée en permanence pour sélectionner la prise 1080p Les lumières bleue et rouge s allument 3 Appuye...

Page 25: ...pour allumer la caméra La LED rouge s allume en permanence en mode veille 2 Appuyez et maintenez enfoncée la touche ON OFF pendant env 2 se condes en mode veille la lumière bleue reste allumée en permanence La lumière rouge clignote deux fois et la lumière infrarouge visible de nuit est allumée pour permettre la prise de nuit 6 2 Lumières infrarouges Arrêt 1 Appuyez sur la touche ON OFF pendant en...

Page 26: ...ez une touche au choix pour quitter le mode de détection de mouve ment 7 2 Détection de mouvement 1080p 1 Appuyez sur la touche ON OFF pendant env 1 2 secondes pour allumer la caméra La LED rouge s allume en permanence en mode veille 2 Appuyez brièvement sur la touche MODE en mode veille la lumière bleue reste allumée en permanence pour sélectionner la prise 1080p Les lumières bleue et rouge s all...

Page 27: ...ns Évitez le contact avec les tensions du secteur Ne court circuitez pas le produit L utilisation de l appareil en extérieur est interdite utilisez le unique ment dans les conditions sèches Protégez le d une humidité élevée de l eau et de la neige Maintenez l appareil éloigné de températures élevées N exposez pas l appareil à des changements de température brusques ou de fortes vibra tions qui pou...

Page 28: ...nal correspondant Le symbole sur le produit le mode d emploi et ou l emballage indique ces dispositions Avec la séparation de matières le recyclage et l élimination d appareils usagés vous apportez une contribution importante à la protection de l environnement 12 Indications pour l élimination des batteries En relation avec la vente de batteries ou de la livraison d appareils contenants des batter...

Page 29: ...191029SZ262 est conforme aux exigences fondamentales et aux autres dispositions pertinentes de la di rective Pour obtenir une déclaration de conformité complète adressez vous à WD Plus GmbH Wohlenbergstraße 16 30179 Hanovre Directive DEEE 2012 19 UE DEEE Numéro de registre DE 67896761 ...

Page 30: ... 1 Contenuto della confezione Mini videocamera Istruzioni per l uso 2 Dati tecnici 3 Dettagli del prodotto Tensione d ingresso 5V DC Formato video 1280 x 720p 30fps 1920 x 1080p 30fps Batteria 180 mAh Risoluzione foto 12 MP 4032 x 3024 Scheda di memoria microSD max 32 GB Tasto ON OFF Slot scheda SD porta microUSB Tasto Reset LED di stato Tasto MODE Microfono Lente della videocam era ...

Page 31: ...ia durante il ciclo di ricarica Quando il dispo sitivo è completamente carico il LED si accende in modo permanente 4 2 Inserimento di una scheda microSD La videocamera supporta solo schede microSD con capacità di memoria da 8 a 32 GB Assicurarsi che il dispositivo sia spento 1 L inserimento o la rimozione di una scheda di memoria durante il funzio namento può danneggiare la scheda e il dispositivo...

Page 32: ...o consultare le istru zioni per l uso del computer 4 4 Filagrana di data ora Se si desidera che la filigrana della data o dell ora sia visibile o meno nel video seguire la seguente procedura 1 Inserire la scheda nello slot per schede microSD 2 La videocamera crea automaticamente un breve documento di testo Aprire il documento di testo TIMEREST 3 In questo file di testo si troverà una combinazione ...

Page 33: ...2 Modalità video 1080p Seguire la procedura descritta nel seguito per effettuare una registrazione a 1080p 1 Premere e tenere premuto il tasto ON OFF per ca 1 2 secondi per ac cendere la videocamera Il LED blu è sempre acceso in modalità standby 2 In modalità standby la luce blu è accesa in modo permanente premere brevemente il tasto MODE per selezionare la registrazione a 1080p Le luci blu e ross...

Page 34: ...c cendere la videocamera Il LED blu è sempre acceso in modalità standby 2 Premere e tenere premuto il tasto ON OFF per circa 2 secondi in modalità standby la luce blu è permanentemente accesa La luce rossa lampeggia due volte e la luce a infrarossi per la visione notturna viene attivata per consentire la ripresa in visione notturna 6 2 Spegnimento della luce a infrarossi 1 Premere e tenere premuto...

Page 35: ... qualsiasi per uscire dalla modalità di rilevamento del movimento 7 2 Rilevamento del movimento a 1080p 1 Premere e tenere premuto il tasto ON OFF per ca 1 2 secondi per ac cendere la videocamera Il LED blu è sempre acceso in modalità standby 2 Premere brevemente il tasto MODE tasto in modalità standby la luce blu è permanentemente accesa Le luci blu e rossa si accendono 3 Premere e tenere premuto...

Page 36: ...itare il contatto con le tensioni di rete Non cortocircuitare il prodotto L apparecchio non può essere usato all aperto utilizzarlo solo in luoghi asciutti Proteggerlo da elevata umidità dell aria acqua e neve In ogni caso tenere l apparecchio lontano da elevate temperature Non esporre l apparecchio a improvvisi sbalzi termici o forti vibrazioni in quanto potrebbero danneggiarsi le parti elettroni...

Page 37: ...odotto le istruzioni per l uso e o la confezione indicano tali disposizioni Con questo tipo di differenziazione dei materiali con il riciclaggio e lo smaltimento di apparecchi vecchi l utente dà un importante contributo alla tutela dell ambiente 12 Note sullo smaltimento delle batterie Con la vendita di batterie o con la consegna di apparecchi che contengono bat terie il fornitore è tenuto a richi...

Page 38: ...arecchio 303956 20191029SZ262 è conforme ai requisiti essenziali e alle rimanenti disposizioni in materia Una dichiarazione di conformità completa è disponibile presso WD Plus GmbH Wohlenbergstraße 16 30179 Hannover Direttiva RAEE 2012 19 UE Numero reg RAEE DE 67896761 ...

Page 39: ...uministro Minicámara Instrucciones de uso 2 Datos técnicos 3 Detalles del producto Tensión de entrada 5 V CC Formato de vídeo 1280 x 720p 30fps 1920 x 1080p 30fps Batería 180 mAh Resolución de fotografía 12 MP 4032 x 3024 Tarjeta de memoria má 32 GB microSD Botón ON OFF Ranura para tarjetas SD Conexión microUSB Botón RESET LED de estado Botón MODE Micrófono Lente de la cámara ...

Page 40: ... de 5V 3 El LED de estado rojo parpadea durante la carga Permanece encendido cuando se ha completado la carga 4 2 Colocar una tarjeta microSD La cámara solo es compatible con tarjetas microSD con una capacidad de me moria de 8 a 32 GB Asegúrese de que el aparato está apagado 1 Colocar o retirar una tarjeta de memoria mientras usa la cámara puede causar daños en la tarjeta y el aparato 2 Inserte la...

Page 41: ...tes de datos en las instrucciones de uso de su ordenador 4 4 Marca de agua para fecha y hora Si desea mostrar u ocultar la marca de agua para la fecha y la hora en el vídeo proceda de la siguiente manera 1 Inserte la tarjeta en la ranura para tarjetas microSD 2 La cámara creará de forma automática un documento de texto Abra el documento TIMEREST 3 En ese archivo de texto encontrará una combinación...

Page 42: ...l 5 2 Modo de grabación 1080p Proceda como se describe a continuación si desea realizar vídeos en 1080p 1 Presione el ON POWER durante unos 1 2 segundos para encender la cámara El LED azul permanece encendido en el modo de espera 2 En el modo de espera luz azul encendida de forma permanente pulse el botón MODE para seleccionar la grabación en 1080p La luz azul y la roja se iluminan 3 Pulse el botó...

Page 43: ...e unos 1 2 segundos para encender la cámara El LED azul permanece encendido en el modo de espera 2 En el modo de espera luz azul encendida pulse y mantenga pulsado el botón ON OFF durante unos 2 segundos La luz roja parpadea dos veces y la luz nocturna infrarroja se enciende para permitir grabaciones nocturnas 6 2 Luz infrarroja apagada 1 Presione el ON POWER durante unos 1 2 segundos para encende...

Page 44: ...zar el modo de detección de movimiento 7 2 Detección de movimiento 1080p 1 Presione el ON POWER durante unos 1 2 segundos para encender la cámara El LED azul permanece encendido en el modo de espera 2 En el modo de espera luz azul encendida de forma permanente pulse el botón MODE para seleccionar la grabación en 1080p La luz azul y la roja se iluminan 3 En el modo 1080p luz azul encendida luz roja...

Page 45: ...No produzca un cortocircuito en el producto El dispositivo no admite la operación en exteriores utilícelo solo en entornos secos Protéjalo contra la humedad el agua y la nieve Manténgalo protegido de las altas temperaturas No lo someta a cambios de temperatura repentinos o fuertes vibraciones porque esto puede dañar las partes electrónicas Antes del uso del dispositivo compruebe si hay daños No de...

Page 46: ...strucciones o en el embalaje indica estas determinaciones Gracias a este tipo de separación de los materiales aprovechamiento y eliminación de dispositivos antiguos se realiza una aportación importante al medio ambiente 12 Indicaciones sobre la eliminación de las pilas En lo que respecta a la distribución de las pilas o el suministro de dispositivos con pilas el proveedor está obligado a informar ...

Page 47: ...ato 303956 20191029SZ262 satisface los requisitos esenciales y el resto de disposiciones pertinentes Solicite una declaración de conformidad completa en WD Plus GmbH Wohlenbergstraße 16 30179 Hannover Alemania Directiva WEEE 2012 19 UE Número de registro WEEE DE 67896761 ...

Page 48: ...WD Plus GmbH Wohlenbergstraße 16 30179 Hannover Germany ...

Reviews: