DV
D+R/R
W
Rec
ord
er
Recording F
unctions
35
DV
D+R/R
W
Rec
ord
er
RW
R
R
W
W
Recording F
unctions
2-4
Recording
-continued
3
3
2
2
1
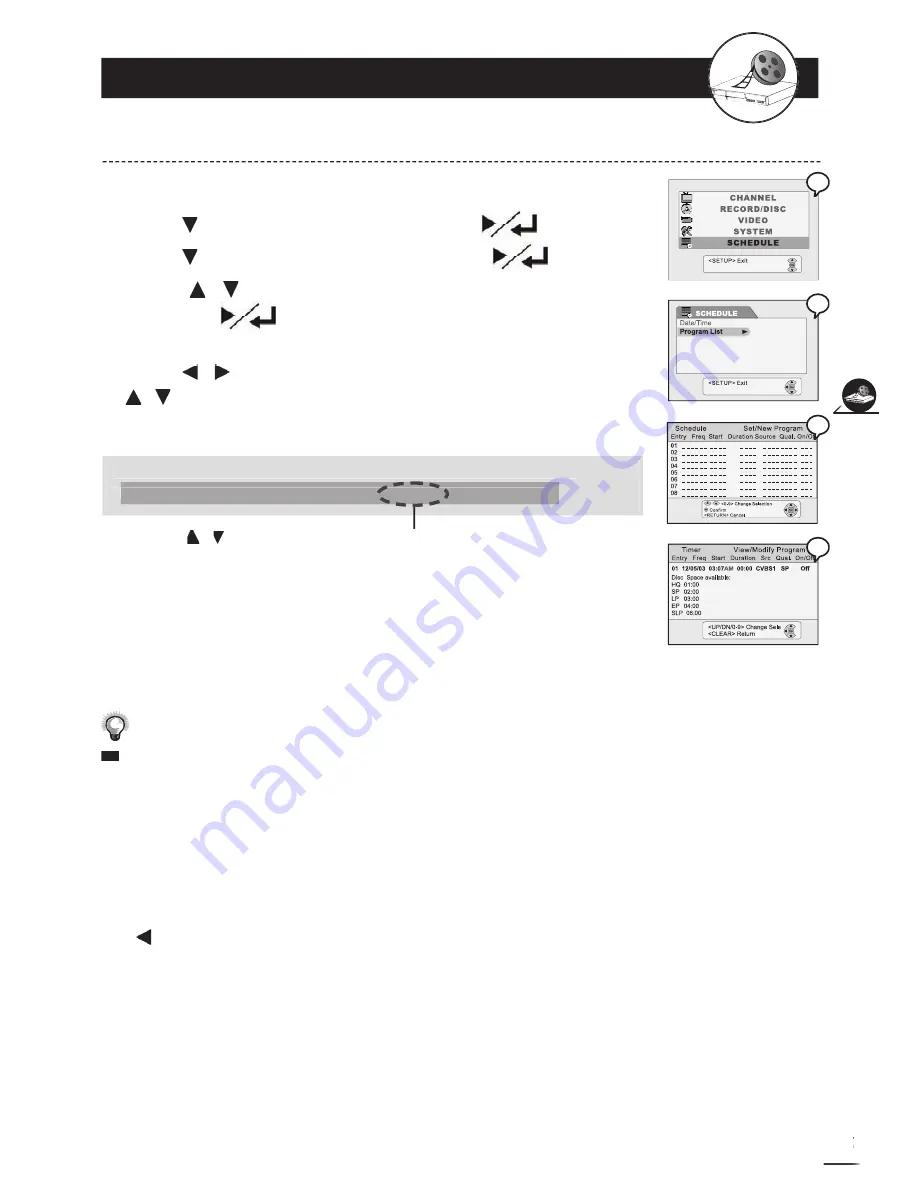
Press
Setup
in the stop mode to display the menus.
2
Press to select “SCHEDULE” and press
.
3
Press to select “Program List” and press
.
4
Press / to select one entry to enter your information
and press
.
This DVD Recorder provides up to
8
entries for schedule recording.
5
Press
/
to select the item you want to change and press
/ or number buttons to change the setting.
Example:
IMPORTANT:
After the scheduled recording has fi nished, a warning message “Exit Setup then Switch
Off for timer recording!“ will appear on the screen. Press the
Power
on the remote con-
Power
Power
trol to enter Stand-By mode. Only by doing this, will you have completed the scheduled
recording.
Verify
Date and Time of the DVD Recorder is true to real time. If not,
check DateTime Setting to correct it. (Refer to Page 56)
l
Before schedule recording, remember to put a recordable DVD+RW or DVD+R
(with enough free space) disc into the DVD Recorder. If not, no recording will
occur even though schedule recording is set up.
l
During scheduled recording, power of the DVD Recorder must be on.
To return to the Setup MENU screen
Press button.
To fi nish the setup operation
Press
Setup
to exit from Setup MENU screen.
Press
/
to select the source of your A/V signals. If you choose to record TV
programs, enter the TV channel number by pressing number or CH+- buttons.
Entry Freq Start Duration Source Qual. On/Off
01 12/05/03 03:07AM 00:00 VIDEO SP Off
01 12/05/03 03:07AM 00:00 VIDEO SP Off
How To Schedule A Recording
4
4
5
5
Important:
When there is a confl ict
in your schedule (an
overlapping of your
chosen recording time)
The recorder will warn
you fo this confl ict.
(the On Screen Display
will show the confl ict
warning for 30 seconds)
If you choose to allow
this confl ict, the
recorder will fi nish the
fi rst recording before
pproceeding to the next
recording schedule.


