background image

Anthony Lifgtates, Inc. 


22 

MRT  Models

www.anthonyliftgates.com 


800-482-0003

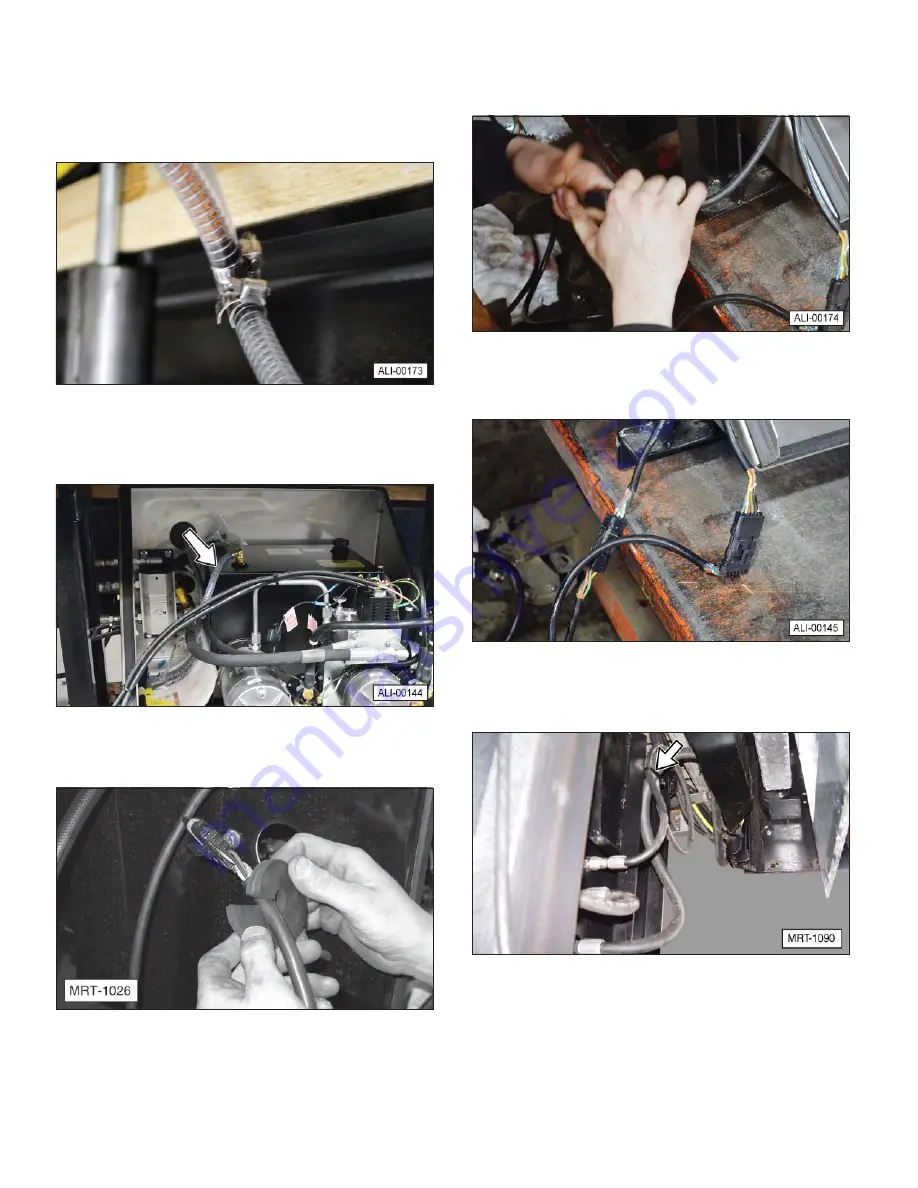
6.  Attach hydraulic hose (3) for the open/close cylinder 

to the fitting on the outside of the power unit.

7.  Connect the drain hoses from the lift cylinders to 

the tee fitting, and another hose from the tee, long 
enough to reach the power unit.  Secure all three 

hoses with small hose clamps.

8.  Route the drain hose into the power pack enclosure.

9.  Cut off any excess drain hose and attach to the fitting 

on the hydraulic tank with a small hose clamp.

10.  Route the liftgate control cable through the split 

grommet in the back of the power pack enclosure.

11.  Connect the liftgate control cable, which controls all 

the liftgate functions (up, down, open, and close) 

to its mating connection inside the power pack 

enclosure.

12.  Connect the liftgate tail light cable, which controls 

the running lights, backup lights, and brake lights, to 

the truck wiring harness.

13.  Use clamps or plastic ties (provided) to secure 

the hoses and wires to the crossmembers, 

approximately every three feet.

Summary of Contents for MRT-3500

Page 1: ......

Page 2: ......

Page 3: ...nit Nomenclature 13 4 Installation Section 14 4 1 Check Shipment 14 4 2 Tools Required 14 4 3 Basic Mounting Information 14 4 4 Van Body Capacity Ratings 14 4 5 Welding Stainless Steel to Galvanized 1...

Page 4: ...38 7 Maintenance Section 39 7 1 Preventive Maintenance 39 7 1 1 Monthly Inspection 40 7 1 2 Semi Annual Inspection 41 7 2 Maintenance And Troubleshooting Procedures 42 7 2 1 Check Lowering Valve Cart...

Page 5: ...1 2 4 Gear Type Flow Divider The direct cylinder lift design uses a maintenance free non adjustable gear type ow divider We believe our ow divider has signi cant bene ts over other liftgates which us...

Page 6: ...ler We urge the installer or anyone else to call us if they have any questions We have quali ed personnel at our Pontiac Illinois plant to answer any questions that you may have Sometimes a detailed d...

Page 7: ...tion of the safety words and rules are included in the Safety Section of this manual Please turn to the Safety Section and read it thoroughly before proceeding to the next page At the bottom of each p...

Page 8: ...this manual 1 8 Ordering Parts We manufacturer a quality liftgate that requires very little maintenance or repair However should a part break become damaged or worn our knowledgeable sta can make sure...

Page 9: ...by Anthony Liftgates occur because the owner installer operator faile to observe basic safety rules or operating instructions Accidents can often be avoided by being alert and recognizing potentially...

Page 10: ...e proper lens to protect your eyes Failure to prevent the truck from moving during the installation of the liftgate could result in a serious crushing injury Do not work under the liftgate while it is...

Page 11: ...proper tools Use two people when lifting heavy objects N ING AR Damaged safety signs Eye protection Breathing protection Use grab handles Inspect Equipment Set parking brake 2 4 2 Prohibited Actions...

Page 12: ...Anthony Lifgtates Inc 12 MRT Models www anthonyliftgates com 800 482 0003 3 Nomenclature 3 1 Liftgate Nomenclature...

Page 13: ...atform Open Valve Cartridge Coil 7 Platform Close Valve Cartridge Coil 8 Platform Up Valve Cartridge Coil 9 Platform Down Valve Cartridge Coil 10 Valve Body Manifold 11 Motor Start Solenoid Item Descr...

Page 14: ...ate model will be installed on the van body of a straight truck re tighten the U bolts that secure the van body to the chassis Tip DO NOT attempt to install a Magnum RailTrac Liftgate on a flatbed veh...

Page 15: ...occurs within 48 hours CAUTION FUME HAZARD Follow all OSHA and other workplace safety standards when welding Welding stainless steel creates hexavalent chromium fumes which can irritate the nose throa...

Page 16: ...nd the truck bed on each side The lower diagonal brace or gusset should extend at least one half the length of the rail For example if the H frame rail extends 20 below the truck bed the ends of the d...

Page 17: ...and spacer must be flush Weld spacers to the corner post using 3 16 x 2 long welds every 12 Tip An alternative to one long spacer is using 3 long plates spaced 9 apart Make sure the last plate is loca...

Page 18: ...Body 1 Make sure the proper required bumper ICC or REAR UNDERRIDE is in place and meets all Federal Regulations 2 Cut the banding attaching the hoses and wiring to the liftgate 3 Measure and determine...

Page 19: ...ith the truck body floor The leveling brackets can be removed after the installation is complete WARNING CRUSH HAZARD To prevent personal injury or death DO NOT remove the lifting device until the tac...

Page 20: ...ind the furthest rear wheel on a trailer However if the space will not allow both units to be installed side by side the power units can be in front of the rear wheels or one unit on either side of th...

Page 21: ...so route the curbside hoses and wire to the power unit 2 Remove the cap from the fitting and the plug from hose Connect the hose to the fitting and tighten it securely 3 Remove the two caps from the f...

Page 22: ...off any excess drain hose and attach to the fitting on the hydraulic tank with a small hose clamp 10 Route the liftgate control cable through the split grommet in the back of the power pack enclosure...

Page 23: ...iftgate with protection against anything that may contact the battery terminals or other situations that could cause an electrical short The circuit breakers are able to carry up to 200 Amps The two c...

Page 24: ...ack of the power unit enclosure Connect one end to the pump body A and the other to the ground terminal on the auxiliary batteries B 16 Connect one end of the battery supply cable wire supplied with k...

Page 25: ...tery separator If this option is used omit the preceding step 22 Connect the battery cable from the liftgate battery box to terminal F on the battery separator or terminal H of the circuit breaker 23...

Page 26: ...wn open unit It can also be ordered to operate as a power up close and power down open unit which provides power when lowering 1 Press and hold the Up Down switch in the Up position until the platform...

Page 27: ...l Welding 1 Thoroughly check the position of the liftgate assembly before starting the final welding a The liftgate must be centered on the chassis or trailer b The crossmember must be flush with the...

Page 28: ...rom the end of the cable to expose the copper wire TYPE SGT TYPE SGT A 1010 1 Remove one inch of insulation 2 Position the cable lug on the exposed wire as shown Crimp the cable lug using a cable crim...

Page 29: ...the hole in bottom rail 5 Secure the recessed plate and switch to the plywood lining with 3 wood screws 6 Route the electrical cord through or under the vehicle crossmembers and tie any dangling cord...

Page 30: ...This opens an internal bleeder valve in the piston and allows the trapped air that was introduced during installation to be expelled from the hydraulic lift cylinders CAUTION PINCH POINT HAZARD Keep h...

Page 31: ...ulic uid can be used but the system should be ushed and the uid changed as soon as reasonably possible Hydraulic uids should not be mixed due to possible compatibility problems The recommended uids ar...

Page 32: ...nt decals contact Anthony Liftgates Inc 1037 West Howard Street Pontiac Illinois 61764 815 842 3383 Web www anthonyliftgates com Email Sales anthonyliftgates com All decals must be in place and legibl...

Page 33: ...re the proper maximum capacity decal goes on the appropriate liftgate For example the 5500 Maximum Capacity decal goes on MRT 5500 models only Do not put a higher rated decal 6500 pound on a smaller l...

Page 34: ...ner manual for safety operation inspection and maintenance instructions Do not place unstable or unsafe loads on platform Do not allow loads to extend over edge of platform Be aware of surroundings wh...

Page 35: ...www anthonyliftgates com 9 A 146982 03 2008 10 A 131030 Rev A 03 2008 11 WARNING Secure this cover using thumb screws on front and if equipped with rubber straps If cover falls off while in transit pe...

Page 36: ...rty or contaminated using Dexron III ATF hydraulic oil or Hyken Glacial Blue For cold weather operation we recommend Hyken Glacial Blue Visually inspect your liftgate frequently and keep it properly a...

Page 37: ...y box or in the cab 2 Press the Down switch to lower the liftgate platform straight down until the platform is below the truck floor 6 2 2 Position Platform For Loading And Unloading 1 Turn ON the mai...

Page 38: ...floor of the truck 3 Press the Close switch to fold the liftgate platform Make sure the platform folds into proper position for raising 4 Press the Up switch to fully raise the liftgate 5 Turn the li...

Page 39: ...yone who is not quali ed to do so The overall performance of the liftgate is directly related to the skill and knowledge of the mechanic performing the inspection If the mechanic cannot see potential...

Page 40: ...damage to wires and hoses from rubbing against the metal surface of the enclosure 5 Inspect the batteries in the battery box enclosure using the inspection checks in Step 1 6 Check the electrical and...

Page 41: ...s You can apply Pam cooking spray or other spray cooking oil to rejuvenate slides for smoother operation 12 Check for hydraulic fluid leaks at all three cylinders one closing and two lifting along the...

Page 42: ...Remove the breather hose if equipped 2 Raise the platform all the way up and hold the switch in the ON position while checking for oil coming out of the breather port to the cylinder 3 If a continuou...

Page 43: ...Platform Speed The platform should operate at recommended speeds of 5 seconds to open and 5 7 seconds to close the platform Adjust the platform speed through two needle valves on top of the manifold...

Page 44: ...system from excessive power drain Auxiliary Start Connection optional Automatic operation Connect a 14 gauge wire from the start position of the ignition switch to the Start terminal of the battery se...

Page 45: ...Check solenoid Replace if defective Optional power cut off solenoid Check solenoid Replace if defective Defective motor If the motor is determined to be defective it should be replaced Defective motor...

Page 46: ...to raise platform Remove breather hose from end of cylinder Activate power unit to raise position if hydraulic fluid pumps out of breather port replace cylinder Lowering valve stuck partially or fully...

Page 47: ...ates properly replace the valve 7 2 4 Raise Lower Flow Control Valve on page 43 Clogged or defective lowering valve Coil or cartridge may need cleaning or replacement 7 2 1 Check Lowering Valve Cartri...

Page 48: ...hony Lifgtates Inc 48 MRT Models www anthonyliftgates com 800 482 0003 9 Inspection Record Anthony LIftgates Inc Liftgate Inspection Record Date of Inspection Notes observations maintenance performed...

Page 49: ...ithin 30 days of repair date will be denied Note ALL CLAIMS MUST BE COMPLETED ON THE ANTHONY LIFTGATES INC WARRANTY CLAIM FORM This form provides all the necessary information Upon approval of the cla...

Page 50: ...___________________________________________________ _______________________________________________________________________________ ____________________________________________________________________...

Page 51: ......

Page 52: ......

Reviews: