background image

Using the NetLinx Module

82

 Metreau Keypads Instruction Manual

Internal Sirius

Touch 

Internal Sirius

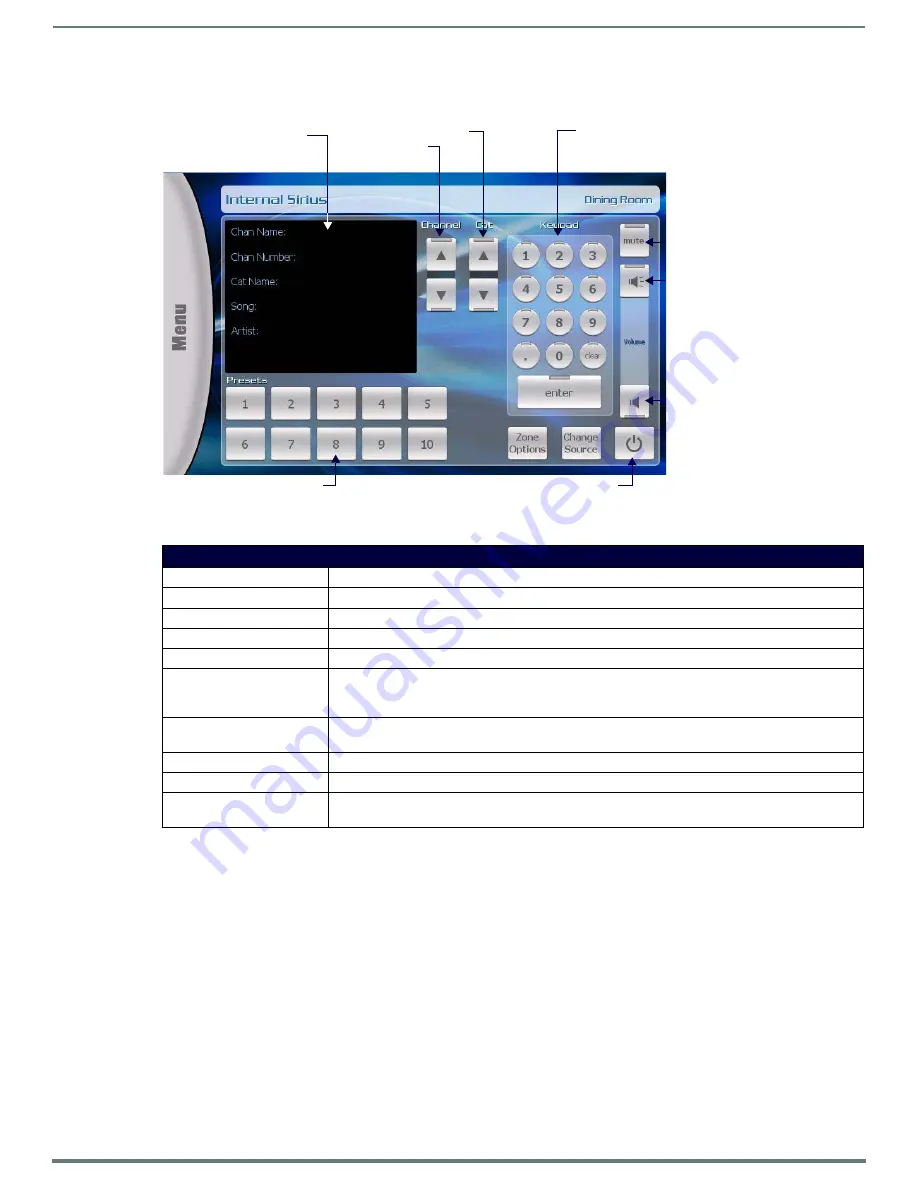
 to invoke the Device Control page shown in FIG. 90. 

The following table lists the option on this page. 

FIG. 90  

Device Control page - Internal Sirius

Device Control Page - Internal Sirius

Display Window:

Displays the current Channel, Category and Song info (as provided by Sirius).

Channel Up/Down:

Press the Up and Down arrow buttons to browse up/down in the selected Category.

Cat:

Press the Up and Down arrow buttons to browse up/down through the Categories list.

Keypad:

Use the keypad button for direct tuning. Press enter to tune to the specified channel. 

Presets:

Use the Presets buttons to recall up to ten station presets.

Zone Options:

Press to access the Zone Options popup for configuring audio settings for the selected Location (Zone). 

Note that the currently selected Location is indicated in the upper-right corner of the page (see the 

Zone 

Options

section on page 80).

Change Source:

Press to access the Sources page for this location. Note that the currently selected Source is indicated in 

the upper-left corner of the page (see the 

Change Source

section on page 80).

Mute:

Press to mute the audio.

Volume Up/Down:

Press the Up and Down arrow buttons to adjust the volume up/down.

Power On/Off:

Press to toggle the Source device Off/On, in this Zone only. The source device will continue playback in 

other Zones.

Display window

Channel

Category Up/Down

Mute

Volume Up

Volume Down

Tuner Presets 1-10

Up/Down

(current Channel/

Category/Song info)

Source On/Off (this Zone only)

Numeric keypad for direct tuning

(press Enter to select 

specified station)

Summary of Contents for Metreau DAS-MET-6SRC

Page 1: ...6 BUTTON KEYPAD WITH NAVIGATION MET 7 MET 13 KEYPADS MET 6NE 6 BUTTON ETHERNET KEYPAD WITH NAVIGATION MET 7E MET 13E ETHERNET KEYPADS MET 7X MET 13X ETHERNET EXPANSION KEYPADS DAS MET6SRC 6 SOURCE AUD...

Page 2: ...pinched particularly at plugs convenience receptacles and the point where they exit from the apparatus 11 ONLY USE attachments accessories specified by the manufacturer 12 USE ONLY with a cart stand...

Page 3: ...of FCC Part 15 as a Class B Digital Device Caution Changes or modifications not expressly approved by the manufacturer could void the user s authority to operate this device This Class B digital appar...

Page 4: ...utton Keypads 14 MET 7 Specifications 15 MET 7E Specifications 15 MET 7X Specifications 16 MET 13 MET 13E and MET 13X 13 Button Keypads 16 MET 13E Specifications 17 MET 13X Specifications 18 DAS MET 6...

Page 5: ...ink Data and Power Connections 35 Using AxLink for Data with an Auxiliary Power Supply 35 Orientation of AxLink Connectors 35 AxLink Status LED 36 SWT Wiring 36 DAS MET 6SRC and DAS MET 7 Rear Panel C...

Page 6: ...au Keypads 45 Programming 46 Programming the Metreau Keypads 46 Button Layouts 46 Channels 46 Port Numbers 46 Programming the Navigation Wheel MET 6N MET 6NE 47 Navigation Wheel Buttons 7 11 47 Naviga...

Page 7: ...6 Windows Client Programs 56 Linux Telnet Client 56 Enabling Disabling Telnet on the Keypad 56 SHOW LOG 56 Basic Keypad Functions DAS MET 6SRC 57 Overview 57 DAS MET 6SRC Listening to a CD or DVD 57 S...

Page 8: ...Using the Navigation Wheel with Other Sources 66 Advanced Functions DAS MET 6SRC 67 Overview 67 Direct Access 67 On Board Tuner Direct Selection of a Radio Station 67 CD Player Direct Selection of a...

Page 9: ...ce 80 Device Control Pages 81 Internal Tuner 81 Internal Sirius 82 DVD 83 CD 84 Audio Server 85 Satellite 86 External Tuner 87 Other 88 Setup Pages 89 Setup Zones 89 Setup Alarms 90 Adding an Alarm 90...

Page 10: ...o Keypads only There are three basic variations within the Metreau device family Metreau Keypads with Ethernet The MET 6NE MET 7E and MET 13E keypads connect to a NetLinx control system via category c...

Page 11: ...wire has been run separately from the speaker cable Metreau Keypads Device Family All Metreau keypads are available in two colors White and Black Some older models are also available in Light Almond...

Page 12: ...tional pushbuttons Up Down Right Left 1 center pushbutton and bi directional rotating wheel for channel adjustments The Navigation wheel itself provides two button functions as well rotate CW button 1...

Page 13: ...tself provides two button functions as well rotate CW button 12 and rotate CCW button 13 as indicated in FIG 5 Rear Panel Components 1 RJ 45 Ethernet connector 10 100 1 10 pin IDC type connector for c...

Page 14: ...event on button 13 The light on the Navigation Wheel can be illuminated by activating channel 11 MET 6N only MET 7 MET 7E and MET 7X 7 Button Keypads The Metreau 7 button keypads offer 7 double width...

Page 15: ...able in a variety of sizes and colors MET 7E Specifications Power PoE PoE Power over Ethernet 802 3af class 0 Power Connector 1 RJ 45 Ethernet Connector 10 100 Power Supply POE injector or switch exte...

Page 16: ...ith blue LED indicators that illuminate when pressed to confirm the source function was selected and that it is currently being used These pre printed buttons are field replaceable Rear Panel Componen...

Page 17: ...airo Wallplates available in a variety of sizes and colors MET 13E Specifications Power PoE PoE Power over Ethernet 802 3af class 0 Power Connector 1 RJ 45 Ethernet Connector 10 100 Power Supply POE i...

Page 18: ...ressed to confirm the source function was selected and that it is currently being used These pre printed buttons are field replaceable Rear Panel Components 1 10 pin IDC type connector for connection...

Page 19: ...ceable IR Sensor Works specifically with the MIO R1 AUDIO remote controller 38 kHz only LED Levels Indicator set of 7 blue LEDs provide volume level feedback Navigation Wheel consists of 5 pushbuttons...

Page 20: ...ad White shown DAS MET NUM Specifications Power 12 VDC 125 mA Front Panel Components Pushbuttons 13 tactile pushbuttons Rear Panel Components Wiring connection One 14 pin connector that provides conne...

Page 21: ...charge the static electricity from your body by touching a grounded metal object The Faceplate is attached to the Mounting Plate via four plastic tabs two on each side of the Faceplate as shown in FIG...

Page 22: ...ommercial DISP PROJ VC AC HVAC LIGHTS SCREEN Custom Keypads and Buttons If a requested keypad needs functions not offered in the standard Button Kits a custom keypad may be built with the AMX Metreau...

Page 23: ...line device Firmware is uploaded to the device address of the keypad not the IR Receiver For example if the MET 6N is set to device address 127 then the IR Receiver on that MET 6N will appear as devic...

Page 24: ...9 1 128 129 If you later change the device number remove and reconnect the power connector to enter the new device number into memory NOTE AMX has created the Dip Switch2 software application to assis...

Page 25: ...d U S decora style wall plates and boxes wallboxes not included IMPORTANT Before touching the device discharge the static electricity from your body by touching a grounded metal object Mounting Dimens...

Page 26: ...Mounting and Installation 26 Metreau Keypads Instruction Manual MET 6NE FIG 16 provides detailed dimensions for the MET 6NE keypad FIG 16 MET 6NE Mounting Dimensions...

Page 27: ...Mounting and Installation 27 Metreau Keypads Instruction Manual MET 7 FIG 17 provides detailed dimensions for the MET 7 keypads FIG 17 MET 7 Mounting Dimensions...

Page 28: ...nting and Installation 28 Metreau Keypads Instruction Manual MET 7E MET 7X FIG 18 provides detailed dimensions for the MET 7E and MET 7X keypads FIG 18 MET 7E and MET 7X Mounting Dimensions MET 7X MET...

Page 29: ...ting and Installation 29 Metreau Keypads Instruction Manual MET 13 DAS MET NUM FIG 19 provides detailed dimensions for the MET 13 and DAS MET NUM keypads FIG 19 MET 13 and DAS MET NUM Mounting Dimensi...

Page 30: ...g and Installation 30 Metreau Keypads Instruction Manual MET 13E MET 13X FIG 20 provides detailed dimensions for the MET 13E and MET 13X keypads FIG 20 MET 13E and MET 13X Mounting Dimensions MET 13X...

Page 31: ...o not overtighten the screws when mounting the Mounting Frame The device should be flush with mounting surface Accent Frame While the Metreau device family does fit into many International wallboxes i...

Page 32: ...e the 10 conductor ribbon included with the expansion keypad to connect to the Ethernet Keypad see FIG 21 FIG 21 Daisy chained connection between the MET 7E and an Ethernet Expansion Keypad NOTE If yo...

Page 33: ...TATUS LED on its rear panel that is under firmware control The following table lists the modes and blink patterns for the LINK ACT and STATUS LEDs on the Metreau keypads Modes and LED Blink Patterns D...

Page 34: ...he cable The following table lists wire sizes and the maximum lengths allowable based on the maximum power consumption rating of 170 mA The maximum wiring lengths for using AxLink power are based on a...

Page 35: ...he Metreau keypad as shown in FIG 25 CAUTION If you are not using power from AxLink disconnect the wiring from the controller before wiring the Metreau keypad Make sure the auxiliary power supply s PW...

Page 36: ...speaker cable originating at the Controller passing through the keypad and terminating at the speaker location AMX recommends using a bundled four conductor 16 gauge stranded copper wire in a single...

Page 37: ...NUM Connecting to the Main DAS MET 6SRC Keypad The DAS MET NUM Metreau numeric keypad connects to the main DAS MET 6SRC keypad via a 14 pin connector as indicated in FIG 29 The red line on the cable i...

Page 38: ...System Integration Drawing Using the Audio Zone Expander FIG 30 System Integration Drawing Using Four Conductor Speaker Wire FIG 31 System Integration Drawing Using the Audio Zone Expander IR OUT LIN...

Page 39: ...verter FIG 32 shows the construction of a simple circuit of discrete components to reduce the speaker level output of the Matrix Controller to line level so that it can drive an auxiliary amplifier Th...

Page 40: ...cable through the keypad In cases such as this it is possible to run a separate cable pair CAT 3 CAT 5 Twisted Pair cable from the Matrix Controller to the keypad for control purposes When using CAT3...

Page 41: ...stalling 2 pairs of speakers in a zone and the speakers are 8 Ohms it is not necessary to use an impedance matching autoformer type volume control A standard stereo volume control will perform properl...

Page 42: ...The device should now appear in the Bound Devices folder Simulating the ID Pushbutton You can press buttons 1 and 2 simultaneously on the keypads to simulate the functions of a NetLinx device s ID pu...

Page 43: ...faster the reset does not occur There is no soft reboot with the Reset button but you can perform a soft reboot from the web pages NOTE When you reset a keypad the keypad is restored to the factory de...

Page 44: ...iver in this example device 127 NOTE Note Refer to the NetLinx Studio online help for additional details on firmware transfers NetLinx Studio is available for free download from www amx com 1 Open Net...

Page 45: ...Device FIG 38 The Send to NetLinx Device dialog opens 5 Click the Browse button to locate and select the firmware kit file that will be transferred in the Browse for Folders dialog FIG 39 The selected...

Page 46: ...ond daisy chained keypad optional 4 IR Receiver on MET 6NE This port supports PUSH and RELEASE channels 1 255 for the received IR code See the Device Addressing on MET 6N Keypads section on page 23 fo...

Page 47: ...provides events on Channel 13 When rotated clockwise counter clockwise the Navigation wheel provides level events on Level 2 Navigation Wheel Level Control In addition to generating button events a ro...

Page 48: ...lumination in the Off state 0 WBRT Set Brightness level for Navigation Wheel LED for both On and Off states NOTE This command is only valid on the MET 6N keypad Syntax WBRT on brightness 0 32 off brig...

Page 49: ...2 2 3 NONE NONE LED DIS Disable LEDs on the keypad Syntax LED DIS Example SEND_COMMAND DEVICE_1 LED DIS Disables LEDs on DEVICE_1 NOTE This parameter does not get stored in non volatile memory LEDs ar...

Page 50: ...ck on the right button you must toggle feedback on the left button Terminal Telnet Commands Telnet terminal communication can be accessed remotely via TCP IP Establishing a Terminal Connection via Tel...

Page 51: ...n incorrect user name you will receive the Invalid Password message as opposed to an Invalid Username message Setting a Telnet User Name and Password To set a Telnet user name and password 1 Establish...

Page 52: ...ule connection information Example get connection Connection Settings ICSNet Ethernet Ethernet Mode URL TCP System Number 1 Master IP URL 192 168 1 211 Master Port 1319 Username Password GET DEVICE Di...

Page 53: ...ERROR WARNING INFO DEBUG If no severity is supplied with msg on the default setting is WARNING MSG OFF disables the display Example MSG ON Extended diagnostic information messages turned on MSG OFF Ex...

Page 54: ...ration NOTE The device must be rebooted to enable new settings Example SET DNS 0 1 0 Enter New Values or just hit Enter to keep current settings Enter Domain Suffix amx com Enter DNS Entry 1 192 168 2...

Page 55: ...25 characters it will be truncated NOTE This command requires a reboot to enable new settings SET TELNET PORT Sets the device s IP port listened to for Telnet connections Example SET TELNET PORT Curr...

Page 56: ...cts both Windows Telnet and Terminal programs Linux Telnet Client The Linux Telnet client has three anomalies that are known at this time A null 00 character is sent after a carriage return If an ALT...

Page 57: ...o change tracks Press the button in the center of the Navigation Wheel to select a track and initiate playback Pausing Playback To Pause playback press the button of the source that is currently playi...

Page 58: ...rs on the DAS MET NUM Numeric keypad Adjusting the Volume The Navigation Wheel can be rotated bi directionally and provides volume level control Clockwise rotation increases the volume level counter c...

Page 59: ...ble Adjustment mode Adjusting Treble Level For a Room Zone When the Bass Level is set via the Select button see above the next adjustment is for Treble Level The top right LED will blink to indicate t...

Page 60: ...r Select pushbutton on the Navigation Wheel to set the current balance settings and proceed to SRS Adjustment mode Adjusting SRS Settings For a Room Zone When the Balance setting is set via the Select...

Page 61: ...for the Source then the favorite begins playing If no Favorite has been set for the Source the following occurs If the Source is the on board Tuner the first Preset will begin playing If there are no...

Page 62: ...on of 4 seconds the selected Source will play in all zones Turning Off On a Source in All Zones Press and hold the active Source button for 4 seconds to turn it off in all zones To turn the source bac...

Page 63: ...he source device that is no longer being used Single Zone Listening To Source Switching sources or turning off the Source for a single Zone dynamically pauses the Source With a single Zone listening t...

Page 64: ...55 describes the functions available at the Navigation Wheel when using the internal AM FM Tuner Using the Navigation Wheel with the Internal SIRIUS Tuner FIG 56 describes the functions available at t...

Page 65: ...TE These are suggested settings All buttons are user definable FIG 58 Using the Navigation Wheel With DVD Player Changer FIG 59 Using the Navigation Wheel With Satellite Radio Video Box FIG 60 Using t...

Page 66: ...uggested settings All buttons are user definable FIG 61 Using the Navigation Wheel With External Tuner FIG 62 Using the Navigation Wheel With Other sources Rotate the wheel counter clockwise to adjust...

Page 67: ...identifier number using the PRESET button to enter a point for FM stations 2 Press ENTER to complete NOTE Strings of 3 to 4 numbers are recognized If a point is part of the string then an FM station...

Page 68: ...To select a channel on a Cable or Satellite receiver the format is CCC ENTER CCC Channel NOTE This information also applies to selecting a Digital Cable Music DCM Channel To change the Cable or Satell...

Page 69: ...a number for this Preset 1 10 6 Press and hold ENTER for four seconds to complete Example To set station 104 5 as Preset 3 a Select a Tuner as the Source b Key in 104 5 to tune to the desired station...

Page 70: ...TE Favorites can only be set for Sources that utilize Direct Access functionality Creating a Favorite for a Specific Source 1 Select a Source CD or Tuner 2 Tune or select the desired entry as the favo...

Page 71: ...Group Volume may be adjusted at any time To enter Group Mode press the Group button see FIG 72 Group Mode is indicated by all Source LED s turned On NOTE Group Mode can also be accessed by pressing an...

Page 72: ...below 1 Press the Group button to enter Group Mode all Source LED s turn On 2 Adjust Volume using the Navigation Wheel on the DAS MET 6SRC keypad NOTE All Zones will have the volume incremented by the...

Page 73: ...ime to display the following screen FIG 76 3 Press Hour to increment the HH hours from 1 through 24 4 Press Minute to increment the MM minutes from 01 through 60 5 Press Second to increment the SS sec...

Page 74: ...Zones 1 Press and hold buttons 5 and 6 simultaneously for four seconds 2 Key in 00 3 Press and hold ENTER for four seconds to complete FIG 78 Clearing the Alarm For a Specific Zone FIG 79 Clearing Al...

Page 75: ...kout itself Examples Press and hold 7 and 8 for 4 seconds 2 ENTER keypad in zone 2 will be locked Press and hold 7 and 8 for 4 seconds 4 ENTER keypad in zones 2 4 will be locked Unlocking a Keypad NOT...

Page 76: ...Source LED s turn Off Examples Press 7 and 8 2 ENTER keypad in zone 2 will be Locked Press 7 and 8 4 ENTER keypad in zones 2 4 will be Locked Press 7 and 8 00 press hold ENTER for four seconds Keypad...

Page 77: ...Advanced Functions DAS MET 6SRC 77 Metreau Keypads Instruction Manual...

Page 78: ...e and loading it onto the NetLinx Master Main Page Initial View The initial view of the touch panel pages is the Main Page featuring the Menu Bar along the left edge as shown in FIG 83 Press the Menu...

Page 79: ...evice The currently selected Location is indicated in the upper left corner of the page in this case DVD The Device currently associated with this location is indicated in the upper right corner in th...

Page 80: ...hen finished press exit to apply changes and close the Zone Options popup Change Source From a Location Device page press Change Source to invoke the Sources page for this Location as shown in FIG 88...

Page 81: ...and AM FM based on the number entered Presets Use the Presets buttons to recall up to ten station presets Zone Options Press to access the Zone Options popup for configuring audio settings for the sel...

Page 82: ...Zone Options Press to access the Zone Options popup for configuring audio settings for the selected Location Zone Note that the currently selected Location is indicated in the upper right corner of th...

Page 83: ...settings for the selected Location Zone Note that the currently selected Location is indicated in the upper right corner of the page see the Zone Options section on page 80 Change Source Press to acce...

Page 84: ...r configuring audio settings for the selected Location Zone Note that the currently selected Location is indicated in the upper right corner of the page see the Zone Options section on page 80 Change...

Page 85: ...dio settings for the selected Location Zone Note that the currently selected Location is indicated in the upper right corner of the page see the Zone Options section on page 80 Change Source Press to...

Page 86: ...Zone Options popup for configuring audio settings for the selected Location Zone Note that the currently selected Location is indicated in the upper right corner of the page see the Zone Options sect...

Page 87: ...l up to ten station presets Zone Options Press to access the Zone Options popup for configuring audio settings for the selected Location Zone Note that the currently selected Location is indicated in...

Page 88: ...ns popup for configuring audio settings for the selected Location Zone Note that the currently selected Location is indicated in the upper right corner of the page see the Zone Options section on page...

Page 89: ...The initial view of the Setup pages is the Zones page FIG 97 Setup Zones Touch any of the Zones buttons to edit the selected Zone s label via the on screen keyboard shown in FIG 98 Press Enter to cre...

Page 90: ...owing table to quickly convert regular time to 24 hour clock time standards Regular and 24 hour clock time use the same number of minutes per hour and they use minutes in exactly the same way There is...

Page 91: ...e exit button allows you to close the Sources window without selecting an Alarm Source Once a Source is selected the Sources windows closes automatically 5 Touch the Volume Up and Down buttons on the...

Page 92: ...etreau Keypads Instruction Manual Removing an Alarm Once an alarm has been set for this Zone the Remove Alarm option is enabled FIG 102 Touch Remove Alarm to remove the alarm for the selected Zone FIG...

Page 93: ...and inspect it to see that it is intact If you have an ohm meter test for continuity across the fuse sometimes they look good but they re really broken near one of the ends If you are using a power ba...

Page 94: ...rd not followed Make certain the center two wires are in the same orientation at the Tango Controller and the keypad They may have been inadvertently reversed during the installation Input and output...

Page 95: ...ontroller and speakers are reversed Keypad not recognized by system Restart system Keypad Lights No Sound Power and command connectivity are getting to the zone Check other zones and select each sourc...

Page 96: ...rks registered trademarks of their respective companies AMX does not assume responsibility for errors or omissions AMX also reserves the right to alter specifications without prior notice at any time...

Reviews: