background image

10

     American-Lincoln

SC7750 IC

WARNING

Always wear eye protection and protective clothing when working near battery.  Remove all jewelry.  Do not put

tools or other metal objects across the battery terminals or across the top of battery.

WARNING

Only authorized personnel must do maintenance and repairs. Tighten all fasteners.  Maintain adjustments accord-
ing to the specifications given in the service manual for the machine.  Keep the electrical parts of the machine dry.

For storage, keep the machine in a building.

WARNING

Make sure all labels, decals, warnings, cautions and instructions are fastened to the machine.

Purchase new labels and decals from American-Lincoln.

WARNING

The operator must exhibit extreme caution when negotiating, turning, and traveling across grades or ramps.  Start,

stop, change direction, travel and brake smoothly.  Slow down when turning.

WARNING

Avoid uneven surfaces and loose materials.  Watch for obstructions, especially overhead.

WARNING

Operate only from the designated operator’s position.  Stay inside the body of the machine.  Keep hands and feet

on the designated controls.  Always operate in well-lighted areas.

WARNING

Do not carry passengers on the machine.  Set the Wheel Lock when leaving the machine.  Chock (block) the

wheels if the machine is parked on a grade (ramp), or is being prepared for maintenance.

WARNING

Never leave the operator’s compartment when the engine is running.

WARNING

Report damage or faulty operation immediately.  Do not operate the machine until repairs have been completed.

Only authorized personnel should do maintenance and repairs.

WARNING

To maintain the stability of this machine in normal operation, the overhead guard, counterweights, rear bumper

guard or any similar equipment installed by the manufacturer as original equipment should never be removed.  If it

becomes necessary to remove such equipment for repair or maintenance, this equipment must be reinstalled

before the machine is placed back into operation.

WARNING

Electrical hazard.  Shocks can cause serious personal injury.  Unplug the battery before cleaning or servicing.  To

avoid possible injury or property damage, read the Operator’s Manual before servicing the machine.  Authorized

personnel should do maintenance and repairs.

FOR SAFETY, OBSERVE THE FOLLOWING WARNINGS. FAILURE TO COMPLY MAY CREATE A SERIOUS
RISK OF INJURY TO YOU AND OTHERS. THIS MACHINE SHOULD NOT BE USED IN HAZARDOUS
LOCATIONS INCLUDING AREAS OF VOLATILE DUST OR VAPOR CONCENTRATIONS.

Operators must be trained and qualified to operate this machine.  They must also understand the
operator’s manual before starting.

Use caution when mounting or dismounting the machine particularly on wet slippery surfaces.

Do not dump the hopper over an open pit or dock. Do not dump the hopper when positioned on a
grade (ramp). The machine must be level (horizontal).

SAFETY INSTRUCTIONS

Summary of Contents for SC7750 IC

Page 1: ...gan 48906 Fax 517 484 9836 Email CustServe Michco com Web site www Michco Com Parts Web site www FloorMachineParts Com Order Parts on Line at www FloorMachineParts Com Directly to Parts Service By Email Shop Michco com By Fax 517 702 2041 By Voice Use numbers above Serving the Cleaning Industry Since 1922 Notice All copyrighted material remains property of original owners all trademarks are proper...

Page 2: ...ne READ THIS BOOK This book has important information for the use and safe operation of this machine Failure to read this book prior to operating or attempting any service or maintenance procedure to your machine could result in injury to you or to other personnel damage to the machine or to other property could occur as well you must have training in the operation of this machine before using it ...

Page 3: ... SWITCH 15 SQUEEGEE SWITCH 15 SOLUTIONCONTROL 16 NON RECYCLING OR STANDARD SCRUBBING SYSTEM 16 RECYCLING OR ESP AUTOFIL SYSTEM 16 DISCONNECT WATER HOSE 16 WARNING BANK 17 ENGINE TEMPERATURE LIGHT WARNING LIGHT 17 ENGINE OIL PRESSURE LIGHT WARNING LIGHT 17 CLOGGED FILTER LIGHT WARNING LIGHT 17 HOPPER TEMPERATURE LIGHT WARNING LIGHT 17 SOLUTION LOW LIGHT WARNING LIGHT 17 RECOVERY HIGH LIGHT WARNING ...

Page 4: ...BBING SYSTEM HOW IT WORKS 24 RECOVERY OR ESP SYSTEM HOW IT WORKS 25 THE SWEEPING DUST CONTROL SYSTEMS HOW THEY WORK 26 OPERATING INSTRUCTIONS 26 DUSTCONTROL 26 BEFORE STARTING THE ENGINE 26 PRE START CHECKLIST STARTING GAS ENGINES 26 STARTING PROPANE ENGINES 27 STARTING DIESELENGINES 27 POST STARTCHECKLIST 27 EMPTYING THE DEBRIS HOPPER 27 POST OPERATION CHECKLIST 28 IC MACHINE STORAGE 28 HELPFUL H...

Page 5: ...e 2900 lbs 1305 0 Kg TIRES Solid Rubber Front Rear Front Two 2 16 41cm x 3 75 8 26 cm Rear One 1 16 41 cm x 4 00 10 16 cm RAMP CLIMBING Sweeping 6 Degrees Transporting 8 Degrees ENGINEDATA Ford TSG416 EFI Engine Bore and Stroke 3 23 x 2 97 82 1 mm x 75 5 mm Oil Capacity 4 4 quarts 4 2 liters Displacement 4 cylinders 1 6 liters 97 5 CID Fuel 87A K I Standard unleaded ASI grade HD 5 for LP versions ...

Page 6: ...Temperature Light Hopper Up Down Check Engine Light Gas LP Dump Door Open Closed Filter Shaker Switch SCRUBBING SYSTEM Brush Size 46 Three 3 16 40 64 cm Diameter Brushes Brush Size 53 Three 3 17 88 45 42 cm Diameter Brushes Brush Drive Hydraulic Motors Off in Neutral after 2 second delay Brush Drive Lift Hydraulic Cylinder Ground Clearance Scrub Load 250 lbs 112 50 Kg or 400 lbs 180 0 Kg SQUEEGEE ...

Page 7: ...ack Up Alarm Wet Sweep Bypass Thermo Sensor Push Pull Light Switch Work Light Amber Safety Light Headlight Taillight Switch ESP Autofil Recycling System Overhead Guard Pad Drivers Non Marking Tires Oil Cooler Scrub Brushes 46 Scrub Option Field Installed Gas 53 Scrub Option Field Installed Spray Wand Option Vacuum Wand Option Fire Extinguisher Clogged Filter Indicator SPECIFICATIONS ...

Page 8: ...American Lincoln 7 SC7750 IC 102 5 260 35 cm 50 8 129 03 cm 27 0 68 60 cm 25 75 65 41 cm 25 75 65 41 cm 55 5 140 97 cm 85 5 217 17 cm 78 75 200 025 cm 52 143 5 cm C1694d 0402 MACHINE DIMENSIONS ...

Page 9: ...reak in oil is used and recommended number of operating hours before the initial oil change is the same as normal See Maintenance 4 Check radiator coolant level Permanent type antifreeze is added at the factory to provide protection to approximately 35 F 37 C To retain this protection level always add part water to part antifreeze 5 Check oil level in the hydraulic reservoir located at the center ...

Page 10: ...WARNINGS CAUTIONSANDNOTES WARNING Machines can ignite flammable materials and vapors Do not use with or near flammables such as gasoline grain dust solvents and thinners WARNING Heavy machinery Improper use can cause personal injury WARNING Operate only when lids doors and access panels are securely closed WARNING Use care when reversing machine in confined area WARNING When servicing the machine ...

Page 11: ...ance WARNING Never leave the operator s compartment when the engine is running WARNING Report damage or faulty operation immediately Do not operate the machine until repairs have been completed Only authorized personnel should do maintenance and repairs WARNING To maintain the stability of this machine in normal operation the overhead guard counterweights rear bumper guard or any similar equipment...

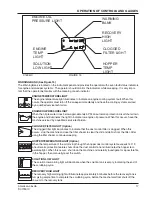
Page 12: ...eaner bracket in the engine compartment count the number of times the panel light flashes then go to the Check Engine Light Codes pages in the machine Service Troubleshooting Guide to determine the problem OPERATION OF CONTROLS AND GAUGES CIRCUT BREAKERS American Lincoln 0 1 2 4 4 FUEL HOUR METER LIGHT SWITCH GLOW PLUG SWITCH Diesel Only WORK LIGHT Option MAIN BROOM LEVER HOPPER LEVER HORN BUTTON ...

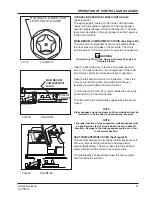
Page 13: ...sired HOUR METER See Figure 4 The hour meter is located on the instrument panel above the engine speed switch The meter is activated when the engine begins running The meter indicates the actual run time of the machine The meter can be used to determine when maintenance should be done on the machine FUEL GAUGE See Figure 4 The fuel gauge is located on the instrument panel to the right of the main ...

Page 14: ...ngine has started until even running has been obtained 4 If the engine does not start disengage the starter motor but keepthe GLOW PLUG switch depressed for a further 10 to15 seconds when a further attempt should be made to start the engine keeping the Glow Plugs energized while starting and for a few seconds after the engine has fired until it is running smoothly SEAT COMPARTMENT PROP LATCH See F...

Page 15: ...nd controls the main broom sweep height To lower the main broom grasp the lever and move it to the left out of the UP position and place it in the SWEEP or FLOAT position The SWEEP position is used for normal sweeping and should be used under most sweeping conditions approxi mately 2 broom pattern The FLOAT position is used for sweeping very uneven surfaces only Using the float position will cause...

Page 16: ...automatically stop rotating until the machine starts moving again SCRUB DECK HEAVY PRESSURE SWITCH See Figure 12 The scrub deck heavy pressure switch is located on the console to the left of the steering wheel in the SCRUB BING section This switch applies additional downward pressure to the scrub brushes This switch has two posi tions down NORMAL and up HEAVY This switch cannot be activated unless...

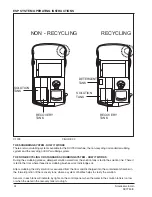
Page 17: ...ect mixture of American Lincoln 100 Industrial Cleaner for the job on hand 4 Close the solution tank cover Vacuum Assembly RECYCLING OR ESP AUTOFIL SYSTEM 1 Make sure the solution control lever is in the off position 2 Connect hose to autofil coupling 3 Turn the key switch to the i position 4 Turn on the water hose valve 5 Fill the detergent tank with American Lincoln 100 Industrial Cleaner 6 The ...

Page 18: ...indicate that the dust control filter is clogged When this occurs stop the machine and use the filter shaker to clear the dirt and debris from the filter After using the filter shaker continue sweeping HOPPER TEMPERATURE LIGHT Option When the temperature of the air moving through the hopper dust control system exceeds 140 F an automatic protection feature shuts down the dust control fan and illumi...

Page 19: ...ion speed The pedal height is adjustable to provide for operator comfort To adjust the foot pedal height for operator comfort 1 Remove the hairpin cotter from the adjustment pin 2 Remove adjustment pin from the foot pedal assembly 3 Align the holes in the lower bracket with one of the four adjustment holes on the foot pedal to set the foot pedal height 4 With the holes aligned at the desired heigh...

Page 20: ...rating and No Load brooms brushes dust control off RPMs are the same for gas and LP equipment The will be a slight drop between Load and No Load RPMs with diesels Always return the throttle lever to the idle position before turning off the key to stop the engine BACK UP ALARM SWITCH Option See Figure 20 The back up alarm is operated by a switch that is located under the lower section of the accele...

Page 21: ...ight on the warning bank The hopper temp sensor can be reset thermal switch which is located in the hopper filter compartment near the vacuum fan intake When the hopper temp light illuminates carefully investi gate for a possible fire in the hopper To reset the temp sensor press the reset button ENGINE COMPARTMENT LATCH See Figure 23 The engine cover encloses the entire engine radiator and hydraul...

Page 22: ...shrink wrap which have a tendency to get tangled in the broom driver To open the main broom door reach inside the hole in the door and lift up on the latch handle The door latch will automatically engage when the door is closed NOTE Side squeegees mount on doors and the scrub deck must be lowered to slide the doors and squeegees into place NOTE For proper function of side squeegees side squeegees ...

Page 23: ...erator s compart ment console The lever is a two position hydraulic valve that controls the operation of the hopper lift system The lever is spring loaded to the center position which stops hopper movement and HOLDS the hopper at the present position To raise the hopper for dumping move the lever to the RAISE position and hold until the hopper reaches the desired height then release WARNING The ho...

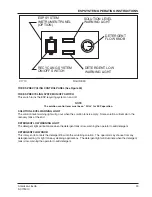
Page 24: ...RNING LIGHT The detergent light will illuminate when the detergent tank is low warning the operator to add detergent DETERGENT FLOW KNOB This rotary knob controls the detergent flow into the scrubbing solution The operator may choose from any detergent setting for light to heavy cleaning applications The detergent light will illuminate when the detergent tank is low warning the operator to add det...

Page 25: ... is fed to the floor where three disc scrubbing brushes work to dislodge soil After scrubbing the dirty solution is vacuumed from the floor and discharged into the containment chamber in the forward portion of the recovery tank where a system of baffles helps to clarify the solution Sensors in each tank will indicate by lights on the control panel when the water in the solution tank is too low or ...

Page 26: ... sends filtered solution from the recovery tank to the solution tank Detergent is added continuously to solution water from the flow valve The autofil system distributes water from the supply hose into the recovery and solution tanks Then a sole noid valve is closed when the proper level in the solution tank is reached NOTE Both tanks must be drained and cleaned before filling Tuck solution tank d...

Page 27: ...brake 2 Make sure all controls are in the OFF position 3 Be sure the directional control pedal is in neutral NOTE Before starting the engine perform the pre start checklist PRE START CHECKLIST 1 Clean engine air filter element 2 Check engine oil level 3 Check radiator coolant level 4 Check hydraulic fluid level 5 Check fuel level 6 Check all systems for leaks 7 Check brakes and controls for proper...

Page 28: ... Under cold starting conditions the glow plug switch may be held longer but do not hold the switch for more than 20 seconds to prevent damage to the glow plugs 4 Turn the key switch clockwise and hold until the engine starts If the engine does not start immediately release the key switch after 15 seconds to prevent damage to the starter POST START CHECKLIST Engine Running 1 Check main and side bro...

Page 29: ... 30 days should be completely drained of fuel to prevent gum deposits from forming on essential engine parts fuel filter and tank The use of a fuel additive such as STA BIL or an equivalent will minimize the formation of fuel gum deposits during storage Such an additive may be added to the gasoline in the fuel tank of the engine The following procedures should be used to prepare the machine for st...

Page 30: ...atches 4 Do not turn steering wheel too sharply when the machine is in motion The machine is very responsive to movement of the steering wheel so avoid sudden turns 5 Try to follow as straight a path as possible Avoid bumping into posts or scraping the sides of the machine 6 When placing the machine in motion avoid slamming the directional control pedal all the way forward quickly This is equivale...

Page 31: ...8 53 GAS VARIABLE DUMP 505 829 53 LP VARIABLE DUMP 505 830 53 DIESEL VARIABLE DUMP 505 825 46 GAS VARIABLE DUMP 505 826 46 LP VARIABLE DUMP 505 827 46 DIESEL VARIABLE DUMP 505 828 53 GAS VARIABLE DUMP 505 829 53 LP VARIABLE DUMP 505 830 53 DIESEL VARIABLE DUMP Parts may be ordered from American Lincoln authorized distributors Record the American Lincoln serial plate information to avoid delays in ...

Page 32: ...American Lincoln 31 SC7750 IC American Lincoln Printed in USA ...

Reviews: