background image

2.  Operation Guide

2.  Operation Guide

2.4  Speed Setting

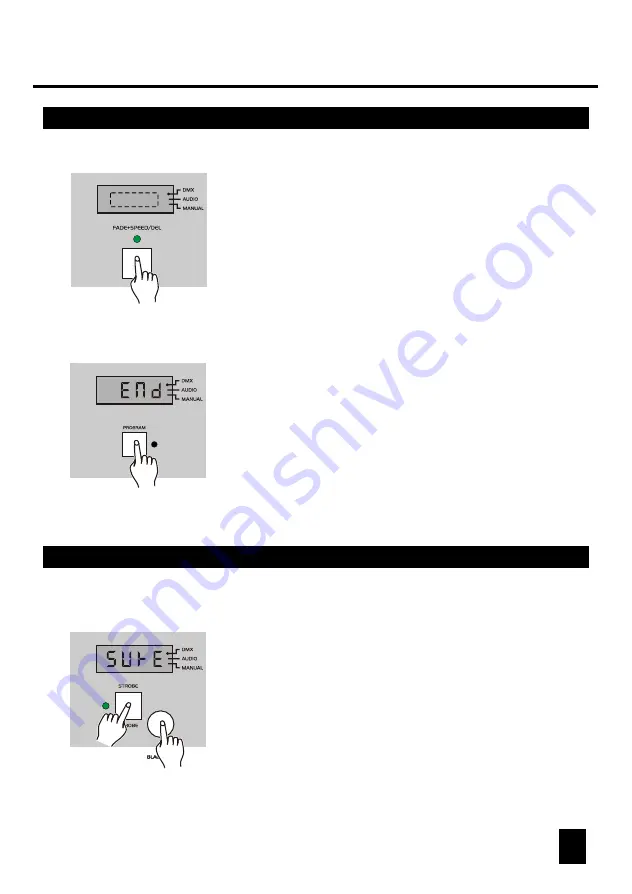
2.5  Send File Dump

2.5  Send File Dump

2.6  Receive File Dump

18

17

2 0 5

2. Tap the Up/Down button to adjust the speed
    within 0.1-600 seconds, the Segment Display
    shows the current speed.
    For Example:
    1:00 represents 1 minute, 1.00 represents 1 
    second.

3. Tap the Program or Strobe button to leave 
    speed setting.

1. Keep pressing the Black-out button for 3 seconds. 
   

1. Keep pressing the Black-out button for 3 seconds. 
   

2. Tap the Program button while holding down the 
    Black-out button. If this unit has record the scenes,
    the Segment Display shows "OUT" indicating this
    unit is ready to send file dump, otherwise shows
    "EPTY" indicating all the programs are empty. 
   

2. Tap the Strobe button while holding down the 
    Black-out button. If this unit has record the scenes,
    the Segment Display shows "SURE" otherwise 
    shows "IN" .
   

s 2 0 2

3. Tap the Fade+Speed button to send file dump.
    During the course of sending, all other operation
    doesn't work.

4. When this unit completes sending, the Segment 
    Display shows "END". Tap any button to leave
    this mode.

Summary of Contents for DMX-SOLO

Page 1: ...ad before use USER S MANUAL English American DJR DMX SOLO DMX SOLO TM RECEIVE SEND POWER 8 8 8 8 MANUAL DMX AUDIO STROBE ON FADE SPEED DEL SPEED PROGRAM BLACK OUT RECORD MODE American DJR DMX SOLO DMX...

Page 2: ......

Page 3: ...ack Out Mode 19 2 8 Initialization 20 2 1 1 Record Enable 6 2 1 2 Record Scenes 6 2 1 3 Delete a Program 7 2 1 4 Delete a Scene 8 2 1 5 Add a Scene 9 2 1 6 Change a Scene 9 2 1 7 Preview a Scene 10 2...

Page 4: ...rd a maximum of 48 scenes Either AS or AP program can record a maximum of 60 scenes Each AS or AP scene enables to has its individual speed or fade time Access the scenes from any DMX controller A con...

Page 5: ...T allow children to tamperor play with it NEVER use the unit under thefollowing conditions In places subject to excessive humidity In places subject to vibrations or bumps In places with a temperature...

Page 6: ...RECEIVE SEND POWER 8 8 8 8 MANUAL DMX AUDIO STROBE ON FADE SPEED DEL SPEED PROGRAM BLACK OUT RECORD MODE American DJR DMX SOLO DMX SOLO TM 1 Overview 1 1 Front View 3 1 3 5 6 9 2 4 7 8 10...

Page 7: ...button to activate Strobe programs and the LED near it lights indicating your selection button enables to receive file dump Tap the button to activate speed setting Tap the button to activate fade spe...

Page 8: ...X Out 4 DMX Polarity Select DC 12V 300mAmin controller or receives file dump from last unit DMX fixture or sends file dump to the next unit Move to select DMX polarity This connector sends DMX signal...

Page 9: ...the Segment Display shows the program and its scene of last time The DMX LED will light when DMX signal is present 1 Record enable 2 Tap the Program or Strobe button to select chase programs or strobe...

Page 10: ...ve record this scene into the program and the Segment Display shows the current step 5 Continue recording scenes until you ve got a desired program You may record a maximum of 48 scenes into a progra...

Page 11: ...Down button to select the scene you wish to delete 4 Tap the Del button all LEDs flash briefly indicating this scene is deleted 8 2 Repeat steps 2 3 in Record Scenes to select the program that holds t...

Page 12: ...es 1 Repeat steps 1 3 in Delete a Scene 1 Repeat steps 1 3 in Delete a Scene 2 Tap the Up Down button to select the scene which you wish to add a new scene before 2 Tap the Up Down button to select th...

Page 13: ...your selection 3 Tap the Up Down button to select the scene you wish to preview 4 Tap the Program or Strobe button again to leave this mode 3 Create a scene on your DMX controller tap the Record butt...

Page 14: ...eration Guide 11 Tap the Black out button until the Record LED goes out this unit is out of Record mode p 3 0 0 1 Record enable 3 Tap the Record button 2 Tap the Up Down button to select AS or AP AS f...

Page 15: ...recording scenes until you ve got a desired program You may record a maximum of 60 scenes into this AP AS program 6 Tap the Black out button the Segment Display shows SP01 now you may adjust beat time...

Page 16: ...or fade time of the current step 9 Tap the Program for AP scenes or Strobe forAS scenes button to enter next step 10 Continue steps 8 9 until every step has its beat time or fade time 11 T ap the Bla...

Page 17: ...on to activate the programs with Audio Manual Auto mode Be sure the programs have record scenes before you can run the programs 2 1 Tap the Mode button several times until the a dot LED lights near Ma...

Page 18: ...D lights near Audio s 2 0 2 s 3 0 5 2 Tap the Program or Strobe button to select chase program or strobe program 3 Tap the Up Down button to select the program you wish to run 4 Once the program is se...

Page 19: ...e the program is selected the program will run at the speed you ve set before You can adjust the speed from 10 steps per second to one step per 600 seconds 1 Tap the Speed or Fade Speed button to sele...

Page 20: ...resents 1 minute 1 00 represents 1 second 3 Tap the Program or Strobe button to leave speed setting 1 Keep pressing the Black out button for 3 seconds 2 Tap the Program button while holding down the B...

Page 21: ...on while holding down the Black out button If this unit has record the scenes the Segment Display shows SURE otherwise shows IN 3 Tap the Fade Speed button to send file dump During the course of sendi...

Page 22: ...ration doesn t work 4 When this unit completes receiving the Segment Display shows END Tap any button to leave this mode 1 Turn the power off 2 Press Speed and Black out buttons at a time while turnin...

Page 23: ...rogram button to leave this mode All the programs are blank when this unit is packed If you are not satisfied with your programs you can initialize this unit to clear all memory 1 Turn the power off 2...

Page 24: ...m E mail support americandj com American DJR Power Input DC 12V 300mA min DMX Out In 3 pin female male XLR socket Audio Input By built in microphone Fuse Internal F0 5A 250V 5x20mm Accessory AC DC ada...

Reviews: