background image

25

XIII. CIR

XIII. CIR

XIII. CIR

XIII. CIR

XIII. CIRCUL

CUL

CUL

CUL

CULA

A

A

A

ATIN

TIN

TIN

TIN

TING AIR & FIL

G AIR & FIL

G AIR & FIL

G AIR & FIL

G AIR & FILTER

TER

TER

TER

TERS

S

S

S

S

D

UCTWORK

 - A

IR

 F

LOW

Duct systems and register sizes must be properly designed for the
CFM and external static pressure rating of the furnace. Design the
ductwork in accordance with the recommended methods of  “Air
Conditioning Contractors of America” Manual D.

Install the duct system in accordance with Standards of the National
Board of Fire Underwriters for the Installation of Air Conditioning,
Warm Air Heating and Ventilating Systems. Pamphlets No. 90A and
90B.

A closed return duct system must be used, with the return duct con-
nected to the furnace. 

NOTE:

  Ductwork must never be attached to

the back of the furnace.


 Flexible joints may be used for supply and

return connections to reduce noise transmission. To prevent the
blower from interfering with combustion air or draft when a central
return is used, a connecting duct must be installed between the unit
and the utility room wall.  Never use a room, closet, or alcove as a
return air chamber.

B

OTTOM

 R

ETURN

 A

IR

 O

PENING

 [U

PFLOW

 M

ODELS

]

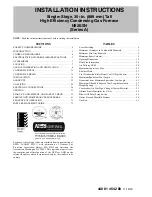
The bottom return air opening on upflow models utilizes a “lance
and cut” method to remove sheet metal from the duct opening in the
base pan. To remove, simply press out the lanced sections by hand
to expose the metal strips retaining the sheet metal over the duct
opening.  Using tin snips, cut the metal strips and remove the sheet
metal covering the duct opening.  In the corners of the opening, cut
the sheet metal along the scribe lines to free the duct flanges.  Us-
ing the scribe line along the duct flange as a guide, unfold the duct
flanges around the perimeter of the opening using a pair of seamer
pliers or seamer tongs.  

NOTE:

 Airflow area will be reduced by ap-

proximately 18% if duct flanges are not unfolded.  This could cause
performance issues and noise issues.

WARNING

E

DGES OF SHEET METAL MAY BE SHARP. 

U

SE GLOVES AS A PRECAUTION

WHEN REMOVING SHEET METAL FROM THE DUCT OPENING.

CUT FOUR CORNERS
AFTER REMOVING SHEET
METAL


CUT USING TIN SNIPS

PRESS OUT BY HAND

SCRIBE LINES OUTLINING
DUCT FLANGES

Duct Flange Cut Outs

When the furnace is used in connection with a cooling unit, the fur-
nace should be installed in parallel with or on the upstream side of
the cooling unit to avoid condensation in the heating element.  With
a parallel flow arrangement, the dampers or other means used to
control the flow of air must be adequate to prevent chilled air from
entering the furnace and, if manually operated, must be equipped
with means to prevent operation of either unit unless the damper is
in the full heat or cool position.

When the furnace is installed without a cooling coil, it is recom-
mended that a removable access panel be provided in the outlet air

presence of gas is suspected, follow the instructions on Page 5 of
this manual.
All propane gas equipment must conform to the safety standards of
the National Board of Fire Underwriters, NBFU Manual 58.
For satisfactory operation, propane gas pressure must be 11 inch
w.c. at the furnace manifold with all gas appliances in operation.
Maintaining proper gas pressure depends on three main factors:

1. Vaporization rate, depending on temperature of the liquid,

and “wetted surface” area of the container or containers.

2. Proper pressure regulation. (Two-stage regulation is

recommended for both cost and efficiency).

3. Pressure drop in lines between regulators, and between

second stage regulator and the appliance. Pipe size will
depend on length of pipe run and total load of all appliances.

Complete information regarding tank sizing for vaporization, recom-
mended regulator settings, and pipe sizing is available from most
regulator manufacturers and propane gas suppliers.
Since propane gas will quickly dissolve white lead and most stan-
dard commercial compounds, special pipe dope must be used. Shel-
lac-based compounds resistant to the actions of liquefied petroleum
gases such as Gasolac

®

, Stalactic

®

, Clyde’s

®

 or John Crane

®

 are

satisfactory.
Refer to the following illustration for typical propane gas installa-
tions.

200 PSIG
Maximum

5 to 15 PSIG
(20 PSIG Max.)

Continuous

11" W.C.

Second Stage
Regulator

First Stage
Regulator

Propane Gas Installation (Typ.)

Sizing Between First and Second Stage Regulator*

Maximum Propane Capacities listed are based on 2 psig pressure drop at 10 psig setting.  
Capacities in 1,000 BTU/hour.

Pipe or

Nominal Pipe Size

Tubing

Tubing Size, O.D. Type L

Schedule 40

Length,

3/8"

1/2"

5/8"

3/4"

7/8"

1/2"

3/4"

Feet

10

730

1,700

3,200

5,300

8,300

3,200

7,500

20

500

1,100

2,200

3,700

5,800

2,200

4,200

30

400

920

2,000

2,900

4,700

1,800

4,000

40

370

850

1,700

2,700

4,100

1,600

3,700

50

330

770

1,500

2,400

3,700

1,500

3,400

60

300

700

1,300

2,200

3,300

1,300

3,100

80

260

610

1,200

1,900

2,900

1,200

2,600

100

220

540

1,000

1,700

2,600

1,000

2,300

125

200

490

900

1,400

2,300

900

2,100

150

190

430

830

1,300

2,100

830

1,900

175

170

400

780

1,200

1,900

770

1,700

200

160

380

730

1,100

1,800

720

1,500

To convert to capacities at 15 psig settings - multiply by 1.130
To convert to capacities at 5 psig settings - multiply by 0.879

Propane Gas Piping Chart I

Sizing Between Single or Second Stage Regulator and Appliance*

Maximum Propane Capacities Listed are Based on 1/2" W.C. pressure drop at 11" W.C. setting. 
Capacities in 1,000 BTU/hour.

Pipe or

Nominal Pipe Size

Tubing

Tubing Size, O.D. Type L

Schedule 40

Length,

3/8"

1/2"

5/8"

3/4"

7/8"

1-1/8"

1/2"

3/4"

1"

1-1/4" 1-1/2"

Feet

10

39

92

199

329

501

935

275

567

1,071

2,205

3,307

20

26

62

131

216

346

630

189

393

732

1,496

2,299

30

21

50

107

181

277

500

152

315

590

1,212

1,858

40

19

41

90

145

233

427

129

267

504

1,039

1,559

50

18

37

79

131

198

376

114

237

448

913

1,417

60

16

35

72

121

187

340

103

217

409

834

1,275

80

13

29

62

104

155

289

89

185

346

724

1,066

100

11

26

55

90

138

255

78

162

307

630

976

125

10

24

48

81

122

224

69

146

275

567

866

150

9

21

43

72

109

202

63

132

252

511

787

200

8

19

39

66

100

187

54

112

209

439

665

250

8

17

36

60

93

172

48

100

185

390

590


*Data in accordance with NFPA pamphlet NO. 54

Propane Gas Piping Chart II

Summary of Contents for ACS9

Page 1: ...Remember it is your responsibility to install the product safely and to know it well enough to be able to instruct a customer in its safe use Safety is a matter of common sense a matter of thinking be...

Page 2: ...ROPER VENT FLUE AND COMBUSTION AIR PIPING PRACTICES 13 TERMINATION LOCATIONS 13 CANADIAN VENTING REQUIREMENTS 14 STANDARD FURNACE CONNECTIONS 14 ALTERNATE FURNACE CONNECTIONS 14 NON DIRECT VENT SINGLE...

Page 3: ...ENERAL 30 INTEGRATED CONTROL MODULE 30 PRIMARY LIMIT 30 AUXILIARY LIMIT 30 ROLLOUT LIMIT 30 PRESSURE SWITCHES 30 FLAME SENSOR 30 XVIII Troubleshooting 31 ELECTROSTATIC DISCHARGE ESD PRECAUTIONS 31 DIA...

Page 4: ...warranty certificate is also supplied with the unit Read the warranty carefully and note what is covered Keep the warranty certificate in a safe location for future reference If additional informatio...

Page 5: ...Coil Front Cover Drain Port 21 Drain Line Penetrations 22 Drain Trap 23 Blower Door Interlock Switch 24 Capacitor 25 Integrated Control Module with fuse and diagnostic LED 26 24 Volt Thermostat Conne...

Page 6: ...on are replaced The input rate and temperature rise are set per the furnace rating plate 100 outside air is provided for combustion air requirements during construction Temporary ducting can be used N...

Page 7: ...d beneath the furnace between the supply air opening and the combustible floor Exposure to contaminated combustion air will result in safety and performance related problems Do not install the furnace...

Page 8: ...ust be corrected Corrections must be in accordance with the latest edition of the Na tional Fuel Gas Code NFPA 54 ANSI Z223 1 and or CSA B149 In paint removers varnishes hydrochloric acid cements and...

Page 9: ...rier etc addi tional air may need to be provided using the methods described in 5 3 3 b or 5 3 4 Space Unconfined For purposes of this Code a space whose volume is not less than 50 cubic feet per 1 00...

Page 10: ...eets the criteria for an unconfined space The total input of all gas utilization equipment installed in the combined space shall be considered in making this determination Each open ing shall have a m...

Page 11: ...L APPLI AL APPLI AL APPLIC C C C CA A A A ATI TI TI TI TIO O O O ONS CO NS CO NS CO NS CO NS CONSID NSID NSID NSID NSIDERA ERA ERA ERA ERATI TI TI TI TIO O O O ONS NS NS NS NS GENERAL Horizontal appli...

Page 12: ...e between natural and propane gas High altitude installations may require both a pressure switch and an orifice change These changes are necessary to compensate for the natural reduction in the densit...

Page 13: ...S AND EXCESSIVE HEAT AS THEY ARE COMBUSTIBLE LIQUIDS AVOID BREATHING CEMENT VAPORS OR CONTACT WITH SKIN AND OR EYES Two or three inch nominal diameter PVC Schedule 40 pipe meet ing ASTM D1785 PVC prim...

Page 14: ...STALLATIONS On upflow units secure the combustion air intake pipe directly to the air intake coupling On counterflow units secure the combus tion air intake pipe to the air intake coupling using the r...

Page 15: ...vent flue piping to the rubber elbow using a worm gear hose clamp NOTE Use of the alternate vent flue location for upright installations requires the drain trap be installed on the same side of the un...

Page 16: ...the wall and solvent cemented to a length of pipe connecting the two couplings The length of pipe should be the wall thickness plus the depth of the socket fittings to be in stalled on the inside and...

Page 17: ...r tees in each Vent Flue Combustion Air Intake pipe Elbows and or tees used in the terminations must be included when determining the number of elbows in the piping systems If the combustion air intak...

Page 18: ...nces be tween the exhaust vent and air intake terminations of adjacent units as with the exhaust vent and air intake terminations of a single unit If more than one direct vent furnace is to be install...

Page 19: ...n port right or left side depending on the intended drain trap mounting 2 Secure HoseAto front cover drain port with a red hose clamp Route hose to rear side panel grommet hole NOTE For left side drai...

Page 20: ...as follows 1 Remove the rubber plug from the coil front cover drain port Counterflow furnaces Relocate the front cover pressure switch hose connection from the left side pressure tap to the right dow...

Page 21: ...harness is an integral part of this furnace Field alter ation to comply with electrical codes should not be required Wires are color and number coded for identification purposes Refer to the wiring di...

Page 22: ...0 Amp maximum at 120 VAC Turn OFF power to the furnace before installing any accessories Follow the humidifier or air cleaner manufacturers instructions for locating mounting grounding and controllin...

Page 23: ...ro pane gas spring from an appropriate manufacturer s propane gas conversion kit Taps for measuring the gas supply pressure and manifold pressure are provided on the valve The gas valve has a manual O...

Page 24: ...TO ACCOMMODATE LINE GAS PRESSURE MEASUREMENT Gas Piping Connections CAUTION EDGES OF SHEET METAL HOLES MAY BE SHARP USE GLOVES AS A PRECAUTION WHEN REMOVING HOLE PLUGS DIRECT STANDARD INLET PIPING Whe...

Page 25: ...tandards of the National Board of Fire Underwriters NBFU Manual 58 For satisfactory operation propane gas pressure must be 11 inch w c at the furnace manifold with all gas appliances in operation Main...

Page 26: ...or NOTE This furnace is equipped with an ignition device which automatically lights the burner Do not try to light the burner by hand 5 Move the furnace gas valve manual control to the OFF position du...

Page 27: ...Off Selector Switch Inlet Pressure Tap Side of Valve Outlet Manifold Pressure Tap White Rodgers Model 36F22 1 Turn OFF gas to furnace at the manual gas shutoff valve external to the furnace 2 Connect...

Page 28: ...gulator preset see control label Consult the appliance rating plate to ensure burner manifold pres sure is as specified If another outlet pressure is required follow these steps 1 Turn OFF all electri...

Page 29: ...quipped with a multi speed circulator blower This blower provides ease in adjusting blower speeds The Product Data Book applicable to your model provides an airflow table showing the relationship betw...

Page 30: ...ange tips but they must not be yellow Flames should extend directly outward from the burners without curling floating or lifting off Flames must not impinge on the sides of the heat exchanger firing t...

Page 31: ...the furnace for 0 20 seconds NOTE If the condition which originally caused the lockout still exists the control will return to lockout Refer to Section XVIII Troubleshooting Diagnostic Chart for aid i...

Page 32: ...ue pipe system from the induced draft blower 4 Remove the induced draft blower and drain and pressure tap hoses from the recuperator coil front cover 5 Remove the recuperator coil front cover to expos...

Page 33: ...s List Gas Valve Blower Motor Gas Manifold Blower Wheel Natural Gas Orifice Blower Mounting Bracket Propane Gas Orifice Blower Cutoff Igniter Blower Housing Flame Sensor Capacitor Rollout Limit Switch...

Page 34: ...pinched or connected improperly Blocked flue and or inlet air pipe blocked drain system or weak induced draft blower Incorrect pressure switch setpoint or malfunctioning switch contacts Loose or impr...

Page 35: ...section for piping details See rating plate for proper gas pressure 7 7 FLASHES Flame sensor is coated oxidized Flame sensor incorrectly positioned in burner flame Lazy burner flame due to improper ga...

Page 36: ...IER FLAME SENSOR 115 VAC TRANSFORMER 40 VA 24 VAC NO C NO C GND CONTR OL LIMIT PRIM AR Y AUT OR ESET SINGLECONTROLO N45KBTU LIMITCONTROL S MANUALRESETROL LOUT RO1 5 RO2 11 HLO 1 HLI 7 PS 10 MVC 9 MV 1...

Page 37: ...H FLAME SENSOR FRONT COVER PRESSURE SWITCH SINGL ECO N TR OLON45KBT U NO C GY BK PLUG CONNECTION FIELD SPLICE SWITCH TEMP OR 24V THERMOSTAT CONNECTIONS BU GN GND 115 VAC 24 VAC BLOWER COMPARTMENT DOO...

Page 38: ...2004 2006 Goodman Company L P is a trademark of Maytag Corporation and is used under license to Goodman Company L P All rights reserved 2550 North Loop West Suite 400 Houston TX 77092 www amana hac c...

Reviews: