background image

22

-EN

Time Difference Table

0

0.0

14

1.4

28

2.8

1

0.1

15

1.5

29

2.9

2

0.2

16

1.6

30

3.0

3

0.3

17

1.7

31

3.1

4

0.4

18

1.8

32

3.2

5

0.5

19

1.9

33

3.3

6

0.6

20

2.0

34

3.4

7

0.7

21

2.1

35

3.5

8

0.8

22

2.2

36

3.6

9

0.9

23

2.3

37

3.7

10

1.0

24

2.4

38

3.8

11

1.1

25

2.5

39

3.9

12

1.2

26

2.6

40 - 98

4.0 - 9.8

13

1.3

27

2.7

99

9.9

Number
of Steps

Time

Difference

(ms)

Number of

Steps

Time

Difference

(ms)

Number of

Steps

Time

Difference

(ms)

Example 2. Listening Position: All Seats

Adjust the time correction level of each speaker to almost the
same level.

1

Sit in the listening position (driver’s seat, etc.) and
measure the distance (in meters) between your
head and the various speakers.

2

Calculate the difference between the distance to
the farthest speaker and the other speakers.

L = (distance to farthest speaker) – (distance to other
speakers)

3

Divide the distances calculated for the speakers by
the speed of sound (343 m/s (765 mph) at 20˚C).

These values are the time correction values for the
different speakers.

Bass Focus

Setting item: BASS FOCUS
Setting contents: TIME DN / UP / FRONT / LEFT / RIGHT /
REAR

The time difference between the front-rear/left-right speakers, can be
adjusted at the same time. With an initial delay of 0.1 ms for each of
the 0 to 99 steps, audible time correction can be done.

Selecting the speaker:

Select the speaker among 

3

 (

FRONT

) through 

6

 (

REAR

).

Setting the step:

Press 

1

 (

TIME


;

DN

) or 

2

 (

TIME UP

:

) to set the step.

• Any manual time correction adjustments will also affect

corrections made for bass focus.

About the Time Correction

The distance between the listener and the speakers in a car vary
widely due to the special conditions of the mobile environment. This
difference in the distances from the speakers to the listener creates a
shift in the sounds image and frequency characteristics. This is caused
by the time delay between the sound reaching the listener’s right
versus left ear.
To correct this, the IVA-D900 is able to delay the audio signal to the
speakers closest to the listener. This effectively creates a perception of
increased distance for those speakers. The listener can be placed at an
equal distance between the left and right speakers for optimum
staging.
The adjustment will be made for each speaker in a step of 0.1 ms.

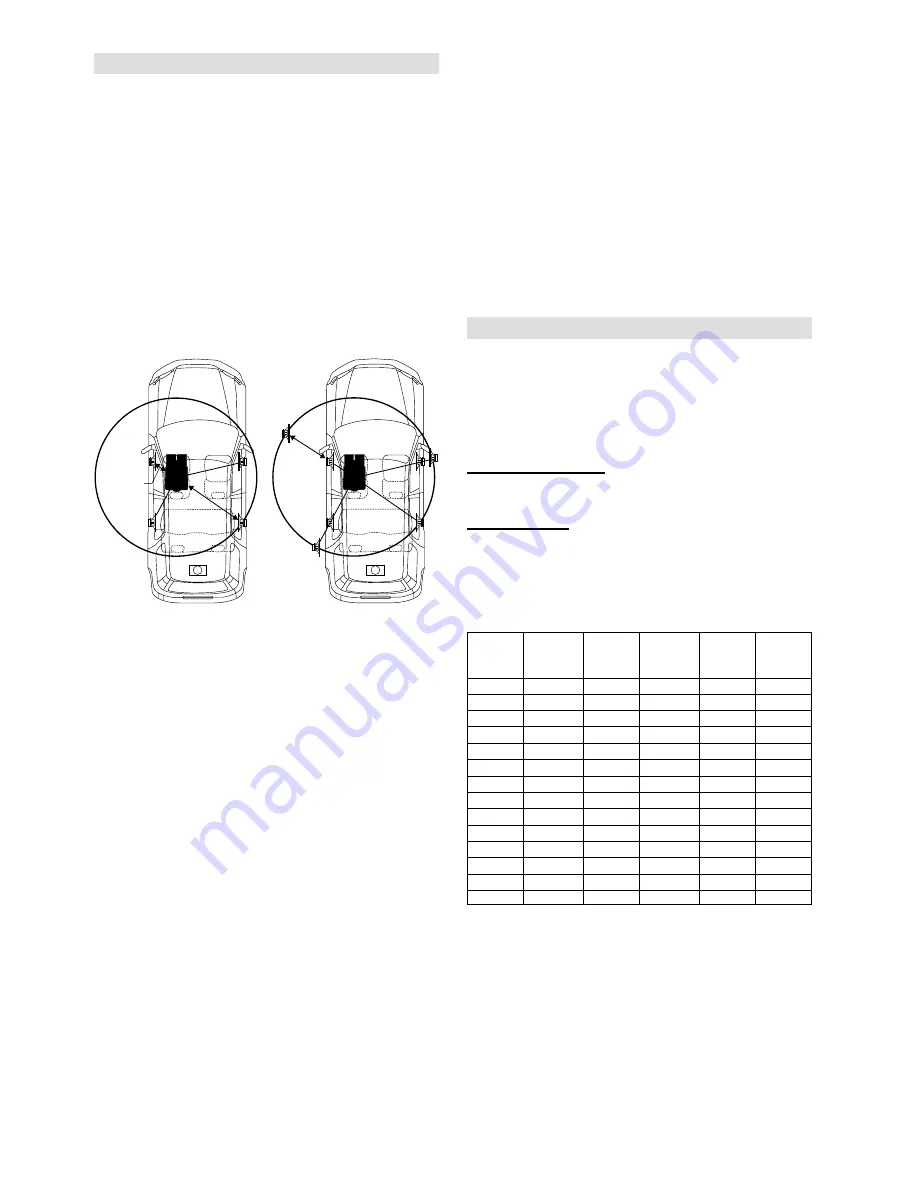
Example 1. Listening Position: Front Left Seat

Adjust the time correction level of the front left speaker to a
high value and the rear right to zero or a low value.

Tips

*

 Subwoofer speaker

You cannot change the time correction value for  the
subwoofer, but you can set the subwoofer's apparent position
to the front by adjusting the time correction value of the front
and rear speakers.
For details, refer to the “Tips” on page 23.

Here we calculate the time correction value for the front left
speaker in the diagram above.

Conditions:

Farthest Speaker – listening position:

2.25 m (88-9/16")

Front left speaker – listening position:

0.5 m (19-11/16")

Calculation:  L = 2.25 m – 0.5 m = 1.75 m (68-7/8")
Time correction = 1.75 ÷ 343

*


×

 1000 = 5.1 (ms)

* Speed of sound: 343 m/s (765 mph) at 20˚C

The sound is not balanced because the distance between the
listening position and the various speakers is different.
The difference in distance between the front left speaker and
the rear right speaker is 1.75 m (68-7/8").

Time correction eliminates the differences in the time required
for the sound to reach the listening position.
The time of the front left speaker is corrected by 5.1 ms so that
its sound reaches the listening position at the same time as the
sound of other speakers.

In other words, giving the front left speaker a time correction
value of 5.1 ms makes it seem as if the distance to the front left
speaker is the same as the distance to the farthest speaker.

2.25m

0.5m

5.1ms

Summary of Contents for D900 - XM Ready DVD/CD/MP3 Receiver

Page 1: ...Canada Phone 1 800 ALPINE 1 1 800 257 4631 ALPINE ELECTRONICS FRANCE S A R L RCS PONTOISE B 338 101 280 98 Rue de la Belle Etoile Z I Paris Nord Il B P 50016 95945 Roissy Charles de Gaulle Cedex Franc...

Page 2: ...od le CHA S634 est un changeur 6 disques ultra performant quip des nouvelles fonctions M DAC CD R RW PLAY BACK MP3 PLAY BACK et CD TEXT Le mod le CHA 1214 Ai NET contient 12 disques Le mod le CHM S630...

Page 3: ...rding Fast reversing 17 Finding the Beginnings of Chapters or Tracks 17 Playing Still Frames Pausing 17 Frame by frame Playback 17 Slow Motion Playback 17 Chapter Track Title Repeat Playback 17 Search...

Page 4: ...ing the Interrupt Icon Display 34 Optical Digital Input Selection for an External Audio Processor 34 DISPLAY Setup Display Setup Operation 35 Illumination Control 35 Adjusting Brightness 35 Adjusting...

Page 5: ...speaker levels 50 Adjusting the DVD Level 50 Storing Settings in the Memory 50 Getting out the Preset Memory 50 Using the ProLogic II Mode 51 Linear PCM Setting 51 Remote Control Operating for the IVA...

Page 6: ...in an accident fire or electric shock USE ONLY IN CARS WITH A 12 VOLT NEGATIVE GROUND Check with your dealer if you are not sure Failure to do so may result in fire etc KEEP SMALL OBJECTS SUCH AS BATT...

Page 7: ...Maintenance If you have problems do not attempt to repair the unit yourself Return it to your Alpine dealer or the nearest Alpine Service Station for servicing Never Attempt the Following Do not grip...

Page 8: ...ne sided disc Approx 80 Minutes Two sided disc Approx 160 Minutes Approx 74 Minutes Approx 74 Minutes Approx 20 Minutes Approx 20 Minutes Two sided disc Approx 8 hours DVD Video Video CD Music CD Audi...

Page 9: ...9660 formatting to insure proper playback You may use standard ISO naming Level 1 8 3 DOS standard Level 2 32 characters or Joliet Windows or Macintosh long filenames file naming conventions Please co...

Page 10: ...execute the selection The DVD player mode screen is displayed The DVD disc is played back If PAGE 1 2 or PAGE 1 3 appears in the Function Guide menu there are additional functions available for the s...

Page 11: ...nel This is not a malfunction To protect the front panel place it in the supplied carrying case Attaching 1 Insert the left side of the front panel into the main unit Align the groove on the front pan...

Page 12: ...Press FLAT SLIDE The monitor moves to the flat position 2 Press FLAT SLIDE again The monitor returns to the previous angle The monitor returns to the previous angle from being flat after 10 seconds I...

Page 13: ...and hold any one of the Function buttons 1 P SET1 through 6 P SET6 for at least 2 seconds The selected station is stored 4 Repeat the procedure to store up to 5 other stations onto the same band To u...

Page 14: ...nt track file Press 1 g Fast backward Press and hold 1 g Advancing to the beginning of the next track file Press 3 f Fast forward Press and hold 3 f To pause playback Press 2 J Pressing 2 J again will...

Page 15: ...g music files by as much as one tenth their original size This is achieved while still maintaining near CD quality The MP3 format realizes such high compression ratios by eliminating the sounds that a...

Page 16: ...he sampling rate the higher the sound quality but also the larger the volume of data Encoding Converting music CDs WAVE AIFF files and other sound files into the specified audio compression format ID3...

Page 17: ...to perform an invalid operation based on the type of disc being played the following mark is displayed on the monitor screen Play Position Memory Function Even if you turn power off or switch the Ign...

Page 18: ...this case set the PBC function to ON Operation from the remote control Press MENU Each pressing switches PBC ON and OFF Operation from the main unit button 1 When the Video CD mode is selected press...

Page 19: ...sed 2 Press 2 J to return to normal mode No sound is played during frame by frame playback Slow Motion Playback 1 When 3 f is pressed and held in while in the pause mode the 1 8th speed slow motion pl...

Page 20: ...Press and hold DEL for at least 2 seconds to clear Chapter and Track numbers Press RTN to cancel the chapter track search mode and resume normal playback With video discs containing playback control P...

Page 21: ...he item then press ENTER 2 Use the Joystick to select the language or angle then press ENTER For some discs they can be selected using the number buttons 0 to 9 while the language or the angle menu is...

Page 22: ...on 4 After pressing 2 ON press 3 SETUP MX list screen is displayed 5 Turn the Rotary encoder to select your desired MX mode The screen shows the Function Guide Displays the function assigned for each...

Page 23: ...ide or narrow A wide setting will boost a wide range of frequencies above and below the center frequency A narrower setting will boost only frequencies near the center frequency The settings of the ba...

Page 24: ...e sounds image and frequency characteristics This is caused by the time delay between the sound reaching the listener s right versus left ear To correct this the IVA D900 is able to delay the audio si...

Page 25: ...ong 3 FRONT LEFT through 6 REAR RIGHT Adjusting the time correction value Press 1 TIME DN or 2 TIME UP to adjust the time correction value 0 0 to 9 9 Adjusting the Built in Crossover Setting item CROS...

Page 26: ...D LIST INPUT REAR 3 Turn the Rotary encoder and select the desired character for the first position To change between upper case lower case numeral and symbol press 3 A 1 Each press changes the bottom...

Page 27: ...or other audio source in the front DVD can be enjoyed in the rear with the optional rear monitor and headphones 1 Press SOURCE POWER The main menu is displayed 2 Press 3 R SEL Rear Select display app...

Page 28: ...d for displaying a cinema type picture at the 16 9 ratio SPE ANA MODE1 SOURCE POWER Rotary encoder WIDE DISP DEMO MODE3 MODE2 Blackout Mode On and Off When Blackout mode is turned on the display will...

Page 29: ...mode Screen explained on page 28 perform the operation described below 1 Press SOURCE POWER The main menu appears on the display 2 Press 2 V SEL to select the video portion 3 Turn the Rotary encoder...

Page 30: ...ess the Function buttons to switch the setting 6 Press 7 RETURN The screen returns to the previous one With the DVD screen displayed pressing and rotating the rotary encoder will adjust the volume lev...

Page 31: ...unrated DVDs playback will not be restricted even if the rating level is set Once set this rating level remains in memory until changed To enable playback of discs of higher rating levels or to cancel...

Page 32: ...UTO or LPCM AUTO or LPCM AUTO or LPCM AUTO LPCM AUTO or LPCM AUTO or LPCM AUTO or LPCM OK OK OK OK OK OK OK OK OK OK OK OK OK OK OK OK OK OK DTS Dolby Digital DTS Elementary Stream LPCM Encode 2ch Dow...

Page 33: ...elect this when connected to a wide screen TV This is the factory setting GENERAL Setup General Setup Operation To display the General mode screen To watch a video source your vehicle must be parked w...

Page 34: ...This operation cannot be carried out when NAV IN and AUX IN 1 to 3 in the SYSTEM list screen are set to off Playing MP3 Data Setting item MULTI SESSION PLAY Setting content CD MP3 When using discs co...

Page 35: ...DVD player or DVD changer is connected to AUX IN 1 DVD is displayed on the screen When both of them are connected DVD is displayed for AUX IN 1 and DVD CHG is displayed for AUX IN 2 System Setup Oper...

Page 36: ...Auxiliary Input Adapter KCA 801B is connected to the IVA D900 an Auxiliary Source will be allowed to interrupt the current audio source For example you can listen to a portable MP3 player through your...

Page 37: ...und illumination of the monitor bright ON Keep the background illumination of the monitor dark AUTO Adjust the brightness of the background illumination of the monitor automatically to the brightness...

Page 38: ...o the remote control operation For operation refer to the Owner s Manual for your navigation system Depending on the navigation system connected to this unit some functions and displays may vary When...

Page 39: ...n menu set AUX IN to LEVEL LOW or HIGH by following Setting the AUX mode page 33 Changer Optional Controlling CD Changer Optional An optional 6 disc or 12 disc CD Changer may be connected to the IVA D...

Page 40: ...the disc numbers 7 to 12 The Function Guide display changes and now the Function buttons 1 6 represent disc numbers 7 12 After selecting the desired setting you can operate in the same way as for the...

Page 41: ...eady being used the current channel will be replaced with the new one Receiving Stored XM Channels 1 Press BAND to select the desired band XM1 XM2 or XM3 2 Press 7 PAGE 1 2 The Function Guide is switc...

Page 42: ...n ON automatically for a hands free call Even if the power of the portable telephone is OFF when IVA D900 is set to the telephone mode the power of the portable telephone will be turned ON Even if the...

Page 43: ...unction buttons 1 6 to 4 9 3 Press 1 to start call 4 To cut the call press 2 Or the call is automatically cut in 5 seconds after finishing If no telelphone number is registered in the selected functio...

Page 44: ...ed Dial display appears 2 Press 7 RETURN The Telephone menu display appears 3 Press 2 PHONE BOOK The Phone Book display appears 4 Turn the Rotary encoder to select a receiver then press the Rotary enc...

Page 45: ...o send from the PHONE BOOK or the CALL LOG 7 In the phone book display or the call log display turn the Rotary encoder to select the address Then press the Rotary encoder to enter it The select displa...

Page 46: ...rake can reactivate the Audio processor mode as long as the car s ignition has not been turned off It is not necessary to repeat the above procedure 1 through 3 of To display the Audio processor mode...

Page 47: ...MX mode MP3 MUSIC or MOVIE that corresponds to the media connected To return to the previous display press 7 RETURN 7 Press the function button to set the MX mode The contents of MX set here is reflec...

Page 48: ...emperature 20 C This value is the time correction value for the various speakers Concrete examples Calculating the time correction value for the front left speaker on the diagram below Conditions Dist...

Page 49: ...nges of the connected speakers before making the equalizer adjustments If the speaker s playable frequency range is 55 Hz to 30 kHz for example adjusting the 40 Hz or 20 Hz band has no effect Addition...

Page 50: ...elect BASS FOCUS The Function Guide changes 7 Press 3 FRONT 4 LEFT 5 RIGHT and 6 REAR to select the front rear left and right speakers 8 Press 1 TIME DN or 2 TIME UP to set the step of front rear and...

Page 51: ...de is switched 1 Turn the Rotary encoder to select BI PHANTOM 2 Press 2 ON By pressing 1 OFF BI PHANTOM is set to OFF 3 Press 3 LEVEL DN or 4 LEVEL UP to adjust the level The level can be adjusted wit...

Page 52: ...ck that Defeat mode is off 2 Press SOURCE POWER The main menu is displayed 3 Press 4 A PROC The A PROC Audio processor list display appears 4 Turn the Rotary encoder to select PRESET MEMORY The Functi...

Page 53: ...nel to the rear channel 1 Check that Defeat mode is off 2 Press SOURCE POWER The main menu is displayed 3 Press 4 A PROC The A PROC Audio processor list display appears 4 Turn the Rotary encoder to se...

Page 54: ...t file DVD Video CD Move to the desired position on the disc During playback press and hold for more than 1 second to reverse the disc at double speed Hold for more than 5 seconds to reverse the disc...

Page 55: ...display The angle moves continuously by keeping it pressed L Button Performs stop SOURCE Button Selects the audio source Button Radio mode SEEK UP Button CD changer mode Press the button to advance t...

Page 56: ...e of IVA D900 instantly Press the button again to cancel MENU SETUP Button Displays the DVD menu Press and hold for at least 2 seconds to access SETUP initial setting Numeric Keypad Inputs numbers DEL...

Page 57: ...d while the status indicator is blinking numerals 0 9 DEL and 10 MODE Change Switch Sets this switch to the NAV side to operate a connected Alpine navigation system Operating a separately sold TV moni...

Page 58: ...ter coming to a complete stop Always stop the vehicle in a safe location before performing these functions Failure to do so may result in an accident Warning Notes on Using the Remote Control Point th...

Page 59: ...Minimum pit length 0 9 m 0 6 mm 0 6 mm Track pitch 0 74 m CDs DVDs In addition DVDs offer a variety of functions Multiple audio page 18 Movies can be recorded in up to eight languages The desired lan...

Page 60: ...n scenes are skipped and other times certain scenes are replaced with other scenes Terminology Dolby Digital Dolby Digital is a digital audio compression technology developed by Dolby Laboratories tha...

Page 61: ...79 6983 6984 6985 7065 7073 7074 7079 7082 7089 7165 7168 7176 7178 7185 7265 7273 7282 7285 7289 7365 Abbreviation IE IK IN IS IT IW JA JI JW KA KK KL KM KN KO KS KU KY LA LN LO LT LV MG MI MK ML MN...

Page 62: ...IS IT JM JO JP KE KG KH 6877 6879 6890 6967 6969 6971 6972 6982 6983 6984 7073 7074 7075 7077 7079 7082 7165 7166 7168 7169 7170 7172 7173 7176 7177 7178 7180 7181 7182 7183 7184 7185 7187 7189 7275 7...

Page 63: ...8371 8372 8373 8374 8375 8376 8377 8378 8379 8382 8384 8386 8389 8390 8467 8468 8470 8471 8472 8474 8475 8477 8478 8479 8480 8482 8484 8486 8487 8490 8565 8571 8577 8583 8589 8590 8665 8667 8669 8671...

Page 64: ...n within the warranty period for the tube is an article of consumption Radio Unable to receive stations No antenna or open connection in the antenna cable Make sure the antenna is properly connected r...

Page 65: ...lock or change the rating level Picture is unclear or noisy Disc is being fast forwarded or fast reversed The picture may be slightly disturbed but this is normal Vehicle s battery power is weak Check...

Page 66: ...or will disappear when the temperature returns to within operation range Leave the power OFF until the temperature decreases and then turn the power ON again Mechanism error 1 Press c and eject the di...

Page 67: ...a magazine No indicated disc Choose another disc HI TEMP ERROR 01 NO MAGZINE ERROR 02 NO DISC Indication for XM radio mode The XM antenna is not connected to the XM radio module Check whether the XM...

Page 68: ...668 nm Laser power CLASS II REMOTE CONTROL Battery Type AAA batteries 2 pcs Width 56 mm 2 1 4 Height 142 5 mm 5 5 8 Depth 37 mm 1 7 16 Weight 72 g 2 54 oz CAUTION CAUTION Laser radiation when open DO...

Page 69: ...cle body The Display must be completely retracted in the casing when installing If it is not problems may occur When installing in automobiles make sure the Display can open close without coming in co...

Page 70: ...oming from the left rear of the IVA D900 Connect all other leads of the IVA D900 according to details described in the Connections section 3 Slide the IVA D900 into the dashboard When the unit is in p...

Page 71: ...ipes or wires 1 Connect the bracket to both the flanks of the tuner with the supplied pan screws M4 x 8 2 Install the tuner on the floor with the supplied flange head tapping screws M4 x 14 Installing...

Page 72: ...IVA D900 is connected directly to the positive post of the vehicle s battery the IVA D900 draws some current several hundred milliamperes even when its switch is placed in the OFF position and the ba...

Page 73: ...ERRUPT IN Connections IVA D900 Wiring Diagram IVA D900 Monitor Yellow Black Battery Blue Pink Black Yellow Blue Red Yellow Black White White Black Green Black Green Violet Violet Black Gray Black Gray...

Page 74: ...e the switch in the NORM position Be sure turn the power off to the unit before changing the switch position Remote Turn On Lead Blue White Connect this lead to the remote turn on lead of your amplifi...

Page 75: ...White Brown White Brown Fiber optic cable Fiber digital Input terminal for Changer Fiber optic cable Ai NET cable Ai NET cable Ai NET cable Fiber optic cable CD Changer Ai NET Sold Separately Only con...

Page 76: ...Terminal 6 Ai NET Connector Connect this to the output or input connector of other product equipped with Ai NET 7 AUX Video Input AUX1 Terminal Connect the video output lead of a DVD video player or D...

Page 77: ...When connecting an equalizer or divider using Ai NET feature place this switch in the EQ DIV position When no device is connected leave the switch in the NORM position Be sure to turn the power off t...

Page 78: ...charges Alpine will at its option repair or replace the product with a new or reconditioned product without charge If the repairs are covered by the warranty and if the product was shipped to an Autho...

Page 79: ......

Page 80: ......

Page 81: ......

Page 82: ......

Page 83: ......

Reviews: