9
5 1/4 DRIVES
5 1/4 LAUFWERK
LECTEUR DE 5 1/4
EN
DE
FR
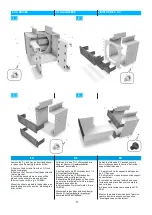
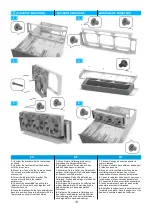
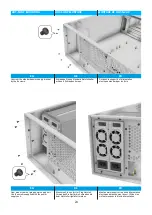
Remove the 5 ¼ inch tray as described above
in the section "Removing the drive holder".
1.
Remove the 8 screws from the 3 1/2 inch
hard drive bracket.
2.
Remove the 10 screws from the bezels and
the fan bracket.
3.
Install the bezels where no drive will be
placed. In this example, top and bottom.
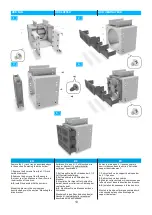
4.
Screw in your drive, e.g. a CD-ROM.
Mount the slide-in module in the enclosure as
described above in the section "Mounting the
drive holder".
Entfernen Sie den 5 ¼ Zoll Einschub wie
oben im Abschnitt „Laufwerkshalter
entfernen“ beschrieben.
1.
Entfernen Sie die 8 Schrauben der 3 1/2
Zoll Festplattenhalterung.
2.
Entfernen Sie die 10 Schrauben der
Blenden und der Lüfterhalterung.
3.
Montieren Sie die Blenden an den Stelle,
wo kein Laufwerk platziert wird. In diesem
Beispiel oben und unten.
4.
Verschrauben Sie ihr Laufwerk, z.B. ein
CD-ROM.
Montieren Sie den Einschub, wie oben im
Abschnitt „Laufwerkshalter montieren“
beschrieben in das Gehäuse.
Retirez le plateau de 5 ¼ pouces comme
décrit ci-dessus dans la section "Retrait du
support d'entraînement".
1.
Retirez les 8 vis du support du disque dur
de 3 1/2 pouces.
2.
Retirez les 10 vis des biseaux et du support
du ventilateur.
3.
Installez les cadres à l'endroit où aucun
lecteur ne sera placé. Dans cet exemple, le
haut et le bas.
4.
Vissez votre lecteur, par exemple un CD-
ROM.
Montez le module d'insertion dans l'armoire
comme décrit ci-dessus dans la section
"Montage du support du lecteur".
1.
2.
3.
4.


