10
HDD FAN
HDD LÜFTER
HDD VENTILATEUR
EN
DE
FR
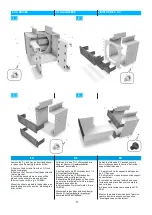
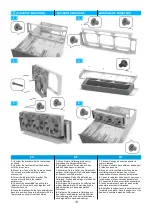
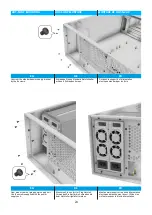
Remove the 5 ¼ inch tray as described above
in the section "Removing the drive holder".
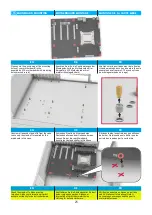
1.
Remove the 8 screws from the 3 1/2 inch
hard drive bracket.
2.
Remove the 6 screws from the bezels.
3.
mount your fan. Make sure the airflow is in
the direction of the drives.
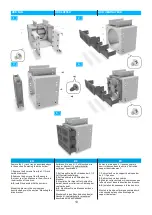
4-5.
Install the panels with the 6 screws.
Mount the drawer in the enclosure as
described above in the section "Mounting the
drive bracket".
Entfernen Sie den 5 ¼ Zoll Einschub wie
oben im Abschnitt „Laufwerkshalter
entfernen“ beschrieben.
1.
Entfernen Sie die 8 Schrauben der 3 1/2
Zoll Festplattenhalterung.
2.
Entfernen die die 6 Schrauben der
Blenden.
3.
Montieren Sie ihren Lüfter. Achten Sie
darauf, dass der Luftstrom in Richtung der
Laufwerke geht.
4.-5.
Montieren Sie die Blenden mit den 6
Schrauben.
Montieren Sie den Einschub, wie oben im
Abschnitt „Laufwerkshalter montieren“
beschrieben in das Gehäuse.
Retirez le plateau de 5 ¼ pouces comme
décrit ci-dessus dans la section "Retrait du
support d'entraînement".
1.
Retirez les 8 vis du support du disque dur
de 3 1/2 pouces.
2.
Retirez les 6 vis des cadres.
3.
Montez votre ventilateur. Assurez-vous que
le flux d'air est dans la direction des disques.
4-5.
Installez les panneaux à l'aide des 6 vis.
Montez le tiroir dans l'armoire comme décrit
ci-dessus dans la section "Montage du
support du lecteur".
3.
5.
2.
4.
1.


