


8
8
THE DISPLAY
The APM 150 incorporates a custom liquid crystal
display (LCD) to show measured values, units of
measurement, page and line numbers of last data
entered, and an indicator showing if the correction
factor is equal to 1. As a result, measurements
exceeding 9,999 of a given unit of measure will be
displayed in a scientific notation format of XXEY.
The actual reading will be rounded to the nearest
thousand, XX. The Y indicates the number of
zeros after XX. For example, 12,751 is displayed
as [
].
The APM 150 is measuring and averaging the
actual
value of the reading, not the rounded
scientific notation value. No accuracy loss will be
encountered. When printing the data on the 8521
MicroPrinter or downloading the data to a host
PC, the scientific notation reading will be seen.
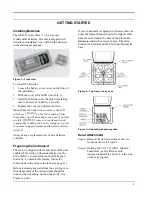
DETAILED OPERATION
With the meter turned on, assemble the hood (see
page 4). The display will show:
• All segments of the display
• The latest software revision
• The type of probe attached (175, 275, 220B)
• Busy message
• An air flow measurement
Note:
If the meter displays [
] turn unit off
and check the probe connection. If this is the first
time you used the meter, clear the memory (see
page 7).
Check to see if the meter’s parameters are set for
your application. The meter always starts
measuring in the
SUPPLY
mode. To select
exhaust, press the supply/exhaust key ( ). If the
meter is in the exhaust mode, the annunciation
below Ex will be on. If a correction factor is
needed, press the
MENU
key until [
] is
displayed. Press
↵
, then press
↑
or
↓
until the right
value appears, then press
↵
. [
] will be
displayed. Press
ON/OFF
to return to the
RUN
mode.
To change the units of measure, press the
UNIT
key until [
] appears. Press the
↑
or
↓
button
until the annunciation is pointing to the correct
unit. Press
↵
.
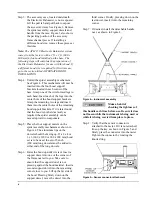
To take a measurement, raise the hood assembly to
the diffuser, making certain the hood frame fits
around the entire diffuser and is held tightly
against the ceiling or wall (see page 5). Let the
display settle to a steady reading. Press the
HOLD
key (you may use the red button on the right
handle or the
HOLD/AVE
button on the meter).
The display will flash the measured value. If this
reading is not satisfactory, press the
ON/OFF
key
to return to the
RUN
mode without storing the
value. If the reading is satisfactory, press the
HOLD
key again to store the value. Repeat this
procedure as many times as needed.
If the data is complete and another set of
measurements is needed, create a new page. To
achieve this, press the
MENU
key until [
]
is displayed. Notice the smaller indicator to the
right. This displays the current working page.
Press
↵
, the display will automatically increase the
page number. To return to the
RUN
mode press
ON/OFF
.
To examine the stored data, press the
MEM
key.
The display will show the current working page.
To scroll to any of the stored pages use the
↑
or
↓
key until the desired page number appears, then
press
↵
. The display will now show the stored line
number, the value stored and its units. To continue
reviewing the data, press the
↑
key.
Summary of Contents for APM 150
Page 1: ...Electronic Balometer with APM 150 Meter OWNER S MANUAL...
Page 4: ......
Page 26: ...22 22...
Page 76: ......