Allweiler AE1+1H Series Operating And Maintenance Instructions Manual Download Page 3


3

Series  AE1L, AE.E, AE.N, AE.H, AE.V, AED1E, AED2N
Design ID, ZD


1. 

General 

1.1 

Application and range of utilization 

The eccentric screw pumps are self-priming, rotary 
positive-displacement pumps for handling and dosing 
low to high-viscosity, neutral or aggressive, pure or 
abrasive, gaseous liquids or liquids which tend to 
froth, even with fibre and solids contents. 


The range of utilization is to be 
taken from the order data sheet. 

1.2 Performance 

data 

The exact performance data applying to the pump 
are to be taken from the order data sheet and are 
engraved on the name plate. 
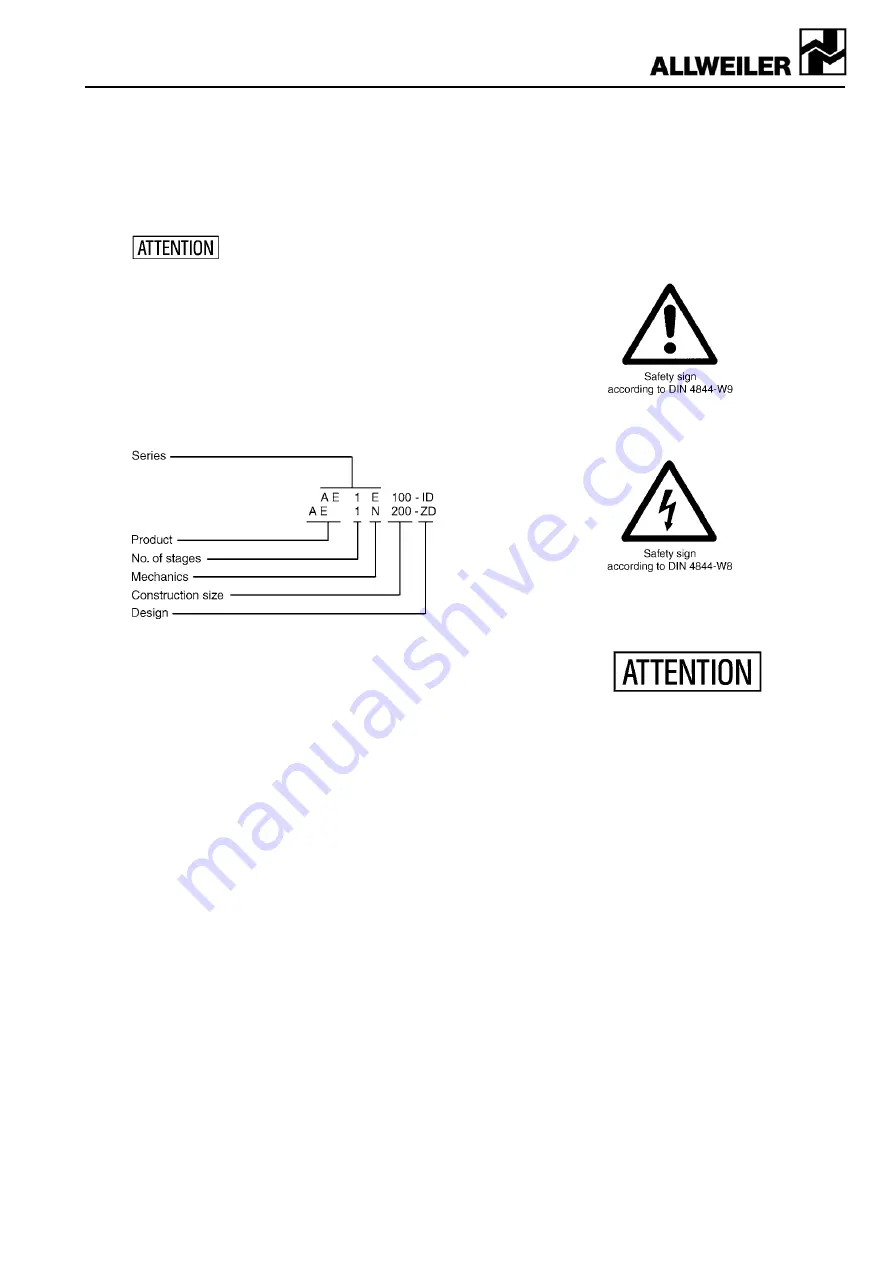
1.3 Abbreviation 

The abbreviation of the eccentric screw pumps is set 
up according to the following scheme: 
 

Example: 


This abbreviation is embossed on the type plate. 

1.4 Warranty 

Our liability for shortcomings in the supply is laid down 
in our delivery conditions. No liability will be under-
taken for any damages caused by non-compliance 
with the operating instructions and service conditions. 
If at any later date the operating conditions happen to 
change (e.g. different liquid pumped, speed, viscosity, 
temperature or pressure conditions), it must be 
checked by us from case to case and confirmed, if 
necessary, whether the pump is suited for these pur-
poses. In case no special agreements were made, 
pumps supplied by us may, during the warranty pe-
riod, be opened or varied only by us or our authorized 
contractual service stations; otherwise, our liability for 
any defects will cease. 

1.5 Testing 

Prior to leaving our factory, all pumps are subjected to 
a leakage and performance test. Only properly oper-
ating pumps leave the factory achieving the perform-
ances assured by us. Thus, compliance with the fol-
lowing operating instructions ensures proper opera-
tion. 

2. 

Safety 

These operating instructions contain basic hints to be 
observed in case of installation, operation and main-
tenance. Therefore, prior to mounting and commis-
sioning, these operating instructions must by all 
means be read by the fitter as well as the pertinent 
expert personnel/customer and must always be avail-
able at the place of installation of the machine/ plant. 

Not only are the general safety hints listed under this 
main item „Safety“ to be observed, but also the spe-
cial safety hints such as for private use added to the 
other main items. 

2.1 

Marking of hints in the operating instructions 

The safety hints contained in these operating instruc-
tions which, in case of non-compliance, may cause 
danger to personnel, are particularly marked with the 
general danger symbol 


in case of warning against electric voltage with 


For safety hints, non-compliance with which may 
cause dangers to the machine and its functions, the 
word 


is inserted. 
 
Hints directly attached to the machine such as 

directional marker 

signs for fluid connections 

must by all means be observed and maintained in 
completely legible condition. 

2.2 

Personnel qualification and personnel training 

The personnel for operation, maintenance, inspection 
and mounting must have the corresponding qualifica-
tion for these operations. Range of liability, compe-
tence and the supervision of the personnel must be 
exactly controlled by the customer. If the personnel do 
not have the required knowledge, same must be 
trained and instructed. If required, this may be ef-
fected by the manufacturer/ supplier on behalf of the 
machine customer. In addition, it must be ensured by 
the customer that the contents of the operating in-
structions are fully understood by the personnel. 

2.3 

Dangers in case of non-compliance with the safe-
ty hints 

Non-compliance with the safety hints may result in 
danger not only to persons, but also to environment 
and machine. Non-compliance with the safety hints 
may lead to the loss of any claims for damages. In 
detail, non-compliance may, 

for example

, entail the 

following dangers: 

Summary of Contents for AE1+1H Series

Page 1: ...y the order related information Retain for future use These Operating and Maintenance In structions contain information from the pump manufacturer They may need to be supplemented by instructions of the operator company for its personnel These instructions do not take account of specific information relating to opera tion and maintenance of the process plant into which the pump is integrated Such ...

Page 2: ...ed 6 1 3 Quality and properties of the flushing sealing and quenching liquid 6 1 4 Turning on the additional facilities for heating or cooling the stuffing box casing and or the suction casing double jacket casing 6 1 5 Breaking away of the pump 6 1 6 Control of the sence of rotation 6 2 Start up 6 2 1 Start up 6 2 2 Drive 6 2 3 Checking the delivery values 6 2 4 Protection against running dry 6 3...

Page 3: ...served in case of installation operation and main tenance Therefore prior to mounting and commis sioning these operating instructions must by all means be read by the fitter as well as the pertinent expert personnel customer and must always be avail able at the place of installation of the machine plant Not only are the general safety hints listed under this main item Safety to be observed but als...

Page 4: ...ll safety and protective devices must be mounted and made operational again Prior to restarting the items listed in Chapter Prepa ration for start up are to be observed 2 7 Independent reconstruction and spare parts pro duction Reconstruction of or changes to the machine are only admissible after consultation with the manufacturer Original spare parts and accessories authorized by the manufacturer...

Page 5: ...of sup ply comprises pump base plate shaft coupling and drive According to the rules for the prevention of acci dents the pump must be started only with a pro tection against accidental contact according to DIN EN 809 If a protection against accidental contact is not sup plied same is to be installed by the operator 4 4 3 Base plate The pumps of horizontal installation are as a rule mounted with t...

Page 6: ...ive VM 706 0001 GB Ident No 133586 must be complied with 5 7 Space required for maintenance and servicing The pump must be accessible from all sides in order to be able to per form the required sight inspections There must be enough room for maintenance and service work especially for the exchange of the con veyor elements The stator and rotor dismounting di mensions are listed in the pump respect...

Page 7: ...ing box with flushing or sealing cham ber ring require a flushing respectively sealing liq uid for maintaining the function The required flushing respectively sealing liquid pressure for pumps with stuffing box is P02 P12 0 1 to 0 5 bar above inner pressure of the suction casing P03 P13 0 5 bar above inner pressure of the suction casing P04 P14 0 to 0 5 bar Flushing and sealing liquid see Chapter ...

Page 8: ...e can be monitored with an ammeter Check the tem perature and the viscosity of the conveyor liquid in this context The resulting values must be compared with the order data sheet respectively acceptance proto col 6 2 4 Protection against running dry When no more conveyor media is sucked in by the pump the thermal energy emerging in the conveyor elements of the eccentric screw pump through dry fric...

Page 9: ... and if this cannot be reduced by slightly tightening the hexagon nuts 202 several times the packing rings have lost their shape elasticity and must be replaced Dismounting the old packing rings and clean ing the stuffing box casing After relieving the pump from pressure and re moving the gland you can take out the old pack ing rings Use a packing puller with elastic shaft Afterwards carefully cle...

Page 10: ...ngs and designs are applied The mechanical seal is maintenance free In case of heavy leaks due to wear and tear you have to exchange the mechanical seal see disas sembly and assembly instructions As the running dry of the mechanical seals must be avoided the pump may only be operated in filled state and if provided with activated additional installations see Chapter 6 1 2 7 1 2 4 V belt drive See ...

Page 11: ... 750 1450 AE2 2H 100 200 380 750 1450 2700 Pump series AE4H 12 25 50 100 200 380 750 1450 AE4 4V 25 50 100 200 380 750 1450 AE2 2V 100 200 380 750 1450 Number of packing rings for design P01 P11 6 6 6 6 6 6 6 6 6 Dimensions of the packing rings with cut rings Ø 37 25 x 6 Ø 42 30 x 6 Ø 51 35 x 8 Ø 59 43 x 8 Ø 73 53 x 10 Ø 80 60 x 10 Ø 99 75 x 12 Ø 118 90 x 14 Ø 142 110 x 16 Dimensions of the packin...

Page 12: ... to be observed under all circumstances 7 2 1 Dismounting of the eccentric screw pump The following work steps have to be performed prior to disassembly Detach the power supply cables to the motor It must not be possible to turn the motor on All shut off devices in the feed and pressure pipes have to be closed Drain the conveyor liquid from the suction casing Unscrew the screw plug for that purpos...

Page 13: ...suction casing 505 across the rotor 401 Make sure that the finely crafted rotor is not damaged Take off the gasket for suction casing 501 Pull of the clutch half respectively pulley and re move the feather key 101 Unscrew the hexagon nuts 139 and remove the bearing cover 131 with the seal 132 Unscrew the bearing nut 116 from the drive shaft 118 Press the drive shaft 118 with the attached rotor 401...

Page 14: ...pull the mechanical seal off the drive shaft 118 Prior to loosening the grub screws mark respectively measure the position of the mechanical seal on the shaft protection sleeve or the drive shaft Do not slide the O ring across the pressure spot of the screw Pull the mechanical seal cover 215 with the throttle ring 234 off the drive shaft 118 Open the throttle ring 234 and remove it with the O ring...

Page 15: ... roller bearing grease Apply the grease filling as de scribed in the following 1 Fill the cavities between the roller bearings approx 30 to 50 with grease 2 Strip off excess grease best with your fingers do not use any metal objects For recom mended roller bearing greases see Chapter 7 1 2 2 Press the double row angular contact ball bearing 104 from the drive side with a matching piece of pipe ove...

Page 16: ... oil polydiol or soft soap Do not use any normal oil Note Make sure that parts that glide on top of each other are always exchanged in pairs When using double PTFE coated O rings make sure that the seam of the outer coating points away from the as sembly direction Otherwise the coating may open re spectively strip off see figure 8 Figure 8 Seam of the outer coating points away from the assembly di...

Page 17: ...erve the installation position of the spacer ring 113 and the spacer sleeve 102 When pressing in the inner bearing ring of the groove ball bearing 193 support this with a suit able tool respectively press against Note With the pump sizes AE1N 380 AE2N 380 AE4N 380 AE1E 750 AE2E 750 AED2N 560 AED1E 1200 AE H 200 and with all larger pumps the drive shaft 118 can also be pulled through the bearings 1...

Page 18: ...Mönchengladbach For the filling quantity see the table in Chapter 7 1 2 6 Check whether the bent loop of the joint clamp 306 is attached to the joint clamp lock If not press down with a common pair of flat nosed pli ers see figure 12 Figure 12 Press down joint clamp loop onto joint clamp lock Insert the joint clamps 306 into the circumferen tial grooves of the joint collar 308 and tighten Note Use...

Page 19: ...e it with a new one 7 2 2 5 Installing the joint shaft and the drive side joint Attach the drive side joint to the drive shaft 118 as described in Chapter 7 2 2 4 Slide the joint shaft into the joint cup of the drive shaft 118 Secure the joint collar 304 as illustrated with a puncher blow Pull on the joint collar 308 fill the joint cavity with joint oil and attach the joint clamps as described Ins...

Page 20: ...eplacement parts spare parts R large repair set r small repair set For reasons of operational safety you may only stock and install original replacement parts supplied by us In this context we refer to the statements in Chapter 2 7 When ordering replacement parts spare parts state the following Machine number Abbreviation of the pump Part number Denomination and part quantity or Ident No and quant...

Page 21: ...R r 4 631 Fixing piece 2 127 Circlip 1 307 Joint shaft R r 1 632 Hexagon nut 2 129 Shim ring 4 308 Joint collar R r 2 633 Spacer 4 131 Bearing cover 1 401 Rotor R r 1 Recommended spare parts 132 Seal R 1 402 Stator R r 1 R large repair set 139 Hexagon screw 4 403 Stator gasket outlet side R r 1 r small repair set 201 Stud bolt 2 404 Stator gasket suction side R r 1 202 Self locking nut 2 501 Gaske...

Page 22: ...22 Series AE1L AE E AE N AE H AE V AED1E AED2N Design ID ZD 7 5 Sectional drawing for series AE1L AE1E AE2E AE1N AE2N AE4N AED1E AED2N Design ID ...

Page 23: ...x with flushing ring P03 Stuffing box with internal sealing chamber ring P04 Stuffing box with external sealing chamber ring G0K and G0N mechanical seal single acting G0S and G0T mechanical seal single acting with throttle ring G0Q mechanical seal single acting with quench G0D mechanical seal double acting ...

Page 24: ... AE V AED1E AED2N Design ID ZD 7 6 Sectional drawing series AE1 1H AE2 2H AE2 2V AE4 4V Design ID 7 7 Sectional drawing series AE2H AE4H Design ID Stator with even elastomer wall thickness Stator with even elastomer wall thickness ...

Page 25: ...25 Series AE1L AE E AE N AE H AE V AED1E AED2N Design ID ZD 7 8 Sectional drawing series AE1N AE2N Design ZD ...

Page 26: ...26 Series AE1L AE E AE N AE H AE V AED1E AED2N Design ID ZD 7 9 Sectional drawing series AE1 1H AE2 2H Design ZD Stator with even elastomer wall thickness Metal stator ...

Page 27: ...27 Series AE1L AE E AE N AE H AE V AED1E AED2N Design ID ZD 7 10 Sectional drawing series AE2H AE4H Design ZD Stator with even elastomer wall thickness ...

Page 28: ...ipe all the way remove congestion in the pressure pipe 9 Pump runs partially or completely dry Check whether there is sufficient conveyor media on the suction side 10 Increase the rotation speed with thin media and large suction volume 11 Reduce rotation speed with viscous media danger of cavitation 12 Check longitudinal clearance of the joint bolts poss joint bush wrongly mounted 13 Check for for...

Reviews: