background image

32

29/06/2022

EN

CAUTION :  

Immediately turn off the gas supply and check the appliance in the following cases :

- When you smell gas and the burner flames are abnormally yellow.

- When the appliance does not heat properly (a temperature below 5°C may cause a disturbance 

in the gas pressure and the appliance may not work properly).
- When the appliance makes a jerking noise during operation (a slight jerking noise is also pro-

duced when the appliance is switched off, which is normal).


•  The appliance can be stored indoors, provided that the gas cylinder has been disconnected, remo-

ved from the housing and the valve closed.

•  Adults and children should keep away from the heating elements of the appliance; some parts will 

become extremely hot while in use.

•  Never leave children and pets unattended when they are near the appliance.
•  Do not hang clothes on the appliance or leave flammable materials within 2.20m of it.
•  Always keep at least 1 metre away from the heater.
•  This patio heater should only be used in the open air or in a ventilated area with at least 25% of 

the surface area completely open (the total surface area is calculated by adding the surface area 

of each wall).

•  Never leave the heater switched on without supervision.

IMPORTANT SAFETY INSTRUCTIONS

•  For outdoor use or in a well-ventilated area 

•  A widely ventilated space should have at 

least 25% of its surface area open.

•  The surface area is the sum of the surface 

area of the walls.

•  Do not use this appliance in enclosed spaces 

(DANGER).

•  Children and adults should be aware that the 

temperature is very high in the upper area of the mast of the appliance 

when it is in operation. Children should be carefully supervised when they 

are in the vicinity of the heater

NEVER hang anything from the sunshade (clothing

or other flammable materials). DO NOT operate the patio heater

until it is fully assembled and the reflector is in place. Keep the heater 

away from any flammable materials.

PLAFOND / SURPLOMB

1m

MUR

1m

Summary of Contents for ARCTIC PCG230KD

Page 1: ...PCG230KD PCG230KDGC ARCTIC 29 06 2022 45 MIN alicesgarden fr alicesgarden be alicesgarden es alicesgarden nl alicesgarden co uk alicesgarden pt alicesgarden it alicesgarden com au alicesgarden de...

Page 2: ...ences relatives au gaz 13 Raccordement une consigne de gaz 13 Contr le de fuites 14 Mode d emploi 15 Entretien 16 Service 17 Rangement 17 Conseils en cas de panne 18 Garantie 19 Assemblage 70 Liste de...

Page 3: ...2 Requisitos relativos al gas 23 Conexi n a una bombona de gas 23 Comprobaci n de fugas 24 Modo de empleo 25 Mantenimiento 26 Servicio 27 Almacenamiento 27 Recomendaciones en caso de aver a 28 Garant...

Page 4: ...afety instructions 32 Gas requirements 33 Connection to gas tank 33 Leak control 34 Directions for use 35 Maintenance 36 Service 37 Storage 37 Advice in case of failure 38 Warranty 39 Assembly 70 Part...

Page 5: ...veiligheidsinformatie 42 Vereisten voor gas 43 Gasaansluiting 43 Controle op lekkage 44 Instructies 45 Onderhoud 46 Service 46 Opslag 47 Tips in geval van storing 48 Garantie 49 Onderdelenlijst 70 Ve...

Page 6: ...ante sobre seguran a 52 Necessidades de g s 53 Conex o de g s 53 Verifica o da folha 54 Instru es 55 Manuten o 56 Servi o 57 Armazenamento 57 Dicas em caso de falha 58 Garantia 59 Recolha 70 Lista de...

Page 7: ...nze relative al gas 63 Collegamento a una bombola del gas 63 Controllo delle fughe 64 Istruzioni per l uso 65 Manutenzione 66 Assistenza 67 Conservazione 67 Consigli in caso di guasto 68 Garanzia 69 A...

Page 8: ...8 29 06 2022...

Page 9: ...estinado a un uso dom stico For domestic use Bestemd voor huishoudelijk gebruik Para uso dom stico Destinato ad un uso domestico F r den h uslichen Gebrauch Attention risques de blessures Cuidado ries...

Page 10: ...uverte La surface est la somme de la surface des murs Fermer le robinet de la bouteille de gaz ou du d tendeur apr s usage Nous visons constamment am liorer nos produits et nous nous r servons le droi...

Page 11: ...nies par le SAV Alice s Garden En cas de vent violent des pr cautions doivent tre prises contre le basculement de l appareil Le changement de la consigne de gaz doit tre effectu dans un endroit bien a...

Page 12: ...urs se tenir une distance d au moins 1 m tre du parasol chauffant Ce parasol chauffant ne doit tre utilis qu en plein air ou dans un espace ventil dont 25 mini mum de la surface est totalement ouverte...

Page 13: ...tre fournisseur de gaz pour obtenir les instructions relatives l utilisation de leurs consignes Remplacer la consigne de gaz l air libre uniquement ou dans un endroit bien a r loign de toute flamme nu...

Page 14: ...volumes d eau La solution savonneuse peut tre appliqu e avec un flacon un pinceau ou un chiffon pour contr ler les points susceptibles de pr senter des fuites comme le montre le sch ma ci contre Le r...

Page 15: ...le parasol chauffant est convenablement al lum vous pouvez alors choisir la puissance en pivotant le commutateur entre HI et LO Note le br leur peut faire du bruit lorsqu il est allum pour la premi re...

Page 16: ...ettant de d terminer s il existe une obturation sont les suivants Odeur de gaz et flamme extr mement jaune L appareil n atteint pas la temp rature d sir e La lueur mise par l appareil n est pas du tou...

Page 17: ...poussi re et autres d bris Si vous le souhaitez recouvrez le parasol chauffant d une housse pour le prot ger et emp cher que les orifices d a ration ne se bouchent Remarque attendez que l appareil so...

Page 18: ...me pas La pression de gaz est basse Remplacez la bonbonne de gaz L orifice est bouch Nettoyez l orifice Le commutateur ne se trouve pas sur la position HI ou LO Tournez le bouton sur la position PILOT...

Page 19: ...tions extr mes et b n ficient des certifications CE d livr es par le laboratoire Kiwa aux Pays Bas LISTE DES EXCLUSIONS DE LA GARANTIE Les dommages pannes d faillances ou d fauts imputables des causes...

Page 20: ...ventilado debe tener al menos el 25 de su superficie abierta El rea es la suma del rea de las paredes Cierre el cilindro de gas o la v lvula reguladora despu s de su uso Nos esforzamos constantemente...

Page 21: ...porcionadas por el Servicio postventa de Alice s Garden Le recomendamos encarecidamente que guarde la estufa de terraza en caso de viento fuerte para evitar que se caiga Es preferible cambiar la bombo...

Page 22: ...teriales inflamables a menos de 2 20 m del mismo Mant ngase siempre a una distancia de al menos 1 metro Este aparato se debe utilizar exclusivamente al aire libre o en un lugar ventilado que disponga...

Page 23: ...Utilice nicamente el tipo de gas y la bombona indicados en estas instrucciones Solicite a su distribuidor de gas las instrucciones de uso de sus bombonas Cambie las bombonas exclusivamente al aire lib...

Page 24: ...gua Apl quela con un envase un pincel o un pa o para comprobar puntos susceptibles de presentar fugas como muestra el esquema que figura al lado La llave de paso de la bombona de gas debe estar en la...

Page 25: ...g relo a la po sici n HI Si el parasol est bien iluminado ahora puede se leccionar el nivel de potencia girando el interruptor entre HI y LO Nota el quemador puede hacer ruido cuando se enciende por...

Page 26: ...aire est n limpias Las se ales que permiten determinar si hay una obturaci n son las siguientes Olor a gas y llama muy amarilla El aparato no alcanza la temperatura deseada El resplandor que emite no...

Page 27: ...gra nizo as como del polvo y otras part culas Si lo desea puede cubrirlo con una funda para protegerlo e impedir que se atasquen los orificios de ventilaci n Observaci n espere a que est completamente...

Page 28: ...no funciona correc tamente Cambie el termopar El quemador no se enciende La presi n del gas es baja Cambie la bombona El orificio est atascado Limpie el orificio El conmutador no est en la posi ci n...

Page 29: ...sivo y condiciones extre mas y disponen de certificaciones CE emitidas por el laboratorio externo LISTA DE EXCLUSIONES DE LA GARANT A Los da os aver as incumplimientos o defectos imputables a causas d...

Page 30: ...areas A well ventilated area must have at least 25 of the total surface area open to the exterior The surface area is the total sum of the walls area when added together Close the gas tap or gas cyli...

Page 31: ...must be taken to prevent the appliance from tipping over The gas setpoint must be changed in a ventilated area and away from any source of ignition candles smoke other flaming devices etc Check the in...

Page 32: ...erials within 2 20m of it Always keep at least 1 metre away from the heater This patio heater should only be used in the open air or in a ventilated area with at least 25 of the surface area completel...

Page 33: ...as supplier for instructions on how to use their product Replace the gas set point in the open air only or in a well ventilated area away from open flames and sources of ignition The gas cylinder must...

Page 34: ...parts water The soap solution can be applied with a bott le brush or cloth to check for leaks as shown in the diagram opposite The gas cylinder valve must be in the OFF position at this stage of the...

Page 35: ...the N switch gently without pushing it in all the way and turn it to the HI position If the sunshade is properly lit you can now se lect the power level by turning the switch between HI and LO Note Th...

Page 36: ...Clues to determine whether a blockage exists are as follows Gas smell and extremely yellow flame The appliance does not reach the desired temperature The glow emitted by the appliance is not at all u...

Page 37: ...lso away from dust and other debris If desired cover the heater with a cover to protect it and prevent the air vents from becoming blocked Note Wait until the unit is completely cool before covering i...

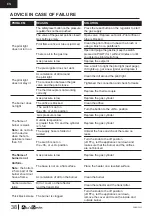
Page 38: ...ctly Replace the thermocouple The burner does not light Gas pressure is low Replace the gas cylinder The orifice is blocked Clean the orifice The switch is not on the HI or LO position Turn the button...

Page 39: ...conditions and benefit from CE certifications issued by an independent laboratory LIST OF EXCLUSIONS FROM THE WARRANTY Damage breakdowns failures or defects attributable to causes of external origin...

Page 40: ...ren Sluit de kraan op de gasfles of drukregelaar na gebruik We streven ons voortdurend om onze producten te verbeteren en wij behouden ons het recht voor om wijzigingen aan te brengen aan het product...

Page 41: ...de After Sales service van Alice s Garden Bij sterke wind moeten voorzorgsmaatregelen worden genomen tegen het kantelen van het appa raat Het is aangeraden om de gasfles te vervangen in een goed geve...

Page 42: ...verwarmer Deze verwarmer mag alleen buiten worden gebruikt of in een geventileerde ruimte waar ten minste 25 van het oppervlak volledig open is de totale oppervlakte wordt berekend door het oppervlak...

Page 43: ...en gasfles dat in deze instructies wordt aangegeven Praat met uw gasleverancier voor instructies over het gebruik van hun gasflessen Vervang een gasfles alleen in open lucht of in een goed geventilee...

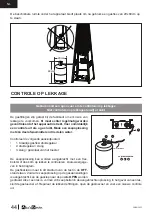
Page 44: ...aar slang 3 slang gasinlaat van het toestel De zeepoplossing kan worden aangebracht met een fles borstel of doek om op lekken te controleren zoals weergege ven in het diagram De gasfleskraan moet in d...

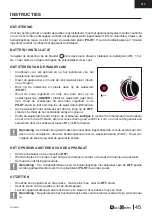
Page 45: ...waakvlam niet ontsteekt zet dan de knop op de OFF stand en herhaal de bovenstaande stappen opnieuw Zodra de waakvlam brandt drukt u de schakelaar zachtjes in zonder hem helemaal in te drukken en zet u...

Page 46: ...en pijpenstopper voor industrieel gebruik De fijnere deeltjes kunnen met perslucht worden verwijderd Koolstofresten kunnen brand veroorzaken Als zich koolstofresten vormen reinig u het rooster en de b...

Page 47: ...niet wenst te gebruiken voor een langdurig periode of indien u wenst het apparaat te verplaatsen Zet de schakelaar uit op positie OFF Koppel de gasfles los en plaats deze buiten in een goed geventilee...

Page 48: ...laag Vervang de gasfles De opening is geblokkeerd Reinig de opening De knop bevindt zich niet in de positie HI of LO Draai de knop nee de PILOT stand De vlam van de brander is zwak Opmerking laat het...

Page 49: ...h alle garanties vervallen Onze terrasverwarmers hebben talloze tests ondergaan bij intensief gebruik en extreme omstandi gheden en hebben CE certificeringen uitgegeven door het Kiwa laboratorium in N...

Page 50: ...m ventiladas Uma sala bem ventilada deve ter pelo menos 25 de rea aberta A rea de superf cie a soma da rea de superf cie das paredes Fechar a v lvula no cilindro de g s ou no regulador de press o ap s...

Page 51: ...Alice s Garden s Em ventos fortes devem ser tomadas precau es contra a inclina o da unidade aconselh vel mudar o cilindro de g s num local bem ventilado longe de fontes de igni o vela cigar ros outro...

Page 52: ...2 20m Ficar sempre a pelo menos 1 metro de dist ncia do aquecedor do p tio Este aquecedor deve ser utilizado apenas ao ar livre ou numa rea ventilada onde pelo menos 25 da superf cie esteja completame...

Page 53: ...seu fornecedor de g s para obter instru es sobre como utilizar as suas garrafas de g s Substituir uma garrafa de g s apenas ao ar livre ou numa rea bem ventilada longe de chamas abertas e outras font...

Page 54: ...o com uma parte de detergente e tr s partes de gua A solu o de sab o pode ser aplicada com uma garrafa pincel ou pano para verificar a exist ncia de fugas como se mostra no diagrama A v lvula da garra...

Page 55: ...rruptor sua vemente sem o empurrar totalmente e rod lo para a posi o HI Se o guarda sol estiver devidamente iluminado pode agora seleccionar o n vel de pot ncia rodando o interruptor entre LO e HI Not...

Page 56: ...As instru es para determinar se existe um bloqueio s o as seguintes cheiro a g s e chamas extremamente amarelas O dispositivo n o atinge a temperatura desejada O brilho do dispositivo n o de todo unif...

Page 57: ...lta qualidade bem como do p e outras sujidades Se desejar pode cobrir o aquecedor do p tio com uma cobertura protectora que evita que as aber turas das janelas fiquem entupidas Nota Aguarde que a unid...

Page 58: ...ncendeia A press o do g s demasiado baixa Substituir a garrafa de g s A abertura est bloqueada Limpar a abertura O bot o n o se encontra na posi o HI ou LO Rode o bot o n o para a posi o ON A chama do...

Page 59: ...da automaticamente todas as garantias Os nossos aquecedores de p tio foram submetidos a numerosos testes em condi es extremas e de utiliza o intensiva e t m certifica o CE emitida por um laborat rio i...

Page 60: ...il 25 della propria superficie aperta La superficie la somma della superficie delle pareti Chiudere il rubinetto della bombola del gas o del riduttore di pressione dopo l uso Puntiamo a migliorare i n...

Page 61: ...e vento necessario adottare delle precauzioni per impedire che il dispositivo sia soggetto a oscillazioni La sostituzione della bombola del gas deve essere effettuata in un luogo ben aerato e lontano...

Page 62: ...a una distanza di almeno 1 metro dalla stufa a piramide riscaldante Questa stufa a piramide riscaldante deve essere utilizzata unicamente all aperto o in uno spazio ventilato dove almeno il 25 della s...

Page 63: ...i al proprio fornitore di gas per ricevere istruzioni relative all uso delle loro bombole Sostituire la bombola del gas unicamente all aria aperta o in luogo ben aerato lontano da qualsiasi fiamma nud...

Page 64: ...dosi di acqua La soluzione saponata pu essere applicata con un flacone un pennello o uno straccio per verificare i punti che potrebbero presentare fughe come indicato nello schema qui a fianco Il rub...

Page 65: ...il pulsante di accensione IGNITER fino a che non si ac cende la fiamma pilota Tenere premuto il commutatore in posizione fiamma pilota PILOT per 30 secondi quindi lasciarlo e la fiamma pilota rester...

Page 66: ...i fori del bruciatore per mezzo di un dispositivo per la pulizia dei tubi a uso industriale Le particelle pi fini possono essere eliminate servendosi di aria compressa I residui di carbonio rischiano...

Page 67: ...ente Qualora non si desideri usare il dispositivo per lunghi periodi di tempo o se necessario traspor tarlo Posizionare il commutatore in posizione di spegnimento OFF Scollegare la bombola del gas e c...

Page 68: ...Sostituire la termocoppia Il bruciatore non si accende La pressione del gas bassa Sostituire la bombola del gas Il foro ostruito Pulire il foro Il commutatore non si trova in posizione HI o LO Girare...

Page 69: ...numerosi test di uso intensivo e condizioni estreme e beneficiano di certificazioni CE emesse dal Laboratorio Kiwa con sede nei Paesi Bassi ELENCO DELLE ESCLUSIONI DELLA GARANZIA I danni guasti d fail...

Page 70: ...70 29 06 2022 ASSEMBLAGE ENSAMBLAJE ASSEMBLY VERZAMELING MONTAGEM ASSEMBLAGGIO A B C D E F G H I J K L M...

Page 71: ...K x1 E x4 K x1 MM x1 F x1 L x1 NN x1 M x1 OO x1 x3 x6 x3 x42 x4 x4 x6 x1 AA BB CC DD EE FF GG LL M6x12 M5x12 M4x6 M6 En option Optional Optioneel Opcional Em op o Opzionale GC x1 LISTE DES PI CES LIST...

Page 72: ...Body of the appliance J Structure inf rieure Estructura inferior Lower structure K Sangle de maintien Correa de sujeci n Holding strap L Roulettes Ruedas Castors M Embase Placa base Base plate HH Fixa...

Page 73: ...o Corpo del dispositivo J Onderste staanders Estrutura inferior Strutture inferiore K Vasthoudriem Correia de reten o Cinghia di tenuta L Wielen Rodas Route M Basis Placa base Base HH Bevestigingsroos...

Page 74: ...ergente por tres de agua Necesita una bombona de gas un regulador de presi n y un tubo En primer lugar enrosque a mano todas las tuercas y tornillos Apri telos cuando termine el montaje Esto le facili...

Page 75: ...r o seu trabalho mais f cil e garantir a estabilidade do seu aparelho Antes da montagem assegurar se de que a protec o da embalagem foi removida O aspecto do aquecedor hardware do p tio pode diferir l...

Page 76: ...os EE y 4 tuercas FF EN Assemble the castors L on the base plat M using the 4 screws EE and 4 nuts FF NL Monteer de zwenkwielen L op de basis M met behulp van de 4 schroeven EE en 4 moeren FF PT Monta...

Page 77: ...Then install the burner body I to the top of the assembled uprights using 4 screws DD NL Schroef het afneembare deel van de elektronische pulsontsteker los om de AA batterij LR6 OO met positieve polar...

Page 78: ...llos GG suministrados EN Install the K strap on the lower struts using the 2 GG screws provided NL Bevestig de riem K aan de onderste staanders met behulp van 2 schroeven GG die PT Instalar a correia...

Page 79: ...4 D brackets into the notches of the already assembled M base You must use 8 DD screws to complete the assembly of this part NL U kunt nu het bovenste gedeelte van de structuur installeren door de 4 s...

Page 80: ...f the structure using the DD screws You can tilt the sunshade to make it easier for you NL Installeer schoorsteen B aan de bovenkant van de constructie met behulp van de schroeven DD U kunt de terrasv...

Page 81: ...place a BB washer and then the AA wing nuts a washer BB and then the wing nuts AA NL Reflector A kan bovenop de schoorsteen worden geplaatst U dient de 3 tussenstukken CC in de schoorsteen te plaatsen...

Page 82: ...conducto de humos como se muestra en el diagrama de al lado A continuaci n puede introducir la parte superior en la chimenea y colocar con cuidado el tubo con su junta en la abertura del quemador Car...

Page 83: ...a oposto Pode ent o inserir a parte superior na chamin e colocar cuidadosamente o tubo com a sua junta na abertura do queimador L installazione della tubazione in vetro C va eseguita con le dovute pre...

Page 84: ...ts on each side of the structure then secure everything with the 4 HH fasteners and 4 DD screws NL U kunt nu de beschermingsroosters E installeren door alle haakjes van de roosters in de 6 openingen a...

Page 85: ...he front side with visible control panel must be free in order to install the door later NL De 3 panelen G kunnen worden gemonteerd aan beide zijden en aan de achterkant van het appa raat Gebruik de s...

Page 86: ...s purpose You can then install the MM chain between the door and the control panel NL Monteer de hendel op deur H door de handgreep KK vast te maken met en de schroef LL Ver volgens kunt u de deur in...

Page 87: ...ser l adaptateur t tine si fourni ES Atornille el adaptador de la boquilla si se suministra EN Screw on the nipple adapter if supplied NL Schroef de slangtule indien meegeleverd PT Aparafusar o adapta...

Page 88: ...88 29 06 2022...

Page 89: ......

Page 90: ...ALICE S GARDEN OUTDOOR PTY LTD 135 153 New South Head Road Edgecliff NSW 2027 AUSTRALIA Contact service alicesgarden com au IMPORTADO POR WALIBUY SPAIN SL Carrer de Mallorca 289 Entresuelo 2 08037 BAR...

Reviews: