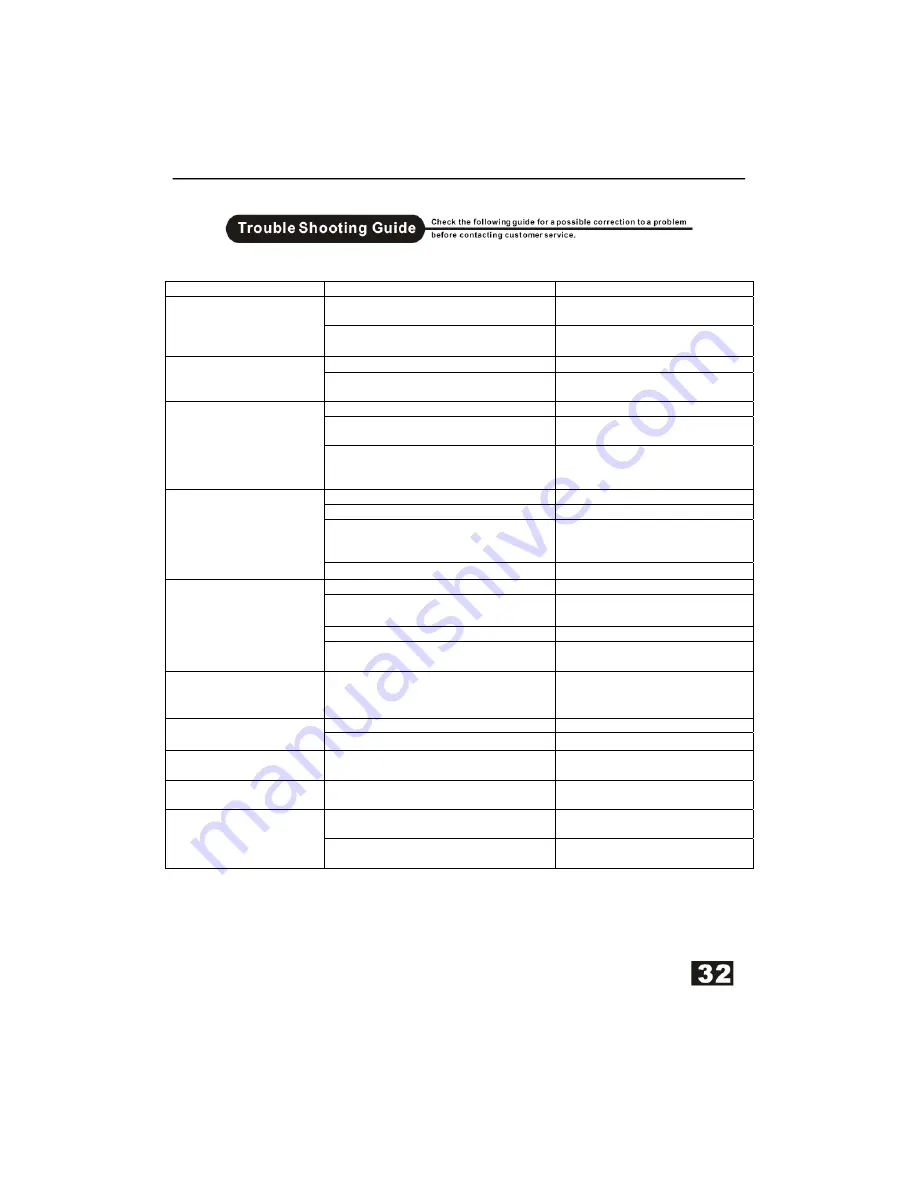
background image


Symptom Possible 

Cause 

Remedy 

No power to recorder. 
 

Check supply connections and 
ensure the power is turned on. 

 
Dead. No display 

Power button on recorder not pushed 
in 

Press power button in. 

No connection to TV 

Check all connections to TV 

Display lit but no picture 
on screen. 

Incorrect connection selected. 

Press source button until you get 
a picture. 

TV not selected. 

Select TV on R/C 

Recorder not tuned to local TV 
stations. 

See page 25 for Tuning details 


No TV signal.  

Aerial not connected or poor signal 

Ensure a good aerial is 
connected. Indoor aerials are 
generally not suitable 

Disc not placed correctly. 

Place disc label side up 

Setup menu displayed 

Press SETUP to turn off 

Parental lock active. or Parental level 
set too high 

Cancel parental lock. Or set 
parental lock to suit disc. 
Password 6666  


No DVD Playback 

Incorrect region disc 

This is a Region 2 player. 

Not a recordable disc 

Place a recordable disc into tray.

Record disc Full or not enough space 
for the recording 

Place a disc with enough space 
to record the program. 

DVD+/-RW disc locked 

Unlock the DVD+/-RW disc. 


Not Recording DVD’s 

DVD+/-R disc finalized 

Place another un finalized disc in 
tray 

Not recording DVD’s from 
external source DVD 
player 

 
DVD protected with Anti-copy 

 
Remove disc. 

Recorder is already recording. 

Check status of Recorder. 

Some keys not working 

Not a recordable disc 

Place a DVD+/-RW or R disc 

Picture freezing or 
breaking up on playback 

Dirty or damaged disc 

Clean dirty disc, discard 
damaged disc 

Distorted  Black and 
White images 

Recorder not matched to TV display 

Select Interlace or Non interlace 
with I/P button 

Exhausted batteries 
 

Replace batteries every 6 
months. 

 
Poor Remote Control 

Objects in infrared signal path 

Ensure a clear path to the I/R 
sensor 


If you are still having difficulty please call the Technical help line. Ring 01422 
263313 (Normal rates apply). 
Opening hours Mon-Fri 8 am – 8pm. Sat 9 am – 4pm. Sun 11am – 4pm “Bank 
holidays as Sun” 


Summary of Contents for AMTDR3101X

Page 1: ...Customer Help Line 01422 263313 DVD ReWritable...

Page 2: ...1...

Page 3: ...ources Household users should contact either the retailer where you purchased the product or their local government office for details of where and how you can take this item for environmentally safe...

Page 4: ...aerial input if external aerial and remove the mains plug This is to prevent power surges damaging the apparatus Disc Tray Keep your fingers well clear of the DVD disc drawer when it is closing it ma...

Page 5: ...it s coaxial output capability enables you to connect an external six channel AV amplifier and processor with built in Dolby Digital encoder with just one cord This enables you to conveniently enjoy d...

Page 6: ...LOSE Button 6 USB Input 12 RECORD Button 1 TV Aerial Input 6 Video Input 2 TV Aerial Output Rf Loopthrough 7 Analog Audio in Rear Left Right 3 5 1 CH Audio Output 8 Coaxial Audio Output L R SL SR C SW...

Page 7: ......

Page 8: ...xpectancy will vary according to use Point the remote control toward the remote sensor on your DVD recorder The description in this Manual is based on the buttons on the equipment You may use the coun...

Page 9: ......

Page 10: ......

Page 11: ......

Page 12: ...SOURCE Press any function button SOURCE DVD TV DV USB to select the desired source The appropriate symbol will appear in the display Note The desired program source will not play unless it and the se...

Page 13: ...1 Power on your recorder 2 Insert a DVD disc Label side UP 3 Press direction keys or the number buttons to select the title...

Page 14: ...back press the DISPLAY button twice or the NAVIGATION button once to access the control MENU 1 The name of the pre recorded disc The default is TITLE 2 The date and time of the recording 3 Time of the...

Page 15: ...Note The above features vary depending upon the disc type such as Digital Audio Audio CD etc...

Page 16: ...2 Press the c d e f buttons to select the title you want...

Page 17: ...Note The function is invalid on Digital Audio discs For CD Discs GOTO is used for track time selection...

Page 18: ...Note There are two repeat modes for CD Digital Audio discs On CD discs they are track repeat and disc repeat on Digital Audio discs they are repeat song and repeat directory...

Page 19: ......

Page 20: ...On Digital Audio discs the AUDIO button is used for selection of Left Right and stereo...

Page 21: ...Note On Digital Audio CD discs there are some differences on the OSD...

Page 22: ......

Page 23: ......

Page 24: ......

Page 25: ......

Page 26: ...to change the letters and the e f to select each letter in the word 4 Select OK and press ENTER to return to the sub menu To change the names of all the channels you must go back to the normal Tv scr...

Page 27: ...ength of recording time is determined by disc capacity and record quality With your setting if it exceeds the capacity of the disc OTR will be canceled and switch to normal record 3 If you want to sto...

Page 28: ...an also use direction keys to highlight and press the ENTER button to choose your setting 4 Highlight the item and press the ENTER button to Confirm to save your setting 5 Five minutes before the prog...

Page 29: ......

Page 30: ......

Page 31: ......

Page 32: ...anymore data on the disc To unlock the disc select UNLOCK Finalise only DVD R Make Compatible Highlight the icon and press the ENTER button It will take a few minutes to finalise the disc Note You mu...

Page 33: ...Not a recordable disc Place a recordable disc into tray Record disc Full or not enough space for the recording Place a disc with enough space to record the program DVD RW disc locked Unlock the DVD R...

Page 34: ...Compatible Discs DVD R DVD RW DVD CD Digital Audio CD R CD RW Recordable disc formats DVD RW DVD R...

Page 35: ...ins plug needs replacing proceed as follows DO NOT CONNECT THE CENTRE PIN EARTH Connect the Blue wire to the N terminal this may be coloured blue Connect the Brown wire to the L terminal adjacent to t...

Page 36: ...DVD Re Writeable...

Reviews: