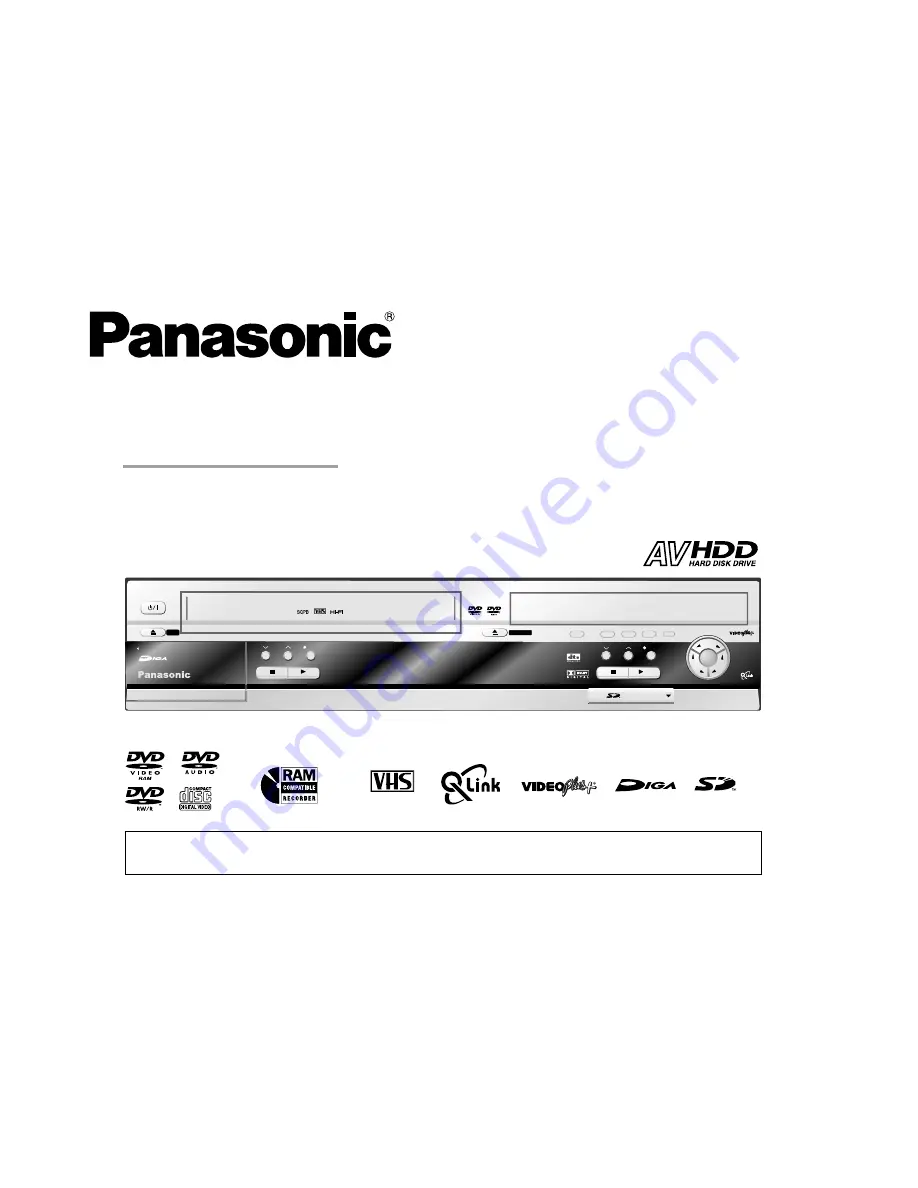
background image

DVD Recorder

Model No. DMR-EH80VEB

Operating Instructions

PAL NTSC

VHS RECORDING

CH

REC

DMR-EH80V

PULL OPEN

DUBBING

REC

CH

/x1.3

PAL

NTSC

EJECT

OPEN/CLOSE

RAM

DVD-RAM/DVD-R/DVD-RW/+R RECORDING

HDD & DVD

HDD

SD

DVD

VHS

DRIVE SELECT

SD CARD / DV IN

HDD

VHS

DVD

Dear customer: 

Before connecting, operating or adjusting this product, please read the instructions completely.
Please keep this manual for future reference.

Summary of Contents for Diga DMR-EH80VEB

Page 1: ... OPEN DUBBING REC CH x1 3 PAL NTSC EJECT OPEN CLOSE RAM DVD RAM DVD R DVD RW R RECORDING HDD DVD HDD SD DVD VHS DRIVE SELECT SD CARD DV IN HDD VHS DVD Dear customer Before connecting operating or adjusting this product please read the instructions completely Please keep this manual for future reference ...

Page 2: ...R 73 Connecting with S VIDEO cable 19 DISPLAY menus 112 113 Setup with Q Link 20 Setup without Q Link Automatic tuning 21 STATUS displays 114 115 DUBBING 78 87 Connecting with RF cable 22 Overview DUBBING 78 Auto Setup with RF cable 23 VHS FUNCTIONS 116 Removing interference Changing RF output PLAYLISTS 88 92 channel 24 Creating a playlist 88 Handling discs 117 Checking the settings after Auto Set...

Page 3: ...ix old with new batteries or batteries of different types Only use batteries without any harmful substances lead cadmium mercury Do not use rechargeable type batteries Remove the batteries if the remote control unit will remain unused for longer periods of time Do not heat or short circuit the batteries Immediately remove used up batteries and replace with batteries of type AA UM3 or R6 Be sure to...

Page 4: ...d from a c mains while it remains connected to a live mains outlet even if it has been turned off 1 Open the fuse cover with a screwdriver Fuse cover Fuse 5 ampere 2 Replace the fuse and close or attach the fuse cover To replace the fuse open the fuse compartment with a screwdriver as shown and replace the fuse and the cover securely WARNING To reduce the risk of fire electric shock or product dam...

Page 5: ...s well ventilated To prevent risk of electric shock or fire hazard due to overheating ensure that curtains and any other materials do not obstruct the ventilation vents Do not obstruct the unit s ventilation openings with newspapers tablecloths curtains and similar items Do not place sources of naked flames such as lighted candles on the unit Dispose of batteries in an environmentally friendly man...

Page 6: ...nsactions and distribution facilities are provided directly by Panasonic UK Ltd It couldn t be simpler Also available through our Internet is direct shopping for a wide range of finished products take a browse on our website for further details Sales and Support Information Customer Care Centre For customers within the UK 08705 357357 Visit our website for product information www panasonic co uk E...

Page 7: ...ive The internal HDD saves up to 355 hours of your recordings when set to EP 8 Hours You can copy DUBBING your data at high speeds from Hard disk drive HDD to DVD RAM DVD R DVD RW DVD Video format or R SD Card drive You can copy DUBBING and save photos directly from the SD Card to the HDD or e g to DVD RAM Immediate playback Start the desired title directly from DIRECT NAVIGATOR Playback during re...

Page 8: ...JPEG Switch button of the AV input between TP DVD DC VHS AV1 AV2 AV3 front DV Cancel button INPUT SELECT CANCEL RESET ENTER Navigation Remote control Select the AV input on the television set Turn the television set on and off CH Select the channel on the television set VOLUME Volume control of the television set AV VOLUME CH TV CH Channel select button A V channel 15 1 5 5 0 5 5 0 5 15 0 1 5 TRAC...

Page 9: ...ection menu Launch sub menus Exit a menu Direction buttons in the menu navigation Selection of groups or titles Still picture or time loop playback ENTER Select or save a setting DIRECT NAVIGATOR TITLE VIEW TOP MENU Main menu of DVD Video ENTER RETURN RETURN 73 70 116 ENTER Select or save a setting ENTER HDD 1 2 3 4 5 6 7 8 9 0 CH AV DVD VHS TV DIRECTTV REC VOLUME VIDEO Plus CANCEL RESET REC TIMER...

Page 10: ...er on and off Record with external recording control Direct TV record to DVD or HDD DIRECTTVREC 55 55 67 67 57 65 REC MODE DUBBING menu DUBBING menu 78 78 1 2 3 4 5 6 7 8 9 0 CH AV DVD VHS TV DIRECTTV REC VOLUME VIDEO Plus CANCEL RESET REC TIMER Panasonic DVD TV INPUT SELECT REC MODE CH SKIP INDEX SLOW SEARCH STOP PAUSE PLAY DISPLAY HDD DVD ERASE ENTER T C E R I D R O T A G I V A N S SUB MENU RETU...

Page 11: ...h the SETUP menu SETUP Launch the SETUP menu SETUP A B B C A Delete station or selection buttons in the menus B Add station or selection buttons in the menus C Move station or selection buttons in the menus TIME SLIP Select the timeframe to be skipped 43 JET REW For fast rewinding to the beginning of the tape 50 A B C 1 2 3 4 5 6 7 8 9 0 CH AV DVD VHS TV DIRECTTV REC VOLUME VIDEO Plus CANCEL RESET...

Page 12: ...n the path of the transmission The maximum range of the remote control is 7 m directly in front of the unit Keep the transmission window and the unit sensor clean The procedure can be impaired by direct sunlight or doors of glass cabinets Operating a television set Change the remote control code to operate your television set Press and hold the TV on and off switch button Enter the two digit code ...

Page 13: ...3 and confirm with ENTER Setting the remote control Setting options If you want to operate two units independently of each other with the same remote control then change the mode of the remote control Setting the remote control mode for unit Select the desired mode on the remote control Press and hold the ENTER button for approx 2 seconds and at the same time enter the number that corresponds to t...

Page 14: ...n and close the disc tray Channel select button Channel select button Record Record AV3 input terminal Remove cassette S VIDEO input AV3 OPEN CLOSE VHS DVD Standby on switch Press to switch the unit from on to standby mode or vice versa In standby mode the unit is still consuming a small amount of power Front access EXT LINK VHS Recording with external recording control Display One Touch Dubbing H...

Page 15: ...ting state e g playback search Tape speed SP normal recording duration LP double the recording duration EP triple the recording duration S VHS Dubbing display during a dubbing procedure SP LP EP TRK Track number GRP Group number TTL Title number PL Nummer of Playlist Channel display Blinking There are less than 10 minutes until the start of a programmed TIMER recording The device is not set to TIM...

Page 16: ... VIDEO S VIDEO out connector 2 VIDEO Video output 6 8 HDD DVD OUT 9 10 VHS DVD COMMON Luminance signal luminance Chrominance signal colour difference Chrominance signal colour difference 1 103 For a conventional tube television we recommend using the Scart socket You will get a high quality RGB video picture with an RGB compatible television If you want to use a progressive scan capable LCD plasma...

Page 17: ...the steps below Disconnect the power from all units 1 Connect the aerial to the RF IN aerial input of the DVD Recorder 2 Connect the RF OUT aerial output of the DVD Recorder to the aerial input of the television set 3 Connect the AV1 socket 21 pin Scart socket of the DVD Recorder to the Scart input of the television set 4 Plug the DVD Recorder and the television set into the AC mains socket If you...

Page 18: ... input Audio Video input AC mains lead TV HDD DVD OUT Follow the steps below Disconnect the power from all units 1 Connect the aerial to the RF IN aerial input of the DVD Recorder 2 Connect the RF OUT aerial output of the DVD Recorder to the aerial input of the television set 3 Connect the HDD DVD OUT AUDIO L R VIDEO of the DVD Recorder to the input of the television set 4 Plug the DVD Recorder an...

Page 19: ...ow Disconnect the power from all units 1 Connect the aerial to the RF IN aerial input of the DVD Recorder 2 Connect the RF OUT aerial output of the DVD Recorder to the aerial input of the television set 3 Connect the AUDIO VIDEO OUT AUDIO L R of the DVD Recorder to the input of the television set Connect the S VIDEO OUT of the DVD Recorder to the input of the television set 4 Plug the DVD Recorder...

Page 20: ...mber the PIN number write it down Press the ENTER button twice to confirm Enter the Name House No and Postcode in the same way using Press the ENTER button to confirm each entry Press the RETURN button to leave the Owner ID screen You will now see the TV picture Your DVD Recorder is now ready to use Owner ID Owner ID RETURN Name House No Postcode PIN number RETURN leave Clock Off Automatic 0 00 00...

Page 21: ... finish this setting If the clock setting menu appears Auto clock set was not possible due to a weak signal Mind that a wrong date or time will influence the programmed recording of TV programmes don t forget to change summer time and winter time You can complete the Owner ID now or skip this step and do it later To do it later press the RETURN button Your DVD Recorder is now ready to use To set t...

Page 22: ...ector Disconnect the power from all units Follow the steps for Auto Setup on page 21 Connecting with RF cable Aerial cable Extra equipment for the connection shown RF cable Aerial cable Follow the steps below Since optimal picture quality cannot be achieved the connection with the RF cable is not recommended DVD Recorder 1 2 3 TV Aerial AC mains lead RF IN Aerial input AV1 21 pin Scart socket RF c...

Page 23: ...der is now ready to use To set the Owner ID now use and press the Numeric buttons or to enter a four digit PIN number Press to correct the digit Be sure to remember the PIN number write it down Press the ENTER button twice to confirm Enter the Name House No and Postcode in the same way using Press the ENTER button to confirm each entry Press the RETURN button to leave the Owner ID screen You will ...

Page 24: ...til you receive the Test pattern It may be necessary to repeat steps above until you can see the Test pattern clearly If using a Scart cable please see the note below Press for about 5 seconds The preset channel will be displayed on the DVD display Press channel select buttons CH or 0 to invoke Confirm with ENTER FUNCTIONS Set the RF output channel of the DVD Recorder to RF OFF if the DVD Recorder...

Page 25: ...exit the On Screen Display When the station names have not been set correctly see page 96 for details If no stations were found confirm all connections of the DVD Recorder again and restart the Auto Setup See page 97 for details Checking the settings after Auto Setup TV reception channels If station name is The asterisks indicate that a station was found during Auto Setup but has not been named du...

Page 26: ...Aerial cable AC mains socket AC mains socket AC mains lead AC mains socket TV 1 1 3 3 3 Aerial input 2 21 pin Scart cable AV1 Connecting to a satellite receiver You can connect a satellite receiver digital analogue to receive digital broadcast or encrypted programs Extra equipment for the connections shown RF cable Aerial cable 21 pin Scart cable E E E E E ...

Page 27: ...C mains supply atellite receiver Switch on the TV set and DVD Recorder Set the settings for AV2 according to the connected satellite receiver Follow the steps below 1 2 Disconnect the power from all units Switch on the Then follow page 21 for Auto Setup with 21 pin Scart cable satellite receiver Connect aerial to the RF IN Aerial input of the DVD Recorder Connect the parabolic antenna to the Aeria...

Page 28: ...ound Sound Amplifier example OPTICAL Optical digital audio cable Push the jack all the way into the socket with this side facing up Connecting a digital amplifier or a digital system component Connect an amplifier with a Dolby Digital DTS or MPEG decoder Use an Optical digital audio cable In the Sound SETUP menu change the Digital Audio Output setting according to your connected digital amplifier ...

Page 29: ... the DV input socket of the DVD Recorder Use the DV cable After you have connected the cables switch both devices on The DVD Recorder cannot be controlled by the connected DV unit The DV input of this unit is only intended for DV units A computer e g cannot be connected Some DV units do not allow for proper input of the picture and sound signal DV IN connection DV unit example DV IN Front connecti...

Page 30: ...r screen Always connect sockets of the same colour Connect the Audio cable to the corresponding audio input sockets of the television PB PR Y If the AV1 Output setting in the SETUP menu is set to RGB without component no output will take place to the COMPONENT VIDEO OUT sockets Set this option to Video with component If the unit is connected to the television via the VIDEO OUT the S VIDEO OUT or t...

Page 31: ... the right and left If it is possible to adjust the aspect ratio of your television for progressive images set the Progressive setting to On In normal televisions progressive output can lead to flickering even if the television is progressive compatible Make sure that the Progressive setting is set to Off If Progressive output is used videos can be viewed at a high resolution e g from DVD Video Th...

Page 32: ...nt to another medium disc if you detect any problems Irregularities are manifested in repeated inexplicable noises and picture distortions Should you detect problems refrain from using your HDD In the worst case you will destroy the HDD Please take the unit to customer service Recordings saved to a damaged HDD cannot be recovered An unexpected sound may occur when switching the unit on and off or ...

Page 33: ...ay Your HDD automatically went into SLEEP mode When the unit is switched on the HDD spins at a high speed To extend the lifetime of the HDD it goes into SLEEP mode if no function is called for more than 30 minutes and there is no disc in the DVD drive Press HDD to activate it If the HDD is in SLEEP mode it needs a short period to power up Thus recordings or playbacks do not start right away Please...

Page 34: ...by the manufacturer not all described functions may be able to be used Depending on the disc type the regional code and the recording conditions it may not always be possible to play the discs listed DVD RW DVD Video format Playback discs 200GB rewritable TIME SLIP function CPRM compatible supports 2 channel sound 16 9 format creation of playback lists deleting individual titles frees up storage s...

Page 35: ...rdings made with this unit must be finalised in order to be played back on a DVD player Digital programmes that allow one time only recording can not be recorded The DVD Video format can be recorded on DVD R or DVD RW RAM RAM 109 Disc formats Cartridge discs When the write protection device is activated you can neither record nor edit or delete the contents of a disc RAM Remove 8cm discs from the ...

Page 36: ...t Copying from HDD to DVD in high speed mode You can copy titles from the HDD to DVD in high speed mode Before the titles are saved to the HDD please perform the following settings In the SETUP menu set the setting for Rec for High Speed dubbing to On After recording is complete it takes approx 30 seconds for the unit to process the information The first 30 seconds of a recording may be missing if...

Page 37: ...mera Setting the DPOF feature page 46 Inserting the storage card Suitable SD storage cards 37 Do not touch the memory card contacts Use an appropriate adapter for miniSD cards If the SD Memory Card has been formatted with another device the recording can take longer than usual If the SD Memory Card was formatted with a PC under certain circumstances you may possibly not be able to use it with this...

Page 38: ... 41 Start Slide Show 47 Quick View Play x1 3 42 JPEG MP3 format 48 Splitting a recording into chapters 42 Changing the audio channel 42 TIME SLIP 43 Playback 49 51 Delayed playback 43 Before playback 49 Using video cassettes 49 Erase protection of cassettes 49 Cleaning the video heads 49 MP3 playback 44 Playback 50 CD MP3 44 Ending playback 50 Selecting a group using the tree structure 44 PAUSE du...

Page 39: ...c CD VCD DVD V DVD A PAUSE during playback Press PAUSE during the playback Press PAUSE again to resume playback Resuming playback Press STOP during the playback The unit saves the position The position is deleted if you switch the unit off Press PLAY to resume playback from the saved position To cancel the function press STOP several times RAM R RW V R RW VR HDD DVD HDD HDD DVD Playback Cancelling...

Page 40: ...RN ENTER Select S SUB MENU Previous Next VIDEO PICTURE HDD HDD Playback Use the numeric buttons to select an entry e g number or number Use or the numeric buttons to select an entry and confirm with ENTER 5 15 A menu appears on the television screen VCD DVD A DVD V If appears on the television screen this function is not possible by the unit or the disc The operation of the disc menu depends on th...

Page 41: ...put at the first fast forward speed Only for forwards direction Only motion pictures VCD DVD A Skipping chapters titles or pictures Press SKIP during playback or pause to skip chapters titles or pictures Each press increases the number of skips Only for forwards direction Only motion pictures VCD DVD A Not Not The pause feature is automatically switched on after approx 5 minutes RAM R RW V R HDD P...

Page 42: ...utput takes place in PCM with a digital connection Quick View is cancelled if SKIP or PAUSE is pressed or playback of a programme begins that was not recorded with Dolby Digital Quick View does not function during simultaneous recording and playback in XP or FR mode During playback press SKIP or SKIP to skip the chapter You can change the number of the audio channel e g the language setting by pre...

Page 43: ...e Currently received picture receive channel The receive channel can be switched using the CH button This is not possible during a recording The TV picture is shown as picture in picture Delayed playback Playback can be started while the unit is still recording Without stopping the current recording you can view the recording from the beginning RAM HDD Playback started 30 seconds ago Image current...

Page 44: ...nch the MENU screen Use to select the desired track and confirm with ENTER Playback continues until the last track of the selected group To select a track via the numeric buttons press e g for track no 8 0 0 0 0 0 0 0 0 0 0 0 0 0 0 0 0 0 0 0 0 0 0 0 0 0 0 0 0 0 0 0 0 0 0 0 0 0 0 0 0 0 0 0 0 0 0 0 0 0 0 0 0 0 0 0 0 0 0 0 0 0 0 0 0 0 0 0 0 0 0 0 0 0 0 0 0 0 0 0 0 0 0 0 0 0 0 0 0 0 0 0 0 0 0 0 0 0 0 ...

Page 45: ... to PICTURE JPEG VIEW HDD RAM Erase Picture Set up Protection Cancel Protection DPOF Other View Displaying the picture properties Select the desired picture and press ENTER Press STATUS twice Press STATUS again to exit the display 13 30 49 21 6 Date 16 6 2005 No 1 22 SD Card 46 Folder Picture No 101 0001 Return to TITLE VIEW SD CARD JPEG playback PICTURE Nächste Set up Protection Erase Picture Can...

Page 46: ...rotection is displayed by Select Yes and confirm with ENTER Change the name of the selected folder Names created with this unit may not be able to be displayed by other units The selected folder and its contents are permanently deleted Even data that is not displayed with this unit Select Erase and confirm with ENTER The print settings DPOF made with this unit may not be able to be viewed on other...

Page 47: ... 015 Next Vorherige Nächste Slide Interval Start Slide Show Set display interval for Slide Show Press ENTER to set JPEG playback 017 RETURN ENTER Select S SUB MENU Previous Next DIRECT NAVIGATOR PICTURE JPEG VIEW SD CARD PICTURE The pictures in the selected folder are automatically played back one after the other The display duration for each picture is determined with the Slide Interval setting U...

Page 48: ...x34 through 6144x4096 sub scanning 4 2 2 or 4 2 0 MP3 format JPEG format CD RAM HDD SD CD JPEG XXXX JPG XXXX TIF DCIM XXXXX XXXX JPG XXXX TIF IM CDPF or IMEXPORT XXXX JPG XXXX TIF XXXX JPG XXXX TIF This unit can display the following Numbers XXX Letters Folders can be created on another unit However these folders cannot be selected as the target for a copy procedure A folder in which all numbers a...

Page 49: ... brand name tapes for example from Panasonic During the playback of cassettes that were recorded on a different VHS recorder you may experience a lower picture quality Write protection of cassettes To protect against the accidental erasing of cassettes break out the write protection tab If you want to record on a protected cassette cover the hole with a piece of tape Cleaning the video heads Use a...

Page 50: ...minutes Image search forwards or backwards During playback press or The search speed increases by pressing the button twice JET SEARCH If you press and hold the button the image search lasts as long as the button is depressed Press PLAY to resume playback Fast forwarding or rewinding In stop mode press or Press STOP to end the forward rewind function JET REW For fast rewinding to the beginning of ...

Page 51: ...nnel in progressive or RGB mode The television must be RGB or progressive capable Press DVD HDD and use CH to select the TP channel Press VHS and then PLAY Playback begins If the index signals are too close together this function may not work Thus the recordings should be at least 5 minutes long Setting the track position manually The unit automatically sets the track position If a cassette was re...

Page 52: ...n external device e g a camera 68 69 Pause during recording Direct TV recording Playback during recording Simultaneous recording and playback TIMER controlled recordings PDC function controlled recordings FLEXIBLE REC FR Displaying the available recording time Manual programming Checking changing or deleting TIMER RECORDINGS Storage space on the disc Backup recording h Recording television program...

Page 53: ...95 XP SP LP EP 6Hours EP 8Hours Recording duration Picture quality Maximum titles It is not possible to record to storage cards The recording is saved to free space If there is no more space left on the target drive you must delete recordings or use a new disc If you want to play a disc recorded using this unit on another playback unit you first have to finalise the disc Recording information It i...

Page 54: ... setting Recording RW V HDD REC PLAY PLAY REC or PLAY DVD REC PLAY PLAY REC or PLAY VHS HDD DVD VHS VHS HDD DVD VHS RAM When recording dual channel or multi audio TV programmes on DVD R DVD RW or R only one audio channel can be recorded When recording on DVD RAM in EP mode 8Hours playback may not be possible on DVD RAM compatible DVD players In this case select EP mode 6Hours EP 6Hours provides be...

Page 55: ... PAUSE or REC again to resume recording The title is not divided DIRECTTV REC Recording VHS HDD DVD VHS Direct TV recording Press DIRECT TV REC for 3 seconds The recording begins Press STOP to end the recording If your television is equipped with Q Link functionality you can directly record the programme that you are watching on TV The programme position shown on the unit automatically switches to...

Page 56: ... of the recording During recording you can start playback from the beginning of the programme Simultaneous recording and playback Press DIRECT NAVIGATOR during the recording or TIMER controlled recording Use to select a title and confirm with ENTER Press DIRECT NAVIGATOR again without selecting a title to exit the title view If you start the playback while the unit is in standby mode for a TIMER c...

Page 57: ... begins Press RETURN to exit the FLEXIBLE REC window Press STOP to cancel the recording before the end has been reached Neither the channel nor the recording mode can be changed in PAUSE mode Displaying the available recording time Press STATUS several times The available time in minutes RAM R RW V R HDD Recording FLEXIBLE REC Recording in FR mode Maximum rec time 1 Hour 49 Min 1 Hour 49 Min Set r...

Page 58: ... the numer buttons Name Date Start Stop Drive Mode PDC RENEW ic If you record several programmes in a row the first few seconds of the following programme are not recorded on the HDD or disc approx 30 seconds If you want to enter the programme name use to select Programme Name and confirm with ENTER Once you have made all changes save the programme with ENTER To continue programming select New Tim...

Page 59: ... name of the TV station Date You can also programme titles to be recorded on a daily or weekly basis Start Start time Stop Stop time If you press and hold the buttons the time increases decreases in 30 minute increments Mode Recording mode XP SP LP EP FR If you selected PDC ON recording mode FR is not possible PDC On or OFF Programme Name You can enter the title of the programme RENEW On or OFF Fo...

Page 60: ...cordings are deleted from the list after two days Make sure that the unit is switched to timer standby mode The symbol lights up in the unit display Drive Storage space on the disc OK There is enough storage space available on the disc for the recording If VPS PDC is switched on during the recording then the entire programme will probably not be recorded Date For recordings that are made daily or ...

Page 61: ...VIDEO Plus 8 5 3 4 2 Enter PlusCode Number by using 0 9 key Remain HDD 72 50 LP DVD 3 59 LP 12 09 37 18 2 THU TIMER RECORDING ENTER RETURN CANCEL Date Start Stop Mode Name Programme Name Press ENTER to store the programme 1 BBC1 Remain HDD 72 50 LP DVD 3 59 LP 12 09 37 18 2 THU PDC Drive 18 2 THU 7 50 8 50 SP ON HDD No 0 9 VPS PDC Nr Name Datum Mode Stop Start TIMER RECORDING 12 09 37 18 2 THU PDC...

Page 62: ...button will appear instead of a channel number AV input Press the CH button to select the channel or AV input that is to be used for recording from the satellite channel Press the ENTER button to memorise the setting The DVD Recorder will now automatically set the programme position or AV input correctly when a VIDEO Plus recording is set for this satellite station in the future Press to select th...

Page 63: ...ong Play mode approx 12 hours If you value a high quality picture select SP Displaying the approximate time remaining on the cassette Press FUNCTIONS Select the desired tape length in the VHS FUNCTIONS menu Press STATUS several times until the time remaining on the tape appears in the unit display With each press of the button the display changes as follows Current time Operating state and tape co...

Page 64: ...h the unit to timer standby mode The symbol lights up in the unit display To cancel or pause the recording press TIMER again The symbol turns off Name Programme position name of the TV station Date You can also programme titles to be recorded on a daily or weekly basis Start Start time Stop Stop time Press and hold the buttons to increase decrease the time in 30 minute increments Recording mode A ...

Page 65: ...time must be set correctly to the start time given in the magazine When recording in the NTSC system the function may not work In the Timer recording screen check the start and end time and the PDC signal If is displayed under Name use to select the desired programme position Use to select the recording mode A SP LP EP Save the programme using ENTER Press TIMER to switch the unit to timer standby ...

Page 66: ...confirm with ENTER Confirm REC with ENTER Recording begins If the recording ends automatically confirm the message with ENTER Start the playback on your external DV unit Press Pause at the desired start position Use INPUT SELECT to select the DV channel If you want to record to VHS switch the unit to VHS and use INPUT SELECT to select the DC channel The DV signal is transferred via HDD DVD Use REC...

Page 67: ...k 2 and confirm with ENTER You control the recording function via an external device e g receiver using EXT LINK Connect the external device with a 21 pin Scart cable to the AV2 socket Adjust the Ext Link function for the connected device TIMER recordings via external devices EXT LINK The programming of the recording must take place on the external device The recording begins when a corresponding ...

Page 68: ...ess REC at the point where you want to begin recording Use STOP to stop recording Recording to HDD DVD Press PAUSE to pause recording Press the button to resume recording This unit cannot record signals from PCs If M1 and M2 are selected on the connected device you can choose the audio mode during playback Select M1 or M2 on the connected device You cannot select the audio mode during playback If ...

Page 69: ...recording mode Use INPUT SELECT to select the TP channel Press REC to start recording Use STOP to stop recording VHS Manually copying from HDD or DVD to VHS Start the desired title Press PAUSE where you want to start recording Use REC MODE to select the recording mode Use INPUT SELECT to select the DC channel Press PLAY Press PAUSE where you want to start the recording Press REC Then press PAUSE t...

Page 70: ...EO Plus 23 TIMER RECORDING DISC MANAGEMENT SETUP FLEXIBLE REC PLAYLISTS DIRECTNAVIGATOR TIMERRECORDING VIDEOPlus DUBBING DVAUTOREC DV AUTO REC The illustrations show DVD RAM menus The menu entries can be different depending on the disc or medium Press FUNCTIONS in stop mode Use to select a menu and confirm with ENTER To view the second screen page use to select To Others and confirm with ENTER To ...

Page 71: ...7 twice to select R and confirm with ENTER Selecting a Disc Name or Title from List Names Use SKIP to open List Names Use to select the disc name or title confirm with ENTER Erasing a Disc Name or Title from List Names Use SKIP to open List Names Use to select the title or name and press SUB MENU Confirm Erase Name with ENTER Use to select Erase in the next screen and confirm with ENTER Entering t...

Page 72: ...currently being recorded The title overlaps other recordings HDD DVD was full or the maximum number of titles or scenes was reached so that the title could not be recorded The programme cannot be played back due to damaged data or cannot be recorded for another reasoon The title is write protected The television programme was copy protected so that the title could not be recorded The title was red...

Page 73: ... View S SUB MENU S SUB MENU ENTER ENTER FUNCTIONS selection menu You can access further sub menus with SUB MENU Editing titles and chapters with the SUB MENU Enter Name Set up Protection Cancel Protection Partial Erase Change Thumbnail Divide Title Erase Chapter Create Chapter Combine Chapters Title View Editing is not possible during a recording Erase Properties Edit Chapter View Button A Select ...

Page 74: ...ties Edit Chapter View Table View Other View VIDEO PICTURE 77 HDD DVD ERASE FUNCTIONS selection menu Remaining Time Corresponding chapter of PLAYLISTS will be erased Erase 2 00 SP Cancel Erase Properties TERRALUNA No 01 Date 13 7 2005 THU Name BBC1 Time 1 02 Rec time 0 01 SP TERRALUNA RETURN SELECT ENTER RETURN ENTER Sorting in TITLE VIEW only Table Display The titles can be sorted according to th...

Page 75: ...ENTER Use to select Erase and press ENTER To exit the menu use to select Exit and press ENTER Use PAUSE and SKIP to jump to the beginning or end of a title You can search for begin and end points with SLOW SEARCH TIME SLIP or Partial Erase RAM HDD Before you start erasing make sure that you really want to erase the recordings The complete name is displayed in the sub menu Properties Confirm Enter ...

Page 76: ...here you want to divide the title and confirm Divide with ENTER Confirm Preview with ENTER The playback will take place 10 seconds before to 10 seconds after the dividing point Use to select Exit if you want skip the preview Confirm Exit with ENTER In the Divide Title screen use to select Divide and confirm with ENTER Divide Title RAM HDD F U N C T I O N S FUNCTIONS selection menu Edit Title Erase...

Page 77: ...ancel 17 BBC1 1 10 FRI TERRALUNA DIRECT NAVIGATOR CHAPTER VIEW RETURN DIRECT NAVIGATOR TITLE VIEW Previous Next DVD RAM DVD RAM DVD RAM 02 03 BBC1 12 9 THU TERRALUNA CARS ASTRAL 01 BBC1 23 9 THU BBC2 1 10 FRI 001 002 004 003 VIDEO PICTURE Use to select Erase and confirm with ENTER If you execute this procedure the chapter will be deleted and cannot be restored Subdivide the titles into chapters De...

Page 78: ...ack during dubbing Dubbing with the dubbing list Titles and playlists can be dubbed to the disc in the desired order Editing the playlist Deleting all saved dubbing settings and lists Timer controlled Dubbing A finalized DVD R DVD RW DVD Video format R etc can be dubbed to the HDD and edited again While the disc is playing the material is dubbed to the Hard disk drive HDD according to the set time...

Page 79: ...HS Video SP 2 Dubbing Time Start Dubbing Cancel All Press ENTER to change settings 3 Time Setting On Dubbing Time 2 00 Dubbing Direction VHS 1 DVD Destination Capacity 2 14 Titles and playlists can be compiled and dubbed in a dubbing list Only pictures can be dubbed with the SD Card A title can be dubbed with just one push of the button without other settings being required You can copy directly b...

Page 80: ...n 1 and 15 minutes depending on the recording mode and the high speed compatible disc Playlists cannot be copied in high speed mode if The playlists are made up of different recording modes or the FR recording mode The playlists contain different audio modes The titles contain many deleted segments Copy direction Information on dubbing with the dubbing list In high speed mode it is possible to cop...

Page 81: ...other players if they were finalized after dubbing If the dubbing of a title in high speed mode stops in the middle the affected title will not be recorded Even if the title was not dubbed to the DVD R DVD RW or R the remaining capacity of the disc is decreased Time lapsed playback editing etc are not possible during dubbing Regardless of the selected recording drive the timer recording is always ...

Page 82: ...at or Recording Mode and confirm with ENTER Format Select whether you want to transfer video or pictures Recording Mode Select the recording quality or the copy speed High Speed XP EP FR Use to select the desired setting and confirm with ENTER Use to return to Dubbing Mode 53 63 Cancel All All saved dubbing settings and lists will be erased In the DUBBING screen use to select Cancel All and confir...

Page 83: ...te List screen use to select the desired title and confirm with ENTER The title is transferred to the copy list Use to return to Create List In order to edit several elements use to select the desired title and press PAUSE appears In the case of high speed recordings to DVD R DVD RW DVD Video format or R only those programmes marked with can be selected Dubbing cannot begin if the Size value is mo...

Page 84: ...erased Use to select Yes and confirm with ENTER Add Add new items to the dubbing list Use to select the desired playlist or title and confirm with ENTER Erase Erase the selected items Use to select Yes and confirm with ENTER Move The selected items are moved in the dubbing list and the order is changed Use to select the desired item and confirm with ENTER In order to edit several elements use to s...

Page 85: ...with ENTER Dubbing Direction Use to select Source and confirm with ENTER Use to select DVD or VHS and confirm with ENTER Use to return to Dubbing Direction and use to select Dubbing Mode Timer controlled Dubbing The entire disc cassette can be dubbed or the duration of the dubbing can be determined The titles are transferred without chapters The procedures and screen displays are also recorded dur...

Page 86: ...nation drive Recording Mode FR and Time Setting Off DUBBING starts after the cassette is rewound Titles for each index signal are automatically created for each index signal On DUBBING starts at the desired start position No titles are created Use or the numeric buttons to change the time setting and confirm with ENTER Dubbing Mode Use to select Recording Mode and confirm with ENTER Use to select ...

Page 87: ... select To Others ENTER PLAYLISTS ENTER When copying from HDD DVD to VHS or VHS to HDD DVD use AUDIO to select the desired audio channel for dual channel sound When copying from HDD DVD to VHS the recording begins at the beginning of the title No other functions are possible during the copy procedure from HDD DVD to VHS Starting DUBBING DUBBING preparation One Touch Dubbing You can copy directly b...

Page 88: ... marking use PAUSE to stop the playback Use SLOW SEARCH SKIP TIME SLIP or to select the position Use to select Exit and confirm with ENTER Press FUNCTIONS in stop mode Use to select To Others and confirm with ENTER Confirm PLAYLISTS with ENTER In PLAYLIST VIEW use to select the free Create field and confirm with ENTER You can create and then edit a playlist from your favourite chapters of your rec...

Page 89: ... Confirm PLAYLISTS with ENTER Use to select a playlist You can play the playlist with ENTER Erase Confirm Erase with ENTER In the next screen use to select Erase An erased playlist cannot be restored Confirm Erase with ENTER Properties Use to select Properties and confirm with ENTER Information on the playlist e g chapter and date is displayed Chapter View To edit several elements use to select th...

Page 90: ... Thumbnail menu press PLAY to start the playback Press ENTER at the selected spot Confirm Exit with ENTER The displayed preview is exchanged for this image Press FUNCTIONS Use to select To Others and confirm with ENTER Confirm PLAYLISTS with ENTER Use to select a playlist Press SUB MENU Use to select Edit and confirm with ENTER In the sub menu select the desired option To edit several elements use...

Page 91: ...URN to go back to CHAPTER VIEW In CHAPTER VIEW use to select the desired chapter and press SUB MENU In the sub menu use to select the desired option and confirm with ENTER You can create a new chapter from the Source Title Edit Chapters PLAYLISTS CHAPTER VIEW Next Previous 002 004 03 BBC2 1 10 FRI 0 00 Seite 01 01 Add Chapter Move Chapter Create Chapter Combine Chapters Erase Chapter PLAYLIST View...

Page 92: ...int can be lost Combine Chapters In the next screen use to select Combine and confirm with ENTER The selected chapter is combined with the next chapter Erase Chapter In the next screen use to select Erase and confirm with ENTER The original title is not erased by erasing the chapter PLAYLIST View Return to PLAYLIST VIEW Move Chapter Use to select the position where the chapter is to be moved and c...

Page 93: ...rd You can copy all content from an SD Card to HDD or DVD using the COPY ALL PICTURES function To select the SD drive press SD Press FUNCTIONS Use to select To Others and confirm with ENTER Confirm COPY ALL PICTURES with ENTER Press RETURN for 3 second to stop the COPY ALL PICTURES procedure early To continue copying press RETURN To exit the screen press ENTER The copied folders are placed behind ...

Page 94: ... desired sub menu and use to switch to setting Use to select the desired setting and confirm with ENTER Use to select the desired option and confirm with ENTER Follow the menu navigation The unit saves your settings Use to return to the sub menu and use RETURN to exit the menu Use FUNCTIONS to return to the FUNCTIONS menu ENTER Tuning Manual Menu navigation in the SETUP menu Sub menu Setting Press...

Page 95: ...9 9 9 9 9 9 9 9 9 9 9 9 9 9 9 9 9 9 9 9 9 9 9 9 9 9 9 9 9 9 9 9 9 9 SETUP To Others FUNCTIONS selection menu Disc Picture Sound Display Connection SETUP Others Manual Auto Setup Restart Download from TV Tuning Manual Tuning Pos Name Ch Pos Name Ch 1 BBC1 7 Delete 7 6 9 10 8 14 15 13 12 11 RETURN SELECT ENTER 5 CH6 11 3 ITV 2 4 CH4 12 2 BBC2 4 Move Add A B C 95 8 16 17 Pos Name 8 95 16 17 18 19 20 ...

Page 96: ...amme position in front of which an empty programme position is to be inserted Q Link Press GREEN button An empty programme position is inserted Changing the name of the television station Use to select the name of the television station and confirm with ENTER Use to select Name and use to select the name field The cursor jumps to the first letter BC1 Change the letter using Use to select the next ...

Page 97: ...7684 Polish 8076 Slovenian 8376 Turkmen 8475 Afrikaans 6570 Bulgarian 6671 Finnish 7073 Interlingua 7365 Macedonian 7775 Portuguese 8084 Somali 8379 Twi 8487 Albanian 8381 Burmese 7789 French 7082 Irish 7165 Malagasy 7771 Punjabi 8065 Spanish 6983 Ukrainian 8575 Ameharic 6577 Byelorussian 6669 Frisian 7089 Italian 7384 Malay 7783 Quechua 8185 Sundanese 8385 Urdu 8582 Arabic 6582 Cambodian 7577 Gal...

Page 98: ...ging the Security Level Unlock Recorder Return to level 8 Change Password Change the password Change Level Change the unlock level Temporary Unlock You can temporarily unlock a disc for playback The unit is locked again when you switch to standby or open the disc tray DVD Audio Video mode Playback On Off On You want to play the DVD Video content of a DVD Audio If you change discs or turn the unit ...

Page 99: ...ge Field Select this function if the picture is disturbed with the Automatic setting Frame Select this function if small text or line structures are not displayed clearly with the Automatic setting S VHS Dubbing Setting If you are dubbing a video tape to DVD that was recorded in S VHS or in S VHS ET format select Automatic or SQPB Automatic Plays and dubs the tape in S VHS quality You can dub the ...

Page 100: ...evel of loud sections is decreased The sound is still clearly audible when the volume is decreased ON Off only Dolby Digital Bilingual Audio Selection If you want to record programmes on discs that were broadcast in dual channel tone you can choose between the original language M 1 or another available language M 2 If you are copying from an external source or a tape position to discs select the s...

Page 101: ...it cannot decode the corresponding signal the setting must be switched to PCM Otherwise strong noise can cause damage to hearing or loudspeakers Perform settings based on your audio system ON The connected unit cannot process signals with a scan frequency of 96 kHz or 88 2 kHz Signals are converted to 48 kHz or 44 1 kHz Off The connected unit can process signals with a scan frequeny of 96 kHz or 8...

Page 102: ...een Messages Automatic Grey Background On FL Display Bright SELECT RETURN TAB On Screen Messages Grey Background On The grey background is displayed when there is no television reception FL Display Changes the brightness of the unit display Automatic Off Bright Dim ON Off Automatic The screen messages are displayed on the screen F U N C T I O N S ...

Page 103: ...n 16 9 4 3 Letterbox PAL NTSC ON Off On In COMPONENT VIDEO OUT mode the signal is displayed in full picture quality PAL You connect the unit to a PAL or multi system television set Programmes that were recorded with NTSC are played back as PAL60 NTSC You connect the unit to an NTSC television set Programmes that were recorded with NTSC are played back as NTSC AV1 Output Video with component RGB wi...

Page 104: ...k AV2 Input RGB Video RGB RETURN SELECT ENTER S Video Video AV2 Settings AV2 Input Ext Link Ext Link 1 For digital receivers that send a special recording control signal e g the F U N receiver TU DSF41 Ext Link 2 External recording control for satellites or digital receivers video signal RGB Video RGB Video S Video AV2 Input Ext Link Ext Link 1 Ext Link 2 Perform the settings in the following sub ...

Page 105: ...o that you can also use another it at the same time Panasonic DVD un All settings except for the security levels with associated password and the time settings are reset to their factory settings All settings except for the programmed channels time country language and disc language settings the security levels including password and the remote control code are reset to the factory settings ON Off...

Page 106: ... On and confirm with ENTER The automatic setting of the clock begins Clock setting If the Clock setting is set to AUTO do not set it to MANUAL otherwise the automatic time correction function is deactivated This DVD Recorder uses a 24 hour clock In the event of a power failure an automatic back up system maintains the clock for approximate 60 minutes When the Clock setting is set to AUTO the autom...

Page 107: ... in the same way using Press the ENTER button to confirm each entry Press the RETURN button to leave the Owner ID screen To display the Owner ID information on TV On the unit press STOP for more than 5 seconds The PIN number is not displayed After 30 seconds this menu automatically disappears Owner ID RETURN Name House No Postcode PIN number RETURN leave SETUP To Others FUNCTIONS selection menu F ...

Page 108: ... Use FUNCTIONS to return to the FUNCTIONS menu Disc Name Enter the name The name is displayed in the FUNCTIONS window You cannot give a name to a DVD R R RW V after it has been finalised Disc Protection This procedure allows you to activate or deactivate write protection Use to select Yes and confirm with ENTER Write Protection On The padlock is closed To deactivate write protection use to select ...

Page 109: ...Start formatting Yes No Start Cancel Format Disc Some discs are not formatted Before you can use them in this unit they must be formatted The formatting erases all data on the disc Use to select Yes and confirm with ENTER Use to select Start and confirm with ENTER The formatting process begins After it is complete a message is displayed Press ENTER Press RETURN to stop the formatting process If th...

Page 110: ...ct the desired menu and confirm with ENTER Use FUNCTIONS to return to the FUNCTIONS menu Auto Play Select Before finalization you must select the start menu to be shown at the beginning of the DVD V Use to select Top Menu or Title 1 and confirm with ENTER Top Menu Before finalizing the disc you can select one of 9 different colour schemes for the disc menu Use to select the corresponding menu from...

Page 111: ...ENTER Disc display on this device Record edit enter names Play on other playback units Before finalization After finalization DVD V Possible Possible DVD R RW R Finalize Finalizing is necessary for compatible playback It will take approximately 15 minutes Finalize the disc No Finalize Finalize will make this disc playback only Start finalizing the disc Start Cancel Do not unplug the unit while the...

Page 112: ...ital 2 Och VCD DVD A DVD V DVD A RAM R RW V R RW VR DVD V DVD A RAM R RW V R RW VR DVD V DVD A Soundtrack Change the language by changing the soundtrack Subtitle Angle Audio channel PBC Subtitle language Select another recording angle Select the audio channel L R L R PBC displays whether the menu playback control is switched on or off Sound properties LPCM PPCm Dolby Digital DTS and MPEG signal ty...

Page 113: ...he video content Auto1 Auto2 Video Select Video if Auto1 or Auto2 settings disrupt the video content PAL output signal NTSC output signal Disc Play Picture Sound Other Playback NR Off Playback NR Reduces noise and image distortion On Off Progressive On Transfer Auto Disc Play Picture Sound Other V S S Off Dialog Enhancer Off DVD V RAM RW V R RW VR DVD A DVD V RAM R RW V R RW VR DVD A V S S Surroun...

Page 114: ...s each time that the button is pressed To exit the display press STATUS 1 Current medium 2 Current recording and playback state input channel Displaying the information Record Pause recording Quick View Playback x1 3 Playback Pause playback Fast forward 5 speeds Rewind 5 speeds Slow motion Slow motion rewind 5 speeds 6 Available recording time and recording mode e g 0 50 SP shows 50 minutes in SP ...

Page 115: ... screen The tape counter is automatically set to 0 00 00 when a video cassette is inserted Rewind Tape counter Time Tape remaining Forward Playback The remaining time on the tape depends on the correct setting of the tape length Use CANCEL RESET to set the counter to 0 00 00 Recording Fast forward Fast rewind These displays do not apper in PAUSE mode or during slow motion playback Changing the sou...

Page 116: ... in stop mode Use to select QUICK ERASE and confirm with ENTER Press ENTER for 5 seconds to start the QUICK ERASE function The erase procedure takes about 30 minutes for an E 180 cassette Once the end of the cassette has been reached the unit automatically rewinds the tape Press STOP to cancel the procedure Settings in the VHS FUNCTIONS Menu Erase all recordings on a played tape 4 3 Information ap...

Page 117: ... cleaners or other solvents Note Only the label side of the disc may be written on Use a soft oil based felt pen Do not use a ball point pen or other hard writing instrument Do not affix any stickers or labels to the disc The disc can warp and may become unusable When not in use place the disc in its jewel case or cartridge so that is does not become scratched or dirty Do not drop the disc place t...

Page 118: ...for 10 seconds The settings are retained Resetting the security level settings î Press DVD With the disc tray open press and hold Rec and Play 1 3 on the unit for at least 5 seconds Restoring the default factory settings while retaining your main settings î In the SETUP menu for Shipping Condition select the option Yes All settings except for password time and security level will be reset to the f...

Page 119: ... î When recording or high speed dubbing to a DVD R DVD RW DVD Video format and R the rotation sound is louder than normal This is not a malfunction î When recording to the Hard disk drive HDD set Rec for High Speed dubbing in the SETUP menu to On î The Hard disk drive HDD is in SLEEP mode HDD SLP appears in the display of the unit î The unit is currently recording î The unit is out of order With t...

Page 120: ...for the television î There is a malfunction The numbers following the letter H indicate the condition of the unit Switch the unit to standby I If the unit does not switch to standby mode press and hold I for approx 10 seconds or unplug it from the power supply for approx one minute and reconnect the cable Press I to switch the unit on If the malfunction is not eliminated after this contact custome...

Page 121: ...s been changed î Some titles and chapter of DVD Video are not played back if the Ratings have changed î The languages were not recorded on the disc î You may need to use the disc menu to select the languages î The language is not recorded on the disc î The subtitles are not recorded on the disc or are not switched on î The angle perspective can only be changed for scenes that were recorded in diff...

Page 122: ... cassette does not work î When recording video cassettes to disc the TP channel was not selected î Video cassette is copy protected Video cassette cannot be copied to disc î When recording from disc to video cassette the DC channel was not selected î DVD is copy protected Some or all recorded programmes were lost î If the power goes out during recording or editing or the power plug is disconnected...

Page 123: ...dio ground 5 Blue ground 6 Audio input CH1 L 7 Blue 8 Switching voltage 9 Green ground 10 Reserved 11 Green 12 No connection 13 Red ground 14 Blanking ground 15 Red 16 Blanking 17 Video output ground 18 Video input ground 19 Video output 20 Video input 21 Ground AV2 Scart socket 1 Audio output CH2 R 2 Audio input CH2 R 3 Audio output CH1 L 4 Audio ground 5 Blue ground 6 Audio input CH1 L 7 Blue 8 ...

Page 124: ... digital signal the whereby two split frame form one full frame DPOF Digital Print Order Format analogue sound signal is scanned at certain time Finalization DPOF is the standard format for printing pictures recorded intervals The number of scans per second is called the A CD R CD RW DVD R etc can only be played back on with a digital camera etc It enables automatic printing in a scan frequency Th...

Page 125: ...ompensation for loss of recorded or edited material nor for consequential damages attributed to a defect in the unit or the disc Information on disposal for users of waste electrical electronic equipment private households This symbol on the products and or accompanying documents means that used electrical and electronic products should not be mixed with general household waste For proper treatmen...

Page 126: ...Ver 2 0 4x Rev 1 0 Ver 2 x 8x Rev 3 0 DVD RW Ver 1 1 Ver 1 1 2x Rev 1 0 Ver 1 2 4x Rev 2 0 DVD R Ver 1 0 Ver 1 1 Ver 1 2 Playback only discs PAL SP 23 39 mm s 240 min LP 11 7 mm s 480 min EP 7 8 mm s 720 min NTSC SP 33 35 mm s 168 min EP 11 12 mm s 505 min with E 240 cassettes Recording mode Recording time DVD RAM DVD R DVD RW R RW DVD Video DVD Audio CD Audio CD DA Video CD CD R CD RW CD DA Video...

Page 127: ...The output impedance of each output socket is less than 1 kOhm 6 dBV 6 dBV VHS Audio interface Input Output Video interface TV system 625 50 PAL 525 60 NTSC Input The input impedance of each input socket is 75 Ohm AV1 SCART Video 1 Vp p AV2 SCART Video 1 Vp p Y 1 Vp p C 0 3 Vp p PAL Burst RGB 0 7Vp p 625 50 AV3 Socket Video 1 Vp p S Video Y 1 Vp p C 0 3 Vp p PAL Burst 625 50 PAL 525 60 NTSC The in...

Page 128: ...rtridge disc 35 SQPB 51 116 Mono 95 Still Mode 99 Date 106 MP3 44 48 125 Subtitle 98 112 DC channel 69 MPEG 101 125 S VHS Dubbing Setting 99 Default Settings 105 Symbols 72 Name 71 Dialog Enhancer 113 NTSC 35 65 67 103 Digital Audio Output 101 Tape length 63 116 Disc formats 34 35 Time 106 On Screen Messages 102 Disc Protection 108 TIME SLIP 43 OPTICAL 16 28 Dolby Digital 28 101 125 Title Page 95 ...

Reviews: