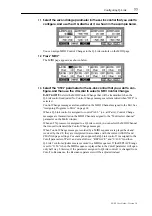
background image

General Utilities

89

Z4/Z8 User Guide—Version 1.0

13  General Utilities

This chapter explains the functions available in Utilities mode.

Setting the Master Level, Tuning, SCSI ID & MIDI OUT/THRU

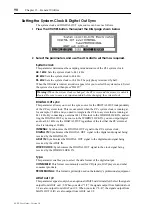
The master level, master tuning, and the Z8’s SCSI ID can be set as follows.

1

Press the UTILITIES button.

The UTILITIES button indicator lights up and the GLOBAL page appears.

2

Select the parameters, and use the JOG dial to set them as required.

Master level: 

Sets the overall output level. The default value is “–12 dB,” the reason for 

this is to prevent output distortion when many “hot” Samples (i.e., Samples at levels close 
to 0 dB) are played simultaneously.

Master tune: 

Sets the overall pitch in semitone and cent steps.

SCSI self ID: 

Sets the SCSI ID of the Z8, the default being “6.”

MIDI out/thru A & B: 

These set the function of the MIDI OUT/THRU ports to either 

MIDI OUT or MIDI THRU.

Setting the Display Contrast, Note Display, Date & Time

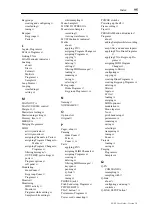
The display contrast, note display format, date, and time can be set as follows. The Z8 
uses the Date and Time settings to date stamp files when they are saved.

1

Press the UTILITIES button, and then select the DISPLY page shown below.

2

Select the parameters, and use the JOG dial to set them as required.

Display contrast: 

Sets the contrast of the display.

Note display: 

(NOTE NUMBER or NOTE NAME) This determines how note values 

are displayed on the display pages. When set to NOTE NUMBER, note values are dis-
played as MIDI note numbers (e.g., 0 to 127). When set to NOTE NAME, they are dis-
played as names (e.g., C-2 to G8). 

Date: 

Sets the date in day, month, and year format.

Time: 

Sets the time in hour, minute, and second format.

Note: Never assign the same SCSI ID to two or more SCSI devices.

Summary of Contents for Z4

Page 1: ...event fire or shock hazard do not expose this appliance to rain or moisture WARNING User Guide To prevent fire or shock hazard do not expose this appliance to rain or moisture WARNING 取 扱 説 明 書 ご使 用 になる前 に 必 ずこの 使用説明書をよ くお読み下さい ...

Page 2: ...I Corp and may not be quoted or reproduced in any form without written permission from the company LIMITED SOFTWARE WARRANTY POLICY All the software provided with or purchased especially for AKAI professional products has been tested for functionality AKAI professional M I Corp will make its best efforts to correct reported software defects for future releases subject to technical practicabilities...

Page 3: ...r onto the Z4 Z8 disconnect the power and call your dealer Make sure that the unit is well ventilated and away from direct sunlight To avoid damage to internal circuitry as well as the external finish keep the Z4 Z8 away from sources of direct heat stoves radiators etc Avoid using aerosol insecticides etc near the Z4 Z8 They may damage the surface and may ignite Do not use denatured alcohol thinne...

Page 4: ...K HAZARD SHOULD IT BE INSERTED INTO A 13 AMP SOCKET ELSEWHERE The wires in this mains lead are coloured in accordance with the following code GREEN and YELLOW Earth BLUE Neutral BROWN Live As the colours of the wires in the mains lead of this apparatus may not correspond with the coloured markings identifying the terminals in your plug please proceed as follows The wire which is coloured GREEN and...

Page 5: ...ssant les limites applicables aux appareils numériques de la Class B prescrites dans le Règlement sur le brouillage radioélectrique édicté par le ministère des Communications du Canada 27 F This digital apparatus does not exceed the Class B limits for radio noise emissions from digital apparatus set out in the Radio Interference Regulations of the Canadian Department of Communications 27 En VENTIL...

Page 6: ...Clipboard 16 Entering Names 17 4 Loading 18 Loading 18 Sound Library CD ROM 19 5 Recording Samples 22 Sampling 22 Adding New Samples to Programs 25 Auto Sampling 26 Sampling with Q FX 27 6 Editing Samples 29 About Sample Editing 29 Selecting Samples for Editing 29 Tagging Samples 30 Selecting a Monitoring Item 30 Trimming Samples 30 Viewing the Waveform 31 Zooming Samples 31 Special Sample Playbac...

Page 7: ...ram Modulation 58 Renaming Deleting Copying Merging Purging Converting Programs 60 Configuring Program MIDI Options 61 Configuring Pitch Bend 62 Configuring the LFOs 63 Configuring the Filters 64 Configuring the Amp Filter Aux Envelopes 65 8 Using Multis 67 About Multi Mode 67 Selecting Multis 67 Creating Multis 68 Assigning Programs to Parts 69 Filtering MIDI Data 71 Applying FX to Parts 72 Copyi...

Page 8: ...eneral Utilities 89 Setting the Master Level Tuning SCSI ID MIDI OUT THRU 89 Setting the Display Contrast Note Display Date Time 89 Setting the System Clock Digital Out Sync 90 Monitoring MIDI Activity 91 Initializing the Z8 91 Erasing Entire Memory 92 Testing Memory 92 Defragmenting the Memory Space 92 Appendix 93 Specifications 93 Index 94 ...

Page 9: ...ith the system clock set to 96kHz 24 bit 96 kHz ADC DAC with Enhanced Dual Bit 64 times oversampling ADC and Advanced Multi bit 128 times oversampling DAC Balanced analog I O S PDIF format digital I O Z4 requires IB 4D option Built in sample rate converters enable you to input and output digital signals easily with out considering the difference in sampling rates between the devices Q Link Digital...

Page 10: ...l samples There are two types of Programs Keygroup and Drum You can use these types to create different sounds Keygroup Programs consist of one or multiple Keygroups which is somewhat like con tainers of Samples In Keygroups a Sample can be assigned to a group of adjacent notes called a Keyspan You can also specify the range of a Keyspan Keygroup Programs are often used for sounds that are played ...

Page 11: ...ms are intended for use with drum and phrase Samples The main difference from Keygroup Programs is that each drum Sample is assigned to a single note number instead of a Keygroup Drum Programs are not used to play different tunes in scales on the keyboard unlike Keygroup Programs Rather they are useful when you want the dif ferent notes to play different sounds such as drum and phrase Samples Othe...

Page 12: ...basic parameters such as level pan tuning etc Combining these parameters with the Z8 s filters envelope shapers and LFOs enables you to perform advanced sound editing See Using Programs on page 48 for detailed information on creating and editing Pro grams Zone 1 Kick1 Zone 1 Kick2 Zone 1 Snar Zone 1 O Hat Zone 1 C Hat Zone 1 Tom1 Zone 1 Tom2 Zone 1 Tom3 Zone 1 Zone 1 Kick1 Zone 1 Kick2 Zone 1 Snar...

Page 13: ...lied while sampling see page 27 re sampling see page 38 or in Multi mode In addition to the various FX types Quick FX presets such as Power Swell and Crisp provide an intuitive way to apply FX See Using FX on page 78 for information on selecting and editing FX types When you use Multis you can adjust FX parameters via the Q Link control in real time See Using Q Link on page 75 for more information...

Page 14: ...ls Up to eight parameters four on the Z4 can be assigned to these controls for real time control See Using Q Link on page 75 for more information 3 SAMPLE button indicator Pressing this button selects Sample Edit mode which is used to edit Samples The SAM PLE button indicator lights up when this mode is selected See Editing Samples on page 29 for more information 1 D E F K L M N 2 3 4 5 6 G H I J ...

Page 15: ... MIDI IN B port 10 CURSOR buttons These buttons are used to select items parameter on the display pages See Navigating the User Interface on page 14 for more information 11 JOG dial This dial is used to increment or decrement parameter values Rotating it clockwise increases values rotating it counterclockwise decreases them See Navigating the User Interface on page 14 for more information 12 MAIN ...

Page 16: ...ed display page Each but ton corresponds to a function on the display See Navigating the User Interface on page 14 for more information 22 WINDOW button The WINDOW button is used to open and close display windows See Navigating the User Interface on page 14 for more information 23 SHIFT button This button is used as a short cut to special functions in conjunction with other buttons 24 Removable Pa...

Page 17: ...at digital audio signals typically from CD players DAT decks or any audio device with S PDIF format digital I O See Sam pling on page 22 for more information 3 DIGITAL I O OUT optional on Z4 This phono connector is used to output the MAIN OUT signals as S PDIF format digital audio 4 WORDCLOCK IN optional on Z4 This BNC connector is used to receive external wordclock signals 5 Wordclock TERMINATOR ...

Page 18: ...I ports transmit MIDI data received at the respective MIDI IN port A or B MIDI Song data can also be transmitted See General Utilities on page 89 for more information 10 USB port Slave This USB port is used to connect the Z8 to a PC or Mac for use with AKAI professional Akai ak Sys software which allows file transfer between the Z8 and the computer and remote editing of Programs and Multis See Con...

Page 19: ...hould be left above and below it to provide ade quate ventilation Do not mount the Z8 directly above equipment that produces a lot of heat such as a power amplifier If the Z8 is to be free standing ensure that it is placed on a sturdy level surface and that its ventilation grilles are not obstructed Hookup Example MIDI OUT MIDI OUT MIDI IN MIDI sequencer MIDI keyboard Headphones Mixer Amplifier Mo...

Page 20: ...o seven SCSI devices each with its own unique SCSI ID can be connected to the Z8 The last device on the bus must be terminated correctly See your SCSI device s manual for details See page 89 for information on setting the Z8 SCSI ID The factory default ID number is 6 Occasionally depending on the type and number of SCSI devices connected to the bus you may find that errors occur when trying to acc...

Page 21: ...nforms to the power require ments stated on the Z8 rear panel Switching On Off To help protect your loudspeakers and your hearing from switch on clicks and thumps switch on the Z8 and any other sound sources first Monitor amps should always be switched on last Reverse this sequence when switching off your equipment 1 Press the POWER switch to switch on the Z8 The Startup page appears as shown belo...

Page 22: ...not be edited but are for display pur poses only indicate an equal sign after their name You can access windows by pressing the WINDOW button when certain parameters are selected Pressing the WINDOW button when the Program name is selected on the dis play shown above opens the Program window shown below Windows close and the previous display screens are restored when you press the WIN DOW button a...

Page 23: ... shown below 2 Select the parameters and use the JOG dial to set them as required Note This determines the note that is generated when the PLAY button is pressed If you hold down the PLAY button while changing this value a new Note On message is gen erated as each note is selected This is convenient for checking the transitions between Keygroups and for checking what Samples are assigned to notes ...

Page 24: ...em in the Clipboard appears at the top of the window While the Clip board window is open you can play the Sample Program or Multi in the Clipboard by pressing the PLAY button or by pressing a key on a connected MIDI keyboard When the Clipboard window is closed you can play the current Sample Program or Multi allowing you to compare it with the Clipboard contents 3 To load the Clipboard Sample Prog...

Page 25: ...ttons to move the CURSOR within the name Use the Up and Down CURSOR buttons to select uppercase and lowercase characters respec tively To enter a space while holding down the SHIFT button press the Right CURSOR button To delete while holding down the SHIFT button press the Left CURSOR button You can copy and paste the name entry by using the COPY and PASTE buttons Press ENTER when you have finishe...

Page 26: ... window The specified disk is selected See Saving on page 84 for more information on the Disk List window 5 Use the Folder parameter to select the folder that contains the file you wish to load If the selected disk does not contain any folders or if you have selected the root directory the folder in the upper most hierarchy appears in the display Only files in the selected folder can be selected b...

Page 27: ... you just selected in the File parameter now appears in the left column Folder parameter and in the right column you can select a file from the selected folder When you close the window by pressing CLOSE the folder selected in the left column appears in the Folder parameter and the file selected in the right column appears in the File parameter To load the selected file press LOAD You can search f...

Page 28: ...the Load and Overwrite Samples parameters as required then press LOAD or press CLEAR to clear the entire memory before loading The Load parameter options are as follows WITH SAMPLES loads the Program with its Samples PROGRAM ONLY loads the Program without its Samples The Overwrite Samples parameter options are as follows YES overwrites Samples with the same name that are already loaded NO FASTER l...

Page 29: ... as follows YES overwrites Sam ples with the same name that are already loaded NO FASTER loads only the Sam ples that are not already loaded In addition to WAV files the Z8 can load files created for the following instruments These files can be loaded using the same procedure as for Z8 files When Samples that were created for other instruments are loaded differences may be heard in the sound outpu...

Page 30: ...uts as the input source requires optional IB 4ADT interface MAIN OUT Selects the Z8 s MAIN OUT as the input source allowing you to record the output from a Multi 3 Press the WINDOW button to access the Bit rate Pre recording time and Auto normalize parameters The Recording Setup window appears If the Time parameter was selected the Sam ple memory window appears instead System sampling rate The sys...

Page 31: ...indication across to the far right If the indication fills the display or the signal sounds distorted back off the REC GAIN control The Peak Hold function is convenient for checking signal peaks which are indicated by the following indicator You can reset the Peak Hold function by pressing RESET PEAK The Margin parameter displays the amount of headroom available before overload 8 Select the Time p...

Page 32: ...g manually by pressing START or cancel recording by pressing CANCEL If the Threshold parameter is set to MIDI the message Waiting for MIDI NOTE appears as shown below Recording starts when a MIDI Note On message is received i e when you press a key on a connected MIDI keyboard You can also start recording manually by pressing START or cancel recording by pressing CANCEL While recording is in progr...

Page 33: ... the Pro gram to which you want to add the Sample 3 If you selected a Drum Program select the Note parameter use the JOG dial to select a note and then press DO IT The Note parameter determines the MIDI note that will play the Sample The Sample is added to the selected Drum Program This completes the procedure for adding new Samples to Drum Programs 4 If you selected a Keygroup Program select the ...

Page 34: ... The Start key parameter determines the key to which the first Sample is assigned Sub sequent Samples are assigned to white keys in ascending order 4 Select the Sample name parameter and rotate the JOG dial The Name window appears See Entering Names on page 17 for more information The name that you enter here is applied together with a number to each Sample recorded For example if you enter the na...

Page 35: ...eds and falls below the specified threshold until you stop it 7 Press FINISH to end Auto Sampling Sampling with Q FX You can record Samples with FX as follows 1 On the Record page press Q FX The Quick FX window appears 2 Select the Mode parameter and use the JOG dial to select a mode OFF No Q FX COMMAND Use Q FX as shown In this mode you can apply one or two Q FX while recording mono or stereo Sam...

Page 36: ...cessor See Editing FX on page 81 for more details 5 Press CLOSE to return to the Record page and continue recording as nor mal When Q FX is enabled for recording i e set to COMMAND or FX a tick appears in the Q FX button as shown below Q FX Parameters 10 to 10 POWER Threshold Attack SWELL Rate Feedback DISTORT Depth Tone CRISP Depth Tone GROW DRUM Tune Depth MASSIVE DR Tune Depth WHIRL Rate Feedba...

Page 37: ...Sample in various ways Selecting Samples for Editing You can Samples for editing as follows 1 Press the SAMPLE button The SAMPLE button indicator lights up and the Z8 enters Sample mode 2 Press TRIM to open the following TRIM page The Sample name appears in the upper left corner Sample parameter 3 Move the cursor to the Sample parameter then use the JOG dial to select the Sample that you want to e...

Page 38: ...y When you tag Samples with an asterisk next to their name that were newly recorded or edited after being loaded from the disk the mark appears instead of an asterisk Selecting a Monitoring Item The Monitor parameter on the TRIM page enables you to select the item you wish to monitor in Sample mode Select one of the following options by using the JOG dial SAMPLE Enables you to monitor the selected...

Page 39: ... waveforms in and out as follows 1 Select the St or End parameter and hold down the SHIFT button The Function keys change as shown below 2 While holding down the SHIFT button press ZOOM or ZOOM to zoom in and out respectively Special Sample Playback for Auditioning You can audition the Samples by using the following Function buttons P TO While the St or End parameter is selected the F6 button disp...

Page 40: ...OG dial to change the number In this way you can make a coarse setting by changing the higher digits then fine tune the value by adjusting the units digit Setting the End Point You can set the End point by various methods depending on the End parameter display options Note that the End parameter and its value can be selected independently In Steps 1 and 2 below you must select the parameter name n...

Page 41: ...able you to edit Samples via Time Stretch Pitch Shift etc as well as by reversing or deleting a section of a Sample 1 In Sample mode press EDIT The Sample Edit window appears 2 Select the parameters then use the JOG dial to set them as required Edit DISCARD RE SAMPLE EXTRACT INSERT SAMPLE TO START DELETE SECTION SILENCE REVERSE PITCH SHIFT JOIN A B FADE UP DOWN MERGE NORMALIZE RE SCALE TIME STRETC...

Page 42: ...rences of the original Sam ple in all Programs in memory 7 Press KEEP to keep the new Sample in memory If you don t want to keep the new Sample in memory press RETRY to discard it and return to the previous window Edit Functions The following are the type of editing functions you can select in the Edit parameter in the Sample Edit window DISCARD The Discard function deletes the data except for the...

Page 43: ...IFT The Pitch Shift function enables you to change the pitch of the entire Sample Preset This parameter enables you to select a preset algorithm that suits the Sample The following preset algorithms are available FEM VOX Female voice MALE VOX Male voice LOW MALE VOX Male bass voice VOCAL HFRQ RHYTHM High range rhythm section MFRQ RHYTHM Mid range rhythm section LFRQ RHYTHM Low range rhythm section...

Page 44: ...and the quality of the low range improves Tune This parameter determines the amount of pitch shift JOIN A B The Join A B function joins two Samples together A B In these parameters select Samples to join Level Adjusts each Sample level X fade Sets the crossfade time to apply crossfade between the Samples Curve Specifies the crossfade curve FADE UP DOWN The Fade Up Down function enables you to appl...

Page 45: ...ples in memory The Normalize Tagged Samples window appears 2 Press DO IT to execute The KEEP or RETRY window does not appear when tagged Samples are normalized RE SCALE The Re scale function enables you to change the level of a Sample When MAX is pressed the Z8 scans the entire Sample and automatically calculates the maximum amount of gain that can be applied before saturation The calculated value...

Page 46: ... Sample names by using the New Left Name and New Right Sample parameters MONO TO STEREO The Mono To Stereo function enables you to convert two mono Samples to create a new stereo Sample Select an L channel Sample for the L source parameter and an R channel Sample for the R source parameter then enter a name for the new stereo Sample in the New ST name parameter Resampling with Q FX You can resampl...

Page 47: ...ou can apply Q FX in FX mode in the same manner as FX processors in Effect mode In FX mode the operation is more complicated but allows detailed settings You can apply up to four FX when resampling mono Samples two when resampling ste reo Samples 1 Select the Effect name parameter then turn the JOG dial The Select Effect window appears 2 Use the JOG dial to select the effect then press SELECT The ...

Page 48: ... that the LOOP page indicates the waveform of the looped section The display of the looped section differs depending on whether the Loop function is on or off 2 Select the Mode parameter then use the JOG dial to select one of the following options to determine how the Sample is played NO LOOP The Loop function is turned off The Sample playback is triggered by the Note On message and stopped by the...

Page 49: ...end to start start to end and so on Setting and Fine tuning the Loop Start End Points You can set the Loop Start and Loop End points in the same way as the Start and End point on the TRIM page You can fine tune the Loop Start and Loop End points in the Loop Fine window 1 Select the St or LP End parameter then press the WINDOW button The Loop Fine window appears You can view the waveform where the ...

Page 50: ...hich can make the transi tions at the Loop Start and Loop End points less noticeable This is especially useful if you have a loop with audible clicks 1 On the LOOP page press X FADE The X fade loop window appears as shown below 2 Select the X fade length and X fade curve parameters then use the JOG dial to set them X fade length Sets the length of the crossfade X fade curve LINEAR LOG SINE Specifi...

Page 51: ...et them as required Refer to LOOP TRIM SAMPLE This is used to select the section of the Sample that you want to divide into Regions When the parameter is set to LOOP the section between the specified Loop Start and Loop End points is used to create Regions When it is set to TRIM the section between the specified Start and End points is used to create Regions And when it is set to SAMPLE the entire...

Page 52: ...ow tempo Assign to program This parameter specifies whether or not the created Sample is assigned to a Program 4 To assign the newly created Sample to a Program select YES for the Assign to program parameter in the Sample Edit window then press DO IT The Assign to Program window appears 5 Select the parameters then use the JOG dial to set them as required Add to Specifies a Program to which you wi...

Page 53: ...ulator shown below You can access the Tempo Calculator by pressing TEMPO Select the parameters then use the JOG dial to set them Section Specifies the length of a section for use with the tempo calculation Beat This parameter should be set to the number of beats per bar of the phrase Current tempo The Tempo Calculator calculates the tempo based on the Section parameter and Beat tempo parameter The...

Page 54: ... more information on using the Name window Original note This determines the note at which the selected Sample plays at its orig inal pitch Tune This allows you to fine tune the pitch of the Sample in semitone and cent steps Rate This is the sampling rate of the selected Sample Bits This is the bit resolution of the selected Sample Size This is the size of the selected Sample in kilobytes Copying ...

Page 55: ...ged Sample press TAGGED To cancel the operation press CANCEL If you pressed DO IT the selected Sample is deleted If you pressed ALL the Delete ALL Samples window appears as shown below Press DO IT All Samples in memory are deleted If you pressed TAGGED the Delete Tagged Samples window appears as shown below Press DO IT Only the tagged Samples in memory are deleted Adding Samples to Programs Sample...

Page 56: ... page for Keygroup Programs is shown below The MAIN page for Drum Programs is shown below 2 Select the Program name and then use the JOG dial to select a Program Only Programs already in memory can be selected To select a Program stored on a stor age device you must load it first See Loading on page 18 for more information New Programs or Programs that have been edited have an asterisk next to the...

Page 57: ...nd then use the JOG dial to select a Program 3 Select the parameters and use the JOG dial to set them as required Monitor OMNI or MULTI This parameter determines how the selected Program responds to MIDI data in Program Mode When this parameter is set to OMNI the Pro gram can be played via any MIDI Channel When it is set to MULTI you can monitor the currently selected Multi Level 60 0 to 6 0 This ...

Page 58: ...rn on and off the Portamento function More Portamento parameters are available on the Portamento window shown below which is accessed by pressing the WINDOW button while the Portamento parameter is selected The Status parameter is the same as the Portamento parameter on the MAIN page and can be set to either ON or OFF The Speed parameter determines the rate of pitch change The Mode parameter selec...

Page 59: ...P or select by using the Right and Left CURSOR buttons New Programs contain one blank Keygroup i e no Samples assigned as shown in the example above New Keygroups can be created as follows If you do not need to create any more new Keygroups go to step 7 3 Select either a Keygroup number in the Kg column or the Kg edit parameter and then press the WINDOW button The Key Group window appears as shown...

Page 60: ...rmation on load ing Samples If you have created a new Program start by assigning Samples to Keygroups You can clear a Sample assignment by selecting the Sample name in the SOUND ZONE1 column and then rotating the JOG dial fully counterclockwise until a blank space appears To quickly locate and select Keygroups press and hold the SHIFT button while playing a connected MIDI keyboard 9 Select the Key...

Page 61: ...nd either the Keyspan Lo or Hi parameter is selected the MIDI keyboard can be used 12 To view the Keygroup s Keyspan settings graphically select SOUND ZONE1 and use the JOG dial to select KEY SPAN The KGRP page changes as shown below A keyboard graphic appears in place of each Sample name indicating the Keyspan of each Keygroup To view the Lo and Hi parameters as MIDI note numbers select any Lo or...

Page 62: ... setting specified for the Part is applied If you wish to use the FX with only a certain Keygroup such as a Drum Kit Program the FX output follows the Keygroup s setting not the Part s setting even if the Program has been assigned to the Part Select AB or CD to use the FX with stereo inputs Send This sets the FX Send level of each Keygroup In addition to assigning Keygroups to FX Sends you must al...

Page 63: ...ant regardless of the note played Playback ONE SHOT NO LOOP LOOP AS SAMPL This determines the Play mode of each Zone When set to ONE SHOT Note On messages cause Samples to play to their end regardless of any Note Off messages When set NO LOOP the Sample plays without looping for as long as the key is pressed When set to LOOP Sample playback is looped while the key is pressed When set to AS SAMPL S...

Page 64: ... can be created as follows See page 2 for more information on Drum Programs 1 Press the PROGRAM button The PROGRAM button indicator lights up and the MAIN page appears 2 Select the Program name and then press the WINDOW button The Program window appears as shown below 3 Press NEW The Create New Program window appears as shown below 4 Select the Type parameter and then use the JOG dial to select DR...

Page 65: ...le 5 Select the parameters and set them as required LVl 60 0 to 6 0 This sets the level of each Sample Pan L50 MID R50 This sets the pan position of each Sample Out L R L R 1 2 3 4 5 6 7 8 1 8 MLT The output of each Sample can be fed to the MAIN OUT an individual left or right MAIN OUT a pair of individual outputs if IB 48P IB 4ADT installed or a single individual output if IB 48P IB 4ADT installe...

Page 66: ...UNE pages is the same as that for Keygroup Programs except instead of being able to select Keygroups in the upper right corner of the page you can select drum notes See Configuring Keygroup Programs on page 51 for more information Configuring Program Modulation Modulation for Keygroup and Drum Programs can be configured as follows 1 On the KGRP page ASSIGN page for Drum Programs select the Tune or...

Page 67: ...se until a blank space appears Kg This is used to select the Keygroup whose modulation depth you want to set When ALL is selected you can set the depth of all Keygroups as a group You can set the depth of ALL Keygroups simultaneously then adjust individual Keygroups afterwards Depth This sets the depth of each modulator for the Keygroup selected by the Kg parameter Press GO to display pages that c...

Page 68: ... and then press DO IT If you selected MERGE the Merge Programs window appears Use the Source parameter to select the Program that you want to merge with the current program Select the New name parameter and rotate the JOG dial to open the Name window Enter a name for the new Program and then press DO IT The settings of the selected Program are used in the newly merged Program If you merge a Drum P...

Page 69: ...When you press the WINDOW button while the Scale parameter is selected the Pro gram Scale window opens as shown below which allows you to view the selected scale and create your own scale To create a custom scale Use the Scale parameter to select a preset scale then press USER to open the Copy Scale window Press DO IT to copy that scale to the User Scale Select the keys and use the JOG dial to set...

Page 70: ...end Down 0 24 These determine the maximum amount of pitch bend when the bend wheel is moved fully up and down Aftertouch 12 to 12 This determines the maximum amount of pitch bend when aftertouch is applied Bend Mode NORMAL HELD This determines how pitch bend is applied When set to HELD pitch bend is applied relative to the position of the bend wheel at the time notes are played However note pitch ...

Page 71: ... them Depth 0 100 This determines the LFO depth Rate 0 100 This determines the LFO speed When the Midi Sync parameter is set to ON the rate is synchronized to the incoming MIDI Clock information and this param eter can be used to set the number of oscillator cycles per beat 1 8 1 6 1 4 1 2 or 1 64 Delay 0 100 This determines the LFO delay time Wave TRIANGLE SINE SQUARE SAW UP SAW DOWN RANDOM This ...

Page 72: ...4 POLE BP 4 POLE BP 6 POLE BP 1 POLE HP 1 POLE HP 2 POLE HP 2 POLE HP 4 POLE HP 4 POLE HP 6 POLE HP LO HI LO BAND BAND HI NOTCH 1 NOTCH 2 NOTCH 3 WIDE NOTCH BI NOTCH PEAK 1 PEAK 2 PEAK 3 WIDE PEAK BI PEAK PHASER 1 PHASER 2 BI PHASE VOWELISER TRIPLE The Filter types marked with a feature enhanced resonance Cutoff freq 0 100 This sets the cutoff frequency of each Filter Resonance 0 64 This sets the ...

Page 73: ...the Kg edit parameter See Configuring the LFOs on page 63 for more information 3 Select the ENV parameter and use the JOG dial to select the Envelope Alternatively press ENVELP to toggle between the Envelopes There are three types of Envelope Amp mainly used for level controls Filter mainly used for Filter Envelopes and Aux mainly used for pitch Envelopes The parameters for each Envelope are expla...

Page 74: ...ch Envelopes i e if Reference is the same as L3 Samples will play at their original pitch R1 R4 These are the time settings for the four points L1 L4 These are the level settings for the four points You will need to select FILT ENV CUTOFF in the Program Modulation window to control the Filters via the FILTER envelope See Configuring Program Modulation on page 58 for more information This is the Fi...

Page 75: ...re are no Multis in memory the message no multi appears as shown below 3 If you want to view a list of Multis in memory press the WINDOW button The Multi List window appears as shown below The Multis in memory are listed in the order of their MIDI Program Change number which is displayed next to each Multi name 4 Use the JOG dial to select a Multi then press SELECT Only Multis already in memory ca...

Page 76: ...number parameter determines the number that will be used to select the Multi via MIDI Program Change The Multi select parameter determines how Multis are selected via MIDI When set to PROG CHANGE Multis can be selected by using MIDI Program Change messages When set to BANK CHANGE Multis can be selected by using MIDI Bank Change messages When set to OFF Multis cannot be selected via MIDI The Multi ...

Page 77: ...en press the WINDOW button The Part window appears as shown below In addition to creating new Parts you can delete DELETE existing Parts and sort ARRANG Parts by MIDI channels from this window 4 Press CREATE The Create New Part window appears as shown below 5 Use the JOG dial to specify the number of new Parts that you want to create 6 Press DO IT The specified number of Parts are created More Par...

Page 78: ...ill respond to MIDI data on channel 1 16 of the MIDI INA port When set to 1B 16B the Part will respond to MIDI data on channel 1 16 of the MIDI IN B port Note that all Parts assigned to the same MIDI Channel will play together No OFF 1 128 This displays the MIDI Program Change number that was assigned to the Part s Program in Program mode 10 Press TUNE The TUNE page appears as shown below 11 Selec...

Page 79: ...solo the Part Multiple Parts can be soloed Even muted Parts can be soloed The SOLO button flashes while the Solo function is active The letter S appears in the Part number column of Parts that are soloed as shown below Filtering MIDI Data You can filter various types of MIDI messages independently for each of MIDI Channels 1A 16A and 1B 16B as follows 1 Select a Multi as explained on page 67 2 Pre...

Page 80: ...or switched off The FX type for each FX processor is set in FX mode See Using FX on page 78 for more information Note that the AB and CD options are intended for adding FX to stereo Samples Note that a Keygroup s FX settings in Program mode must be set to MULTI for the settings on the FX page to work See Configuring Keygroup Programs on page 51 for more information Send dB Use the JOG dial to set ...

Page 81: ...in the upper left corner then use the JOG dial to select a Multi you wish to delete 3 Press the WINDOW button The Multi window appears as shown below 4 Press DELETE The Delete Multi window appears as shown below The Multi parameter indicates the Multi to be deleted 5 Press DO IT to delete the selected Multi or press ALL to delete all Multis in memory Alternatively press TAGGED to delete only the t...

Page 82: ... from which playback starts To Bar This determines the bar at which playback ends Tempo mode FILE MANUAL This parameter determines the source of the tempo information When set to FILE the tempo information in the MIDI Song File is used When set to MANUAL the Manual Tempo parameter setting is used Manual Tempo This sets the tempo when the Tempo mode is set to MANUAL This value cannot be changed whe...

Page 83: ...ing Q Link Q Link can be configured as follows 1 Select a Multi as explained on page 67 2 Press the Q Link button and then select the ASSIGN page shown below The Q Link ASSIGN page is divided into eight sections one for each Q Link control 3 Select the word Part or FX and use the JOG dial to select Part or FX for the Q Link control 4 If you selected Part select the Part parameter field and specify...

Page 84: ...example above 9 Use the JOG dial to select either of the following options REPLACE Adjustments made by using the Q Link control are absolute which means that they ignore the parameter s original setting OFFSET Adjustments made by using the Q Link control are relative to the parameter s original setting 10 Select the first range parameter for the Q Link control that you want to con figure and use t...

Page 85: ...en a Q Link control is assigned to control ALL i e all Parts Control Change messages are transmitted on the MIDI Channel assigned to the Multi select channel parameter on the Multi window When an FX processor is assigned to a Q Link control you can select the MIDI Channel that is used to transmit the Control Change messages When Control Change messages recorded by a MIDI sequencer are played back ...

Page 86: ... SEND A D Selects FX Send A B C or D as the input source The same FX Send can be selected for one or more FX processors FX 1 4 Selects the output of FX processor 1 4 as the input source allowing you to con nect FX in series Since the input to each FX processor is mono and the output is stereo the output of the preceding FX processor is mixed into mono before being fed to the sub sequent FX process...

Page 87: ...ted the FX processor output is not fed to any of the outputs which is useful when FX are connected in series In the following configuration example FX3 and FX4 provide delay and reverb in series The input source for FX4 is set to FX3 Samples routed to FX Send B are processed by FX3 delay whose output is fed to both L R and the input of FX4 reverb the output of which is also fed to L R Selecting FX...

Page 88: ...re linked the FX Type and Output parameters are set by FX1 FX3 The Output parameter for FX2 FX4 cannot be set The FX Type parameter for FX2 FX4 appears as STEREO LINKED as shown below Stereo Samples in Programs and Multis can be routed to linked FX via the AB or CD FX Send See Configuring Keygroup Programs on page 51 and Applying FX to Parts on page 72 for more information In the following linked ...

Page 89: ...Program or Part signal are output Editing FX FX can be edited as follows 1 Press the FX button The FX button indicator lights up and the PATCH page appears 2 In the FX Type column select the FX processor that you want to edit 3 Press EDIT The edit page for the selected FX appears as shown in the example below 4 Select the parameters and use the JOG dial to set them as required FX can be turned on ...

Page 90: ...ural distortion effect distorts input signals An equal izer is connected to the effect in series Enhancer This monaural effect enhances sounds by adding new over tones Expander This monaural effect limits signals at a certain level thresh old or lower and expands the dynamic range providing an effect opposite to the compressor effect Flanger Mono This is a standard flanger effect with mono in and ...

Page 91: ...berations of a medium size room Reverb Non linear This reverb effect simulates reverberations that are cut by a gate Reverb Plate 1 This stereo reverb effect simulates reverberations of a typical plate reverb Reverb Reverse This stereo reverb effect simulates reverberations with reverse playback Reverb Small Hall This stereo reverb effect simulates reverberations of a small hall Reverb Small Room ...

Page 92: ...ction method SCSI ID and the amount of free space Disk partitions are displayed as separate disks Disks can be selected by using the JOG dial or CURSOR Up and Down buttons You can display more information about the selected disk by pressing INFO Disks can be renamed by pressing RENAME The UPDATE button updates the Disk List 4 Select the Folder parameter and use the JOG dial to select a folder To m...

Page 93: ... saves all files in memory The Item parameter indicates only the file selected in the Type parameter If SAVE ALL is selected the Item parameter does not appear 6 Select the Item parameter and use the JOG dial to select the file in mem ory that you want to save 7 Press DO IT to save the specified file press ALL to save all files of the specified type in memory or press MODIFY to save only new and m...

Page 94: ...imilar to the following appears 9 Set the Save and Replace same samples parameters as required and then press DO IT The Save parameter options are as follows MULTI ONLY saves the Multi with no Programs and no Samples WITH PROGS SAMPLES saves the Multi with its Pro grams and Samples WITH PROGRAMS saves the Multi with its Programs NEW MODIFIED saves the Multi with all its new and modified Programs a...

Page 95: ...tions include PROGRAMS MULTIS and FOLDERS 3 Select the Disk parameter and use the JOG dial to select the disk that contains the file or folder Disks can be selected from the Disk List window See Saving on page 84 for more information 4 Select the Folder parameter and use the JOG dial to select the folder containing the file or folder to be copied moved or deleted To move transversely through the f...

Page 96: ...w opens See Entering Names on page 17 for information on naming 6 When the warning window appears press DO IT Formatting commences The time taken to format a disk depends on its size The Z8 supports FAT16 and FAT32 DOS disk formats Disks smaller than 2 GB are for matted as FAT16 Larger disks are formatted as FAT32 You can also use the Quick Format and Wipe Volume functions by selecting QUICK FORMA...

Page 97: ... the default being 6 MIDI out thru A B These set the function of the MIDI OUT THRU ports to either MIDI OUT or MIDI THRU Setting the Display Contrast Note Display Date Time The display contrast note display format date and time can be set as follows The Z8 uses the Date and Time settings to date stamp files when they are saved 1 Press the UTILITIES button and then select the DISPLY page shown belo...

Page 98: ... to the WORDCLOCK IN you can output digital audio at 44 1 kHz via the DIGITAL OUT regardless of the fact that the Z8 s internal clock is running at 96 kHz INTERNAL Synchronizes the DIGITAL OUT signal to the Z8 s system clock DIGITAL IN Synchronizes the DIGITAL OUT signal to the digital audio signal being received by the DIGITAL IN ADAT IN Synchronizes the DIGITAL OUT signal to the digital audio si...

Page 99: ...a square indicator appears above the corresponding port and MIDI Channel number useful for troubleshooting MIDI setups Initializing the Z8 All parameters inside the Z8 can be reset to their factory defaults as follows 1 Press the UTILITIES button The UTILITIES button indicator lights up and the GLOBAL page appears 2 Press INIT The Initialize ALL PARAMETERs window appears as shown below 3 Press DO ...

Page 100: ...ORY DELETE ALL 3 Press DO IT The Warning window appears for confirmation 4 Press YES to erase all data in memory You can also select PURGE UNUSED SAMPLES or PURGE UNUSED PRO GRAMS for the Do parameter These functions are the same as PURGE SAMPLES and PURGE PROGRAMS in the Program window in Program mode After selecting one of these functions press DO IT to open the Warning window then press YES to ...

Page 101: ...Wave Low Frequency Oscillators Display Backlit 248 x 60 dot graphic LCD Connectors REC IN 2 x 1 4 stereo phone balanced STEREO OUT 2 x 1 4 stereo phone balanced 6 dBm ASSIGNABLE OUTS 8 x 1 4 stereo phone balanced 6 dBm optional HEADPHONES 1 x 1 4 stereo phone 60 mW 32 ohms load max MIDI 4 x 5 pin DIN IN OUT THRU x 2 SCSI Interface 1 x 50 pin high pitch SCSI S PDIF digital IN OUT 2 x phono input ou...

Page 102: ...drums 57 Zones 58 E Edit Functions 34 Editing DELETE SECTION 35 DISCARD 34 EXTRACT 34 FADE UP DOWN 36 FX 81 INSERT SAMPLE TO START 35 JOIN A B 36 MERGE 36 MONO TO STEREO 38 Multis 67 NORMALIZE 37 parameters 14 PITCH SHIFT 35 Programs 48 RE SAMPLE 34 RE SCALE 37 REVERSE 35 Samples 29 33 SILENCE 35 STEREO TO MONO 38 TIME STRETCH 38 End point display format 32 Samples 30 Entering names 17 Envelopes i...

Page 103: ...editing 67 filtering MIDI messages 71 loading 18 renaming 68 saving 84 selecting 67 Mute groups Drum Programs 57 Keygroup Programs 51 54 N Naming 17 NORMALIZE 37 O Option slot 9 Original 23 P Pages about 14 Panning drum Zones 57 Parts 69 Zones 51 54 Parts applying FX 72 assigning MIDI Channels 69 assigning Programs 69 creating 69 deleting 69 filtering MIDI messages 71 keyspan 69 panning 69 Q Link ...

Page 104: ...CSI connecting devices 12 formatting disks 88 port 10 Z8 ID 89 Selecting FX types 79 Multis 67 parameters 14 Programs 48 Samples for editing 29 SHIFT button 8 SILENCE 35 Size 18 SMF playing 74 Songs playing 74 Start Point 30 32 Stereo Sample 23 STEREO TO MONO 38 Switching on the Z8 13 Sync 90 System clock setting 90 System sampling rate 22 T Tag 30 TERMINATOR switch 9 Testing Memory 92 Threshold s...

Page 105: ...essages Altered True Voice Note ON Note OFF Key s Channel 0 1 Memorized disk Multi Mode Program Sample Mode C 2 G8 C 2 G8 Selectable as KEY or CHANNEL 24 Semitones Bank Select Multi Modulation Wheel X X X X X X O O X O X X AUX MESSAGES All Sound Off Reset Controllers Local ON OFF All Notes OFF Active Sensing System Reset Mode 1 Mode 3 OMNI ON POLY OMNI OFF POLY Mode 2 Mode 4 OMNI ON MONO OMNI OFF ...

Page 106: ......

Reviews:

Related manuals for Z4