


KONA LH Capture, Display, Convert v14.3 15 www.aja.com
Cabling the System
KONA LHi Cable Connections
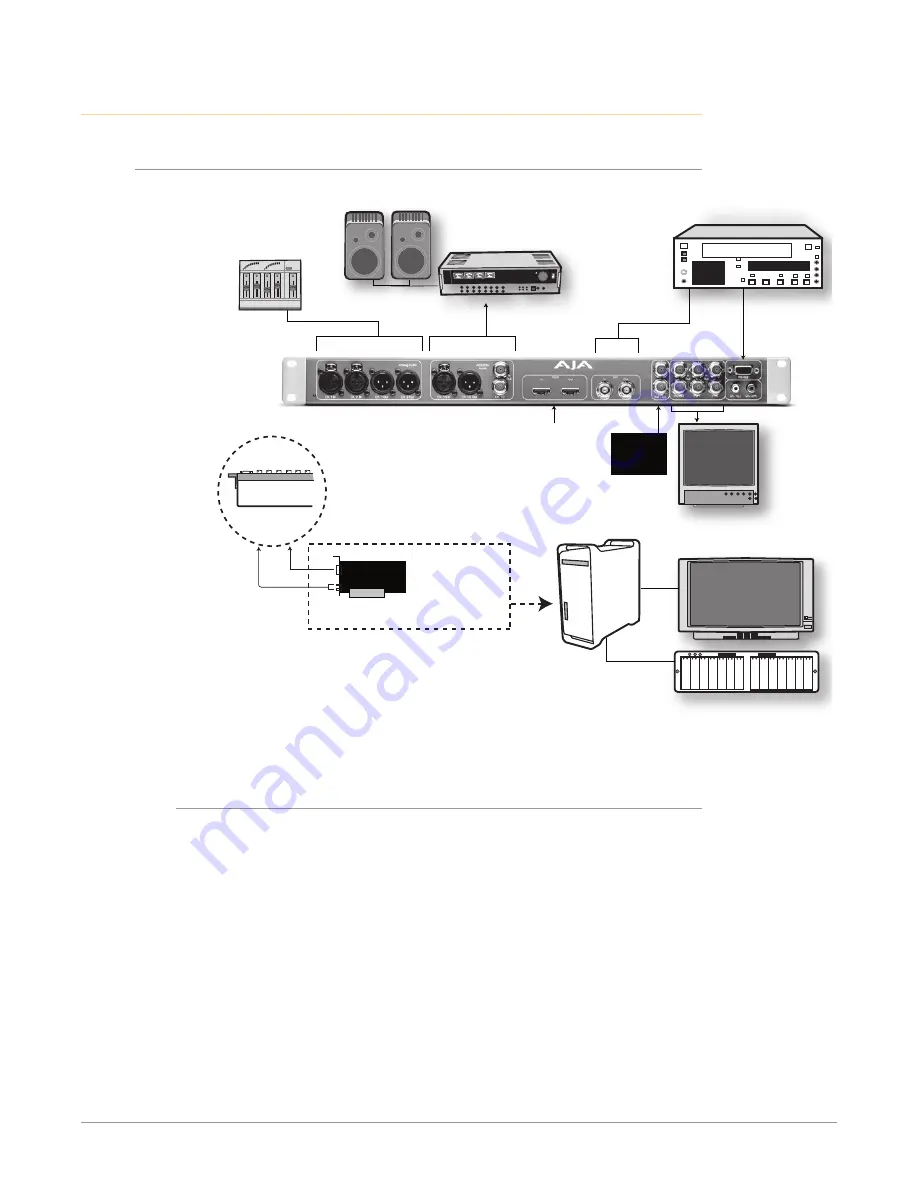
Figure 5. Typical KONA LHi System Shown with Optional KLHi-Box
Digital VTR with SDI Inputs
RS422
Machine
Control
SDI Video
with Embedded
Audio In/Out
Audio Monitor
AES/EBU Audio In/Out
to Monitor System
Reference Monitors
Analog Audio
Inputs/Outputs
(Balanced)
POWER
CMPTR
External Storage
Computer Monitor
••
••
••
••
••
••
••
••
••
••
••
••
••
••
••
••
••
••
Optional
Genlock
Reference
Video Monitor
Component
Video
Apple Mac Pro
with OSX
or PC with
Windows 7
AJA KONA LHi Card
Connect to
KLHi-Box Using
Cables and Instructions
Supplied With it
Installed
Inside Mac
or PC
Connect HDMI In/Out
Adapter Cables
Between KONA LHi
Card and KLHi-Box
Also see
Figure 1 on page 10
for KONA LH cable connector identification.
Typical System
Figure 5 on page 15
shows typical system interconnections for a system
with digital A/V sources. Your system may differ depending on VTRs, audio
monitoring, and video monitoring.
1. If desired, connect your house reference sync to the KONA LHi Ref Loop
connector (BNC). The second KONA LHi Ref Loop connector on the KLHi-
Box (if used) can be connected to the VTR or terminated with a 75-ohm
terminator. If instead using LTC timecode input, connect to the Ref Loop
input.
2. Connect an HDMI Video Monitor to the KONA LHi HDMI Out connector. Or
instead, use the Component Analog Video Out BNC connectors to go to an
analog monitor.
3. Connect a 9-pin DE9 machine control cable between your VTR’s RS422
control port and the breakout cable’s RS-422 machine control connector.
4. Connect two SDI cables between KONA LHi (BNCs are on the card endplate)
and your digital VTR (Digital Betacam etc.), one from KONA LHi SDI In to the


