background image


Aisino RCK-600                                                                                                              User Guide  


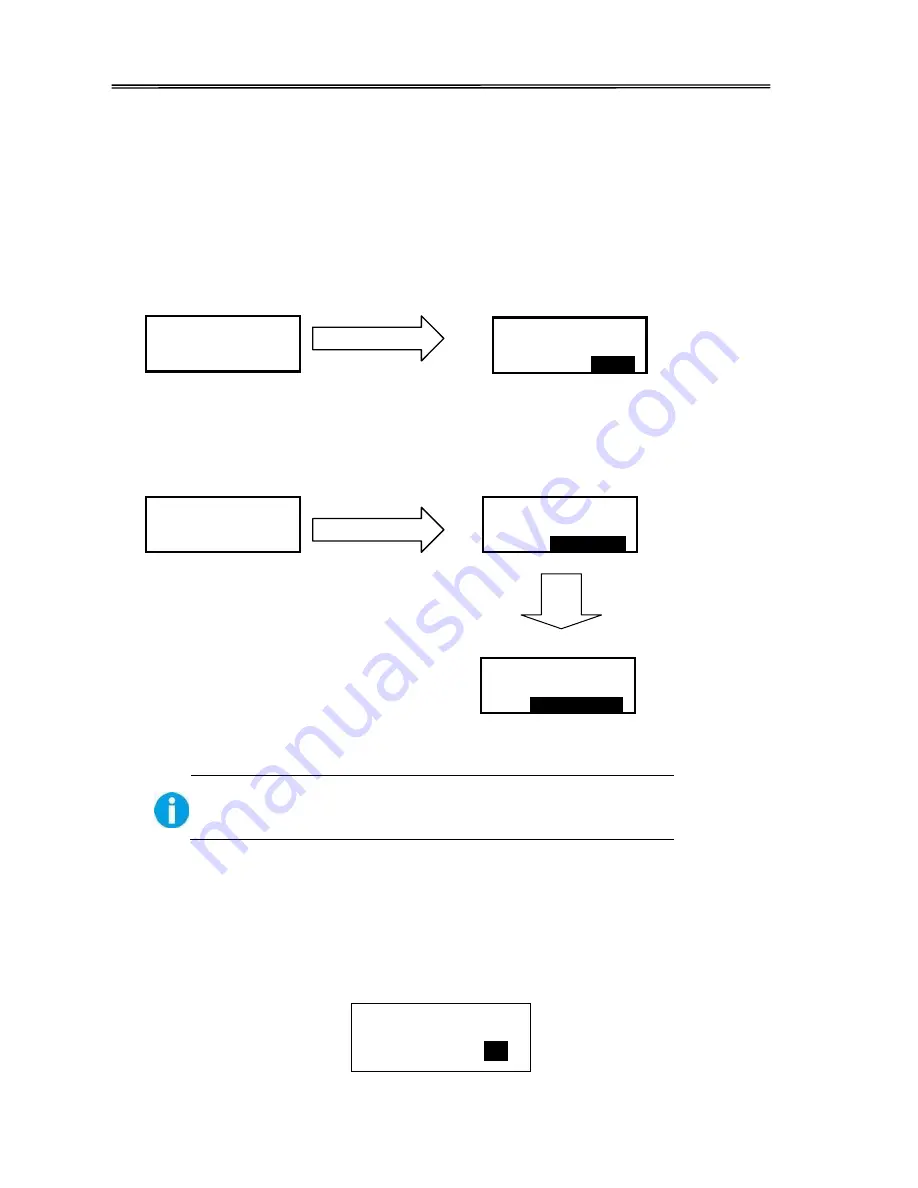
3.2 User Mode


User Mode allows changing the parameters and checking the status.


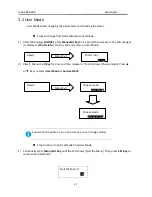
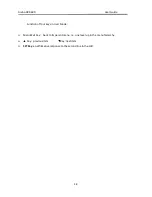
Steps to change from Normal Mode to 

User 

Mode:


1)


After LCD 

displays 

[READY]

, press 

Menu/Exit Key 

for 1 second then release it. The LCD changes


its display to [

Printer Info

.],

 which is the entry menu in User 

Mode:


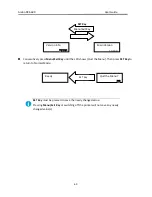
2)


Press


Menu


/Exit


Key 

for 

3

 second then release it. 

The


LCD

 shows [Choose mode]. 

Press


▲ 

or 

▼ 

Keys to select 

User Mode 

or 

Service Mode

:


Even when the printer is in an error state, you can change modes.


Step to return to Normal Mode from

 User 

Mode:


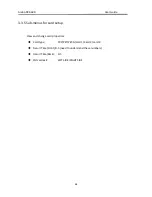
1)

  Continually press 

Menu/Exit Key 

until the 

LCD

 shows [Quit the 

Menu].


Then

 press 

SET Key 

to 

return to Normal


Mode:


Quit the Menu


Yes


Choose mode 

Service Mode


Ready 

Menu/Exit


Printer Info.


Setup:


Ready 

Menu/Exit


Choose mode 

User Mode


57


Summary of Contents for RCK-600

Page 1: ......

Page 2: ... substances Ensure the printer is connected to a socket with the correct voltage Always disconnect the printer from power source before opening the device to perform maintenance work or remedy errors Do not expose the printer to high temperature direct sunlight or dust Keep all liquids away from the printer Protect the printer from shock impact and vibration Make sure that both printer and compute...

Page 3: ...oder explosiven Stoffen auf Den Drucker nur an eine Steckdose mit der richtigen Spannung anschließen Wenn Sie den Drucker vom Netz trennen wollen den Drucker ausschalten und immer den Netzstecker an der Steckdoseziehen Den Drucker weder hohen Temperaturen noch direktem Sonnenlicht und Staub aussetzen Keine Flüssigkeiten mit dem Drucker in Berührung bringen Den Drucker keinen Erschütterungen Stößen...

Page 4: ...ension est correcte Pour déconnecter l imprimante de l alimentation principale mettre l imprimante hors tension et toujours débrancher le connecteur secteur de la prise murale Ne pas exposer l imprimante à des températures élevées à la lumière directe du soleil ou à la poussière Ne pas mettre l imprimante en contact avec des liquides Ne pas exposer l imprimante à des chocs impacts ou vibrations S ...

Page 5: ...Collegare la stampante a una presa di corrente con tensione adeguata Per scollegare la stampante dalla rete di alimentazione spegnere la stampante e disinserire sempre il connettore di rete dallapresa Non esporre la stampante ad elevate temperature né alla luce solare diretta e alla polvere Evitare il contatto della stampante conliquidi Non esporre la stampante a colpi scosse ovibrazioni Verificar...

Page 6: ...as explosivas Asegure conectar la impresora sólo a un enchufe con un voltaje correcto Cuando quiera desconectar la impresora de la red apague la impresora y siempre hale de la clavija de alimentación del enchufe nunca delcable No exponga la impresora a temperaturas altas a la luz solar directa y al polvo No ponga la impresora en contacto con fluidos Nunca exponga la impresora a sacudidas choques o...

Page 7: ...яющихся газов и взрывчатых веществ Включайте принтер в розетку толькос соответствующим напряжением Если Вы хотите отключить принтер от напряжения сначала выключите принтер сам и затем выньте штекер изрозетки Берегите принтер от нагревания от попадания на него прямых солнечных лучей и пыли Не допускайте попадания жидкости напринтер Нельзя подвергать принтер тряске ударам ивибрации Убедитесь что при...

Page 8: ...nciasexplosivas Assegure se de conectar a impressora à tomada elétrica com a voltagem apro priada Quando desligar a impressora da rede desligue sempre a impressora e retire o cabo da tomada Não exponha a impressora a temperaturas altas ou luz solar direta Não aproxime substâncias líquidas da impressora Proteja a impressora de choques impactos e vibrações Desligue a impressora e o computador antes ...

Page 9: ...zıcı akım kablosunu sadece doğru gerilime sahip bir prizetakın Yazıcıyı şebeke ağından ayırmak istediğinizde yazıcıyı kapatın ve ağ fişini her zaman prizden çıkartın Yazıcıyı ne yüksek ısılı ne de doğrudan güneş ışığına ve toza mâruz kalan mekânlarda bulundurun Yazıcı hiçbir sıvı maddeyle temasta olmamalıdır Yazıcı hiçbir sarsıntıya darbeye veya titreşime mâruz kalmamalıdır Veri kablosu bağlanmada...

Page 10: ...ademark of Centronics Data Computer Corporation DOS is a trademark of Microsoft Corporation SAP is a trademark of SAP AG Windows Windows 7 Windows 8 Windows 95 Windows 98 Windows NT Windows 2000 Windows 2003 2008 2012 2012R2 Server Windows XP and Windows Vista are trademarks of Microsoft Corporation All other product names and company names appearing in this manual are the registered trademarks or...

Page 11: ...ead the following carefully before handling the product CAUTION Provides information that must be observed to prevent damage to the equipment or loss of data NOTE Advises you of information that is essential to complete a task Related Software and Documents Related Software and Documents Software document name Description RCK 600 User Manual This manual RCK 600 Maintenance Manual This manual provi...

Page 12: ...Installing Windows Driver via Ethernet 17 CHAPTER 2 INSTALLATION 22 2 1 Installing Cards 22 2 1 1 Card Specifications 22 2 1 2 Setting the Card Thickness 23 2 1 3 Adjust the card inlet according to the thickness of the cards 25 2 1 4 Face Up Down Stacking for Output Cards 26 2 1 5 Optimizing Print Quality 26 2 1 6 Managing Rejected Cards 27 2 2 Replacing the Ribbon 27 2 3 Replacing the Retransfer ...

Page 13: ...11 Sub menus for Reset User Default 69 CHATPER 4 CLEANING 70 4 1 Cleaning with a Cleaning Card 70 4 2 Cleaning the Cleaning Roller 71 4 3 Cleaning the FeedingRoller 71 4 4 Cleaning the Transport Roller 73 4 5 Filter Cleaning 74 CHATPER 5 TROUBLESHOOTING 75 5 1 Warning Messages andTroubleshooting 75 5 2 Valuable Help fromYou For Troubleshooting 77 5 3 Troubleshooting 78 5 3 1 Faults Related to Prin...

Page 14: ...Aisino RCK 600 User Guide ...

Page 15: ...rial Check if the parts and accessories in the box are complete as the following picture If found any damage Please contact the carrier and notify your authorized Aisino reseller to realize the steps to be taken When repairing the printer you must provide the complete original package outer crate wedge and package If send back the printer without original package or the accessories are damaged in ...

Page 16: ...ard cassette 1 unit Reject bin 1 piece Output tray 1 piece Power cord 1 piece USB cable 1 piece Cleaning Card 1 piece Graphic installation guide 1 piece CD ROM 1 piece Includes operation manual GIG User Guide Driver card editor software Setup Tool Product using video 2 ...

Page 17: ...ve thepackaging Remove protective material as shown below before the printer power on Pinch the box locker loosen and remove it 2 in front 2 in the back 4 in total Hold the handles on both sides of the box and then pull up the box 3 ...

Page 18: ... or explosive materials or a heater stove or any other device that produces heat Do not place the printer near volatile combustible materials such as combustible materials Place the printer away from walls as shown in the diagram below to maintain air flow Also maintain at least 30 cm 12 inches of open space above the printer Blocking vents may cause the printer to overheat and fail prematurely Do...

Page 19: ...terminals installed as type A B or C A copper rod 65 cm 25 6 inches or longer buried in the ground Not permitted for ground wires Gas piping risk of fire or explosion Water pipes or taps water pipes that include plastic piping cannot act as a ground However if a water pipe is configured to act as a ground then connection of a ground wire ispermitted Telephone line ground wires or lightning conduct...

Page 20: ...ating platen and printer head may produce high temperature please don t touch these three parts Under the following conditions images on cards may deteriorate or cards may warp afterprinting The surface of the card is in contact for an extended period with a vinyl card holder or synthetic leather or other material that contains a plasticizer The surface of the card is exposed to direct sunlight fo...

Page 21: ...Aisino RCK 600 User Guide 1 3Printer Components 1 3 1 The front side of the printer Printer components and their functions are shown as below 7 ...

Page 22: ...er film move the lock switch away from retransfer film cartridge to release Retransfer film cartridge Retransfer film This is where you install retransfer INTM film Ribbon cartridge Ribbon cartridge This is where you install color print ribbon Rib cartridge lock When loading ribbon move the lock switch away from print ribbon cartridge to release Power switch Turns power on and off Front cover swit...

Page 23: ... 600 User Guide 1 3 2 The profile of printer Component Name Function Output slot Ejects correctly printed cards Output tray Catches collects correctly printed cards Reject bin Cards with errors are placed here 9 ...

Page 24: ...te gap to match card thickness Factory default is set so the gap corresponds to feeding of cards of 0 76 mm 30 mil cards Manual feeding slot Manually feed cards one at a time or single feed Ejection slot Through this slot to eject cards Interface USB Hub USB 2 0 and Ethernet as standard interface Serial 1 and serial 2 as optional Power socket Used to connect Power Cable 10 ...

Page 25: ...d buzzer There re two LED lights blue means ready red means error The combinations of different lights and buzzer mean different status of printer Printer Status Ready LED Blue Error LED Red buzzer Initiating Flashes Flashes Heating Ready On Off Menu setup On On Printing Flashes Off Warning Flashes Flashes Error Off On Buzz constantly LCD User can learn status of printer and modify the parameters ...

Page 26: ...uter arepowered off 2 Connect the power cord to theprinter 3 Connect the power cord to thepower socket 4 Ensure the power cord is securely connected Turn on the printer power button 1 Press the power switch I switch on the printer 2 Press the power switch O switch off the printer 12 ...

Page 27: ... of this printer are USB port and Ethernet port All the ports are behind of the printer please choose the proper port 1 Ensure your printer is switch off 2 Insert the interface cable into the corresponding port 3 Connect the other end of the interface cable to the hostcomputer 13 ...

Page 28: ...and etc via driver We load the driver on the attached CD The guide steps are operated with Win 10 system 1 6 1 Installing Windows Driver via USB Connect the USB cable to the computer put the CD ROM into the computer then choose print diver program manual The program will guide you to finish the whole installation Please follow the installer carefully Some Windows versions require users to have adm...

Page 29: ...Aisino RCK 600 User Guide 2 Select the diver selection and port selection click Next 3 Set up the printer name click Start 15 ...

Page 30: ...Aisino RCK 600 User Guide 4 Waiting for the installation 5 Finish the installation click the Finish 16 ...

Page 31: ...l The program will guide you to finish the whole installation Ensure the printer and the computer are on the same LAN before installation Switch on the printer Please follow the installer carefully Some Windows versions require users to have administrator privileges to install the driver 1 Choose the install port click Next 2 Click Search 3 Choose you printer click Modify printer 17 ...

Page 32: ...Aisino RCK 600 User Guide 4 You can modify the Printer name IP address acquisition mode IP address Subnet mask Click the OK when you finish 18 ...

Page 33: ...et port configuration page wait for a few seconds you can see the updated Ethernet information 6 Select you printer click Select the corresponding IP address information is displayed at the bottom left Start the installation when you click the OK 19 ...

Page 34: ...Aisino RCK 600 User Guide 7 Select the diver selection and port selection click Next 8 Set up your printer name click Start 20 ...

Page 35: ...Aisino RCK 600 User Guide 9 Waiting for the installation 10 Finish the installation click the Finish 21 ...

Page 36: ... 1 Card Specifications This printer supports CR 80 cards Dimensions 85 6mm 54mm Thickness 0 48mm 1 10mm Types blank card magnetic stripe card contact smart card contactless smart card and pre printed card Non CR 80 cards may cause defective print results or become stuck or lodged in the printer requiring service Do not use the cards listedbelow Previously printedcards Damp cards Cards containing f...

Page 37: ...cover will be released 2 1E A Open the slot cover backwards A 2E AMove the card block lever to the left A 3E APress the lever handle with your hand and move the card to the left A 4E AAt the same time insert the card into the slot Release the lever handle the block return to fix the card A 5E AMove the lever to the right close the cassette 23 ...

Page 38: ... code selection may not work properly 3 Open the top cover of card printer A 1E AFirstly press the right side of the card cassette into the printer A 2E A Then press the left side of the card cassette into the printer 4 Close the top cover When take out the card cassette lift up the left side of the card cassette firstly then take the left side In this way user can easily take out the card cassett...

Page 39: ...ull out the whole feeder 2 Take out all stored cards if any 3 Turn the knob underneath the card cassette right and left to adjust the card inlet The number corresponding to the position of the knob indicates the size of the open gap When you don t want the card pass turn the knob to the right When you have multiple cards pass turn the knob to the left 4 Put the card cassette in place close the top...

Page 40: ...he Key to change the stacking orientation Press the SET Key Auto is the factory default for output cards stacking 2 1 5 Optimizing Print Quality For optimizing print quality you can change the retransfer settings refer to the card you want to print You can select proper card type by LCD panel settings or Windows driver software to optimize the print quality which is determined by the retransfer sp...

Page 41: ...Key Press the Key until Std card exit Error card exit is displayed Press the SET Key Press the Key to select the proper reject slot For factory defaults the printer outputs correctly printed cards and rejected ones to the left and right slots respectively 2 2 Replacing the Ribbon Change the ribbon when the LCD prompts RIBBON END message Approved ribbons for this printer Type Description Product Co...

Page 42: ...hin the warranty period fees may be charged on servicing the printer using non genuineproducts You can get the unused quantity of ribbon and retransfer film Refer Section 3 3 to get the unused amount of your ribbon retransfer film LCD Panel operation or the Windows software driver provide an estimation of the remaining ribbon retransfer film that are sufficient for your current print job The LCD d...

Page 43: ...Aisino RCK 600 User Guide Open the front cover Hold the handle and open front cover Turn the ribbon lock clockwise to unlock the ribbon cartridge and pull out the whole cartridge 29 ...

Page 44: ... ribbon film route the film around three guiding poles Finally engage the black spool to the winding hub of cartridge Apply some force to push in the spools to the hubs The ribbon should be slightly tightened and not slanted As shown in the right diagram push in the ribbon cartridge to the far end until a click is heard to indicate correct insertion 30 ...

Page 45: ...ate the film in the replacement process You can check the unused amount of your ribbon retransfer film Refer Section 3 3 to get the unused amount of your ribbon retransfer film When the film cartridge is removed do not touch the interior space which is very hot Read provided safety instructions Approved retransfer film Type Description Product Code Transparent Retransfer Film Transparent retransfe...

Page 46: ...for ribbons not listed above Direct touching contaminates the ribbon retransfer film and causes uneven print quality Avoid dropping or stressing the ribbon retransfer film when replacing them Using non genuine products may cause poor print quality and printer 32 ...

Page 47: ... malfunction Quality and reliability of non genuine products are not guaranteed Even within the warranty period fees may be charged on servicing the printer using non genuineproducts Hold the handle and open the front cover 33 ...

Page 48: ...etransfer film onto the cartridge engage the green spool of the retransfer film to the feeding hub of the cartridge While unwinding the ribbon film route the film around the five indicated guiding poles Note the change of direction on the 4th pole Finally engage the black spool to the winding hub of the cartridge need to show winding hub in picture to right 34 ...

Page 49: ...sertion Improper retransfer film installation affects the overall print quality After inserting the retransfer film cartridge double check so that there is no slanted film Open the printer top cover Take out the card cassette Confirm the retransfer film stays within the area shown in the right diagram Between the two stages of guiding spool 5 If not re install retransfer film cartridge by followin...

Page 50: ... Guide Return the front cover to its original position Press SET key when the LCD screen displays Please press the Set key 2 4 Replacing the Cleaning Roller Replace cleaning roller each time you change the ribbon film 36 ...

Page 51: ...Aisino RCK 600 User Guide Open the front cover Hold the handle and open the front cover 37 ...

Page 52: ...RCK 600 User Guide Directly pull out the cleaning cartridge to release it from lock position Pull the lock to release the spindle Remove the old cleaning roller Sleeve a new cleaning roller into the spindle 38 ...

Page 53: ...nd drop the roller to its original position in the cleaning cartridge After the replacement procedure restore the cleaning cartridge until you hear a click sound Return the front cover to its original position Press SET Key when the LCD screen displays Please press the set key 39 ...

Page 54: ...Aisino RCK 600 User Guide 2 5 Installing the Output Tray Hook the output tray to the opening next to the output slot 40 ...

Page 55: ...Aisino RCK 600 User Guide 2 6 Installing the Reject Bin Hook the reject bin to the opening next to the ejection slot 41 ...

Page 56: ...upport AISINO card printers Users can quickly generate and edit content that needs to be printed 1 Double clicks Card Editor icon to start click create icon as following picture There re 5 buttons Click above buttons separately can control different function Button 1 New user can create a new card Button 2 Template user can choose a suitable card template then edit and modify it Button 3 Open user...

Page 57: ...ludes lines rectangle circles text one dimensional code QR code and images The advanced tools includes clip art print counting date database image image collection and signature collection Each object has some properties such as location borders color fill rotation and so on The user can add these objects to the card area refer to their requirements And the position of these objects can be adjuste...

Page 58: ...Aisino RCK 600 User Guide Click Template on the right side of the user interface then user can see many default templates as follow 44 ...

Page 59: ...no RCK 600 User Guide The detailed instruction can be found as below picture 4 Double clicks the model you want to edit when you finish click the print on the file menu 5 You can print the card directly 45 ...

Page 60: ...se side and maintenance Card Tabs The printing side User can choose front reverse side to print Printer can print the image on the card reverse side and can also split the different color of the ribbon Card direction Portrait or landscape Print quantity Rotation Rotate 180 printing on the front reverse side Ribbon tabs User can choose the card type manually and also check the printer ribbon type a...

Page 61: ...Aisino RCK 600 User Guide 47 ...

Page 62: ...ia print K color or YMC secondary colors and K color As well as user can choose monochrome printing color printing set the black valid area and the black invalid area Black ribbon settings Monochrome printing or color printing Choose the card which is monochrome printing or color printing The printing method of black data Set black color via using K color to print or using YMC secondary colors and...

Page 63: ...black printing Set up the valid area of K color printing the area is from the top left corner 0Pixel 0Pixel to the lower right corner 2112Pixel 1324Pixel on the card Use width and height to set the length and width of the invalid printing area 49 ...

Page 64: ...color via settings User can also adjust the color brightness contrast and chroma Settings of Black ribbon using User can print black via print K color or YMC secondary colors and K color As well as user can choose monochrome printing color printing set the black valid area and the black invalid area 50 ...

Page 65: ...e maximum printing area and minimum printing area Printer parameter setting User can read the detailed printer parameter Showing the printer status monitor Decide whether the monitor pops up during printing Color management Processing optimization of Color can make the color more consistent with the color displayed by the software 51 ...

Page 66: ...ons state and various of configuration information The printer information parameters and options state parameters only support readable Configuration information support can read and write reference 3 2 user mode Servicemode The password is 123456 If you want to modify it you can follow the below steps 52 ...

Page 67: ...K 600 User Guide In service mode user can modify the print position print density system settings print head option state and configuration Please don t random change them it may lead to poor printing effect 53 ...

Page 68: ... only when a problem or failure is explicitly identified in AISINO To download the update please visit WWW AISINO COM The steps to update firmware 1 Select the control panel on the start key in the lower left corner of the Windows taskbar 2 Select the device and printer then double clicks 3 Choose the printer property on the printer menu 4 Select the tools label and click the printer icon 5 Choose...

Page 69: ...n card with this printer Do not interrupt the transmission between the computer to the printer during the download Such as switch off the printer or computer power unplug the cable etc Otherwise printer might not restart In case of such failure please contact AISINO dealer 55 ...

Page 70: ...n and retransfer film indicated by a series of marks Each represents 20 remaining Ribbon Empty Full RTF Empty Full In this mode after you press the Key for 1 second the LCD displays the temperature of the heater unit and print head Heater Temp 203 Print head Temp 38 Normal Mode Message List Initialize The printer undergoes system diagnostic and initialization Cards remaining in printer from a prev...

Page 71: ...try menu in User Mode 2 Press Menu Exit Key for 3 second then release it The LCD shows Choose mode Press or Keys to select User Mode or Service Mode Even when the printer is in an error state you can change modes Step to return to Normal Mode fromUser Mode 1 Continually press Menu Exit Key until the LCD shows Quit the Menu Then press SET Key to return to Normal Mode Quit the Menu Yes Choose mode S...

Page 72: ...ser Guide Function of four keys in User Mode Menu Exit Key back to its parent menu i e one level up in the menu hierarchy Key previous item Key next item SET Key an affirmative response to the second line in the LCD 58 ...

Page 73: ...d menu For example Entering a sub menu go down one level in the menu hierarchy Sections 3 3 1 3 3 11 are the sub menus associated with the corresponding parent menus listed in Section 3 3 When SET appears on the second line of the menu pressing SET Key enters available sub menus or parameter values Below the right menu is the sub menu of the left one Version Info SET Printer Info SET Printer Info ...

Page 74: ...enu Then press SET Key to return to Normal Mode SET Key must be pressed to save the newly changed value Pressing Menu Exit Key or switching off the printer will not save any newly changed value s SET Key Menu Exit Key Version Info SET Main Version 1 0 10 0 Quit the Menu Yes Ready SET Key 60 ...

Page 75: ...efault 3 3 1 Sub menus for Printer Info View the utilization history of this printer in each sub menu Card Count Print Count Ribbon Remainder Film Remainder Printer S N For quality assurance at the factory it is necessary to run various print tests on the printer A value of tens or more for Card Count is normal during manufacturing of your printer 3 3 2 Sub menus for Head Info 61 ...

Page 76: ...View the print head information in two sub menus Print Count Print head S N Record the new print head serial number after replacement otherwise failure to do so affects print quality and voids the warranty for this print head 62 ...

Page 77: ...tup View and change operation parameters Buzzer OFF ON Power Save Mode Sleep Mode Delay Power Down Language Chinese Japanese English LCD Contrast 128 LCD Light OFF ON Sleep Mode Time elapsed to sleep mode from idle Delay Power Down Time elapsed to cut off the main power from sleep mode Setting Name Valid Settings Sleep mode Default Off 5 120 minutes Delay power down Off 5 120 minutes 63 ...

Page 78: ...de 3 3 5 Sub menus for card setup View and change card properties Card type PVC PET PET G card 1 Card 2 card 3 Decurl Time Front 0 5 need to understand these numbers Decurl Time Back 0 5 Std card exit LEFT SIDE RIGHT SIDE 64 ...

Page 79: ... is 1 The correcting time of reverse side the default value is 0 1 means correct the bend card for 1 second 0 means do not correct the bend card Valid Settings Details PVC Default Apply optimized retransfer conditions for standard PVC cards PET Apply optimized retransfer conditions for standard PET cards PET G Apply optimized retransfer conditions for standard PET G cards Card1 aa bb aa re retrans...

Page 80: ...600 User Guide Card loading fac IC Chip card loading Valid Settings Printing Surface when singled side printing Rear Side when singled side printing Standard Default Contact IC ISO chip back ISO chip Contact IC 66 ...

Page 81: ...nds the printer feeds cards automatically on the right side Manually feeding Follow instructions shown on LCD display Manually insert a card from the right insertion slot 3 3 6 Sub menus for Ribbon Film Setup View and change ribbon retransfer film Ribbon Type YMCK YMCKU YMCKIKI YMCKI YMCKFK YMCKH YMCKO YMCKK_HALF YMCK_HALF YMCKK Film Type Normal Ribbon near end 0 100 Film near end 0 100 Ribbon Typ...

Page 82: ...pe Valid Settings Product Code Normal Special When the unused amounts of ribbon retransfer film reaches the values specified in Ribn near end and Film near end respectively the LCD displays warning messages Check Ribbon or CheckFilm 68 ...

Page 83: ...View and change the interface settings Printer ID 0 15 IP Type Static DHCP IP Address 192 168 0 12 Subnet Mask 255 255 255 0 DefaultGateway 192 168 0 1 MAC Address Timeouts s 10 USB ID OFF ON 3 3 9 Sub menus for Cleaning Execute the cleaning process following instructions shown on the LCD display 3 3 10 Sub menus for Option Magnetic Encoder IC R W1 IC R W2 External Box 3 3 11 Sub menus for Reset U...

Page 84: ...ing cooling is the current temperature of feeding roller When Cool Down is displayed wait until the figure drops to 70 When Remove Film is displayed open the Front Cover and remove the Retransfer Film 4E AClose the Front Cover Remove Cards is displayed If there s no card in the slot just ignore this step After removing the cards Set Cleaning Card is displayed put the cleaning Card in the card Feed...

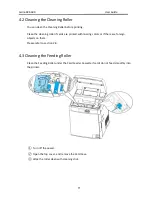
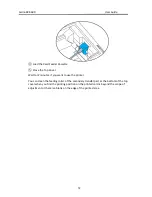
Page 85: ...s are printed with missing colors or if there are foreign objects on them Please refer to section 2 8 4 3 Cleaning the Feeding Roller Clean the Feeding Roller under the Card Feeder Cassette if cards do not feed smoothly into the printer Turn off the power Open the top cover and remove the Card Case Wipe the roller clean with cleaning stick 71 ...

Page 86: ...for 2minutes if you want to use the printer You can clean the feeding roller of the secondary transfer part at the bottom of the top cover when you find the printing position on the printed card is beyond the scope of adjustment or there is a blank on the edge of the printed area 72 ...

Page 87: ...Transport Roller Turn off the power Open the top cover and remove the Card Feeder Cassette Open the Front Cover and Top Access Cover Lift the decurl section Wipe the roller clean with cleaning stick Close the Top Access Cover and Front Cover 73 ...

Page 88: ...d the filter be cleaned monthly Turn off the power Remove the filter cover on the rear of the printer Take out the filter Use a vacuum cleaner or similar to remove dirt that is adhered to the filter or wash it A 5E A Press the filter prevent it from inhaling by the vacuum cleaner A 6E A Attach the filter cover to the printer 74 ...

Page 89: ...Beware if unused ribbon retransfer film is sufficient for your print job Ribbon End Do not turn off power Refer to Section 2 2 to replace a new ribbon Press SET Key to clear this warning and the printer resumes the previous printing after initialization Film End Do not turn off power Refer to Section 2 3 to replace a new retransfer film Press SET Key to clear this warning and the printer will resu...

Page 90: ...robable Cause Ribbon winding problem Action Do not turn off power Refer to Section 2 2 to reload the ribbon Press SET Key to clear this warning and the printer will resume previous printing after initialization Feeder Card Jam Pressing SET as LCD display shown may eject jammed card after initialization If the fault is not cleared after initialization turn the rollers manually to clear jammed card ...

Page 91: ...bon is used Next check if the ribbon has an RFID ring Press SET as the LCD shown to initialize the printer Call Support Contact your reseller s service support team to report Error Code s displayed on the lower right Contact your reseller s service support team if you find errors not listed above Please inform Error Code displayed on the lower right of the LCD 5 2 Valuable Help from You For Troubl...

Page 92: ...r Check if the printer is connected correctly to power Check if the LCD display shows READY Confirm power accessories provided for this printer are correctly installed Check the USB cable Check if the USB cable is connected to your printer and your host Check the ribbon and the retransfer film Check if the ribbon and retransfer film are properly installed Check if associated parts are locked in pr...

Page 93: ...and retransfer film Check if ribbon retransfer film run out or are damaged Replace them if necessary Check if print head is damaged Print test pattern If failed to print the test pattern contact local reseller for support Is the printing quality dissatisfactory 79 ...

Page 94: ... the ribbon and retransfer film Check if ribbon retransfer film are folded up Ribbon not synchronized Open and close the front cover to synchronize theribbon Dirty printer or cleaning rollers Clean printer Non genuine cards Check if your cards meet specifications Recommend that you purchase cards from Aisino authorized reseller If the problem persists please contact your Aisinoreseller Bent Cards ...

Page 95: ...to keeps cards free from dust and contamination Check ribbon and retransfer film Check if ribbon and retransfer film are installed properly Check that the ribbon and retransfer film are running smoothly Check print head If a straight white line s travels across the length of your card the print head may be dirty or defective If the problem persists after cleaning please contact your Aisino reselle...

Page 96: ...e the rollers and heating rollers Damages caused by such action may void the warranty To reduce the chance of card jamming See Section 2 1 3 to set the proper card thickness dial Use cards with thickness specified in the specifications Check that cards are not bent Before putting the cards to the card cassette shuffle the cards by holding the outside edges to prevent sticking cards To take out jam...

Page 97: ... the card cassette Close the card feed cover and the printer covers Press the SET Key The error message disappears from the LCD display and the printer restarts To take out card jammed in the reverse section Open the top cover and front cover Take out the card cassette Release the lock and lift it up as shown in the diagram Take out the cleaning roller and cleaning cartridge Rotate the reverse kno...

Page 98: ...e printer in a dust free environment as detailed in the specifications Use good well conditioned cards clean without deterioration causing head damage 5 4 Technical support If you have trouble configuring and using a printer read this manual carefully If you still can t solve the problem you can get detailed information and help via the AISINO partner network 5 4 1 AISINO partner network If you ha...

Page 99: ...or the daily use of printers 5 4 2 More information If additional technical assistance is required you can visit AISINO website WWW AISINO COM and find information about the use and troubleshooting of AISINO printers in the driver and support section You can download the latest version of firmware print driver and use manual AISINO printer usage and maintenance related video and FAQ FAQ section 85...

Page 100: ...system Automatic feed from Card Input Feeder Manual feed single page Card feeding capacity Card Case 250cards 0 76mm Outer Hopper 250cards 0 76mm Reject Box 30cards 0 76mm Standard interface USB2 0 Ethernet 100BASE TX IEEE802 3u RS 232C x 2 Port for extended users USB HUB Option RFIDreader writer SET MCW Supported OS Windows XP Windows 7 Windows 8 and Windows 10 32bit and 64bit Power source AC100V...

Page 101: ...non contact card This port can support The non contact card of IS014443TypeA and users can choose the radio frequency antenna inside or outside The second generation ID card This port is optional support for the second generation id card of the People s Republic of China of ISo14443 Type B SAM card slot This slot is optional support for standard SAM card slot of GSM11 11 User can choose 4 slots at...

Page 102: ...l interference in a residential installation This equipment generates uses and can radiate radio frequency energy and if not installed and used in accordance with Aisino instructions may cause harmful interference to radio communications However there is no guarantee that interference will not occur in a particular installation If this equipment does cause harmful interference to radio or televisi...

Page 103: ...any different form requires our explicit approval We reserve the right to make changes to this manual without notice All care has been taken to ensure accuracy of information contained in this manual However we cannot accept responsibility for any errors or damages resulting from errors or inaccuracies of information herein 2018 Aisino ...

Reviews: