background image

30

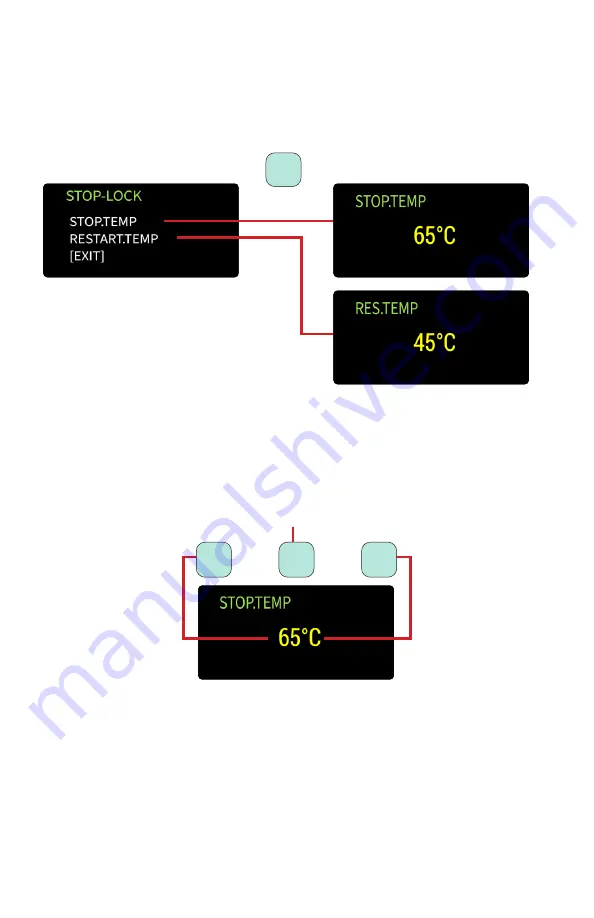
7.5.6 Safe-Limit

1.  In the Admin menu, press key 

 or 

 to navigate to Safe-Limit, and 

press key 

 to enter the Stop-Lock setting menu where you can set the 

temperature at which the tool should shut off for safety reasons, and 
the temperature at which it’s safe for the tool to restart. 

Key

2

Selects option

2. To set the tool Stop Temperature press key 

 to select Stop.Temp, 

which will open up the Stop.Temp interface. Use key 

 or 

 to 

increase or decrease the temperature. When finished, press key 2 to 
return to the Stop-Lock menu.

Increase 

temperature

Decrease 

temperature

Key

1

Key

2

Key

3

Sets temperature and 

returns to Stop-Lock menu

3. Set the Restart Temperature using the same steps. When finished, 

press key 2 to return to the Stop-Lock menu.

4. From the Stop-Lock menu, navigate to Exit and press key 

 to return 

to the Admin menu.

Summary of Contents for AcraDyne ABETP Cordless XT Series

Page 1: ...10000 SE Pine St Portland OR 97216 800 852 1368 Fax 800 582 9015 www aimco global com ABETP Cordless XT Series Operations Manual ...

Page 2: ...in 21 7 5 1 Span 22 7 5 2 Calibration 22 7 5 3 Unit 28 7 5 4 ReverseAngle 29 7 5 5 ForwardSpeed 29 7 5 6 Safe Limit 30 7 5 7 Language 31 7 5 8 DateTime 31 7 5 9 BatterySelection 32 7 5 10 ResDisplayTime 32 7 5 11 Recheck 32 7 5 12 CheckPoint 34 7 5 13 Exit 34 7 6 WiFi 34 8 Tool Operation 35 8 1 Charging the Battery 35 8 2 Installation and Removal of Lithium Battery 35 8 3 Preheating the Motor 35 8...

Page 3: ... for the bolting of commercial or industrial applications Do not store the equipment in humid environments or environments with corrosive gas dust high temperature vibration or where collision or impact may happen Do not disassemble assemble or repair the equipment without the approval of the manufacturer If the tool does not work properly please contact the distributor or manufacturer to solve th...

Page 4: ...ools to rain or humidity Water in the tool increases the risk of electric shock 1 1 4 Personal Safety 1 Keep alert and pay attention to the surrounding environment and tools Do not use power tools if fatigued or after drug or alcohol use Carelessness could lead to serious injury 2 Wear protective glasses Using appropriate safety equipment such as a dust mask antiskid safety shoes a safety helmet o...

Page 5: ...r to ensure the safety of you and others post warning signs and attention signs on obvious tools and reaction parts The design of electric torque wrench is very safe for the bolting of commercial or industrial applications by workers versed in high torque reactive tooling Understand the relevant safety regulations of all working places and pay special attention to the following points 1 Before you...

Page 6: ...working environment and causes personal property loss the company will not bear any responsibility 4 When using the equipment the operator shall ensure that his her body is in normal working condition The company shall not be liable for any damage or personal property loss caused by an operator who is in a compromised physical state such as drunk or fatigued 5 If the equipment fails stop use immed...

Page 7: ... the safety of the tool 3 Tool Introduction Every battery tool has been carefully tested and controlled by the quality assurance department At the same time the life span of any battery tool mainly depends on you as a user Please read this manual and related documents carefully If you use the tool properly it can provide you with longer and more reliable service time The ABETP torque wrench can pr...

Page 8: ... 5 Ah Capacity Metabo Reference 625368000 Battery charger for all batteries ASC 30 36 120VAC Input Charger Metabo Reference 627046000 ASC 55 220VAC Input Charger Metabo Reference 627044000 4 2 Tool Diagram Trigger Air Cooled High Capacity Lithium Battery Monitor High Performance Planetary Gear with High Speed System Reaction Arm Spline High Efficiency Brushless Motor Square Drive Forward Reverse L...

Page 9: ...nal direction of the motor Switch can be pressed from both sides When pressed in from the left side the tool will rotate counterclockwise When pressed in from the right side the tool will rotate clockwise When the switch is in the center position the tool is locked Trigger Starts the tool ...

Page 10: ... foot pounds Nm indicates Newton meters Tool status Tool is in a ready state Tool is in wait mode Tool is in error mode Tool is in stop mode Remaining battery capacity Battery is at full charge Battery power is sufficient Battery is at 2 3 capacity Battery power is insufficient Control Strategy Displays the currently selected control strategy Options are Torque mode set torque value for operation ...

Page 11: ...immediately and take corrective action Icon Meaning Corrective Action Low battery Stop operation remove the battery and charge or replace the battery Sensor error Stop operation Turn the fwd rev lock switch to the center locked position remove and reinstall the battery and restart the tool using the trigger If the error persists contact your tool distributor High temperature Stop operation Remove ...

Page 12: ...12 6 Menu Relationships Key 1 Key 2 Key 3 ...

Page 13: ...es for operation 5 Angle Directly set the angle value for operation To check the current Mode setting 1 From the main tool screen press key to enter the first operation selection screen which is the Mode screen The mode shown on this screen is the current mode selected To maintain this mode press key or to navigate to the Exit screen and press key return to the main tool screen Key 1 Key 2 Key 3 N...

Page 14: ... selected mode Navigate to Exit screen Key 1 Key 3 or Mode Selection Interface Key 1 toggles up Key 3 toggles down Key 2 Select highlighted option return to mode screen 3 Press key or to navigate to the Exit screen and press key return to the main tool screen which will now display the Torque interface Torque Interface Key 1 Key 2 Key 3 Increase value Decrease value 4 Set the working parameters in...

Page 15: ...key or to navigate to the Exit screen and press key return to the main tool screen which will now display the Preset interface showing the Torque Angle that you defined as a preset Instructions for setting presets are given in 7 2 Preset on p 17 Preset Interface Key 1 Key 2 Key 3 Select previous preset value Current preset value Select next preset value 4 Select the Preset value in the main interf...

Page 16: ...lection Interface Key 1 toggles up Key 3 toggles down Select highlighted option return to mode screen Key 2 Navigate to Exit screen Key 1 Key 3 or 3 Press key or to navigate to the Exit screen and press key return to the main tool screen which will now display the Angle interface Angle Interface Increase value Decrease value Key 1 Key 2 Key 3 4 Set the rotation angle in the main interface Press ke...

Page 17: ...set values Number of presets available To torque angle preset list Key 2 2 To adjust the number of presets that show in the menu press key or to scroll to Preset Num Press key to select This opens a value setting screen Scrolls forward Scrolls backward Key 1 Key 2 Key 3 Selects and opens value setting screen Selects highlighted number Key 2 When finished select OK then to return to the main Preset...

Page 18: ...lect highlighted number Digit appears in the value at the top When finished select OK then to return to the Preset values screen 6 Press key or to scroll through the value table Press key to select the highlighted number The number will appear at the top of the screen Follow the same steps for the remaining digits pressing key to select each digit If you make a mistake or need to modify the set va...

Page 19: ...urrent device parameters 1 To enter the Info operation screen from the main tool interface press key then press key or to navigate to the Info screen Press key to enter the Info detail screen to view device parameters to Info detail screen Manufacturing date Cycle count 80 of tool cap Model number Serial number Software version Manufacturer Minimum torque Unit of measurement Maximum torque Key 2 C...

Page 20: ...rking angle and torque values Current record Result If the ratio of working angle torque to set angle torque is less than 5 the run is counted as PASS success otherwise it is counted as FAIL failure Total records 2 Press key or to scroll through the log records Key 2 Exit and return to Preset information screen Key 1 Key 2 Key 3 Scrolls forward through log records Scrolls backward through log reco...

Page 21: ...hrough list Scrolls backward through list Key 1 Key 2 Key 3 Selects highlighted digit Key 2 Press key to select the highlighted digit which will appear on the line above To delete a digit scroll to Del and press key Once all digits are entered navigate to OK and press key 3 If the password was entered incorrectly a password error screen appears Press key which will close the error screen and retur...

Page 22: ...When the wrench reaches a set torque there is a one to one correspondence between the value read by an external sensor and the sensor within the tool We strive to bring these values into close agreement in this procedure By recording six sets of calibration values the linear relationship between the set torque and the actual torque can be obtained and the set torque can be converted into an interm...

Page 23: ...correct navigate to OK and select by pressing key If calibration is not required navigate to EXIT and select by pressing key Both OK and EXIT will return you to the Calibration menu c To adjust the target value use key or to scroll through the value sets until the desired target value is highlighted Press key to select This will open up the main interface Adjust the target value by pressing key or...

Page 24: ...ect OK then to return to the Sixpoint value screen e Press key or to scroll through the value table Press key to select the highlighted number The number will appear at the top of the screen Follow the same steps for the remaining digits pressing key to select each digit If you make a mistake or need to modify the set value select and press key to delete one digit When the value is completed move ...

Page 25: ... which set of digits you want to edit This takes you to the inner value entry table At any point select Exit to return to the Parameter screen d In the value entry table set your parameter by pressing key or to scroll through the numbers and then pressing key to select a number The digit will appear in the value at the top Scrolls backward in table Scrolls forward in table Selects highlighted numb...

Page 26: ...ects highlighted text f Also in the Parameter screen you can select Reset to reset all parameters to zero Key 2 Selects highlighted text g When finished setting parameters select Exit to return to the Calibration menu Then select Exit again to return to the Admin menu Makeup a From the Calibration menu press key or to navigate to Makeup and press key to select b To change any of the values navigat...

Page 27: ...ntry table At any point select Exit to return to the Makeup screen d In the value entry table set your Makeup value by pressing key or to scroll through the numbers and then pressing key to select a number The digit will appear in the value at the top Scrolls backward in table Scrolls forward in table Selects highlighted number Set value and return to outer options Key 1 Key 2 Key 3 Key 2 When fin...

Page 28: ...n the Makeup screen you can select Reset to reset all parameters to zero Key 2 Selects highlighted text g When finished setting Makeup values select Exit to return to the Calibration menu Then select Exit again to return to the Admin menu 7 5 3 Unit 1 In the Admin menu press key or to select Unit Press key to enter the Unit setting screen 2 Three measurement options are available Press key or to s...

Page 29: ...ation the tool automatically undertakes at the end of a cycle Without sufficient CCW rotation the loaded force on the reaction bar will make it impossible to remove the tool from the application Press key or to increase or decrease the angle value as shown 3 Press key to set the Reverse Angle value and return to the Admin menu 7 5 5 Forward Speed 1 In the Admin menu press key or to select Forward ...

Page 30: ... the tool Stop Temperature press key to select Stop Temp which will open up the Stop Temp interface Use key or to increase or decrease the temperature When finished press key 2 to return to the Stop Lock menu Increase temperature Decrease temperature Key 1 Key 2 Key 3 Sets temperature and returns to Stop Lock menu 3 Set the Restart Temperature using the same steps When finished press key 2 to retu...

Page 31: ...me and press key to enter the Date Time setting screen Scroll backward Scroll forward Key 1 Key 3 Key 2 Selects highlighted text Increases Key 1 Key 3 Decreases Key 2 Accept value 2 Use key or to navigate to the setting you want to change date time or UTC time zone Press key to select and then press key or to increase or decrease value as shown When finished setting the value press key to accept t...

Page 32: ...ndown Increases number Decreases number Sets value and returns to main Admin screen Key 1 Key 2 Key 3 2 Press key or to scroll through the options which range from 5 to 5 Press key to set value and return to the Admin menu 7 5 11 Recheck 1 In the Admin menu press key or to scroll to Recheck and press key to enter the Recheck menu Percentage a Press key or to scroll to Percentage Select highlighted...

Page 33: ...urn you to the Main interface where you can press key or to adjust the target value Select highlighted option only Target is selectable Key 2 Scroll backward Key 1 Key 3 Scroll forward Increases value Decreases value Key 1 Key 2 Key 3 Selects value and returns to the Re_Cab menu b Press key to accept the new value and return to the RE_CAB target value screen Your new settings will show Continue se...

Page 34: ...n Admin screen 7 5 13 Exit 1 When finished with all Admin settings from the main Admin menu press key or to scroll to Exit and press key to return to the Admin operation screen 2 From the Admin operation screen press key or to scroll to the Exit screen and press key to return to the main tool interface 7 6 WiFi WiFi is not enabled in the ABETP Series Tools ...

Page 35: ...t full power and recharged within six months WARNING Make sure that nothing is pressing the tool trigger before inserting the battery onto the tool WARNING To avoid injury remove battery before installing reaction arm Installation Push the battery toward the tool handle until the battery is fully seated A click will sound to ensure the battery is in place Removal Press and hold the release button ...

Page 36: ...om stock and will design specific Reaction Bars to suit specific applications upon request It is the user s responsibility to ensure that the correct Reaction Bar or Tool Holding Fixture is in place PRIOR to use of the AcraDyne XT Series Nutrunner 8 4 1 Reaction Bar Guidelines Caution is required Failure to exercise caution and correct operating technique can result in serious personal injury loss...

Page 37: ...aged as they also will experience failure to an extent where tool damage or operator injury may occur 8 4 3 Pinch Point The nature of a reaction bar in any continuous drive tool is to press against an object to counteract torque reaction as the tool is delivering torque The operator must take great care to keep body parts or foreign matter clear of the area between the Reaction Bar and the surface...

Page 38: ...tion Bar snap ring onto the end of the Gearbox securing the Reaction Bar in place on the Gearbox Failure to secure the reaction bar properly can result in severe injury to the operator and or damage to the tool application 4 Install tool battery The tool handle must not be located against an object or restriction during operation of the tool to avoid creation of a pinch point An OEM sourced or app...

Page 39: ...p the tool and cancel the torque cycle Clockwise operation Reaction Point Counter clockwise operation Reaction Point 4 When Rdy is displayed on the screen the tool is ready for the next torque WARNING Do not continue tightening or loosening directly after tightening or tighten objects that exceed the target maximum torque value which will cause overload and damage to the tool WARNING Do not contin...

Page 40: ...from the right side the tool will rotate clockwise To enable trigger lock position the Fwd Rev switch In the middle position 8 7 Recovery Should there be a corruption in the onboard control system a Recovery menu will appear at tool startup 1 Press key or to scroll through the options Selecting an option by pressing key brings up the following menus Revision Information Key 2 Selects option Don t ...

Page 41: ...of the charger This can result in electric shock or short circuit and can endanger the equipment and the operator Vents should be ventilated at all times Recommended distance between the charger and other objects is 2 inches 5 cm Do not open the charger or battery casing Keep away from children Keep away from moisture Do not try to charge a fully charged battery Do not leave a fully charged batter...

Page 42: ...rox 5 seconds 3 Push the battery pack onto the sliding seat completely until it stops The operation indicator light will flash This means the battery is charging Note To view the charge level on Li ion battery packs remove battery from battery charger and press the button on the battery pack 9 2 2 Charging Complete 1 When charging is complete the green operation indicator light will be on and the ...

Page 43: ... battery from the charger immediately A flashing red light may also mean the battery is not properly plugged into the charger Remove the battery and push it correctly onto the sliding seat 3 If the red light keeps flashing unplug the charger from the wall and carefully clean the contact surface If the problem cannot be solved replace the charger 4 Repairs to the charger must only be carried out by...

Page 44: ...ntact the distributor for repair 3 The displayed value does not match the input value during calibration The value digits may have been entered incorrectly which may cause the wrong sequence to occur The maximum input value is four digits When the input value is less than four digits the prior digits must be filled in with zero 4 Torque out of limit during calibration Actual torque exceeds set tor...

Page 45: ...lore software installation file from the AIMCO website Click on the file to launch the software The Tool Connect screen will appear Not enabled on ABETP Series tools Options available at the top of this screen include Language Select English or Chinese Netcard Not applicable to XT series tools Database This option displays the tightening events that have been stored in the tool memory ...

Page 46: ...ent software version 11 2 Connecting the Tool Connect the tool to the host computer using a USB cable The USB cable port on the tool is located directly below the user interface screen Select USB Search on the host computer and the name of the connected tool will appear Click Connect After connected successfully the software main menu will open ...

Page 47: ...tool software s main menu shows information about the connected tool model number torque range gear range serial number SN and production date From the main menu you can navigate to three workspaces including Setting Logs and Upgrade ...

Page 48: ...face Preset Set The Preset Set window lets you view and alter tool presets Click Read to read the preset data from the tool Once the data appears you can make changes by typing in new values When finished click Write to transfer the new preset values to the tool Click Export to save the existing configuration file wconf for backup purposes ...

Page 49: ...unctionality Enter factory level password here for higher level access authorized service department use only Language Choose English or Chinese Unit Options are NM FTLBS or KGFM Bolt Joint Toggle the switch to the left for a hard joint and toggle the switch to the right for a soft joint WiFi Setting WiFi is not enabled in th ABETP Series Tools Other Setting The Other Setting box allows you to syn...

Page 50: ...s from a specific time date range click Filter From this pop up menu Select a date will pull up a calendar and a clock Select the time frame of the logs you want to view The bottom of the Log interface shows two buttons Sync DevLog and Export List Click Sync DevLog to synchronize the software with the data stored on the wrench Click Export List to export the log in xls csv pdf or html format ...

Page 51: ...s where the tool s firmware can be updated To upgrade the firmware click Select Firmware which will open up a window where you can navigate to the firmware s location Click Program to begin loading the selected firmware into the tool operating system ...

Page 52: ...battery tools 30 days DC Electric tools 90 days EXCLUSION FROM WARRANTY This warranty is valid only on products purchased from AIMCO or through its authorized distributors or agents AIMCO shall have no obligation pursuant to the AIMCO Warranty with respect to any tools or accessories which in AIMCO s sole judgment have been altered damaged misused abused badly worn lost or improperly maintained Th...

Page 53: ...E FOR COSTS OF PROCUREMENT OF SUBSTITUTE GOODS BY THE BUYER IN NO EVENT SHALL AIMCO BE LIABLE FOR ANY SPECIAL CONSEQUENTIAL INCIDENTAL OR OTHER DAMAGES INCLUDING WITHOUT LIMITATION LOSS OF PROFIT WHETHER OR NOT AIMCO HAS BEEN ADVISED OF THE POSSIBILITY OF SUCH LOSS HOWEVER CAUSED WHETHER FOR BREACH OR REPUDIATION OF CONTRACT BREACH OF WARRANTY NEGLIGENCE OR OTHERWISE THIS EXCLUSION ALSO INCLUDES A...

Page 54: ...54 NOTES ...

Page 55: ...55 NOTES ...

Page 56: ...E HEADQUARTERS 10000 SE Pine Street Portland Oregon 97216 Phone 503 254 6600 Toll Free 1 800 852 1368 AIMCO CORPORATION DE MEXICO SA DE CV Ave Cristobal Colon 14529 Chihuahua Chihuahua 31125 Mexico Phone 01 614 380 1010 Fax 01 614 380 1019 WWW AIMCO GLOBAL COM ...

Reviews: