27
GENERAL MAINTENANCE
water heater tank
Drain a pail of water through the drain valve at least once a year. This
will remove excess sediment from the bottom of the tank. This
sediment, if allowed to accumulate, will reduce the efficiency and the
life of the tank.
clean out access
The water heater is supplied with a clean-out access door to enable
removal of sediment inside the tank during the maintenance.
Remove access door covering the clean-out door. you must always
turn off the power and drain the tank completely before remov-
ing the clean-out door by removing all six (6) screws. When
maintenance is complete install clean-out door with a new gasket
making sure the surface is clean on the flange of the tank.
element and thermostat Replacement
DANGER
WARNING
CAUTION
AVERTISSEMENT
ATTENTION
Before attempting to repair or replace any of the electrical compo-
nents on this water heater, turn “off” the power to the water
heater. Failure to do so could result in electrical shock and/or prop-
erty damage, personal injury, or death.
Replacing an element
1) Turn “off” the power to the water heater and drain all of the water
from the water heater (see
Draining the Water Heater, page 28).
2) Open the element access cover and remove the insulation.
3) Disconnect the wires from the element terminals.
4) Unscrew the four (4) bolts securing the element to the water
heater and pull element out of the tank. Make sure the TWIST-
LOCK flange is in the right position (see figure 28).
figure 28 twist-locK
5) Replace the element with a new element of the same wattage and
voltage. Make sure that the gasket surface is clean and that the
element has been re-installed water-tight with a new gasket.
6) Re-connect the wires to the element and tighten securely.
7) Re-fill the water heater (see
Filing the Water Heater, page 5).
do not tuRn the PoweR on to the wateR heateR
unless you aRe suRe it is coMPletely filled with
wateR.
8) Replace the insulation and close the element access panel before
turning “on” the power to the water heater.
Replacing a thermostat
(see
Replacement Parts, page 29 to 33)
1) Turn “off” the power to the water heater.
2) Open the element access panel and remove the insulation.
3) Disconnect the wires from the thermostat terminals.
4) Lift the thermostat bracket arms and slide the thermostat up to
remove it.
5) Replace the thermostat with a new thermostat of the same manu-
facturer and type.
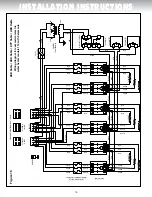
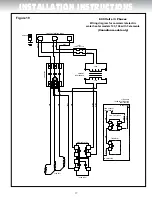
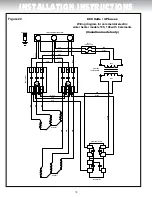
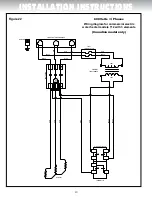
6) Reconnect the wires on the thermostat terminals referring to the
corresponding wiring diagram in figures 11 to 24.
7) Set the thermostat to the desired temperature (see
Water
Temperature Regulation, page 26).
8) Replace the insulation and close the element access panel before
turning “on” the power to the water heater.
temperature and Pressure-Relief valve
Manually operate the temperature and pressure-relief valve at least
once a year, standing clear of the outlet to avoid being burned. Lift
and release the operating lever on the valve to make it operate freely.
If, after manually operating the valve, it fails to completely reset itself
and continues to discharge water, replace it with a new one.
anodes
This water heater is equipped with two anodes that are designed to
prolong the life of the glass-lined tank. The anodes are slowly
consumed, protecting the glass-lined tank from corrosion. The
anodes should be inspected every two (2) years. If more than half of
the anodes has been consumed, they should be replaced. Instructions
on how to change the anodes can be obtained from the manufacturer.
The life expectancy of the water heater is reduced where a water
softener is introduced to fight hard water. The sodium salts added by
a softener make the water extremely conductive, therefore, the
anodes are consumed more rapidly. Under these conditions, the
anodes should be inspected every year.
In certain water conditions, the anodes will react with the water,
producing discoloured or smelly water. The most common complaint
is hot water that smells like rotten eggs. This phenomenon is the
result of the reaction between the magnesium of the anodes and
hydrogen sulfide gas dissolved in the water, which occurs frequently
in well systems. This problem can usually be eliminated or reduced
by changing the anodes to a type more suitable for these conditions
(aluminum anodes) and by chlorinating the water heater and
plumbing system. If the problem persists, special filtration equipment
may be required. Under no circumstances is the anodes to be
removed from the water heater on a permanent basis. Removal of
the anodes will lead to premature failure of the water heater and
void the warranty.
DANGER
WARNING
CAUTION
AVERTISSEMENT
ATTENTION
Hydrogen gas can be produced in a hot water system that has not
been used for a long period of time (generally two [2] weeks or
more). hydRogen gas is extReMely flaMMable. It is
highly recommended to open a hot water faucet for several min-
utes before you use any electrical appliances connected to the hot
water system, such as a dishwasher or washing machine. If hydro-
gen gas is present, there will be an unusual sound, such as air
escaping through the pipe, as the hot water faucet is opened. do
not smoke or introduce an open flame near the faucet when
it is opened.


