background image

27 

Gallery / Viewer  

Screenshot images  

The gallery (found in the setting menu) allows you to preview and scroll through all screenshots taken by using 
the Screen Shot Button (see pages 22 and 28 for more info). Screenshots are captured images of what is visible 
on the screen only, not full 360° spherical images. It is possible to take and save a screenshot in any mode; 
recording, live-streaming, or playing back. 

Video 

Video is recorded in a proprietary 360° format that allows full 360° playback of the entire space and allows the 
user to search as if you would in a live scenario. This is helpful during training exercises and while getting 
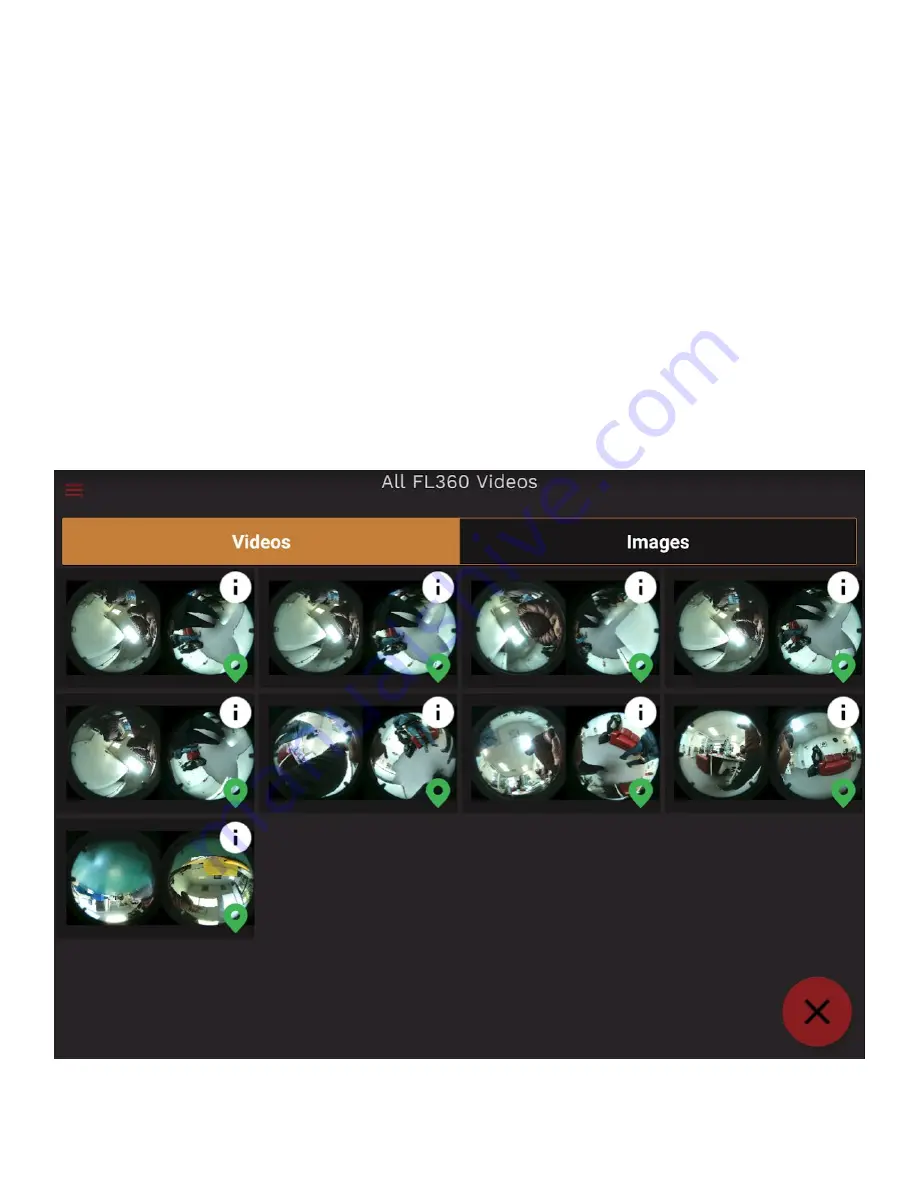
comfortable searching using the FL360. Recorded videos are stored in the Gallery under the Videos tab (fig 
44). Tap the 

“i”

 for meta data information captured with the videos for Time, Date, Location, Device 

identification, File Size etc. Under this tab you also have the option to delete the video.  
 
Tapping the location icon will take you to the Map View (fig 43) and show you the location where the video 
was taken. Multiple videos taken in the same location are shown in a cluster. 


Figure 44: Recorded videos can be found in the Gallery under the 

Videos

 tab.


Summary of Contents for FirstLook360

Page 1: ...ADVANCING TECHNICAL SEARCH www agilitycorp com FIRSTLOOK360 Camera User Manual v 4 0 ...

Page 2: ...AUTIONS 3 FL360 CAMERA OVERVIEW 6 FL360 LED INDICATOR MULTI FUNCTION 7 BATTERY LIDS 8 CHARGING PROCEDURES 10 PREPARING THE TABLET 11 CONNECTING THE CAMERA 12 FL360 APP OVERVIEW 19 BATTERY HANDLING 30 ALTERNATE POWER 31 FL360 SPECIFICATIONS 33 SERVICE 34 WARRANTY 35 ...

Page 3: ...echnician to quickly view any space in its entirety FL360 has the capability to record 360 video take screenshots and communicate via two way audio All recorded media is digitally overlaid on a map and is time date and GPS stamped This manual provides information for the safe and proper operation and maintenance of the FL360 Please read the complete user manual before operating this device If you ...

Page 4: ...Class A limits for radio noise emissions from digital apparatus set out in the interference causing equipment standard entitled Digital Apparatus ICES 003 of the Canadian Department of Communications This device complies with Industry Canada license exempt RSS standard s Operation is subject to the following two conditions 1 this device may not cause interference and 2 this device must accept any ...

Page 5: ...ure smooth and uninterrupted operation of FL360 The maximum recommended continuous ambient operating temperature for the FL360 is 140 F 60 C The camera is designed to operate at this temperature indefinitely The system can be operated at higher temperatures when necessary but only for short periods of time To prevent overexposure to heat avoid leaving the system in direct sunlight when not in use ...

Page 6: ... 18650 in or near objects that will produce a static electric charge Very quick pressure changes can cause 18650 batteries to malfunction Always charge on a fireproof surface Charge only in a recommended smart charger designed for this specific type of lithium ion battery Do not overcharge or over discharge batteries Recharge drained batteries as soon as possible Do not short circuit batteries Do ...

Page 7: ...6 FL360 CAMERA OVERVIEW ...

Page 8: ...up if battery level is too low Blue Red Alternating Camera booted waiting for connection to tablet Green Every 2 seconds Battery level greater than 75 Green Every second Battery level between 25 and 75 Yellow Every second Battery level between 10 and 25 Red Every second Battery level 10 or less replace batteries White Continuous Solid Using CR123A Batteries Battery malfunction when using FL360 Rec...

Page 9: ...ure that the gasket on the interior face of the Environmental Lid is in good condition free from debris and contains no nicks or cuts that could negatively affect the seal The Environmental Lid is held in place by two captive stainless steel screws and must be securely and evenly hand tightened into place using the provided FL360 Battery Compartment Tool WARNING DO NOT over tighten the screws or t...

Page 10: ...d with the Environmental Battery Lid Ensure that the gasket on the interior face of the Speaker Microphone Battery Lid is in good condition free from debris and contains no nicks or cuts that could negatively affect the seal Flush out any debris from the speaker grill by removing it from the camera and running it under a flow of clean water Shake out all the water from the lid and allow to dry tho...

Page 11: ...lti charger provided in the USAR kit also allows for charging of the tablet and power bank via its USB A port Please refer to the kit specific manual for more detailed instructions Charging FL360 Batteries The FL360 batteries can be charged using the battery charger provided inside the kit Please refer to the kit specific manual for more detailed instructions ...

Page 12: ...turn the Wi Fi settings on or off simply by tapping the Wi Fi icon in the pull down menu Register log into Google Account To download FL360 App updates from the Google Play Store a Google Account is required Please use an existing Google Account or register a new one 1 Open Settings by tapping on the gear icon 2 Tap Accounts 3 Tap the plus icon in the top right corner to add a new account 4 Tap Go...

Page 13: ...th 4mm screws and remove the battery lid from the FL360 Camera housing fig 3 Step 3 Insert two 2 fully charged FL360 Batteries over the orange ribbon into the camera while carefully observing polarity by lining up the red positive side of the FL360 Battery with the positive terminal in the battery compartment fig 4 5 6 The FL360 Batteries should be inserted top of the orange ribbon to allow for ea...

Page 14: ... sequence After finishing booting up the multifunction LED will indicate the charge level of the battery by flashing three times in green yellow or red Green meaning full charge yellow meaning partial charge red meaning insufficient charge Refer to FL360 LED INDICATOR MULTI FUNCTION on page 7 for details Once the boot sequence is completed the LED will flash Red Blue to indicate the camera is read...

Page 15: ...camera fig 11 viz FL360_xxxxx making sure the number after FL360_ corresponds with the serial number on the camera then tap connect Once the camera is connected the Wi Fi icon will turn green fig 12 Figure 10 Tap and hold the Wi Fi icon Figure 11 Select the proper camera then tap connect Figure 12 A green Wi Fi icon indicates the camera has been connected ...

Page 16: ...ill stream full 360 See FL360 APP OVERVIEW on page 19 for more details Step 10 after usage of camera To power off the camera press and hold the camera power button for 4 seconds until the multifunction LED turns off Remember to always remove the FL360 Rechargeable Li ion Batteries from the camera after use Figure 13 Tap the start icon to start live streaming ...

Page 17: ...pole fig 14 Step 9 Slowly twist the coiled cable clockwise while at the same time pushing it toward the camera attachment point When the circular connector is visible in the slot of the pole coupler fig 15 pull it out and connect it to the port at the rear of the FL360 Camera fig 16 The connector has an orientation notch so carefully rotate the connector and apply slight pressure until you feel it...

Page 18: ... the right angled USB connector into the tablet fig 22 Mount the tablet as desired fig 23 Figure 19 Twist to secure tablet cable to the end of the coiled cable Figure 20 The right angled cables route forward on the boom Figure 21 The cables nestle into the rear of the boom when the boom is extended Figure 22 Plug the USB connector into the tablet Figure 23 Tablet mounted onto the boom ...

Page 19: ...g to the camera The USB Tethering icon will turn green when it has finished connecting Step 12 To start live streaming press the start icon fig 26 You will be taken to the Camera Control Screen where the camera will stream full 360 See FL360 APP OVERVIEW on page 19 for more details Figure 24 Tap the USB tethering icon to open the tablet s Mobile Hotspot and Tethering settings Figure 25 Turn on USB...

Page 20: ...19 FL360 APP OVERVIEW Home Screen Camera Control Screen ...

Page 21: ...This will give a quick overview of how to use the application s features Home The Home button fig 29 is located on the left side of the Camera Control Screen Tap the home button at any time to return to the home screen Figure 27 Tap the info icon to activate the instructional overlays Figure 28 Camera Control Screens with instructional overlays visible Figure 29 Home Button ...

Page 22: ...te feature Push to Talk PTT The PTT button fig 31 is displayed on the left side of the Camera Control Screen Tap and hold the PTT button to communicate through the speaker on the camera Virtual Joystick The Virtual Joystick fig 32 is located in the bottom left corner of the Camera Control Screen It allows one handed operation while viewing spaces Press and hold the white dot then move it within th...

Page 23: ...ot The Screen Shot button fig 34 is displayed at the bottom of the Camera Control Screen Tapping this button allows the user to take a screenshot of the image currently visible on the Tablet s screen Each screenshot is date time and GPS stamped Screen shots are stored in the tablet s internal storage Refresh The Refresh button fig 35 is displayed at the bottom of the Camera Control Screen Tapping ...

Page 24: ... the white sector and indicates the angle of the horizontal field of view as well as the total magnitude of the field of view The vertical FoV is represented by the red center line and indicates the angle of the vertical field of view relative to the telescoping pole When looking straight ahead the FoV indicator will appear as in figure 37 TIP tap the FoV indicator to return the view back to the d...

Page 25: ...ss the settings menu fig 40 Pinch and Zoom The pinch zoom gesture fig 41 allows the operator to digitally zoom in or out of a live stream video or image Too zoom out placing two fingers on the tablet screen and pinch them together while touching the screen To zoom in place two fingers on the tablet and separate your fingers from each other while touching the screen Figure 39 Hamburger Icon Figure ...

Page 26: ...ick see page 21 for more info can be used for single handed operation 2 Recorded video stream If a space requires a precarious position or is difficult to access the operator has an option to record the live stream by pressing the Record Video Button see page 22 for more info The 360 degree spherical recording can be thoroughly reviewed at any time after moving to a safer location An alternative w...

Page 27: ...ed fig 43 Tap the cluster to view all the videos in the selected location The cluster will open up into a thumbnail gallery fig 44 see page 27 for more info Click on the thumbnail to view a specific video or image Figure 43 Map view showing a cluster of 8 images videos taken at the same location Tap the number to view the images videos ...

Page 28: ... the entire space and allows the user to search as if you would in a live scenario This is helpful during training exercises and while getting comfortable searching using the FL360 Recorded videos are stored in the Gallery under the Videos tab fig 44 Tap the i for meta data information captured with the videos for Time Date Location Device identification File Size etc Under this tab you also have ...

Page 29: ...ot while playing back a video 2 Information button Displays stored meta data time date location and device ID 3 Slider bar Play Pause Allows the user to play pause rewind or fast forward recordings 4 Share button Allows the user to share your videos or screenshots 5 Loop button Enables 360 videos to play and loop indefinitely Figure 45 Gallery Playback Controls 1 2 3 4 5 ...

Page 30: ...d Checks of major systems onboard the FL360 rescue camera Scroll down for more information such as firmware version number CPU temperature etc If any of the Checks show as negative please contact support see page 34 for service information Figure 46 Diagnostics Page ...

Page 31: ...replacement Once complete make sure to correctly install the FL360 Speaker Mic Lid or FL360 Environmental Lid FL360 Smart Battery Holder 0607 52 004 The smart battery holder is included in the kit to provide an additional layer of safety when transporting extra batteries on a person The smart holder helps to prevent unintentional shorting of the battery contacts It can also provide a handy method ...

Page 32: ... polarity markings on the adapter tube batteries and FL360 are aligned fig 50 WARNING DO NOT USE CR123 lithium ion batteries Please note that the higher voltage of the lithium ion cells could damage the camera s circuitry Make sure to check the battery type before using the adaptor tubes Understand the difference between lithium and lithium ion batteries Physical cell size is the same but the chem...

Page 33: ...or storing your FL360 Camera and tablet in the following kinds of places as this may damage the camera Places with extreme high temperature high humidity or rapid changes in humidity or temperature Places with large amounts of sand or dust Places where FL360 Camera or parts will be in contact with chemicals Places where strong magnetism is emitted next to monitors transformers magnets etc Always s...

Page 34: ...8650 Protected Batteries Alternative Power Source 4 x CR123A Lithium 2 FL360 CR123A Adapter Tube included Operating Temperature Range 10 C 60 C Audio Speaker and microphone 2 way communication Wireless Connectivity Wi Fi 802 11n MIMO Dual Antennas 2 4GHz Wired Coiled Cable Expanded length telescoping tube 10 ft Mechanical Camera Diameter 1 95 Mechanical Dimensions 10 x 1 95 Construction Aircraft G...

Page 35: ...ip only the parts requested by the service manager 3 Include a copy of the RMA form in the box and print the RMA number clearly on the exterior of the shipping container 4 Insure your camera during shipment 5 Make sure to include contact information return address and a description of the reason for the return 6 On the customs form please make sure to include Country of Origin Canada RMA return ma...

Page 36: ... 2 years This does not include damage caused by misuse negligence or abuse No other warranties are expressed or implied See website for more details Made in Canada FL360 is designed developed and assembled in Canada using a combination of locally sourced and imported materials and components Agility Technologies follows the Canadian competition bureau enforcement guidelines ...

Reviews: