26
Installation Note E8362-90016
Step 13. Replace the Front Panel Nameplate
Remove the Old Nameplate
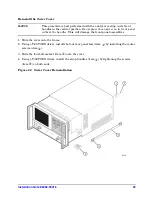
1. Using a sharp object such as a knife blade, lift one end of the old nameplate (item
①
). Be
careful not to scratch the painted surface.
2. Using your fingers, pull the nameplate completely off of the front panel and discard it.
3. If any adhesive remains on the front panel surface, it can be removed by rubbing it with
your finger. Do not use a sharp object to remove this adhesive. If necessary, the surface can
be cleaned with isopropol alcohol.
Install the New Nameplate
IMPORTANT
If the Option 050 upgrade kit will be installed to extend the frequency to
50 GHz, do not install the new nameplate provided in this upgrade kit.
Instead, use the one provided in the Option 050 upgrade kit.
1. Remove the protective backing from the new nameplate to expose the adhesive. Avoid
touching the adhesive with your fingers as this may affect its ability to adhere to the front
panel surface.
2.
Loosely
align the new nameplate over the recess in the front panel and apply lightly.
3. Once the nameplate is properly aligned, press it firmly onto the surface to secure it.
Figure 19
Model Number Nameplate Replacement


