


Chapter 5
5-7
Performance Tests
Gain Compression
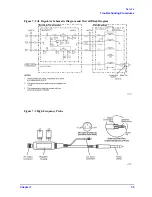
16. Connect the probe, the probe adapter, and a barrel between the attenuator and the power sensor. The
signal from the analyzer should now go through the attenuator and then the probe before reaching the
power sensor. Record the power reading on the
(item F).
17. Remove the attenuator pad, connect the probe adapter to the output port of the analyzer. Connect the
attenuator pad between the probe and the power sensor. The signal from the analyzer should now go
through the probe and then the pad before reaching the power sensor. Record the power reading on
the
(item G).
18. Perform the calculation indicated on the test record to determine the result of the test.
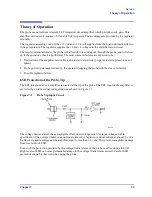
Calculating Equivalent Power
The probe is usually used as a high impedance device. The compression specification is given as a
voltage (instead of power) because of the wide range of devices with which the probe may be used. For
testing the probe, the probe adapter is used to make the probe input 50
. Using this known impedance,
an equivalent power can be calculated.
To find the power level equivalent to the 0.3 peak voltage, perform the following mathematical steps:
Steps
Formula
Example
1. Convert the peak voltage into RMS.
2. Convert the RMS voltage to a raw power.
3. Convert the raw power to a power
which is relative to 1 mW.
divide by 0.001w
4. Convert to dBm.
* Therefore, as shown in the example, the equivalent power to 0.3 V peak in a 50
system is
0.458
dBm.
V
pk
1.4142135
-------------------------
0.3
V
1.4142135
-------------------------
0.212132
V
R MS
=
V
2
R
------
0.212132
2
50
-----------------------------
0.0009
w
=
0.009
w
0.001
w
-----------------
0.9
=
10 LOGx
10 LOG 0.9
0.458 dBm
*
–
=
Summary of Contents for 85024A
Page 4: ...iv ...
Page 7: ...1 1 1 General Information ...
Page 13: ...2 1 2 Accessories ...
Page 19: ...3 1 3 Installation ...
Page 24: ...3 6 Chapter3 Installation Returning the Product for Service ...
Page 25: ...4 1 4 Operation ...
Page 30: ...4 6 Chapter4 Operation Operator s Check ...
Page 31: ...5 1 5 Performance Tests ...
Page 40: ...5 10 Chapter5 Performance Tests Average Noise Level ...
Page 41: ...6 1 6 Replaceable Parts ...
Page 46: ...6 6 Chapter6 Replaceable Parts Parts Lists ...
Page 47: ...7 1 7 Service ...
Page 60: ...7 14 Chapter7 Service Replacement Procedure Figure 7 11 Regulator Parts and Wiring ...
Page 64: ...7 18 Chapter7 Service Connector Inspection and Cleaning ...


