


1-21
Getting Started
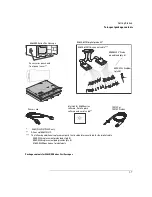
To connect a printer
To connect a printer
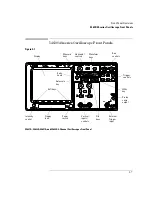
The oscilloscope connects to a parallel printer through the Parallel output
connector on the rear of the oscilloscope. You will need a parallel printer cable
to connect to the printer.
1 Attach the 25-pin small “D” connector to the Parallel output connector
on the rear of the oscilloscope. Tighten the thumbscrews on the cable
connector to secure the cable.
2 Attach the larger 36-pin “D” connector to the printer.
3 Set up the printer configuration on the oscilloscope.
a Press the
Utility
key, then press the
Print Confg
softkey.
b Press the
Print to:
softkey and set the interface to
Parallel
.
c Press the
Format
softkey and select your printer format from the list.
For more information on printer configuration, refer to the “Utilities” chapter.
To connect an RS-232 cable
The oscilloscope can be connected to a controller or a pc through the RS-232
connector on the rear of the oscilloscope. An RS-232 cable is shipped with each
oscilloscope except 54621A/21D and may be purchased for the 54621A/21D
oscilloscopes.
1 Attach the 9-pin “D” connector on the RS-232 cable to the RS-232
connector on the rear of the oscilloscope. Tighten the thumbscrews on
the cable connector to secure the cable
2 Attach the other end of the cable to your controller or pc.
3 Set up the RS-232 configuration on the oscilloscope.
a Press the
Utility
key, then press the
I/O
softkey.
b Press the
Controller
softkey and select
RS-232
.
c Press the
Baud
softkey and set the baud rate to match your controller or pc.
d Press the
XON DTR
softkey and set the handshake to match your controller
or pc.
For more information on RS-232 configuration, refer to the “Utilities” chapter.
Summary of Contents for 54621A
Page 4: ...iv ...
Page 10: ...Contents 6 ...
Page 11: ...1 Getting Started ...
Page 38: ...1 28 ...
Page 39: ...2 Front Panel Overview ...
Page 63: ...3 Triggering the Oscilloscope ...
Page 117: ...4 MegaZoom Concepts and Oscilloscope Operation ...
Page 171: ...5 Making Measurements ...
Page 222: ...5 52 Making Measurements Making overshoot and preshoot measurements ...
Page 223: ...6 Utilities ...
Page 239: ...7 Performance Characteristics ...
Page 250: ...7 12 Performance Characteristics Agilent 54620 series Performance Characteristics ...
Page 260: ...7 22 ...


