background image

APAX-5000 I/O Series User Manual

14

1.7.2

Using the APAX-5343E Power Supply Module

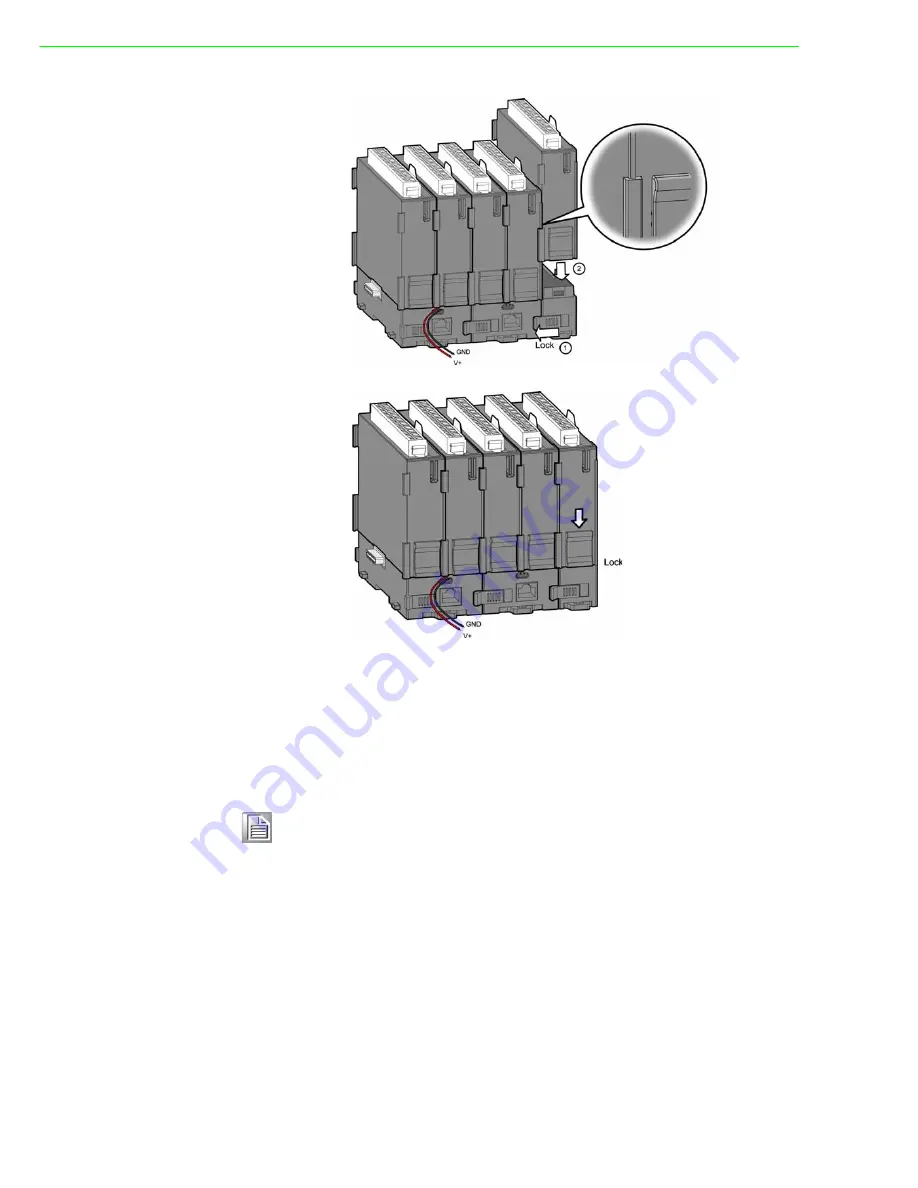
APAX-5000 I/O modules can also be powered by the APAX-5343E power supply
module, connected to the left side of the whole system. The power can be transferred
to APAX-5000 I/O modules though the backplanes. 

1.

Follow the procedure described in Section 1.7.1 to assembly APAX-5000 I/O 
modules into one complete system. The only difference is that you don't need to 
connect the power supply wiring to the power connectors on the backplane 
(step 1 in Section 1.7.1).

2.

Pull up the module locks on the upper case of one APAX-5343E. Then you can 
separate the upper case of APAX-5343E from its backplane.

Note!

Refer to Chapter 5 for APAX-5343E specifications. 

Summary of Contents for APAX-5013

Page 1: ...User Manual APAX 5000 Series I O Modules...

Page 2: ...ation Advantech assumes no liability under the terms of this warranty as a consequence of such events Because of Advantech s high quality control standards and rigorous testing most of our customers n...

Page 3: ...ire Pro tection Association work sites are classified into different classes divisions and groups based on hazard considerations This equipment is compliant with the speci fications of Class I Divisio...

Page 4: ...t overvoltage 13 Never pour any liquid into an opening This may cause fire or electrical shock 14 Never open the equipment For safety reasons the equipment should be opened only by qualified service p...

Page 5: ...1 2 1 4 APAX 5018 12 ch Thermocouple Input Module 32 Figure 2 7 APAX 5018 Module Front View 32 Figure 2 8 Wiring for APAX 5018 33 2 1 5 APAX 5017PE 12 ch Analog Input Module for P E Applications 36 Fi...

Page 6: ...ce 75 Figure 3 32A B Phase 2X With Reload Count Repetitively 76 Figure 3 33A B Phase 4X No Reload Count Once 77 Figure 3 34A B Phase 4X With Reload Count Once 78 Figure 3 35A B Phase 4X With Reload Co...

Page 7: ...es 102 3 4 1 APAX 5090P 4 port RS 232 422 485 Communication Module 102 Figure 3 58APAX 5090P Module Front View 102 Figure 3 59APAX 5090P Function Block Diagram 102 Table 3 1 Configuration Settings 103...

Page 8: ...APAX 5000 I O Series User Manual viii...

Page 9: ...Chapter 1 1 Overview...

Page 10: ...tions Analog I O APAX 5013 8 ch RTD Module APAX 5017 12 ch Analog Input Module APAX 5018 12 ch Thermocouple Input Module APAX 5017H 12 ch High Speed Analog Input Module APAX 5028 8 ch Analog Output Mo...

Page 11: ...type terminal blocks clamp type terminal blocks can save up to 75 wiring time and provide better reliability for shock and vibration Follow the pro cedures below for wiring your APAX 5000 I O module...

Page 12: ...ock Warning APAX 5000 I O modules can be categorized into four categories AI AO DI and DO If you insert a terminal block into a module which has a different function it might damage the modules for ex...

Page 13: ...ntech provides write on labels for each APAX 5000 I O module This write on label has two sides one with the model name specifications and a wiring diagram while the other side allows users to write in...

Page 14: ...through the onboard jumpers This section will show you how to adjust the jumper settings 1 Pull out the write on label and you can see the location of the jumper 2 You can use the screw driver to adj...

Page 15: ...t side Rotate that ID switch and point the hole on the central axis to correspond ing ID number 0 F Refer to figures below for the location of the rotary ID switch and how to set the ID number by the...

Page 16: ...n the PCB that it can double the available ID number Thus the maximum number for digital module in one system is 32 You can distinguish if the ID number is doubled by the front LED When the LED color...

Page 17: ...swich Green Warning Avoid two modules with the same ID number in the same system or you cannot see the module in the software utility The LED on the front side will flash four times if two or more mo...

Page 18: ...between backplanes and provides to all APAX 5000 I O modules inserted on the backplanes Refer to figures below for how to wiring the power to the backplane and how to assembly APAX 5000 I O modules w...

Page 19: ...O module to the APAX 5002 backplane by pulling down the module locks 4 Insert another APAX 5000 I O module on the same APAX 5002 backplane Use tongue and groove slots to move the module 5 Lock that AP...

Page 20: ...ackplane locks Warning When you assembly different backplanes together remember to turn off the power connected to the backplane If not the backplanes may be damaged Turn on the power again after you...

Page 21: ...module locks similar as step 5 10 If needed repeat step 8 9 to have another APAX 5000 I O module on the same APAX 5002 backplane If you need more APAX 5000 I O module repeat Step 6 Step 10 until all n...

Page 22: ...s though the backplanes 1 Follow the procedure described in Section 1 7 1 to assembly APAX 5000 I O modules into one complete system The only difference is that you don t need to connect the power sup...

Page 23: ...15 APAX 5000 I O Series User Manual Chapter 1 Overview...

Page 24: ...side of the first APAX 5002 back plane in the system 4 Lock the stacked APAX 5343E backplane with the APAX 5002 backplane by the backplane locks on the APAX 5002 backplane 5 Insert the upper case of...

Page 25: ...serted on the backplane when the complete sys tem is power on This can significantly help to make it more convenient for system maintenance Changing one module won t affect operation of other modules...

Page 26: ...ule locks to lock on the backplane and APAX 5000 I O module will be power on and can be used The device must be fully dismantled in order to dispose of it Electronic parts must be disposed of in accor...

Page 27: ...f all backplanes into the position to fix all backplanes to the DIN rail 6 Insert all necessary APAX 5000 I O modules to the backplanes Similar to Step 2 Step 4 and Step 8 in section 1 7 1 7 Slide the...

Page 28: ...0 I O module to a wall panel through backplane using two screws per module Use M4 or 8 panhead screws Refer to figure below for the dimensional template Below are the procedures for the wall panel mou...

Page 29: ...rew for APAX 5002 to hang should be special designed We have provided it in accessory Diameter 9 mm length 16 mm height of head 2 7 mm 3 Mount the first APAX 5002 backplane to the wall panel using two...

Page 30: ...Series User Manual 22 4 Stack Another APAX 5002 backplane to original backplane Lock the two back planes together 5 Mount the second APAX 5002 backplane to the wall panel using two standard M4 or 8 p...

Page 31: ...1 7 1 8 Lock APAX 5520 and all necessary APAX 5000 I O module to the backplane by pull down the buckle Similar to Step 3 Step 5 and Step 9 in section 1 7 1 Note When the total number of APAX 5000 I O...

Page 32: ...ies User Manual 24 We suggest remaining enough clearance space from enclosure walls and adjacent equipments Allow 50 mm 2 in of space on all sides as shown below This provide ventilation and makes ass...

Page 33: ...Chapter 2 2 Analog Input Output Modules...

Page 34: ...transformer based isolation up to 2 500 VDC 2 1 1 APAX 5013 8 ch RTD Module The APAX 5013 is a 16 bit 8 channel RTD input module that features programmable input ranges on all channels This module is...

Page 35: ...rent Range for Each Channel Yes Resolution 16 bit Accuracy 0 1 of FSR at 25 C Sampling Rate 50 Hz filter 8 sample second total 60 Hz filter 10 sample second total CMR 50 60 Hz 90 dBs NMR 50 60 Hz 60 d...

Page 36: ...input Refer to the figure below to see how to define the input type by the jumper Besides you can use software APAX utility to configure range type for each channel This module is an extremely cost ef...

Page 37: ...ft 30 ppm C Zero Drift 6 V C Input Characteristic Curve According to IEC 61131 2 Common Mode Voltage up to 200 VDC Wire Burnout Detection Only for 4 20 mA range Note To keep measurement accuracy pleas...

Page 38: ...ut Module APAX 5017H is an 12 ch analog differential input module that provides programma ble input ranges on each channel Its sampling rate depends on the data format received up to 1000 sample secon...

Page 39: ...Span Drift 25 ppm C Zero Drift 6 V C Input Characteristic Curve According to IEC 61131 2 Wire Burnout Detection Only for 4 20 mA range Protection Over Voltage Protection 35 VDC Isolation 2 500 VDC Bet...

Page 40: ...current input 20 mA 0 20mA 4 20mA and thermocouple input Type J K T R S E B An external CJC on the plug in ter minal is designed for accurate temperature measurement The module provides 2500 VDC optic...

Page 41: ...25 C Temperature Range and Accuracy Note You can use the jumpers to configure each analog input channel type voltage thermocouple or current Refer to Section 1 5 for the location of the jumpers There...

Page 42: ...ltage up to 200 VDC Wire Burnout Detection For 4 20 mA range and all thermocouple type Protection Isolation 2 500 VDC Between channels and backplane bus Note This accuracy information only relates to...

Page 43: ...ut Output Modules Environment Operating Temperature 10 60 C when mounted vertically Storage Temperature 40 70 C Relative Humidity 5 95 non condensing General Dimensions W x H x D 30 x 139 x 100 mm Wei...

Page 44: ...hannel This module is an IEC 61850 3 compliant I O modules and suitable for measurement and monitoring for power and energy related application The highly anti electromagnetic interfer ence make it mo...

Page 45: ...olution Sampling Rate 12 samples second total CMR 50 60 Hz 90 dB NMR 50 60 Hz 67 dB Noise Suppression for Frequency 50 60 Hz Span Drift 30 ppm C Zero Drift 6 V C Input Characteristic Curve According t...

Page 46: ...Environment Operating Temperature 20 70 C when mounted vertically Storage Temperature 40 85 C Relative Humidity 5 95 non condensing General Dimensions W x H x D 30 x 139 x 100 mm Weight 170 g Power C...

Page 47: ...h the configuration software For each channel voltage and current can be used by connecting to different terminal The module provides 2500 VDC optical isolation between channels and backplane bus If a...

Page 48: ...t 250 V C Load Voltage 1000 minimum Current 0 500 Protection Isolation 2 500 VDC Between channels and backplane bus Short Circuit Protection Fail Safe Protection When I O module lose its communication...

Page 49: ...Chapter 3 3 Digital Input Output Modules...

Page 50: ...proximity switches The digital input channels offer LED to indicate digital status The module provides 2500 VDC optical isolation between channels and backplane bus If any high voltage or current dam...

Page 51: ...mA At signal 1 Maximum Input Current 7 3 mA Input Filter 3 ms Input Characteristic Curve According to IEC 61131 2 type 1 Protection Isolation 2 500 VDC Between channels and backplane bus Over Voltage...

Page 52: ...ls can generate discrete signal to external devices and change its output value to control the devices The digital output channels offer short circuit protection and LED to indicate digital status The...

Page 53: ...k Source Wet Contact Input Voltage Rated Value 24 VDC For 0 signal 5 5 VDC For 1 signal 15 30 VDC and 15 30 VDC Input Impedance 5 4 k Input Current typical 4 4 mA At signal 1 Input Filter 3 ms Input C...

Page 54: ...Protection Isolation 2 500 VDC Between channels and backplane bus Over Voltage Protection 70 VDC for DI channel Short Circuit Protection For DO channel Thermal Shutdown Protection For DO channel Fail...

Page 55: ...and backplane bus If any high voltage or current damage the channels the whole system backplanes other mod ules and control unit won t be affected because it is already isolated Figure 3 5 APAX 5046...

Page 56: ...ad max 200 Hz Using 5W lamp and testing under 24 V Protection Isolation 2 500 VDC Between channels and backplane bus Short Circuit Protection Thermal Shutdown Protection Fail Safe Protection When I O...

Page 57: ...l status This module is an IEC 61850 3 compliant I O modules and suitable for power and energy related applica tion The highly anti electromagnetic interference make it more robust and reliable to sur...

Page 58: ...ent 4 4 mA At signal 1 Maximum Input Current 7 3 mA Input Filter 3 ms Input Characteristic Curve According to IEC 61131 2 type 1 Protection Isolation 2 500 VDC Between channels and backplane bus Over...

Page 59: ...urrent damage the channels the whole system backplanes other modules and control unit won t be affected because it is already isolated The APAX 5046SO supports two independent power sources with diffe...

Page 60: ...ad max 200 Hz Using 5W lamp and testing under 24 V Protection Isolation 2 500 VDC Between channels and backplane bus Short Circuit Protection Thermal Shutdown Protection Fail Safe Protection When I O...

Page 61: ...ches can be used to control the relays The digital output channels offer short circuit protec tion and LED to indicate digital status The module provides 2500 VDC optical isolation between channels an...

Page 62: ...User Manual 54 Application Wiring Figure 3 12 Wiring for APAX 5060 Warning When you connect DO channel with inductive load we suggest adding one diode in the circuit to protect the APAX 5060 module Re...

Page 63: ...esistance 30 m maximum Insulation Resistance 1 G minimum at 500 VDC Operating Time 10 ms maximum at rated voltage excluding bounce time Release Time 5 ms maximum at rated voltage excluding bounce time...

Page 64: ...ompliant I O modules and suitable for power and energy related application The highly anti electro magnetic interference make it more robust and reliable to survive in the hush environ ment The module...

Page 65: ...Resistance 30 m maximum Insulation Resistance 1 G minimum at 500 VDC Operating Time 10 ms maximum at rated voltage excluding bounce time Release Time 5 ms maximum at rated voltage excluding bounce tim...

Page 66: ...APAX 5000 I O Series User Manual 58 Dimensions W x H x D 30 x 139 x 100 mm Weight 195 g Power Consumption 2 W 24 VDC typical Status Display LED per channel On Logic level 1 Off Logic level 0...

Page 67: ...tput function the APAX 5080 supports 4 general isolated digital output and spe cific alarm function with counter For counter frequency function the APAX 5080 can support many modes of counter input ty...

Page 68: ...APAX 5000 I O Series User Manual 60 Application Wiring Figure 3 16 Wiring for APAX 5080 Warning Please use different power supply modules for digital channels and sys tem to ensure isolation effect...

Page 69: ...61 APAX 5000 I O Series User Manual Chapter 3 Digital Input Output Modules APAX 5080 Function Block...

Page 70: ...irection Up Down Up Pulse A B phase and Frequency Channels 4 Pulse and Direction Up Down and A B phase mode 8 Up Pulse and Frequency mode Counting Range 32 bit 1 bit overflow underflow Minimum Pulse W...

Page 71: ...umber of steps will be added by one and vice versa A B Phase 2X counter mode A B Phase x 2 A B Phase 4X counter mode A B Phase x 4 With Reload When the counter0 value is overflow the value will be res...

Page 72: ...0 starts to count If the counter value is overflow or underflow it will reset to the defined value e g 0x33 but won t keep counting Figure 3 18 Pulse DIR With Reload Count Once 0x33 0x32 0x31 Up Down...

Page 73: ...function When the counter0 is enabled the couner0 starts to count If the counter value is overflow or underflow it will reset to the defined value e g 0x33 and keep counting repetitively Figure 3 19...

Page 74: ...e counter0 is enabled the couner0 starts to count If the counter value is overflow or underflow it will show the minimum 0x00 or maximum 0xFFFFFFFF value and not count continuously Figure 3 20 Up Down...

Page 75: ...ne pulse one down count When the counter0 is enabled the couner0 starts to count If the counter value is overflow or underflow it will reset to the defined value e g 0x33 but won t keep counting Figur...

Page 76: ...ount When the counter0 is enabled the couner0 starts to count If the counter value is overflow or underflow it will reset to the defined value e g 0x33 and keep counting repetitively Figure 3 22 Up Do...

Page 77: ...ter up mode Ch0_A provides the counting up function one pulse one up count When the counter0 is enabled the couner0 starts to count If the counter value is overflow or underflow it will reset to the d...

Page 78: ...etitively Figure 3 25 Up With Reload Count Repetitively Frequency Figure 3 12 shows the frequency function Every counter channel can measure the frequency of assigned time window and the range is from...

Page 79: ...ed the couner0 starts to count If the counter value is overflow or underflow it will show the minimum 0x00 or maximum 0xFFFFFFFF value and not count continuously Figure 3 27 A B Phase 1X No Reload Cou...

Page 80: ...ouner0 starts to count If the counter value is overflow or underflow it will reset to the defined value e g 0x33 but won t keep counting Figure 3 28 A B Phase 1X With Reload Count Once 0x33 0x34 0x35...

Page 81: ...s enabled the couner0 starts to count If the counter value is overflow or underflow it will reset to the defined value e g 0x33 and keep counting repetitively Figure 3 29 A B Phase 1X With Reload Coun...

Page 82: ...uner0 starts to count If the counter value is overflow or underflow it will reset to the defined value e g 0x33 but won t keep counting Figure 3 30 A B Phase 2X No Reload Count Once 0x33 0x32 0x31 0x3...

Page 83: ...0 is enabled the couner0 starts to count If the counter value is overflow or underflow it will reset to the defined value e g 0x33 and keep counting repetitively Figure 3 31 A B Phase 2X With Reload C...

Page 84: ...s to count If the counter value is overflow or underflow it will reset to the defined value e g 0x33 and keep counting repetitively Figure 3 32 A B Phase 2X With Reload Count Repetitively 0x33 0x34 0x...

Page 85: ...arts to count If the counter value is overflow or underflow it will reset to the defined value e g 0x33 but won t keep counting Figure 3 33 A B Phase 4X No Reload Count Once 0x33 0x00 Ch0_A Ch0_B Coun...

Page 86: ...counter value is overflow or underflow it will reset to the defined value e g 0x33 and keep counting repetitively Figure 3 34 A B Phase 4X With Reload Count Once 0x33 0x33 Ch0_A Ch0_B Counter0 Value...

Page 87: ...n trigger the counter to count once Retriggerable It means DI0 can trigger the counter to count anytime High level the DI0 trigger level Low level the DI0 trigger level Rising Edge the DI0 trigger edg...

Page 88: ...count If the counter value is overflow or underflow it will show the minimum 0x00 or maximum 0xFFFFFFFF value and not count continuously Whatever the DI value is the counter still continu ously count...

Page 89: ...nabled the couner0 starts to count If the counter value is overflow or underflow it will reset to the defined value e g 0x33 but won t keep counting Whatever the DI value is the counter still continuo...

Page 90: ...alue is overflow or underflow it will reset to the defined value e g 0x33 but won t keep counting If the DI0 value is high level the counter0 will starts to count but cannot retriggered Otherwise the...

Page 91: ...nt If the counter value is overflow or underflow t will reset to the defined value e g 0x33 but won t keep counting If the DI0 value is high level the counter0 will starts to count but cannot retrigge...

Page 92: ...s overflow or underflow it will reset to the defined value e g 0x33 and keep counting repetitively If the DI0 value is high level the counter0 will starts to count and can be retriggered Otherwise the...

Page 93: ...counter value is overflow or underflow it will reset to the defined value e g 0x33 and keep counting repetitively If the DI0 value is high level the counter0 will starts to count and can be retrigger...

Page 94: ...ue is overflow or underflow it will reset to the defined value e g 0x33 but won t keep counting If the DI0 value is low level the counter0 will starts to count but cannot retriggered Otherwise the cou...

Page 95: ...t If the counter value is overflow or underflow t will reset to the defined value e g 0x33 but won t keep counting If the DI0 value is low level the counter0 will start to count but cannot be retrigge...

Page 96: ...value is overflow or underflow it will reset to the defined value e g 0x33 and keep counting repetitively If the DI0 value is low level the counter0 will starts to count and can be retriggered Otherwi...

Page 97: ...e counter value is overflow or underflow it will reset to the defined value e g 0x33 and keep counting repetitively If the DI0 value is low level the counter0 will starts to count and can be retrigger...

Page 98: ...lue is overflow or underflow it will reset to the defined value e g 0x33 but won t keep counting If the DI0 status is rising edge the counter0 will starts to count but cannot retriggered Otherwise the...

Page 99: ...If the counter value is overflow or underflow t will reset to the defined value e g 0x33 but won t keep counting If the DI0 status is rising edge the counter0 will start to count but cannot be retrig...

Page 100: ...alue is overflow or underflow it will reset to the defined value e g 0x33 and keep counting repetitively If the DI0 status is rising edge the counter0 will starts to count and can be retriggered Other...

Page 101: ...counter value is overflow or underflow it will reset to the defined value e g 0x33 and keep counting repetitively If the DI0 status is rising edge the counter0 will starts to count and can be retrigge...

Page 102: ...ue is overflow or underflow it will reset to the defined value e g 0x33 but won t keep counting If the DI0 status is falling edge the counter0 will starts to count but cannot retriggered Otherwise the...

Page 103: ...t If the counter value is overflow or underflow it will reset to the defined value e g 0x33 and keep counting If the DI0 status is falling edge the counter0 will start to count but cannot be retrig ge...

Page 104: ...lue is overflow or underflow it will reset to the defined value e g 0x33 and keep counting repetitively If the DI0 status is falling edge the counter0 will starts to count and can be retriggered Other...

Page 105: ...ounter value is overflow or underflow it will reset to the defined value e g 0x33 and keep counting repetitively If the DI0 status is falling edge the counter0 will starts to count and can be retrigge...

Page 106: ...t If the counter value is overflow or underflow it will reset to the defined value e g 0x33 but won t keep counting If the DI0 status is rising edge the counter0 will starts to count and won t be retr...

Page 107: ...arts to count If the counter value is overflow or underflow it will reset to the defined value e g 0x33 and keep counting If the DI0 status is rising edge the counter0 will starts to count and won t b...

Page 108: ...t If the counter value is overflow or underflow it will reset to the defined value e g 0x33 but won t keep counting If the DI0 status is falling edge the counter0 will starts to count and won t be ret...

Page 109: ...ill be high and when the counter value counts to defined alarm value the DO status will change high to low No Auto Reload When the counter is overflow or underflow the value will be reset to the initi...

Page 110: ...rated with the APAX 557X series and transmits data to through the COM port The integrated sys tem is an intelligent stand alone system and can connect and issue commands to control devices such as pri...

Page 111: ...als TxD RxD RTS CTS GND for RS 232 TxD RxD TxD RxD for RS 422 Data Data for RS 485 Isolation 2500 VDC Connector PLUG_26_3 81mm NONE jumper change mode Environment Operating Temperature 10 70 C when mo...

Page 112: ...tection with an automatic transmission repeat function This drastically reduces the chance of data loss and ensures system reliability The on board CAN controllers are located at different positions i...

Page 113: ...dware Communication Controller SJA 1000 CAN Transceiver 82C250 Signal Support CAN_H CAN_L Speed bps Up to 1 Mbps programmable transfer rate Isolation Protection 2000 VDC Connector DB9 Operating Temper...

Page 114: ...ts data to through the COM port The integrated system is an intelligent stand alone system and can connect and issue commands to control devices such as print ers and PLCs in remote factory location F...

Page 115: ...C when mounted vertically Relative Humidity 5 95 Storage Temperature 40 70 C non condensing Configuration Settings SW4 COM1 SW5 COM2 SW6 COM3 SW7 COM4 SW4 7 Status Function PIN1 ON Force Disable RS 23...

Page 116: ...APAX 5000 I O Series User Manual 108...

Page 117: ...Chapter 4 4 Backplane Modules...

Page 118: ...lso be used between two APAX 5002 Therefore you can flexibly build any remote expansion with line tree or star topology All the APAX 5000 I O modules can benefit from the remote expansion architecture...

Page 119: ...neral Dimensions W x H x D 28 x 151 x 38 mm Weight 70 g Mounting DIN rail wall panel Power Input 24 VDC Power Consumption 0 3 W 24 VDC 4 3 APAX 5004L 4 slot Backplane Module APAX 5004L is an interface...

Page 120: ...APAX 5000 I O Series User Manual 112...

Page 121: ...Chapter 5 5 Power Supply Modules...

Page 122: ...l 60 ms Rated Output Current 3 A Output Current Limitation 3 5 4 3 A Efficiency 87 at 115 230 VAC Input Voltage Rated load Protection Isolation Protection In Out 42 42 VDC Over Voltage Protection Shut...

Page 123: ...stability especially in the envi ronment with high electromagnetic interference such as power substation And this is a necessary unit for APAX to complaint with the IEC 61850 3 standard APAX 5350 Spe...

Page 124: ...APAX 5000 I O Series User Manual 116...

Page 125: ...Chapter 6 6 Error Handling and Diagnostics...

Page 126: ...tself Solution 1 Download latest firmware again to see if it works well 2 If the LED continues flashing after updating firmware then you need to contact Advantech for technical support LED continues f...

Page 127: ...I O module Solution 1 Check ID number of all I O modules in the same system Adjust the ID number to avoid different I O modules with the same ID number Refer to Section 1 6 for how to adjust ID numbe...

Page 128: ...APAX 5000 I O Series User Manual 120...

Reviews: