


NeuronBot
List of Figures
35
5.2. Remote Control and Monitoring
Before teaching ROS to control and monitor NeuronBot, you must remove the keyboard, mouse, and monitor from
the NeuronBot. To get started, install Ubuntu and set up the ROS environment on your computer and connect the
NeuronBot and computer to the same WiFi router.
Note:
We recommend using a portable computer (i.e., a laptop) to remotely control the NeuronBot for added
mobility and accessibility.
5.2.1. Wireless Setup
After connecting the NeuronBot and computer to the same WiFi router, you need to obtain the IP address of the
NeuronBot and computer to remotely control the NeuronBot.
1. Power on the NeuronBot and connect it to a monitor and keyboard.
2. Connect to the WiFi.
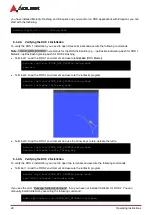
3. Execute the following command to obtain the IP address of the NeuronBot:
ip address show
The IP address is at the following location:
Use the same command to get the IP address of the computer. Take note of these IP addresses for use in the
following sections.
Note:
NeuronBot has multiple network interfaces because it comes installed with a wireless card (wlp1s0) and
wired (enp0s31f6) card. The IP address obtained from the WiFi router must be aligned with the wlpXXX interface.
5.2.2. ROS 1 Remote Control Settings
In ROS 1, the IP address is needed to tell ROS 1 applications (e.g., rviz and rqt) where to find NeuronBot.
Therefore, when you want to connect NeuronBot remotely, make sure that ROS_MASTER_URI and ROS_IP are
set correctly.
ROS_MASTER_URI
This is a required setting that tells nodes where they can locate the ROS Master. In this example, NeuronBot is the
Master because we will run roscore on the NeuronBot.
ROS_IP
This tells other nodes where they can locate themselves.
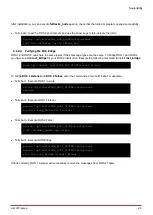
Use the following commands to set up ROS_MASTER_URI and ROS_IP.
•
NeuronBot:
export ROS_MASTER_URI=http://<IP_OF_
NEURONBOT
>:11311