background image

EINAR 

USER MANUAL 

Page 10/51  

Adaptive Recognition 

America 

Adaptive Recognition 

Hungary 

Adaptive Recognition 

Nordic 

Adaptive Recognition 

Singapore 

[email protected]


WWW.ADAPTIVERECOGNITION.COM


4.


LIVE 

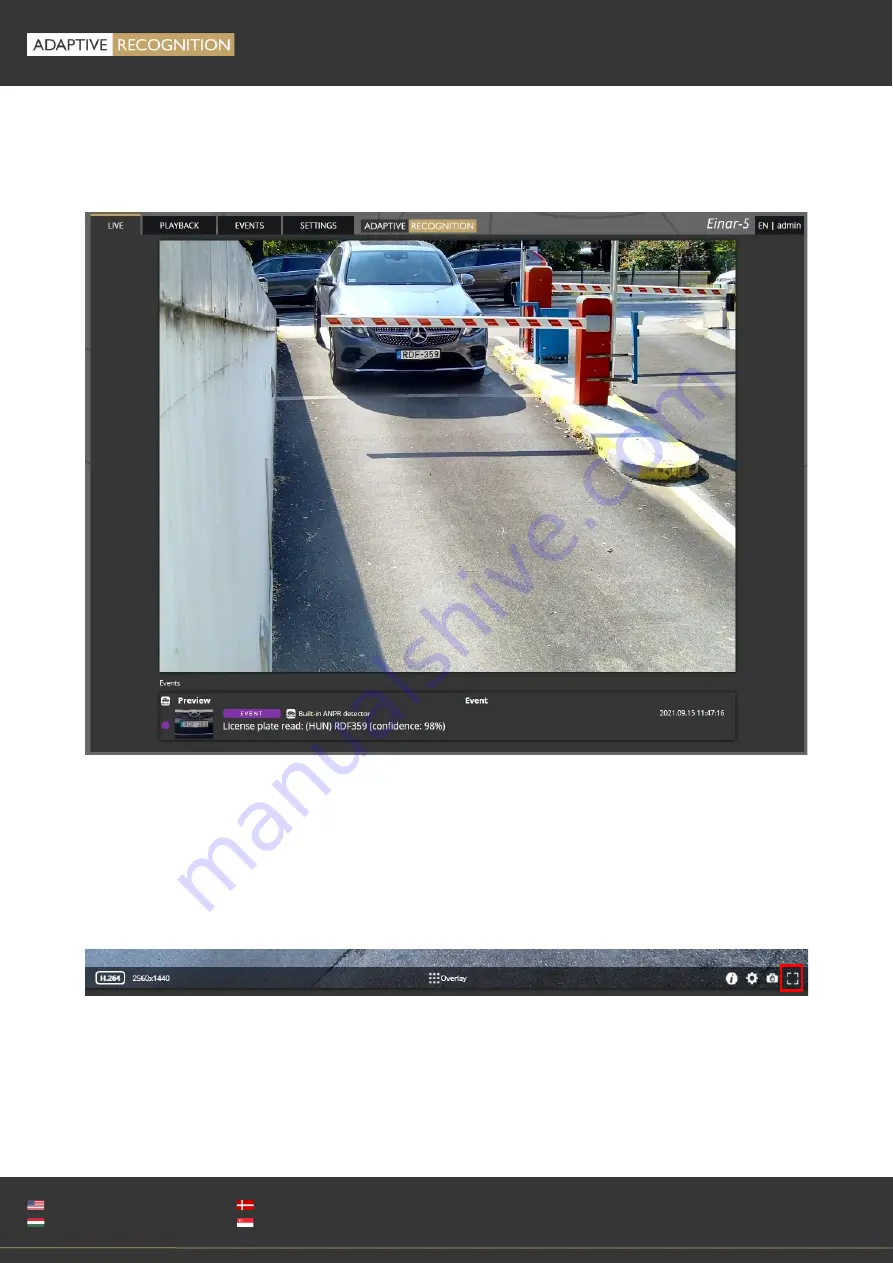
After login, the interface navigates to the LIVE tab that shows a live feed of the camera streams. 


4.1.


FULL-SCREEN MODE 

The 

camera’s live stream

 can be displayed on full screen by clicking on the icon located in the 

image’s 

bottom-right corner.  


To exit from the full-screen mode, press the ESC keyboard key or click on the icon mentioned above.  


Summary of Contents for Einar

Page 1: ......

Page 2: ...ocument version 2021 11 11 Firmware version 1 8 3 Table of Contents 1 Overview 4 1 1 Default IP Address 5 1 2 Link Local IP Address 5 1 3 Finding Cameras 5 2 AR Device Tool 6 2 1 Finding cameras 6 2 2 Firmware License and Engine Upload 7 3 Overview of the Web Interface 9 4 Live 10 4 1 Full Screen Mode 10 4 2 Saving image 11 4 3 Switching Stream 11 4 4 Help 11 4 5 Overlay 12 4 6 Event Preview 12 5 ...

Page 3: ...ting the Recordings 16 6 Events 17 7 Settings 20 7 1 System Status 20 7 2 System Device 21 7 3 SyStem Network 23 7 4 System Security 24 7 5 System Storage 26 7 6 System IO 30 7 7 System Service 31 7 8 Media Image 32 7 9 Media Video 36 7 10 Media Lens 37 7 11 Analytics Settings 38 7 12 Analytics Detectors 38 8 How to use the Einar camera 46 8 1 Camera Installation 46 8 2 Using Einar Camera 48 CONTA...

Page 4: ...hrough which you can access the camera settings the LIVE the PLAYBACK the EVENTS and the SETTINGS interfaces Accessing the web interface 1 Start a browser and enter the camera IP address into the address bar of the browser 2 Type the username and the password on the displayed login interface and click on Login The default user account is the following Username admin Password admin It is recommende...

Page 5: ...mbers that can be converted into the last two parts of a link local address 169 254 XX YY Example the camera with the MAC address 00 19 B4 01 42 1A ends with 42 and 1A representing the decimal values 66 and 26 The link local address of this camera is 169 254 66 26 1 3 FINDING CAMERAS You can find the camera on the network using the AR DeviceTool Double click on the selected camera and the Einar ca...

Page 6: ...ogram here AR DeviceTool It runs on Windows operating system 2 1 FINDING CAMERAS Once started the program lists the cameras detected on the local network The camera name product family name type firmware version IP address MAC address and brief information about the current upload process will be displayed The currently available cameras are marked with green color in the first column The red colo...

Page 7: ... using Ctrl Shift Select the camera s you want to update and press the Upload firmware Upload License or Upload engine buttons that become active In the window that appears enter the username and password to access the camera select the file you want to upload and click Start to start the upload If you want to save the username and password to access the cameras you can create user profiles to mak...

Page 8: ...America Adaptive Recognition Hungary Adaptive Recognition Nordic Adaptive Recognition Singapore SENDINFO ADAPTIVERECOGNITION COM WWW ADAPTIVERECOGNITION COM Previously created user profiles can be edited or deleted using the buttons next to the button ...

Page 9: ...WEB INTERFACE The following menu items are available on the web interface 1 LIVE Shows a live view of the camera streams 2 PLAYBACK Browse recordings on the configured storage device 3 EVENTS Browse the recorded events on the configured storage device 4 SETTINGS Under this menu you can access the following options SYSTEM Status Device Network Security Storage I O Service MEDIA Image Video Lens ANA...

Page 10: ...OM WWW ADAPTIVERECOGNITION COM 4 LIVE After login the interface navigates to the LIVE tab that shows a live feed of the camera streams 4 1 FULL SCREEN MODE The camera s live stream can be displayed on full screen by clicking on the icon located in the image s bottom right corner To exit from the full screen mode press the ESC keyboard key or click on the icon mentioned above ...

Page 11: ... it you can save an image of the current live stream with previously selected OSD information The CTRL S keyboard shortcut can be used as well 4 3 SWITCHING STREAM The Streams button is located next to the Save image icon By clicking on it you can select which stream will be displayed as LIVE 4 4 HELP The last icon on the right is the Help button It brings up keyboard shortcuts on how to use and n...

Page 12: ...NGS menu where the video stream is visible e g 7 8 Media Images The OSD layers come in handy for observing the internal workflow of the camera setting up the device or troubleshooting 4 6 EVENT PREVIEW You can find the event preview section under the live stream image displaying the notifications about the latest received events Basic events like ANPR are shown with a purple color and the EVENT te...

Page 13: ...AYBACK You can access the PLAYBACK interface is accessible if the storage is turned on By clicking on this tab the recordings stored on the storage device will be listed You can then navigate them by clicking on the timeline below the video feed In case the storage is turned off but the storage device is available the previously recorded ele ments can be viewed and played if the storage function i...

Page 14: ...the video parts ready to be played In the middle of the timeline see image above there is a purple marker that shows where you are in the playback Under this section you can also see the current time of the playback The magnifying glasses located under the timeline are to increase magnifying glass with sign or decrease magnifying glass with sign the time interval found on the timeline In the middl...

Page 15: ... to them on the right side of the PLAYBACK interface The events and timeline of each detector can be turned on off by clicking on the appropriate detector button Clicking on an event in the list navigates the playback to the event s date and time If you hover the cursor over an event located in the list the detector related to the event is highlighted above the list It works vice versa by hovering...

Page 16: ... viewed in most modern video player applications The Export button is located in the bottom right corner of the PLAYBACK interface By clicking on this button a dialog box pops up and two gold arrows appear on the timeline Drag the arrows with the mouse and click the calendar buttons next to Start and End to modify the exported time range The duration of the video to be exported is displayed in the...

Page 17: ...ON COM WWW ADAPTIVERECOGNITION COM 6 EVENTS You can access the EVENTS interface provided that the storage is turned on By clicking on this tab all events recorded by the camera will be listed You can navigate between the recorded events in the event browser by scrolling through them with your mouse s wheel The events appear as small images The latest events are at the top ...

Page 18: ...ector related to the event is highlighted in the list on the right Simultaneously a video clip of the event will be loaded and played automatically Clicking on an event brings up a detailed view of that event including a video clip and any related image The interface can be redirected to the PLAYBACK menu item by clicking on the Show in play back button The data belonging to the event can be saved...

Page 19: ...s related to the detector will be highlighted in the event browser By clicking on the detector the display of its events can be turned on off A calendar appears by clicking on the time located in the bottom right corner After setting the appro priate time and clicking on the Apply button in the calendar the browser skips to the specified time On ANPR capable devices an additional license plate sea...

Page 20: ...e Recognition Singapore SENDINFO ADAPTIVERECOGNITION COM WWW ADAPTIVERECOGNITION COM 7 SETTINGS The SETTINGS page contains all customizable parameters of the camera 7 1 SYSTEM STATUS On this interface you can find a summary of the important data of the camera the installed detectors the operating time and the ANPR licenses ...

Page 21: ...acturer settings are restored except for the network settings Set the date and time Upload firmware ANPR engine and license Date time settings The camera s current time is displayed at the Device time using your web browser s locale The device time can be set manually by clicking on the calendar icon You can synchronize the device to the computer time with the Sync button next to the calendar icon...

Page 22: ... click on the corresponding upload button The update process can be interrupted by clicking on the Cancel button located on the panel showing the upload status When the upload is finished in the case of uploading license before the update process the camera asks a security question whether you are sure about the modification Choosing No interrupts the update process and the camera operates with th...

Page 23: ...WWW ADAPTIVERECOGNITION COM 7 3 SYSTEM NETWORK The Network menu item hides the network settings The IP address assigned to the camera can be static or dynamic Default DNS 8 8 8 8 Fallback to static If the device is set to DHCP the Fallback to static option will be accessible The device will use the configure fallback address when obtaining a new address from a DHCP server fails ...

Page 24: ...YSTEM SECURITY In the Users database you can perform the maintenance of the user data like Adding new users Deleting users Modifying the already existing user profiles The default user is admin When adding a new user you can set three levels of permissions 1 Administrator The administrator can access and edit all parameters of a camera 2 User The user can view but not edit the parameters of the ca...

Page 25: ...camera zoom and focus if available Sessions At Lockout policy the maximum number of failed login attempts can be adjusted After reaching the specified number the device blocks that session By default after three failed login attempts the ca mera blocks the client for a minute Note that the number of Maximum attempts may vary between one and ten The duration of the block can be set between 30 secon...

Page 26: ...nder Operation mode the storage trigger can be selected The image sequences will be saved based on this selection The following can be selected as a storage trigger Event Only those image sequences will be stored which have taken place during the signaling of one of the detectors Motion When the camera detects motion the storage process starts and finishes when the motion is over Event Motion Stor...

Page 27: ...essary to record at every detector signaling Thus the user can select which detector signals should trigger the recording Devices Under the Devices tab information about the data of the SD card the length of the recordings the available storage and the writing speed can be found Formatting the SD card With the Format button you can format the storage unit immediately After clicking on the Format b...

Page 28: ...lowing fields should be defined Server Address IPv4 of the GDS server Port Access port of the GDS server Path Access within the server Table name The name of the GDS table where the upload will be done Username Username required for the identification Auto obtain user The username can be queried automatically The device queries the user token which will be the user However it has to be authorized ...

Page 29: ...Singapore SENDINFO ADAPTIVERECOGNITION COM WWW ADAPTIVERECOGNITION COM Setting the HTTP S upload Enable the upload to the HTTP POST at Target then enter the Host URL to set the HTTP event re ceiver You can set which data should be uploaded in addition to the event data Event image A cropped image of the license plate Video of the event ...

Page 30: ... adjusted by clicking the Edit button at the Inputs tab When the port s active state is set to Low the signal is only received from a detector if the device connected to the camera sends about 0 1 VDC When the port s active state is set to High then the signal is received from a detector if the device connected to the camera sends about 2 24 VDC You can also modify the Output ports at the Outputs ...

Page 31: ...rvice port The service port of the RTSP can be specified by filling in the field Authentication required By selecting Enabled authentication is required when connecting to the RTSP stream SNMP Service enabled The SNMP service can be enabled or disabled Read community Password required for the camera properties on SNMP MIB file can be downloaded from here UPnP Allow discovery Enable or disable the ...

Page 32: ... a dark room Burn sensitivity The more sensitive this setting is the fewer burned pixels appear Note howe ver that the image will be darker e g to compensate for over illuminated and therefore burnt out number plates Contrast Brightness difference between the brightest and darkest points of the image Auto gamma It increases the contrast on the darker spots of the image so that the details are more...

Page 33: ... adjusts the ma ximum overlap of the two images Day night mode Day and night mode can be chosen manually or automatically Day night preference A preferred setting of day or night mode can be defined which is applied in the case of automatic shifting 2D noise filter Noisy pixels are filtered based on the environment of a pixel 3D noise filter The deviation of the same pixels of frames in the sequen...

Page 34: ...NAR USER MANUAL Page 34 51 Adaptive Recognition America Adaptive Recognition Hungary Adaptive Recognition Nordic Adaptive Recognition Singapore SENDINFO ADAPTIVERECOGNITION COM WWW ADAPTIVERECOGNITION COM ...

Page 35: ...wing Surveillance General setting for basic motion detection and surveillance Traffic General setting for traffic observation ANPR free flow Ideal for free flow traffic license plate reading ANPR parking Recommended for parking license plate reading Exposure Zone The Exposure Zone tab allows you to draw and enable the zone s the image control is based on using polygons If the area outside the expe...

Page 36: ...erformed separately Frame rate control It can be enabled or disabled When it is disabled the camera operates with maximum FPS regardless of the other settings located on this interface After enabling it the following functions can be set Normal frame rate The frame rate of the camera in normal state Condition of reducing the frame rate The FPS can be set to be reduced upon Motion exclusi vely Even...

Page 37: ...t the aspect ratio to 4 3 or 16 9 7 10 MEDIA LENS On this interface you can fine tune the lens of the device the Focus and the Zoom can be customized by using the corresponding buttons Autofocus The camera possesses autofocus The autofocus function is enabled by default but it can be disabled on the Settings tab with the Change focus when zooming option If the Change focus when zooming option is t...

Page 38: ...and quality of the images specified in Stream1 or Stream2 MEDIA Video to be assigned to events when uploading via API GDS or HTTP Status The registered detectors names type ID and status are displayed on the page alongside the list of detectors supported by the camera and their current total quantity 7 12 ANALYTICS DETECTORS You can add modify or delete the camera detectors in this window The list...

Page 39: ...e It cannot be deleted If you click on the engine a mask can be applied to the live stream This can be set to exclusive or inclusive with the Masks Type option If the mask is set to Include the engine will only trigger when motion happens inside the selected area When it is set to Exclude it will not trigger inside the area The mask can be modified by clicking on the green area The Motion engine d...

Page 40: ...image to trigger the motion engine Further filtering can be done with the previously set sensitivity conditions to determine the degree of action intensity triggering recording The motion diagram is the OSD belonging to the setting which can provide visual assistance 7 12 2 Motion detector The Motion detector can be used to create events based on Motion engine The following can be ad justed on the...

Page 41: ...idence Use the slider to define what reading confidence percentage should trig ger an event A low value potentially results in more reading errors A high value potentially leads to missed reading cases Therefore values between 50 70 are recommended Check the ANPR Status OSD layer to see the detected license plate numbers and their confidence values and then set the desired minimum confidence level...

Page 42: ...ters Minimum confidence Use the slider to define what reading confidence percentage should trig ger an event A low value potentially results in more reading errors A high value potentially leads to missed reading cases Therefore values between 50 70 are recommended Check the ANPR Status OSD layer to see the detected license plate numbers and their confidence values and set the desired minimum conf...

Page 43: ...he following can be adjusted on the ANPR detector interface Name The name of the detector can be entered Description To add a brief description to the detector Filter The system can be set only to read certain license plates You can create additional ANPR detectors in addition to the Built in ANPR detector For example by enabling filters and adding license plates to them you can activate different...

Page 44: ...tector interface Name To enter the name of the detector Description A brief description can be added to the detector Input port The input receiving the signal must be selected Currently IN_0 is the only available input on the camera 7 12 6 Test detector The Test detector can be used to test the camera s upload and storage capabilities Important use it for testing purposes only The following can be...

Page 45: ...bject to be monitored moves In addition to the settings below you also need to mask the object in the image The mask should surround the object to be monitored in such a way it slightly overlaps it The following can be adjusted on the Stolen Object detector interface Name Enter the name of the detector Description Add a brief description to the detector Violation time No signal is given if there i...

Page 46: ...ply end e g switch but take care not to create a ground loop g The maximum angle of rotation and or tilt of the camera should not exceed 25 30 degrees h The optical axis of the camera should face the license plate of the oncoming or de parting vehicle The camera s optical axis shall be as small an angle as possible with the axis of travel of passing vehicles i The camera should be at least one met...

Page 47: ...s the camera from both IP addresses b Optionally you can use the AR Device Tool to locate the camera on your local network AR Device Tool c You can access the camera s web interface with the admin admin username password pair It is strongly recommended to change the default password 3 Some simple but important basic settings a Upload the ANPR Engine and License Key to your camera System Device acc...

Page 48: ...ea on the picture where you expect to see number plates using a mask This will increase the possibility of speeding up the number plate recognition and cars parked passing by in an undesirable place will not trigger an event ANPR engine f During the setup testing and checking of the operation it is recommended to display the necessary OSD layer s to get technical feedback about the camera s intern...

Page 49: ... interface In addition to local storage on an SD card it is also possible to configure an optional HTTP or GDS server for event upload The number plates are detected in the camera but the number plates are recognized in Car men Cloud The necessary devices and the most important specific settings are as follows Stable internet connection microSD card GPIO cable kit Einar camera without ANPR Engine ...

Page 50: ...ed 8 2 4 Integrated operation with ParkIT System The camera provides video stream and motion information to the ParkIT System software License plate recognition is processed within the ParkIT System on the server s side The possible trigger so urce is transmitted from the camera input to the ParkIT System then the open command is sent by the ParkIT System to the camera output The IO management can...

Page 51: ...ost proficient assistance so you can quickly get back to business Information regarding hardware software manuals and FAQ are easily accessible for customers who previously registered to enter the dedicated ATSS site Besides offering assistance the site is also designed to provide maximum protection while managing your business information and the technical solutions utilized New User If this is y...

Reviews: