background image


ACT-HDC11FH/ACT-HDC13FH Manual


Chapter 3  The Buttons & LCD


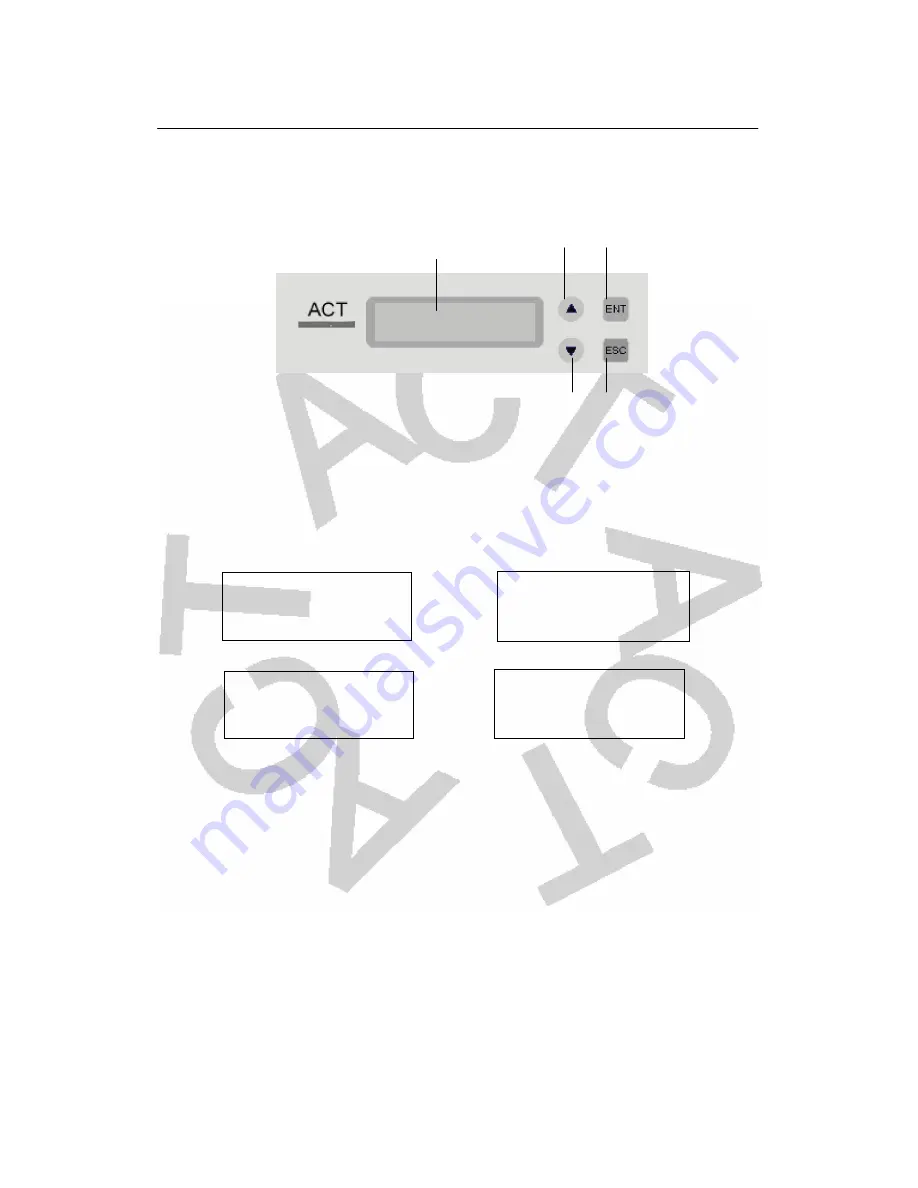
There  are  four  buttons  and  an  LCD  on  the  panel  of  ACT-HDC11FH/ACT-HDC13FH. 


1.  It  shows  all  functions  and  messages. 


2.  It  is  used to  scroll  up through functions or menus. 


3.  It  is  used to  scroll down through functions  or menus. 


4.  It is  used to execute a  selected function. 


5. It is used to cancel a selected function. 


Figure 1 

Figure 2 


HD 

Duplicator


1-1 

ver: 0.96F


Initialize  SDRAM


Figure 3 

Figure  4 


Detect 

Drives 

1. Copy HD


Figure 1

  shows the firmware version of ACT-HDC11FH/ ACT-HDC13FH,     

 
Figure 2

  the memory initialization, 

 
Figure 3

  the  scanning  of  the  drives 

 
Figure 4

  the  first  function. 


The  correct  display  of  the  four  figures  means  the  normal  powering  up. 


Summary of Contents for HDC11FH

Page 1: ...D Duplicator User s Manual Ver 1 1 Attention It takes over 5 seconds to power on after shutdown otherwise the system may operate abnorrmally ACT ACT POWER COMPUTER TECHNOLOGY CORP http www honetek com Copyright 2007 ACT All Rights Reserved ...

Page 2: ...This manual contains materials protected under International Copyright Laws All rights reserved No part of this manual may be reproduced transmitted or transcribed without the expressed written permission of the manufacturer and author of this manual ACT s ACT HDC 11FH ACT HDC 13F HDD Duplicator is used for copying whole hard driver ACT s Duplicator only supports legal backup operation ACT Corp is...

Page 3: ...2 4 Quick Installation Guide 8 Chapter 3 The Buttons LCD 9 Chapter 4 Functions 10 4 1 Copy HD 12 4 2 Compare 13 4 3 PreScan 14 4 4 ReScan Bus 14 4 5 Source HD size 15 4 6 Setup 16 4 6 1 Language 16 4 6 2 DMA Mode 16 4 6 3 Copy Size 17 4 6 4 Startup Menu 17 4 6 5 Auto Compare 18 4 6 6 Copy with detect 18 4 6 7 Button Sound 18 4 6 8 Device Info 19 4 6 9 System Info 19 4 7 Adv Setup 20 ...

Page 4: ... Compare Firmware 21 4 7 4 Quick Erase HDD 21 4 7 5 H W Diagnostic 22 4 7 6 Load Default 22 Chapter 5 Troubleshooting 23 5 1 About LCD 23 5 2 About Error Messages 23 5 3 About HDD 23 5 4 About Buttons 23 5 5 About Firmware Update 23 Technical Support Form 24 ...

Page 5: ...ams It takes time to learn how to use the software and more time to duplicate In view of this ACT has launched ACT HDC11FH ACT HDC13FH 1 2 Features Standalone IDE to IDE HDD copy controller Independent device without extra hardware or software Support high speed 1 to 1 1 to 3 HDD duplication User friendly interface with LCD showing messages Optional functions for application 1 3 Specifications ACA...

Page 6: ... Appearance Theappearances of ACT HDC11FH and ACT HDC13FHareasthe followingfiguresshow Figure 2 1a Figure 2 2 Figure 2 1b Figure 2 1c Figure 2 1d 1 Figure 2 1a b c d are up left front and back face of the ACT HDC11FH 2 Figure 2 2 is whole picture of the ACT HDC13FH ...

Page 7: ... drives be in Master mode Besides make sure that the watt of power supply is sufficient 2 3 The Steps for ACT HDC11FH 1 Connect the IDE cables and power cord wires to IDE ports and power ports Figure 2 3a Source IDE port Figure 2 3b Target IDE port 2 1 Connect the source hard drive to source port and connect the target hard drive to target port on ACT HDC11FH with the IDE cable as follow figure 2 ...

Page 8: ... source HDD and target HDD please confirm the power is turning off and then turn on the power to copy After copying completely first turn off the power and then take away your HDD fromACT HDC 112 SH 5 Before copying please check again your source HDD whether is correct you can know this information in function 6 Select Source If your source is SCSI HDD please check the SCSI ID generally the defaul...

Page 9: ...l down through functions or menus 4 It is used to execute a selected function 5 It is used to cancel a selected function Figure 1 Figure 2 HD Duplicator 1 1 ver 0 96F Initialize SDRAM Figure 3 Figure 4 Detect Drives 1 Copy HD Figure 1 shows the firmware version of ACT HDC11FH ACT HDC13FH Figure 2 the memory initialization Figure 3 the scanning of the drives Figure 4 the first function The correct ...

Page 10: ...tions There are 7 major functions in ACT HDC 11FH ACT HDC13FH and there are sub functions in Function 6 and Function 7 as the following figures show Copy Controller 1 Copy HD 2 Copy HD 3 Pre Scan HD 4 Re Scan Bus 6 Setup 5 Source HD size 7 Adv Setup ...

Page 11: ...CT HDC13FH Manual In Function 6 there are 9 sub functions 6 01 Language 6 02 DMA Mode 6 03 Copy Size 6 04 Startup Menu 6 06 Copy ith detect 6 05 Auto Compare 6 09 System Info 6 07 Button Sound 6 08 Device Info 6 Setup ...

Page 12: ...Copy HD is to copy data from a source hard drive to a target one Before copying be sure that the capacity of the target hard drive is equal to or larger than that of the source one Select function 1 1 Copy HD 7 01 Rescan Bus Delay 7 02 Read Error Skip 7 03 Update Firmware 7 04 Compare Firmware 7 06 H W Diagnostic 7 05 Quick Erase HDD 7 08 Copy HPA 7 07 Load Default 7 Adv Setup ...

Page 13: ...3 30 When comparison comes to an end the LCD will show the result as follows Compare OK 1 Fail 0 Diff 0 4 3 PreScan Function 3 PreScan is to scan if the source hard drive can be read correctly and to test the reading speed too Select function 3 3 PreScan HD Press ENT to prescan The LCD will show the scanning information as follows Scan 35MB s 0 28 5GB 13 30 When scanning finishes and the source ha...

Page 14: ...uiry as follows Re scan BUS Now Yes Press ENT The order of scanning is IDE0 IDE1 etc Detect Drives IDE BUS 0 Master When scanning finishes the LCD will show the result as follows BUS re scan OK 4 5 Source HD size Function 5 Source HD size is to display the capacity of the source hard drive Select function 5 5 Source HD size Press ENT The LCD will show the information as follows Total 28 5GB ...

Page 15: ...rtup Menu Auto Compare Copy with detect Button Sound Device Info and System Info as the figure on page 13 shows Select function 6 6 Setup 4 6 1 Language This function lets you select a language to show messages on the LCD 6 01 Setup Language Press ENT The default is English Language English 4 6 2 DMA Mode DMA means direct memory access This function can quicken the transfer rate by sending the dat...

Page 16: ...artup Menu This function lets you select any one of the functions except Setup as the first item appearing on the menu whenever you turn on the copy controller 6 04 Setup Startup Menu Press ENT The default is Copy HD You certainly can select any other function as the first item but remember to pressENT Startup Menu 1 Copy HD 4 6 5 Auto Compare This function is to compare the source hard drive and ...

Page 17: ...ory can be used as HDD and supports hot swap on an IDE slot before copying 6 06 Setup Copy with detect Press ENT The default is Off You can press to select On Copy with detect Off 4 6 7 Button Sound This function lets you decide whether to produce the sound of a button when you press it or not 6 07 Setup Button Sound Press ENT The default is On You can press to select Off Button Sound On ...

Page 18: ...hard drives connected to ACT HDC11FH ACT HDC13FH 6 08 Setup Device Info Press ENT 00 IDE0 Master HD IBM DLTA Press ENT 307030 TX40 4 6 9 System Info This function is to display the information of the system 6 09 Setup ystem Info Press ENT HD Duplicator 1 1 ver 0 96F Press ENT SST 39SF040 2006 06 23 ACARD ...

Page 19: ...tion 8 4 7 1 Rescan Bus Delay 7 01 Adv Setup Rescan Bus Delay Press ENT The default is 1Sec Rescan Bus Delay 1Sec 4 7 2 Read Error Skip This is to ignore any error that occurs during copying Under normal circumstances when an error occurs during copying a message will appear on the LCD Yet you can use Read Error Skip to neglect the bad sector of a hard drive 7 02 Adv Setup Read Error Skip Press EN...

Page 20: ... ACT HDC11FH ACT HDC13FH and connect a DVD ROM to its IDE0 After turning on place the disc containing the new firmware into DVD ROM and press ENT The system will begin searching the new firmware and show the message on the LCD after it finds it Press ENT to update Searching F W XXX XXXXX 4 7 3 Compare Firmware Now press ESC and to enter the following figure This is to compare the current firmware ...

Page 21: ... Erase Finished 4 7 6 H W Diagnostic Now press ESC and to enter the following figure This is to test the system 7 06 Adv Setup H W Diagnostic Press ENT to enter the following figure The system will do the button test self test of SDRAM the hardware connection test and flash test All test results will be shown on the LCD It is the easiest way to know if the system can work well LCD Test Start When ...

Page 22: ...e all changed settings return to defaults 7 07 Adv Setup Load Default Press ENT Use or to confirm Yes or No Load Default Config Yes When default loading finishes the LCD will show the result as follows Load Default OK 4 7 8 Copy HAP Now press ESC and 7 08 Adv Setup Copy HPA Copy HPA OFF ...

Page 23: ...o you have to power on again 5 3 About HDD If a hard drive cannot read confirm if the cable and the power are normal 5 4 About Buttons If you press any of the four buttons on the panel but there is no response it is perhaps that the button cannot function well Inspect if the cables on the control board of ACT HDC11FH ACT HDC13FH are loose 5 5 About Firmware Update If you cannot update the firmware...

Page 24: ...24 ACT HDC11FH ACT HDC13FH Manual Technical Support Form Email honetek honetek com http www honetek com Model F W Version OS Version HDD Model Capacity Other Problem Description ...

Reviews: