background image


13.9 

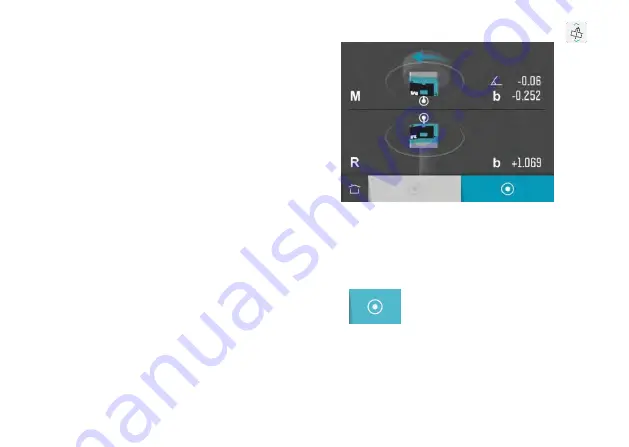
The screen displays the SR sensor at the 

bottom and the SM sensor at the top. 
The measurement is carried out by register 

values in four positions, 0°, 90°, 180° and 

270°. Index from CNC control or fixture is 

needed. The graphics show where to rotate 

the sensors.  
When the SR sensor is positioned, the SM 

sensor is positioned with the help of a relative 

rotational angle. The rotational angle is shown 

when the laser from the SM sensor hits the 

detector of the SR sensor. 
NOTE: The relative rotational angle must be 

inside 0.1° at each position in order to get a 

good result. 


Set the SR sensor at the first measurement 

position. 
Set the SM sensor at the first measurement 

position, with the help of the relative angle. 


Touch the measurement icon. 
This registers the first 

measurement position. 

Summary of Contents for Meax DU 01

Page 1: ...USER MANUAL MEAX...

Page 2: ......

Page 3: ...pindle Parallelism 13 1 Sensor Display Level 14 1 Sensor Display Position 15 1 Sensor Display Pen 16 1 Max Min Pen 17 1 Temperature Log 18 1 Memory Manager 19 1 Global Settings 20 1 Display Unit MEAX...

Page 4: ......

Page 5: ...ver increasing demands are being placed on machine tools we have arrived at the conclusion that an optimally functional machine forms the basis for better business Modern machine tools must maintain a...

Page 6: ...the system is the property of ACOEM AB any copying or redistribution is strictly prohibited Modifying disassembling reverse engineering or decompiling the system or any part thereof is strictly prohi...

Page 7: ...los Fixturlaser AB is since mid 2014 a fully owned subsidiary of ACOEM Group headquartered in Lyon France Other brands within ACOEM Group are 01dB ONEPROD METRAVIB and FIXTURLASER For more information...

Page 8: ...1 4...

Page 9: ...EAX DU 01 1 0984 MEAX LM 201 1 0985 MEAX LR 201 1 0986 MEAX SM 201 1 0987 MEAX SR 201 1 1039 MEAX P 100 1 1058 MEAX P 250 Manufacturer s name address phone no ACOEM AB Box 7 SE 431 21 M lndal Sweden P...

Page 10: ...lies with Part 15 of the FCC Rules Operation is subject to the following two conditions 1 this device may not cause harmful interference and 2 this device must accept any interference received includi...

Page 11: ...y or use the equipment in other ways than explained in the operating instructions ACOEM AB will not accept any liability for such use WARNING Make sure to fully comply with all appropriate safety meas...

Page 12: ...considered safe for its intended use with only minor precautions required These are Never stare directly into the laser transmitter Never shine the laser directly into anyone else s eyes CAUTION USE...

Page 13: ...3 3 Your system complies with the requirements in IEC 60825 1 2015 British Standard BS EN 60825 1 DIN EN 60825 1 USA FDA Standard 21 CFR Ch 1 Part 1040 10 and 1040 11...

Page 14: ...ystem is not used for a long time charge the batteries to approximately 50 75 before storing the system if kept in storage repeat this every 3 4 month if needed When used in typical conditions the bat...

Page 15: ...if handled improperly Do not disassemble and keep away from heat sources Handle damaged or leaking batteries with extreme care Please keep in mind that batteries can harm the environment Dispose of b...

Page 16: ...e sure that there are no restrictions on the use of radio transceivers at the site of operation before using the wireless transceivers WARNING Before using the wireless transceivers make sure that the...

Page 17: ...4 1 CARE PACKING THE CASE Make sure to use the supplied case when transporting the system Calibration certificates are placed behind the lid foam...

Page 18: ...except for the detector and laser window surfaces which should be cleaned with alcohol For the best possible function the laser diode apertures detector surfaces and connector terminals should be kep...

Page 19: ...4 3 Do not use paper tissue which can scratch the detector surface Do not use acetone...

Page 20: ...4 4...

Page 21: ...specific purposes The programs included depend upon which program packages you have selected Press the ON button to start the system In the Home Menu you can select the program that you want to use In...

Page 22: ...N PROGRAMS Straightness and Level Spindle Direction Coaxiality Squareness Vertical Spindle Direction Vertical Coaxiality Spindle Parallelism Vertical Spindle Parallelism Sensor Display Level Sensor Di...

Page 23: ...5 3 Sensor Display Pen Max Min Pen Temperature Log MEMORY MANAGER Memory Manager SYSTEM FUNCTIONS Global Settings Battery Status Decrease Backlight Increase Backlight Off Bluetooth Indicator On Off...

Page 24: ...5 4...

Page 25: ...e and measures the movement in two directions when the carriage is moved along the machine guideway The pitch roll is performed at the same time by having the LM sensor mounted on the tool holder carr...

Page 26: ...with a best fit calculation or according to selected reference points The results are presented in a graph and in a list and can be saved in the memory manager on the system The pitch roll measuremen...

Page 27: ...6 3 STARTING THE PROGRAM Start the Straightness and Level program by touching its icon in the Home Menu Turn on the laser on the SR sensor...

Page 28: ...raightness and Level the machine bed slant screen is displayed The machine bed slant is measured with the SM sensor If you have an existent machine bed slant you just need to confirm it Measure machin...

Page 29: ...nsor the angle value is displayed live Place the SM sensor at the machine bed slant Confirm measured machine bed slant The machine bed slant can also be entered manually Enter machine bed slant manual...

Page 30: ...t point 1 first and then at another point positions in between will be filled with equal distances between them If position is entered at another point than 1 first position will be set to 0 at point...

Page 31: ...oint 1 first and then distance is entered between any two points positions in between will be filled with equal distances between them If distance is entered between any two points first position will...

Page 32: ...ndow for tolerance settings Note Open notes Confirm configuration Confirm configuration and continue to summary screen Save configuration The configuration can be saved separately to be opened up late...

Page 33: ...points are registered in the measurement point screen Touch and release a point to open the measurement point screen The touched point is marked in blue If you want to change configuration it is possi...

Page 34: ...0 Wait about 20 seconds for the values to stabilize before registering the measurement point The measurement point screen shows b and a values and rotational angle from the position sensor and alpha...

Page 35: ...ta values in relation to the selected tolerances Within tolerance black Out of tolerance orange When a measurement point is registered fixed values are shown A filled circle around the measurement poi...

Page 36: ...ntinue to a neighbor point direct in the measurement point screen without returning to the summary screen in between Go to neighbor point to the left Go to neighbor point to the right Re measure a poi...

Page 37: ...6 13 Move the carriage with the SM and LM sensors to another measurement point and repeat the measurement procedure...

Page 38: ...Straightness summary screen Contrary to the selection of reference points best fit is a function that can be enabled or disabled The function calculates a reference line that minimizes the deviation f...

Page 39: ...nts Straightness on one page and Level on another The diagram scale is automatically adjusted according to the biggest value Show Straightness page Show Level page Summary screen Straightness The b an...

Page 40: ...point Values within tolerance Values out of tolerance Unmeasured point Reference point When a reference sensor LR is used level values can either be presented as M R values relative to the R sensor o...

Page 41: ...Touch and release a point to open the measurement point screen Touch the list icon to go to the list Save measurement The measurement can be saved anytime and be opened up later Touch the save icon to...

Page 42: ...e selected tolerances Within tolerance black Out of tolerance orange There is also a tolerance indication at the measurement point number If all values at a point are in tolerance the point number is...

Page 43: ...tive to the R sensor or as M values not relative to the R sensor It is also possible to see the R values Select M M R or R values with the check boxes in the Level summary screen Level summary screen...

Page 44: ...20 SENSOR DISPLAY Sensor Display is accessible directly from the summary screen Sensor Display Machine Tool from the Straightness page and Sensor Display Level from the Level page Start Sensor Displa...

Page 45: ...ideway is used as a reference line The direction of the spindle is presented as an angle towards the reference guideway in 2 axes MEASUREMENT METHOD The direction of the spindle rotational axis is obt...

Page 46: ...s close to the spindle and at far distance The distance between the points are entered into the system In each position the spindle is rotated 180 to determine the spindle rotational center on the det...

Page 47: ...dle Direction the machine bed slant screen is displayed The machine bed slant is measured with the SM sensor If you have an existent machine bed slant you just need to confirm it Measure machine bed s...

Page 48: ...nsor the angle value is displayed live Place the SM sensor at the machine bed slant Confirm measured machine bed slant The machine bed slant can also be entered manually Enter machine bed slant manual...

Page 49: ...o the right or the spindle to the right reference R and the tool holder to the left Screen Flip When entering the program the latest used direction is shown If this corresponds to your machine just co...

Page 50: ...7 6 Positions and distance Enter positions at the measurement points and or distance between the measurement points Confirm positions and distance...

Page 51: ...the machine bed slant The measurement is carried out by register values in two positions at each measurement point The small circles show where to rotate the sensors Place the tool holder with the SM...

Page 52: ...7 8 Rotate the SR sensor to the second measurement position at 180 Touch the measurement icon This registers the second measurement position at the first measurement point...

Page 53: ...t the SR sensor stay at the position 180 Touch the measurement icon This registers the first measurement position at the second measurement point Rotate the SR sensor back to the measurement position...

Page 54: ...7 10 During the measurement it is possible to re measure the latest position Touch the re measure icon to re measure the latest position...

Page 55: ...symbols the diagram and the color of the values show if the values are inside the selected tolerance or not Perpendicular direction in tolerance Perpendicular direction out of tolerance Parallel dire...

Page 56: ...7 12 Save the measurement result Go to adjustment...

Page 57: ...l all values are within tolerance Both the sensors must remain inside 0 1 during the adjustment If not a warning appears Orange for a sensor that is out of 0 1 and blue for a sensor that is still insi...

Page 58: ...the settings the current selection is shown beside the icon Machine Bed Slant Open window for machine bed slant settings Positions Distance Open window for position and distance settings Tolerance Op...

Page 59: ...7 15 Notes Open notes Sensor Display Open Sensor Display Machine Tool Global Settings Open Global Settings Return Return to the program...

Page 60: ...7 16...

Page 61: ...r and parallel to the bed slant The Coaxiality program is also used to monitor the actual position of the secondary spindle or a tool holder during adjustment During adjustment the program shows the o...

Page 62: ...stem By rotating both spindles and recording the radial displacements in 4 rotational angles the angular and offset error can be calculated STARTING THE PROGRAM Start the Coaxiality program by touchin...

Page 63: ...Coaxiality the machine bed slant screen is displayed The machine bed slant is measured with the SM sensor If you have an existent machine bed slant you just need to confirm it Measure machine bed slan...

Page 64: ...nsor the angle value is displayed live Place the SM sensor at the machine bed slant Confirm measured machine bed slant The machine bed slant can also be entered manually Enter machine bed slant manual...

Page 65: ...tool holder to the right or the spindle to the right reference R and the tool holder to the left Screen Flip When entering the program the latest used direction is shown If this corresponds to your m...

Page 66: ...8 6 Distances Measure and enter distance between the sensors SR and SM Measure and enter distance from the sensor SM to the turret front This gives the offset position...

Page 67: ...op These angles are relative to the machine bed slant The measurement is carried out by register values in four positions 0 90 180 and 270 The small circles show where to rotate the sensors NOTE Both...

Page 68: ...8 8 Rotate the sensors to the second measurement position at the rotational angle 90 Touch the measurement icon This registers the second measurement position...

Page 69: ...at the rotational angle 180 Touch the measurement icon This registers the third measurement position Rotate the sensors to the fourth measurement position at the rotational angle 270 Touch the measure...

Page 70: ...8 10 During the measurement it is possible to re measure the latest position Touch the re measure icon to re measure the latest position...

Page 71: ...machine bed slant The symbols and the color of the values show if the values are inside the selected tolerance or not Perpendicular direction in tolerance Perpendicular direction out of tolerance Par...

Page 72: ...8 12 The axes can be custom named up to 3 characters by touching them Name perpendicular axis Name parallel axis Save the measurement result Go to adjustment...

Page 73: ...until all values are within tolerance Both the sensors must remain inside 0 1 during the adjustment If not a warning appears Orange for a sensor that is out of 0 1 and blue for a sensor that is still...

Page 74: ...f the settings the current selection is shown beside the icon Machine Bed Slant Open window for machine bed slant settings Distances Open window for position and distance settings Tolerance Open windo...

Page 75: ...8 15 Notes Open notes Sensor Display Open Sensor Display Machine Tool Global Settings Open Global Settings Return Return to the program...

Page 76: ...8 16...

Page 77: ...es when engaged Together with an angular prism the laser beam can be used as an optical square working as a reference during the entire measurement The squareness error is determined by measuring the...

Page 78: ...g the second machine axis the X axis in the picture above The SM sensor is mounted in the tool holder or turret in a way so it records values a position 1 and 2 The SM sensor is then moved and mounted...

Page 79: ...9 3 STARTING THE PROGRAM Start the Squareness program by touching its icon in the Home Menu...

Page 80: ...ing Squareness the machine bed slant screen is displayed The machine bed slant is measured with the SM sensor If you have an existent machine bed slant you just need to confirm it Measure machine bed...

Page 81: ...nsor the angle value is displayed live Place the SM sensor at the machine bed slant Confirm measured machine bed slant The machine bed slant can also be entered manually Enter machine bed slant manual...

Page 82: ...h one of the position boxes to enter a position Enter distances Touch one of the distance boxes to enter a distance Name axes The axes can be named with up to 3 characters Name axes by touching their...

Page 83: ...9 7 Confirm configuration Confirm configuration and continue to summary screen...

Page 84: ...laser It need to be parallel to the motion in the first measured line The system will guide you through the adjustment of the laser The software need the distance from the rotational center to the bac...

Page 85: ...oint Measure and enter the distance from the center of the R sensor to the back of the M sensor Ensure that you have the machine on the correct coordinate Check that the rotational angle for the R sen...

Page 86: ...at the machine is moved to the correct position The parallelism error is now shown and can be adjusted by rotating the RM The blue arrow will guide you The value should be within 0 020 100 When it is...

Page 87: ...played to the left Values from the SM sensor are displayed to the right The rotational angles are relative to the machine bed slant The measurement is carried out by register values at four measuremen...

Page 88: ...12 Place the fixture with the SM sensor at the first measurement point The main value a and the b value are shown from the SM sensor Touch the measurement icon This registers the first measurement poi...

Page 89: ...ture with the SM sensor to the second measurement point When using the MEAX bracket 90 the second measurement point is in center of the machine X0 Touch the measurement icon This registers the second...

Page 90: ...till be at 0 Place the SM sensor in the tool holder at the third measurement point The main value a the b value and the rotational angle are shown from the SM sensor Rotate the SM sensor to 0 Touch th...

Page 91: ...9 15 Move the tool holder with the SM sensor to the fourth measurement point Touch the measurement icon This registers the fourth measurement point...

Page 92: ...the deviation from squareness The diagram and the color of the values show if the values are inside the selected tolerance or not The direction of the deviation is also shown Save the measurement res...

Page 93: ...quareness For most of the settings the current selection is shown beside the icon Machine Bed Slant Open window for machine bed slant settings Tolerance Open window for tolerance settings Per distance...

Page 94: ...9 18 Sensor Display Open Sensor Display Machine Tool Global Settings Open Global Settings Return Return to the program...

Page 95: ...ool The guideway is used as a reference line The direction of the spindle is presented as an angle towards the reference guideway in 2 axes MEASUREMENT METHOD The direction of the spindle rotational a...

Page 96: ...lose to the spindle and at far distance The distance between the points are entered into the system At each point the spindle is rotated 180 to determine the spindle rotational center on the detector...

Page 97: ...holder at the top or the spindle at the top reference R and the tool holder at the bottom Screen Flip When entering the program the latest used direction is shown If this corresponds to your machine...

Page 98: ...10 4 Positions and distance Enter positions at the measurement points and or distance between the measurement points Confirm positions and distance...

Page 99: ...he first measurement point the SM sensor can be positioned with the help of a relative rotational angle The rotational angle is shown when the laser from the SM sensor hits the detector of the SR sens...

Page 100: ...10 6 Rotate the work holding spindle with the SR sensor 180 to the second measurement position Touch the measurement icon This registers the second measurement position at the first measurement point...

Page 101: ...le with the SR sensor stay at the same rotational position Touch the measurement icon This registers the first measurement position at the second measurement point Rotate the work holding spindle with...

Page 102: ...10 8 During the measurement it is possible to re measure the latest position Touch the re measure icon to re measure the latest position...

Page 103: ...lues show if the values are inside the selected tolerance or not In out direction in tolerance In out direction out of tolerance Side to side direction in tolerance Side to side direction out of toler...

Page 104: ...10 10 Go to adjustment...

Page 105: ...l all values are within tolerance Both the sensors must remain inside 0 1 during the adjustment If not a warning appears Orange for a sensor that is out of 0 1 and blue for a sensor that is still insi...

Page 106: ...indle Direction For most of the settings the current selection is shown beside the icon Positions Distance Open window for position and distance settings Tolerance Open window for tolerance settings P...

Page 107: ...10 13 Sensor Display Open Sensor Display Machine Tool Global Settings Open Global Settings Return Return to the program...

Page 108: ...10 14...

Page 109: ...in two directions The Coaxiality program is also used to monitor the actual position of the secondary spindle or a tool holder during adjustment During adjustment the program shows the offset and ang...

Page 110: ...ing the radial displacements in 4 rotational angles the angular and offset error can be calculated The positions of the rotational angle are defined by the main spindle CNC STARTING THE PROGRAM Start...

Page 111: ...he tool holder at the top or the spindle at the top reference R and the tool holder at the bottom Screen Flip When entering the program the latest used direction is shown If this corresponds to your m...

Page 112: ...11 4 Distances Measure and enter distance between the sensors SR and SM Measure and enter distance from the sensor SM to the turret front This gives the offset position...

Page 113: ...itioned with the help of a relative rotational angle The rotational angle is shown when the laser from the SM sensor hits the detector of the SR sensor NOTE The relative rotational angle must be insid...

Page 114: ...otate the SR sensor to the second measurement position with the help of the rotation of the work head spindle CNC Rotate the SM sensor to the second measurement position with the help of the relative...

Page 115: ...Rotate the SR sensor to the third measurement position with the help of the rotation of the work head spindle CNC Rotate the SM sensor to the third measurement position with the help of the relative...

Page 116: ...pindle CNC Rotate the SM sensor to the fourth measurement position with the help of the relative angle Touch the measurement icon This registers the fourth measurement position During the measurement...

Page 117: ...show if the values are inside the selected tolerance or not In out direction in tolerance In out direction out of tolerance Side to side direction in tolerance Side to side direction out of tolerance...

Page 118: ...11 10 Name in out direction Name side to side direction Save the measurement result Go to adjustment...

Page 119: ...t values live Flashing direction symbols indicates that values are live Adjust the machine until all values are within tolerance To confirm the result re do the measurement Re measure Re measuring aft...

Page 120: ...tical Coaxiality For most of the settings the current selection is shown beside the icon Distances Open window for position and distance settings Tolerance Open window for tolerance settings Per dista...

Page 121: ...11 13 Sensor Display Open Sensor Display Machine Tool Global Settings Open Global Settings Return Return to the program...

Page 122: ...11 14...

Page 123: ...surement an external and secondary axis of rotation is used to determine the parallelism between the spindle rotational axis and its own movement on a horizontal guideway The measurement is performed...

Page 124: ...12 2 STARTING THE PROGRAM Start the Spindle Parallelism program by touching its icon in the Home Menu...

Page 125: ...dle Parallelism the machine bed slant screen is displayed The machine bed slant is measured with the SM sensor If you have an existent machine bed slant you just need to confirm it Measure machine bed...

Page 126: ...nsor the angle value is displayed live Place the SM sensor at the machine bed slant Confirm measured machine bed slant The machine bed slant can also be entered manually Enter machine bed slant manual...

Page 127: ...o the right or the spindle to measure to the left Screen Flip When entering the program the latest used direction is shown If this corresponds to your machine just continue to positions and distances...

Page 128: ...12 6 Positions and distance Enter positions at the measurement points and or distance between the measurement points Confirm positions and distance...

Page 129: ...achine bed slant The measurement is carried out by register values in two positions at each measurement point The small circles show where to rotate the sensors Place the spindle to measure with the S...

Page 130: ...cond measurement position at the first measurement point Move the spindle to measure with the SM sensor to the second measurement point Let the SM sensor stay at 0 and let the SR sensor stay at the po...

Page 131: ...osition at 0 Touch the measurement icon This registers the second measurement position at the second measurement point During the measurement it is possible to re measure the latest position Touch the...

Page 132: ...12 10 Coaxiality Go to distance Measure and enter distance between the sensors SR and SM...

Page 133: ...relative to the machine bed slant The measurement is carried out by register values in four positions 0 90 180 and 270 The small circles show where to rotate the sensors NOTE Both the sensors must be...

Page 134: ...on at the rotational angle 90 Touch the measurement icon This registers the second measurement position Rotate the sensors to the third measurement position at the rotational angle 180 Touch the measu...

Page 135: ...ent position at the rotational angle 270 Touch the measurement icon This registers the fourth measurement position During the measurement it is possible to re measure the latest position Touch the re...

Page 136: ...symbols the diagram and the color of the values show if the values are inside the selected tolerance or not Perpendicular direction in tolerance Perpendicular direction out of tolerance Parallel dire...

Page 137: ...12 15 Save the measurement result When the measurement is completed it is possible to re measure all the coaxiality positions Re measure...

Page 138: ...le Parallelism For most of the settings the current selection is shown beside the icon Machine Bed Slant Open window for machine bed slant settings Tolerance Open window for tolerance settings Per dis...

Page 139: ...12 17 Sensor Display Open Sensor Display Machine Tool Global Settings Open Global Settings Return Return to the program...

Page 140: ...12 18...

Page 141: ...or this measurement an external and secondary axis of rotation is used to determine the parallelism between the spindle rotational axis and its own movement on a vertical guideway The measurement is p...

Page 142: ...13 2 STARTING THE PROGRAM Start the Vertical Spindle Parallelism program by touching its icon in the Home Menu...

Page 143: ...easure at the top or the spindle to measure at the bottom Screen Flip When entering the program the latest used direction is shown If this corresponds to your machine just continue to positions and di...

Page 144: ...13 4 Positions and distance Enter positions at the measurement points and or distance between the measurement points Confirm positions and distance...

Page 145: ...first measurement point the SM sensor can be positioned with the help of a relative rotational angle The rotational angle is shown when the laser from the SM sensor hits the detector of the SR sensor...

Page 146: ...nd measurement position at the first measurement point Move the spindle to measure with the SM sensor to the second measurement point Let the SM sensor and the SR sensor stay at the same rotational po...

Page 147: ...ional position Touch the measurement icon This registers the second measurement position at the second measurement point During the measurement it is possible to re measure the latest position Touch t...

Page 148: ...13 8 Coaxiality Go to distance Measure and enter distance between the sensors SR and SM...

Page 149: ...d the SM sensor is positioned with the help of a relative rotational angle The rotational angle is shown when the laser from the SM sensor hits the detector of the SR sensor NOTE The relative rotation...

Page 150: ...the help of the relative angle Touch the measurement icon This registers the second measurement position Rotate the SR sensor to the third measurement position Rotate the SM sensor to the third measur...

Page 151: ...or to the fourth measurement position with the help of the relative angle Touch the measurement icon This registers the fourth measurement position During the measurement it is possible to re measure...

Page 152: ...lues show if the values are inside the selected tolerance or not In out direction in tolerance In out direction out of tolerance Side to side direction in tolerance Side to side direction out of toler...

Page 153: ...13 13 When the measurement is completed it is possible to re measure all the coaxiality positions Re measure...

Page 154: ...tical Spindle Parallelism For most of the settings the current selection is shown beside the icon Tolerance Open window for tolerance settings Per distance Open window for per distance settings Notes...

Page 155: ...13 15 Global Settings Open Global Settings Return Return to the program...

Page 156: ...13 16...

Page 157: ...ts angle towards gravity levelling or be able to measure an objects relative angular deviation roll and pitch When two sensors are connected it is also possible to measure an objects angle towards a r...

Page 158: ...ayed values are set to zero The object can then be moved or the sensor can be placed on another object The displayed values are the angular deviation relative to the first measuring point object zero...

Page 159: ...n Wait about 20 seconds for the values to stabilize before using any function Available functions at start Zero values Sample and display a single value Record values to file Global settings Home M M...

Page 160: ...14 4 Zero values Halve values Reset values to raw data...

Page 161: ...14 5 Sample and display a single value Return to live values...

Page 162: ...ding All values are recorded until the function is stopped Stop and confirm continuous recording Only available when continuous recording is active Finish recording values to file Recording can be sta...

Page 163: ...s and present a fixed value for a dedicated measurement point It is also possible to download recorded measuring values or stream values to a data file MEASUREMENT METHOD The Sensor Display program is...

Page 164: ...When entering Sensor Display Position raw data from the connected position sensors are displayed Available functions at start Zero values Sample and display a single value Record values to file Global...

Page 165: ...15 3 Zero values Halve values Reset values to raw data Sample and display a single value Return to live values...

Page 166: ...ding All values are recorded until the function is stopped Stop and confirm continuous recording Only available when continuous recording is active Finish recording values to file Recording can be sta...

Page 167: ...g distance d The displayed values can be shown live or it can record readings and present a fixed value for a dedicated measurement point It is also possible to download recorded measuring values or s...

Page 168: ...rs are displayed Available functions at start Zero values Sample and display a single value Record values to file Global settings Home P P P P P P The values from the second pen to the right can eithe...

Page 169: ...16 3 Zero values Halve values Reset values to raw data Sample and display a single value Return to live values...

Page 170: ...ding All values are recorded until the function is stopped Stop and confirm continuous recording Only available when continuous recording is active Finish recording values to file Recording can be sta...

Page 171: ...s to measure run out on a machine spindle The MEAX Pen sensor is mounted in the desired measurement direction radial or axial and values are continuously recorded during rotation of the spindle Result...

Page 172: ...sampling time The sampling time can be adjusted in the settings The values from the MEAX Pen sensor can be zeroed before starting the max min measurement When the recording is finished the maximum val...

Page 173: ...en entering Max Min Pen raw data from the connected pen sensors are displayed Adjust the position of the pen to be within the measuring range using the raw data on the screen Zero values Measure max m...

Page 174: ...17 4 ZERO VALUES Measure max min Reset values to raw data...

Page 175: ...min is measured the difference during the measurement is displayed The max and min values are also displayed The displayed measurement result can be saved Measure max min Save the measurement result...

Page 176: ...17 6 SETTINGS The settings menu includes settings for Max Min Sampling time Open window for sampling time settings Notes Open notes Global Settings Open Global Settings Return Return to the program...

Page 177: ...ates a diagram log from a connected temperature data logger The Temperature Log program works with the external accessory ElmaLOG 181T Mini PDF USB temperature data logger STARTING THE PROGRAM Start t...

Page 178: ...r When the temperature logger is connected the log diagram will be created The diagram shows the temperature during the measured time Highest temperature lowest temperature and the difference between...

Page 179: ...nu and the Express Manager appears In the Express Manager measurements are sorted by date without folders Open file Touch a file to open it Select files Touch the check box to the left to select a fil...

Page 180: ...e available Open the Standard Manager from the Home Menu Measurements are sorted by date in folders Open file or folder Touch a file or folder to open it Select files Touch the check box to the left t...

Page 181: ...that have been cut or copied New folder Create a new folder Change name of file or folder Change name of selected file or folder Delete Delete selected items PDF report Generate a PDF report with the...

Page 182: ...field to enter a file name Confirm Confirm When saving a measurement both a text file and a picture file jpeg are created In some programs there will also be a list file lst in the PC Recorded values...

Page 183: ...drive in the USB port of the display unit and the USB flash drive will be available in the Standard Manager Files can be transferred to the USB flash drive with the cut copy paste functions in the St...

Page 184: ...folder in the Memory Manager can be generated Select files Touch the check box to the left to select files Generate a PDF report Touch the PDF icon to generate a PDF report with the selected files En...

Page 185: ...r a header for the PDF report Touch the white fields to enter data Confirm data and generate PDF report Transfer PDF file to a PC The PDF file will appear in the folder where it was generated and can...

Page 186: ...ame date and time serial number of the display unit and the sensors program and program version Straightness is shown on one page and Level on another It is possible to go directly to Straightness and...

Page 187: ...19 9 Level screen Switch to Straightness page...

Page 188: ...IRECTION The screen displays measurement results positions distance machine bed slant tolerance axes names file name date and time serial number of the display unit and the sensors program and program...

Page 189: ...OAXIALITY The screen displays measurement results distances machine bed slant tolerances axes names file name date and time serial number of the display unit and the sensors program and program versio...

Page 190: ...file name date and time serial number of the display unit and the sensors program and program version The measurement result is shown as deviation from squareness The diagram and the color of the val...

Page 191: ...tance tolerance directions names file name date and time serial number of the display unit and the sensors program and program version The diagram and the color of the values show if the values are in...

Page 192: ...VERTICAL COAXIALITY The screen displays measurement results distances tolerances directions names file name date and time serial number of the display unit and the sensors program and program version...

Page 193: ...RALLELISM The screen displays measurement results positions distance machine bed slant tolerance axes names file name date and time serial number of the display unit and the sensors program and progra...

Page 194: ...LE PARALLELISM The screen displays measurement results positions distance machine bed slant tolerance axes names file name date and time serial number of the display unit and the sensors program and p...

Page 195: ...19 17 SENSOR DISPLAY LEVEL The screen displays recorded values with a time stamp for each sampling Close...

Page 196: ...19 18 SENSOR DISPLAY POSITION The screen displays recorded values with a time stamp for each sampling Close...

Page 197: ...19 19 SENSOR DISPLAY PEN The screen displays recorded values with a time stamp for each sampling Close...

Page 198: ...19 20 MAX MIN PEN The screen displays measurement results file name date and time serial number of the display unit and the sensors program and program version Close...

Page 199: ...19 21 TEMPERATURE LOG The screen displays temperature log file name date and time serial number of the display unit program and program version Close...

Page 200: ...19 22...

Page 201: ...is shown beside the icon The program version and serial number of the display unit is also shown on this screen Date and time Open window for date and time settings Measurement unit Open window for se...

Page 202: ...20 2 Backlight Decrease Backlight Increase Backlight Service settings Open service settings Requires access code Home Home...

Page 203: ...Bluetooth activated Bluetooth deactivated Pairing Bluetooth units Touch the search icon to search for units that are pair able Search for Bluetooth units Pair able units appear in the list to the righ...

Page 204: ...20 4 Paired units are marked with a check mark Confirm To unpair touch the check mark icon beside the unit...

Page 205: ...hed off 4 Display Unit battery status a Continuously green battery capacity b Rolling green charging c First LED flashing red 10 capacity 5 Measurement Unit battery status Will only work when the Disp...

Page 206: ...display unit has two operating modes On and Off To turn on the unit press the ON button To turn off the unit touch the Off icon in the Home Menu In case the system fails to respond it is possible to t...

Page 207: ...ection for the Display Unit is the built in Bluetooth connection See chapter Global settings for instructions on how to pair measurement units The USB master can be used with USB flash drives to trans...

Page 208: ...rnal power unit is connected to the external power connector on the display unit and to a wall socket with 110 240 Volts When the external power supply is connected the unit will automatically start c...

Page 209: ...21 5 AUTO OFF In the Home Menu the Display Unit will turn itself off automatically after 60 minutes inactivity...

Page 210: ...on will save the data When the system is turned on again after charging the batteries you will be prompted to choose whether to return to the stage when the system was turned off i e resuming operatio...

Page 211: ...r You can choose between exiting and not upgrading or installing the new software version The version numbers of the existing and the new software are displayed above the icons To proceed with the ins...

Page 212: ...rts If there is no flashing the display unit will need to be manually rebooted Turn the unit off by pressing the on off button for more than 15 seconds Turn the unit on with a short press on the on of...

Page 213: ...chnology by Adobe Systems Inc Copyright 1995 2003 Adobe Systems Inc All rights reserved Adobe Systems Flash Macromedia Flash and Macromedia Flash Lite are trademarks or registered trademarks of Adobe...

Page 214: ...utside of the icons for 10 seconds The screen calibration function should start Touch and hold down on the target displayed until it moves Repeat the step above on the 4 new positions of the target Wh...

Page 215: ...dication LED a Continuously green On 2 Mini USB for charging 3 Bluetooth indication LED a Continuously blue paired and ready b Flashing blue searching ready to pair c No light Bluetooth disabled 4 Bat...

Page 216: ...ng red less than 5 charge left c One LED continuously orange charging d One LED continuously green fully charged 6 Battery status LED when battery button is pressed a Continuously green battery status...

Page 217: ...are powered by a high capacity rechargeable Li Ion cell or by the external power unit The operating time of the batteries is approximately 12 hours when the system is used for a typical measurement wo...

Page 218: ...ntact your sales representative for battery re placement The batteries contain safety circuitry to operate safely with the unit The unit can therefore only be used with the Li Ion batteries supplied b...

Page 219: ...e collet if the jaws are hardened You can either use the supplied protective collets with outer diameter of 25 mm or you can use your own collets The LM and LR sensors can also be placed on their refe...

Page 220: ...22 6...

Page 221: ...with status indication LED a Continuously green On 2 Mini USB for charging 3 Bluetooth indication LED a Continuously blue paired and ready b Flashing blue searching ready to pair c No light Bluetooth...

Page 222: ...left c One LED continuously orange charging d One LED continuously green fully charged 6 Battery status LED when battery button is pressed a Continuously green battery status b Rolling green battery...

Page 223: ...are powered by a high capacity rechargeable Li Ion cell or by the external power unit The operating time of the batteries is approximately 10 hours when the system is used for a typical measurement wo...

Page 224: ...ales representative for battery re placement The batteries contain safety circuitry to operate safely with the unit The unit can therefore only be used with the Li Ion batteries supplied by MEAX Impro...

Page 225: ...erence Mount the sensor SM in the tool holder or in the opposite work head spindle SM will represent the measured value If the spindles have numerical control functions you can use that to achieve the...

Page 226: ...23 6...

Page 227: ...24 1 ANGULAR PRISM MEAX SQ 201 Angular prism front Angular prism back MOUNTING The angular prism is mounted on the SR sensor...

Page 228: ...24 2...

Page 229: ...P 250 with a measuring range of 5 mm 1 ON OFF button 2 Bluetooth indication LED a Continuously blue paired and ready b Flashing blue searching ready to pair 3 Battery status LED a Continuously red le...

Page 230: ...button firmly CONNECTIONS Bluetooth connection The main connection for P 100 250 units is the built in Bluetooth connection The units will automatically connect to the display unit when turned on as l...

Page 231: ...ged the LED will turn green The charging time is approximately 8 hours for fully drained batteries The charging time will be longer if the unit is turned on while being charged When used in typical co...

Page 232: ...25 4...

Page 233: ...adjustment of the laser beam in horizontal and vertical level The fixture has 3 adjustment possibilities On top there is a locking screw for locking the transmitter mounted with diameter 16 shaft If...

Page 234: ...26 2 The screw on the front is used for adjustments in the horizontal plane The screw on top is used for adjustments in the vertical plane...

Page 235: ...e back is used for orientation around the laser beam Levelling Coarse adjustment Untighten the lock ring Levelling Fine adjustment Tighten the lock ring NOTE Do not unscrew the fine adjustment further...

Page 236: ...s when pointing fixture need to be mounted in front of milling heads SR 201 and circular plate For mounting SR 201 when spindle holder is removed Makes it possible to mount SR 201 on flat tables on wo...

Page 237: ...26 5 MAGNETIC BASE Pointing fixture and magnetic base...

Page 238: ...26 6 INDEXING FIXTURE Simulates a rotation in a machine Needed for spindle parallelism to its own motion in machines without rotation possibility...

Page 239: ...ing Temp system off 0 to 38 C 32 to 100 F Battery Charging Temp system on 0 to 32 C 32 to 90 F Relative humidity 10 90 Weight 1 2 kg 2 6 lbs with battery Dimensions 224mm x 158mm x 49mm 8 8 in x 6 2 i...

Page 240: ...n and reduced glare Gyroscope 6 Axis MEMS Inertial Motion Sensor with drift compensation and automatic field calibration Connectors 1 USB 2 0 Master port IP67 1 Power Charger connector 10 14V DC IP67...

Page 241: ...se with 50 LCD backlight Battery charging time system off room temperature 5 h Battery capacity 48 8 Wh LED indicators Unit state and 2x5 battery state indicators with instant battery check Specificat...

Page 242: ...27 4...

Page 243: ...to 40 C 32 to 104 F Relative humidity 10 90 Weight 386 g 13 6 oz Dimensions 77 mm x 84 mm x 45 mm 3 0 in x 3 3 in x 1 8 in Environmental protection IP 65 Dust tight and protected against water jets In...

Page 244: ...ation range 10 m 33 ft Peripherals User accessible 1 USB Mini port Charging 5V 0 5A Power supply High performance Li Ion battery or external power Operating time 12 hours continuously Battery charging...

Page 245: ...ery charging temp 0 to 40 C 32 to 104 F Relative humidity 10 90 Weight 306 g 10 9 oz Dimensions 82 mm x 86 mm x 33 mm 3 2 in x 3 4 in x 1 3 in Environmental protection IP 65 Dust tight and protected a...

Page 246: ...luetooth Low Energy BT 4 0 and Classic Bluetooth Communication range 10 m 33 ft Peripherals User accessible 1 USB Mini port Charging 5V 0 5A Power supply High performance Li Ion battery or external po...

Page 247: ...o 28 C 64 to 82 F Battery Charging Temp 0 to 40 C 32 to 104 F Relative humidity 10 90 Weight 135 g 4 76 oz Dimensions battery unit 44 x 91 x 33 mm 1 7 x 3 6 x 1 3 in Dimensions pen body Length 60 mm 2...

Page 248: ...op capability BLE Bluetooth Low Energy BT 4 0 Communication range 10 m 33 ft Connectors 1 USB Mini micro port Charging 5V 0 5A Power supply Rechargeable Li Ion battery or external power supply Operati...

Page 249: ...28 C 64 to 82 F Battery Charging Temp 0 to 40 C 32 to 104 F Relative humidity 10 90 Weight 142 g 5 01 oz Dimensions battery unit 44 x 91 x 33 mm 1 7 x 3 6 x 1 3 in Dimensions pen body Length 85 mm 3...

Page 250: ...op capability BLE Bluetooth Low Energy BT 4 0 Communication range 10 m 33 ft Connectors 1 USB Mini micro port Charging 5V 0 5A Power supply Rechargeable Li Ion battery or external power supply Operati...

Page 251: ...Aluminum and ABS plastic Operating temp 15 to 30 C 59 to 86 F Storage temp 20 to 70 C 4 to 158 F Relative humidity 10 90 Weight 100 g 3 5 oz Dimensions 64 mm x 56 mm x 45 mm 2 5 in x 2 2 in x 1 8 in M...

Page 252: ...30 2...

Page 253: ......

Page 254: ...blication No P 0279 GB 2019 ACOEM AB M lndal Sweden All rights reserved No part of this manual may be copied or reproduced in any form or by any means without prior permission from ACOEM AB www meax c...

Reviews: