3
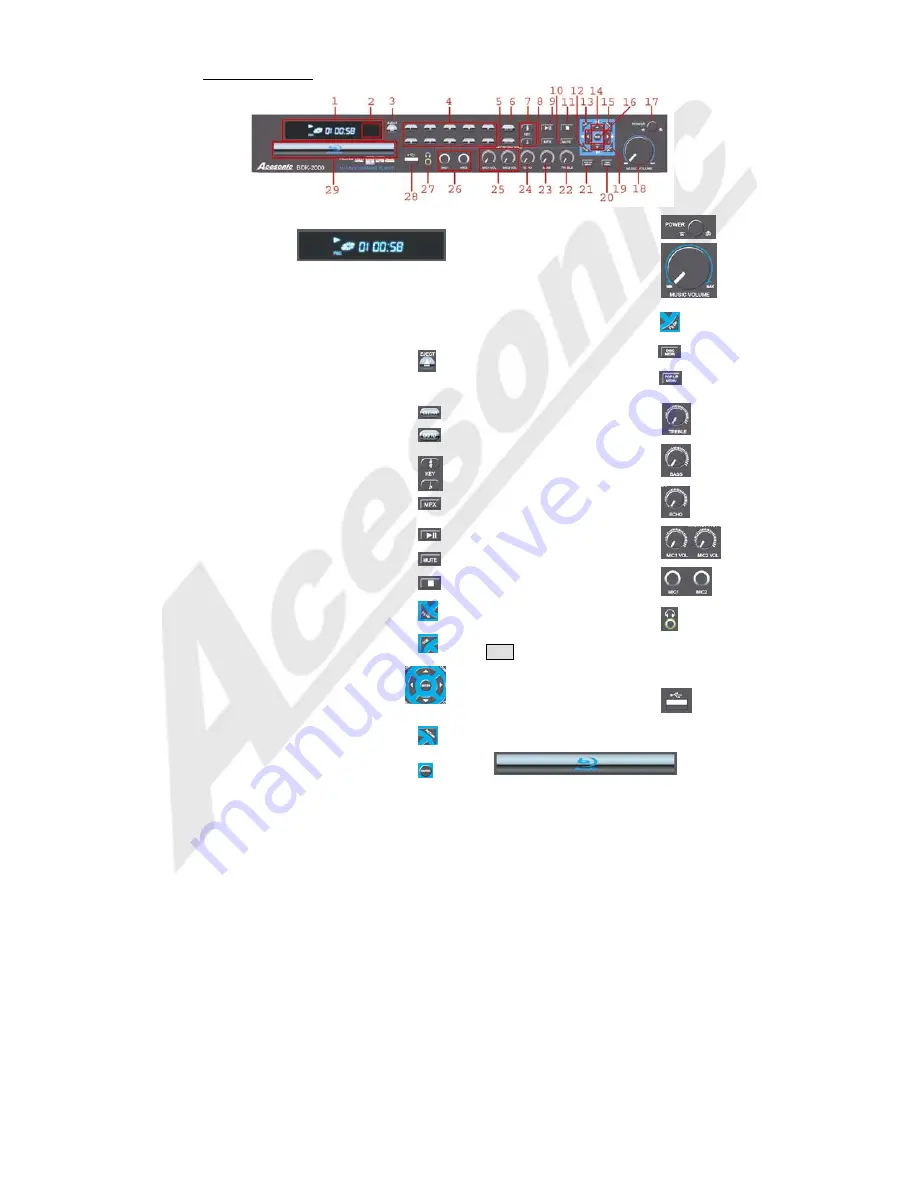
Front Panel Operation:
1)
DISPLAY WINDOW -
Displays player status such as
time, disc
format, and
song
number. If no
disc is in the tray, the display window will display
NO
DISC
. Detailed information will also be shown on the
TV screen.
2)
REMOTE SENSOR window -
Receives signals from
remote control. (Underneath display bezel and so not visible
here. This is where the remote should be aimed for best
operation.)
3)
EJECT -
Press to open and close disc tray.
4)
Numeric Keypad -
Used to enter numbers as
needed.
5)
6)
CLEAR -
Press to reset any entered data.
7)
GOTO -
Used to go to a specific point
during playback.
8)
KEY CONTROL Buttons -
# button
: used to flatten by a half tone.
b button:
used to sharpen by a half tone.
MPX -
Selects Left/Right MONO and Stereo audio
output for CDs and audio track for DVDs.
9)
PLAY/PAUSE -
Start to play the disc or
temporarily suspends playing.
10)
MUTE -
Toggles muting on or off.
11)
STOP -
Stops playing or recording.
12)
Pg Up -
Used to scroll up through file lists
one full page at a time.
13)
CUE -
Switches the Cue function on and
off. When switched on, the cue function will pause
playback at the end of the track currently playing.
14)
Direction Buttons -
Press to move
through various menus and files. They also are
used as
Fast Forward
/
Rewind buttons
(
Direction Buttons
[
▲
/
▼
]) and
Chapter
Forward
/
Chapter Backwards
(
Direction Buttons
[
▲
/
▼
])
buttons while playing media.
15)
RETURN -
This button is used to return to a
menu screen while playing.
16)
ENTER -
Used to confirm the selection.
17)
POWER -
Press the button to
turn the unit on or off.
18)
MUSIC VOLUME Knob -
Used to
control the music level.
19)
Pg DN -
Press to scroll down
through file lists one full page at a time.
20)
Disc Menu -
Returns to the main
DVD menu.
21)
POP UP MENU -
Press to
activate the Blu-Ray Pop Up Menu (if available).
22)
TREBLE Knob -
Used to control
the amount of Treble or “Highs” in the
audio.
23)
BASS Knob -
Used to control the
amount of Bass or “Lows” in the audio.
24)
ECHO knob -
Used to control the
amount of ECHO applied to MIC
CHANNELS 1 & 2.
25)
MIC 1 & 2 VOL Knob -
Used to
control the volume output from MIC
CHANNEL 1& 2.
26)
MIC 1 & 2 INPUT Jacks -
Connects microphones with 1/4 inch plug.
27)
Headphones Jack -
Connects a
pair of headphones (With a 1/8” jack) to
the unit.
Note:
While it is possible to use a set of headphones that have a
¼” jack through an adapter, many adapters are known to cause
intermittent problems and their use is not recommended.
28)
USB INTERFACE -
Use this
interface to connect USB devices such as
flash drives or external hard drives.
29)
DISC TRAY -
Press to open tray. Press or to close
the tray, it will play the disc automatically.


