


147
Chapter 4
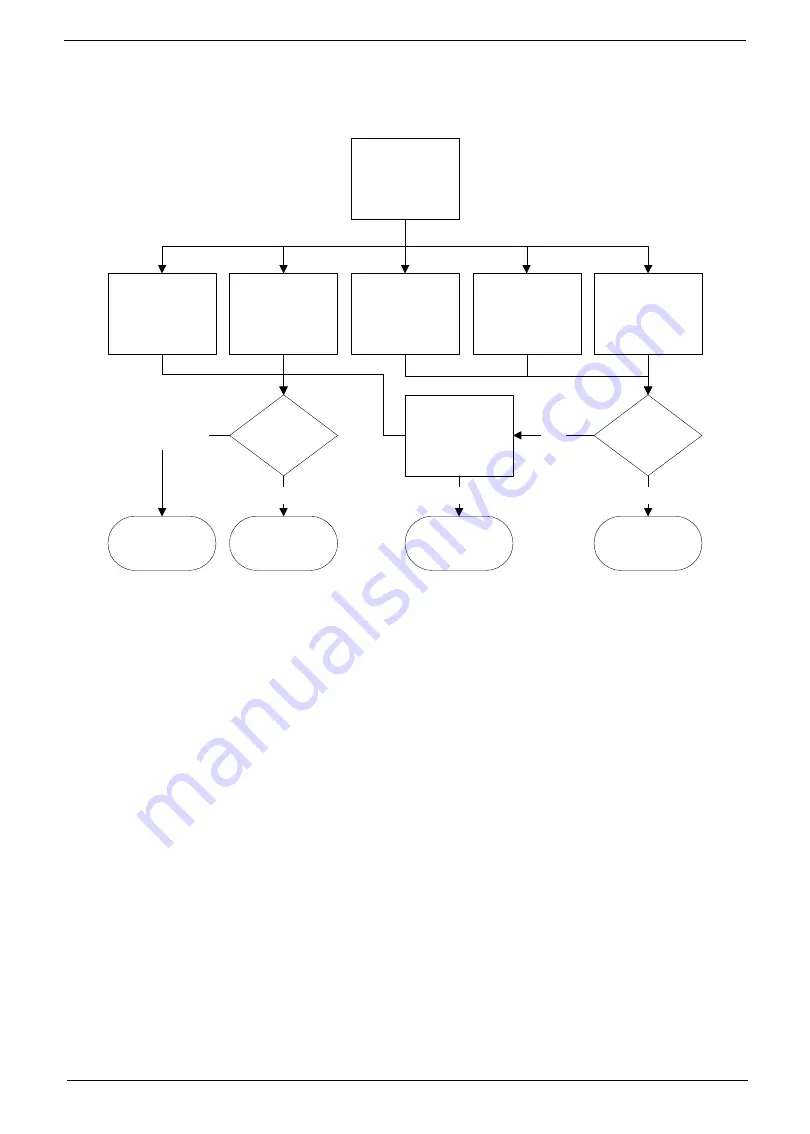
Component Failure
If a component fails, follow the flowchart below to isolate the problem
ODD Failure
If the
ODD
exhibits any of the following symptoms it may be faulty:
•
Audio CDs do not play when loaded
•
DVDs do not play when loaded
•
Blank discs do not burn correctly
•
DVD or CD play breaks up or jumps
•
Optical drive not found or not active:
•
Not shown in My Computer or the BIOS setup
•
LED does not flash when the computer starts up
•
The tray does not eject
•
Access failure screen displays
•
The ODD is noisy
Perform the following general solutions one at a time to correct the problem.
1.
Reboot the computer and retry the operation.
2.
Try an alternate disc.
3.
Navigate to
Start
´
Computer
. Check that the ODD device is displayed in the
Devices
with
Removable
Storage
panel.
4.
Navigate to
Start
´
Control
Panel
´
System
and
Maintenance
´
System
´
Device
Manager
.
Component
Failure
ODD Failure
Wireless LAN
Failure
Speaker Failure
Cable
connected
properly?
Change cables
Replace module
according to
procedure
Replace
Mainboard
Close
Yes
Ok
Component pass
Camera
Failure
Touch Screen
Failure
Close
No
Component fail
Test
component on
test bed
Summary of Contents for ZX4830 Series
Page 6: ...VI Laptopblue...
Page 10: ...X Table of Contents Laptopblue...
Page 47: ...Chapter 2 37 Laptopblue...
Page 53: ...43 Chapter 3 4 Lift the ODD bezel away 5 Close the ODD assembly Laptopblue...
Page 57: ...47 Chapter 3 5 Forcefully pry the rear cover from the assembly i ii iii iv Laptopblue...
Page 59: ...49 Chapter 3 4 Disconnect the audio cable from the audio board Laptopblue...
Page 62: ...Chapter 3 52 7 Remove the HDD module from the bracket Laptopblue...
Page 74: ...Chapter 3 64 15 Lift the mainboard shielding away from the chassis Laptopblue...
Page 76: ...Chapter 3 66 4 Lift the WLAN module away Laptopblue...
Page 82: ...Chapter 3 72 4 Remove the fan Laptopblue...
Page 87: ...77 Chapter 3 4 Remove the cables from the guide clips Laptopblue...
Page 97: ...87 Chapter 3 4 Lift the power board away from the bezel Laptopblue...
Page 100: ...Chapter 3 90 4 Disconnect the webcam cable Laptopblue...
Page 121: ...111 Chapter 3 13 Connect the LVDS cable 14 Adhere the LVDC cable protective cover Laptopblue...
Page 138: ...Chapter 3 128 4 Connect the left and right touchscreen sensor cable connectors Laptopblue...
Page 143: ...133 Chapter 3 4 Connect the two 2 LCD to inverter board cables 1 and 2 1 2 Laptopblue...
Page 155: ...145 Chapter 3 4 Close the ODD Laptopblue...
Page 193: ...183 Appendix B Laptopblue...
Page 196: ...186 Laptopblue...
Page 197: ...187 Laptopblue...
Page 198: ...188 Laptopblue...


