background image

30 

EDID Upgrade SOP 


Equipment List 

1.  PC : with parallel (printer) port   
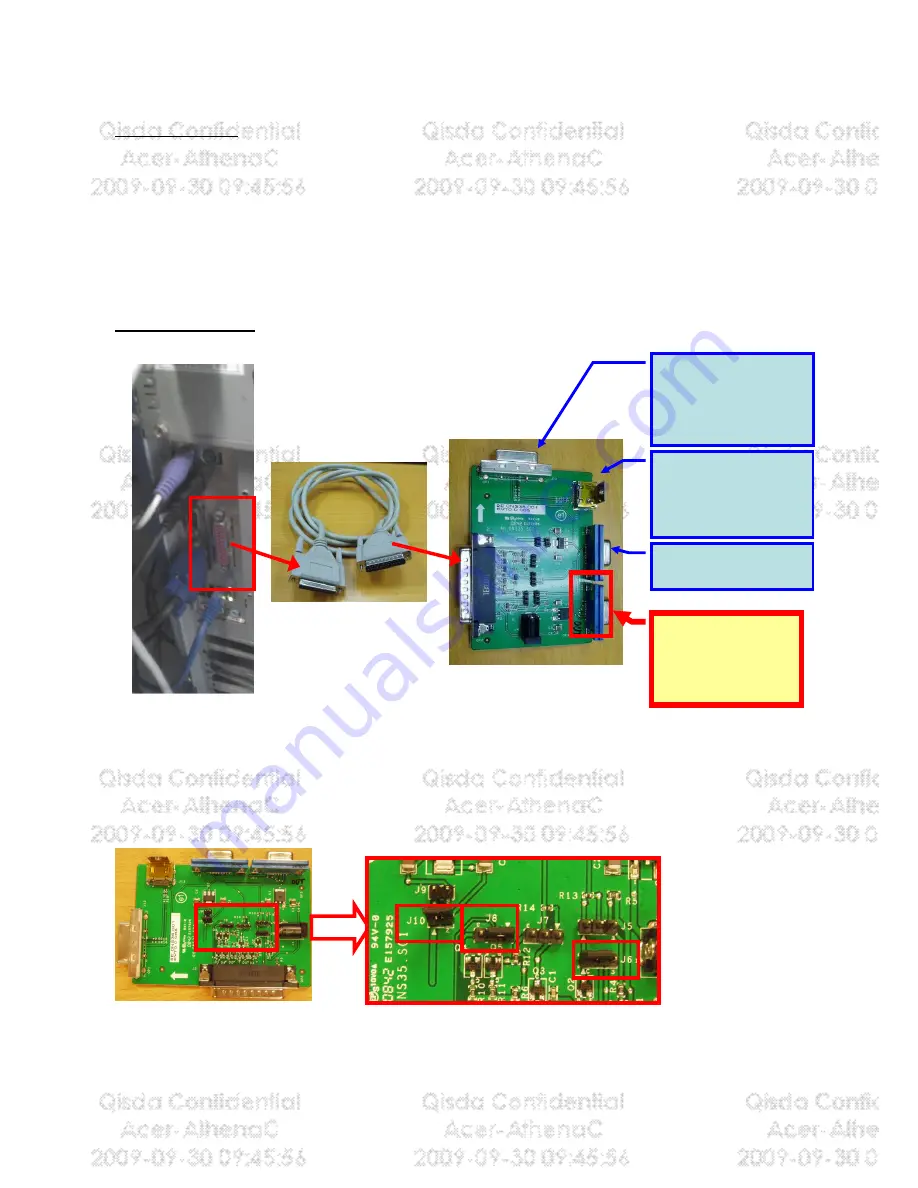
2.  EDID Board 
3.  Printer cable : 25pin male-female (connect PC to EDID board) 
4.  D-sub cable* : with full 15pin (connect EDID board to Projector) 
5.  HDMI cable*(connect EDID board to Projector) 
6.  DVI cable* (connect EDID board to Projector) 
(*Note: Not every model’s EDID input (D-sub, DVI, HDMI) is the same. Need to check what 
kind of file you need before download.) 


Setup Equipment 

1. Connect between PC, EDID board and the Projector: 


2. Need to set Jumper before using EDID board : 

<Jumper setting :>   

J6 : 1,2 short 
J8 : 1,2 short 
J10 : short 


3. How to use Download Tool :   

Link to Main 
board :


For D-sub DDC 
download 

Link to Projector :


For HDMI DDC 
download 

(no need in 

X1130/ X1230/ X1230S/ 
X1235/ X1230K series)


Link to Projector :

 For 

DVI-D DDC download 

(no need in X1130/ X1230/ 
X1230S/ X1235/ X1230K 
series)


“25pin male-female 
cable” (normal 
printer cable) 

EDID board


PC with parallel 

(printer) port


Please ignore this 
connector 

Summary of Contents for X1130P Series

Page 1: ...1 Projector Service Manual Model X1130P X1130PA X1230PK X1230P X1230PA X1237 Version Rev3 First Edition Jul 2009 RESTRICTIONS ON USE OF MATERIALS ...

Page 2: ...assembling 36 Module Assembly Key Point Optical Engine 41 Module Assembly Key Point Mechanical 54 CHAPTER 4 TROUBLESHOOTING 71 System Analysis 71 Optical Problems Checking Items 72 Power Supply Problems Checking Flow 74 LED Messages Definition 75 Error Count Messages Definition 76 RS232 Connection 77 Adjustment Alignment Procedure 79 CHAPTER 5 FRU LIST 84 Exploded Diagram 84 Module 1 Total Explode...

Page 3: ... Assembly Key Point 3 Ch4 alignment procedure 4 Ch5 FRU List 5 Appd A DDC table Rev2 2009 09 11 Add X1130PA different part 1 Ch1 SPEC 2 Ch3 Disassembly process Module Assembly Key Point 3 Ch4 alignment procedure 4 Ch5 FRU List 5 Appd A DDC table Rev3 2009 09 23 Add X1230P X1230PA X1237 different part 1 Ch1 SPEC 2 Ch2 How Change Model Name for X1230P X1230PA X1237 3 Ch3 Disassembly process 4 Ch4 Ad...

Page 4: ...rmance 2 0 Image Quality 3 0 Mechanical Specification 4 0 Packaging 5 0 Thermal Specification 6 0 Environmental 7 0 Regulatory 8 0 Reliability 9 0 Power Requirements 10 0 Panel Specification 11 0 Compatibility 12 0 Image Interface 13 0 Control Interface 14 0 User Interface ...

Page 5: ...e Area 0 5 lux compared to center point within 60 Diagonal at 2 3m Wide image size Note This light leakage in Active area is only described as the spot light with obvious shape It is not included the uniformity difference of the projector for black pattern 1 4 2 Light Leakage out of Active Area Except DMD Defect 0 5 lux with 60 80 Diagonal at 2 3m Wide image size 1 5 Color X Y 1 5 1 White 0 314 0 ...

Page 6: ...185W 160W 0 9 E20 9 with VIDI 3 0 Mechanical Specification 3 1 Dimensions 264 x 225 x 95 mm L x W x H 3 2 Weight 2350g 3 3 Security Slot Kensington compatible slot 150N break away force 3 5 Lens Cover Lens Cover 3 6 Feet Fast adjustable foot in front Adjustable foot and Fixed foot in rear foot Tilt 0 6 right left 2 2 0 5 4 0 Packaging Detail refer to following Packing section 4 1 Outside Dimension...

Page 7: ...tude Ramp rate 3500 feet per minute 1 hour Non operating 40 000 feet 30 C 1 hour Safety CB GS cTUVus PSE CCC EMC CE FCC VCCI 7 0 Regulatory ESD 8 0 Reliability 8 1 MTBF 25000 hours except Lamp 8 2 Lamp Lifetime Normal 3000 hours Eco 4000 hours 50 of Projector will have 50 initial minimum brightness 9 0 Power Requirements Adhere to Power Supply Specification section 9 1 Power Supply Normal VAC 100 ...

Page 8: ...mplitude 0 7 Vp p Impedance 75Ω 12 5 Analog RGB Output X1130P None X1130PA X1230PK X1230P X1237 X1230PA 15 pin D Sub Female x 1 Only support D sub 1 G Y Video amplitude 0 7 1 0 Vp p Impedance 75Ω RB CbCr Video amplitude 0 7 Vp p Impedance 75Ω HD VD CS TTL Level 13 0 Control Interface 13 1 IR Receiver IR Receiver x 2 Front Top Angle 0 Distance 0 10m 40 Distance 0 8m 13 2 Serial Connector RS232 Mini...

Page 9: ...ypads are not allowed to operate 19 0 3D Projection Running change to phase in X1130P X1130PA X1230PK X1230P X1237 X1230PA MP stage See below detail description 3D Projection This function is only for 3D contents and must wear 3D glasses TI DDP DDP2430 TI DDP DDP2431 Does not support FRC Frame Rate Conversion Can not support HQFS 60Hz 3D source from DVD which need to go thru FRC Can only support 1...

Page 10: ...sers can press Menu to exit within 10 sec 1 When 3D enable this screen will appear after exit OSD menu 2 There has reminder screen if 3D still enable when power on projector Priority PWD login screen Security fn is on Lamp life reminder 3D reminder Screen Timer and other OSD pup up fn ...

Page 11: ... 600 SXGA_75 75 025 79 976 135 000 1280 x 1024 SXGA_85 85 024 91 146 157 500 QuadVGA_60 60 000 60 000 108 000 1280 x 960 QuadVGA_75 75 000 75 000 126 000 1400 x 1050 SXGA _60 59 978 65 317 121 750 1600 x 1200 UXGA_60 60 000 75 000 162 000 640x480 60Hz Mac G4 59 940 31 469 25 170 640x480 67Hz MAC13 66 667 35 000 30 240 800x600 60Hz Mac G4 60 317 37 879 40 000 832x624 75Hz MAC16 74 546 49 722 57 280...

Page 12: ...PAL 15 63 50 4 43 SECAM 15 63 50 4 25 or 4 41 PAL M 15 73 60 3 58 PAL N 15 63 50 3 58 PAL 60 15 73 60 4 43 NTSC4 43 15 73 60 4 43 2 Characteristics of inputs outputs Signal Parameter Min Type Max Impedance 75 Ohm Amplitude 0 7 Volts peak to peak Black pedestal 0 Volts RDATA GDATA BDATA Pixel Clock 165 M Hz Impedance 75 Ohm Amplitude 1 Volts peak to peak Video amplitude 0 7 Volts peak to peak Sync ...

Page 13: ...PA X1230PK X1230P X1237 X1230PA Total Harmonic Distortion 10 3 Electrical Interface Character Interface Definition 15 pin definition of the mini D sub male for DDC2B protocol 1 5 6 10 11 15 Pin Definition Pin Definition Pin Definition Pin Definition 1 Red video Pr 2 Green Video Y 3 Blue Video Pb 4 NC 5 NC 6 Red Video Return 7 Green Video Return 8 Blue Video Return 9 DDCP 5V 10 GND 11 GND 12 Bi dir...

Page 14: ...on D sub Composite Video S Video Searching The system does not detect the signal Input Not Supported The signal is over the specification Lamp is approaching the end of its useful life in full power operation Replacement suggested Lamp Hour is at 2970 hours Pin Description 1 TX 2 RX 3 GND Pin Description 1 Vbus 2 D 3 D 4 ID 5 GND ...

Page 15: ... NO Voltage Regulation Load Current Range Ripple Noise 1 12 V 5 0 15 A 2 5 A 120mV 240 mV 2 5 V 5 0 04 A 0 5 A 50mV 100 mV The power supply can provide DC 380V output as below NO Voltage Range Load Current 1 380 V 370 400V 0 5 A TYP 3 Lamp Power specifications Specification Description Applicable Lamp Philips Normal 189W ECO 163W AC operation Starting pulse from Ignitor 2 5KV 4 Power Protection It...

Page 16: ...16 System Block Diagram ...

Page 17: ...17 Product Overview ...

Page 18: ...18 ...

Page 19: ...19 ...

Page 20: ...20 ...

Page 21: ...s applied for Download firmware If operator wants to enter this mode he should press and hold keypad Power and Menu together then plug in power cord Release the two keypads Power Lamp Temp LED will show red light continuously In download mode you can use DLP composer to download new firmware and power LED will show purple while downloading Download WT6702 MCU Code in Low Power 1 Watt Standby Syste...

Page 22: ...up file for DLP Composer Lite to unzip TI Download Tool V1 1 for DDP243x rar to start to install program 2 When the Installation Wizard appears click Next 3 Select to accept the License Agreement than click Next 4 Click Next in the following steps to continue installation process ...

Page 23: ...r Lite9 2 If you want to install to a different directory perhaps alongside a prior release of DLP Composer Lite click the Browse button on the Select Features page 5 When finishing installation click Finish and then restart your computer to complete the installation process ...

Page 24: ...zip the library file into the path Click Click Click Click Browse Browse Browse Browse to to to to select select select select path for library files path for library files path for library files path for library files Click the Click the Click the Click the library library library library folder to assign folder to assign folder to assign folder to assign the path the path the path the path Then ...

Page 25: ...25 Set communication for download by RS232 1 Select Edit Preference 2 Select Communications Serial Port Config 3 Make sure the settings are the same as below figure Click OK 4 Click OK ...

Page 26: ...Software required 1 DLP Composer Lite program 2 New version FW Download procedure 1 Connect RS 232 cable to PC and projector 2 Let projector be in Download Mode Press and hold keypad Power and Menu together then plug in power cord Release the two keypads Power Lamp Temp LED will show red light continuously 3 Execute DLP Composer Lite 9 2 program 4 To select the RS 232 communications interface choo...

Page 27: ...27 5 Click on Flash Loader and browse the image file new version firmware 6 Select Complete Image Download and make sure to check Skip Boot loader area 32KB ...

Page 28: ...8 7 Press Reset Bus and check the status which should show Bus Reset 8 Press Start Download to begin update new firmware 9 Press Yes to continue when download new firmware and power LED will show purple ...

Page 29: ...ete When download complete LED signal on projector will show standby status Method to enter factory menu 1 Press keypad Power and image will show Power Down OSD function 2 Press keypad Left twice then press Menu then enter the Factory mode Step 1 Step 2 ...

Page 30: ...hat kind of file you need before download Setup Equipment 1 Connect between PC EDID board and the Projector 2 Need to set Jumper before using EDID board Jumper setting J6 1 2 short J8 1 2 short J10 short 3 How to use Download Tool Link to Main board For D sub DDC download Link to Projector For HDMI DDC download no need in X1130 X1230 X1230S X1235 X1230K series Link to Projector For DVI D DDC downl...

Page 31: ...use Download Tool 1 Execute EDID Tools V0 16 1 Run Q EDID V016 exe 2 Program will appear as below picture 2 Write EDID When write D SUB DVI EDID 1 EDID Type Selection Choose EDID 128 Bytes 2 Open Files Click Open File to select file DDC Note If your DDC file name is not like DDC e g 2dc please rename it to DDC 3 Write EDID Click Write EDID and it will execute writing process 4 While complete it wi...

Page 32: ...the read out DDC will show in the table in program Important Note Be reminded to connect Only One port every time because the software will not be able to identify the command signal from which port After connecting all equipment always read DDC before writing DDC to ensure the connection status is OK for writing DDC Step1 Step2 Step3 Step4 Step1 Step2 Ste Step3 ...

Page 33: ...pare the download equipment RS232 cable connect to PC and projector 2 Plug power cord into projector and the projector will be in stand by mode 3 Execute Acer_Service_Tool Data _3 1 exe and it will appear as below picture 4 Change to connected COM port and Click Port Open icon 5 Read data from original Main board Click Read system Data and it will read the Adjustment data except Auto keystone data...

Page 34: ...trieve System and write Data SN to projector 9 Load from data Retrieve System 1 Click Load from data and select load file 2 Click Retrieve System to write the values into main board 6 1 Click Save icon 6 2 This window will pop out and it shows the file saving folder 6 3 Enter file name here Suggest to use Serial Num as the file name 6 4 Click Save to save data 9 1 Click Load From Data to load data...

Page 35: ... X1237 use the same Main board after replacing new Main board it s necessary to change model name 1 Enter Factory menu 2 Go to Page2 as below figure 3 Default Model name is X1230P When change Main board on X1230PA or X1237 please press right left key to choose correct model name ...

Page 36: ...e When taking off upper case module don t break the IR sensor wire 3 Take off the case left module and the front case module keypad braket 2 1 3 4 5 FRONT IR BD keypad Rubber 4 1 Take off screws For X1130P Disassemble the screw 2 STAND OFF XH4 40 6L For X1230PK Disassemble the screw 4 STAND OFF XH4 40 6L For X1130PA X1230P X1230PA X12 37 Disassemble the screw 6 STAND OFF XH4 40 6L 2 Take off the r...

Page 37: ...n wireform M B 2 Take off right cass module X1130PA X1 230PK X1230P X1237 X1230PA have Speaker twin fan take off this long wire first 1 2 3 4 CLAMP 5 wire C W FPC wire C W sensor wire blower fan wire ballast 5pin wire speaker For X1130PA X1230PKX1230P X1237 X1230PA sponge 3 8 Take off the M B Main BD Note Circuit boards 10cm2 has been highlighted with the yellow rectangle as above image shows Plea...

Page 38: ...screw 1 M3 7L and take off the power BD and ballast Mylar screw driver 12 1 Disassemble the screw 2 M3 7L and take off the lamp box 2 Disassembly the screw 2 M3 8L and take off the blower fan screw driver screw 1 grounding screw 1 ballast wire screw 1 blower fan s thermal wire screw 1 screw 1 screw 1 screw 1 2 1 Ballast Mylar Screw 3 Note Circuit boards 10cm2 has been highlighted with the yellow r...

Page 39: ...3 5L screw driver 15 Take off the push button screw driver 16 1 Take off the gasket 2 2 Disassemble the focus ring screw driver ring focus gasket 2 定位 点 1 2 3 anchor point 1 2 3pin wire 5pin wire 2pin wire push button shielding 17 Take off th LENS screw 3 M3 4L and Ring Zoom and Ring Focus screw 2 M2 3 5L screw driver 1 3 2 1 2 ...

Page 40: ...21 1 Disassemble ILL module screw 2 M2 5 5L 2 Take off screw 1 M2 8L FM holder fold mirror FM clip 2 clip CM front clip CM side and sponge screw driver 22 1 Disassembly the screw 1 M2 3L 2 Take off the LP module and LP screw 2 M2 8L screw driver 1 2 3 4 3 screw 1 1 2 sponge screw 1 1 2 1 2 CW module baffle DMD L P Note Circuit boards 10cm2 has been highlighted with the yellow rectangle as above im...

Page 41: ...l Fig 1 4 5 Assembly Baffle LP first Fig 1 5 1 push Baffle LP to hook DMD HSG and then lock with screw well Fig 1 5 2 1 2 Overfill Adjustment LP Module Overfill Adjustment Criteria 1 Pre assembly 2 adjusting screws Criteria shown as Fig 1 6 2 Alignment Sequence a To adjust Horizontal Adjustment Screw firstly and then Vertical Adjustment Screw b Refer to Fig 1 6 3 For Overfill Re adjustment a Those...

Page 42: ...42 Fig 1 3 Fig 1 4 1 Press down the Clip 2 Insert the LP Module Overfill adjustment screws LP Datum of DMD HSG ...

Page 43: ...Fig 1 5 1 Fig 1 5 2 Fig 1 6 1 Place Clips on BKT surface 2 Push Baffle LP to hook DMD HSG 3 Lock screw Pre assemble this screw not over the side surface Pre assemble this screw not over the bottom surface ...

Page 44: ...nd to make CM contact three datum on the HSG ILL Well Fig 3 3 III Assemble CLIP TOP CM with forceps to the HSG IL Fig 3 4 IV To check and make sure CLIP of CM hooks the HSG ILL very Well Fig 3 5 V Paste Sponge tube AL on cannelure of HSG ILL Fig 3 6 6 2 FM Module Assembly 1 FM Module must be placed to fixed shaft and on the datum surface of ILL SUB and then lock with screw well Fig 3 7 Fig 3 1 Fig...

Page 45: ...45 Fig 3 3 Fig 3 4 Fig 3 5 Fig 3 6 Datum1 Datum2 Datum3 Clip UP CM Sponge ...

Page 46: ...aced AL on the HSG DMD The raised surface of AL shall toward DMD direction Fig 4 1 4 2 To assemble HSG ILL SUB Module with HSG DMD and cover over on AL and the then lock with screws Fig 4 2 Fig 4 1 Fig 4 2 AL DMD Direction screw Fixed shafts holes screw ...

Page 47: ...ying and Assemble DMD to Chip B D Fig 5 3 5 3 Push DMD slightly and use screwdriver rotate clockwise button to lock close notation DMD on Chip B D Fig 5 4 Fig 5 1 Fig 5 2 Fig 5 3 Fig 5 4 5 4 Place Damper on the surface of Chip BD Fig 5 5 Fig 5 5 Damper Alignment keying Button Open notation Close notation ...

Page 48: ...G and then lock with screws well Fig 6 1 Fig 6 1 7 Assembly OP ENG 7 1 Assemble Baffle DMD to HSG DMD Fig 7 1 7 2 Assemble Sponge DMD to HSG DMD Fig 7 1 7 3 Assemble Chip B D Module to HSG DMD Fig 7 2 Fig 7 1 Screw Shield CW BKT Link Lamp Baffle DMD Sponge DMD Alignment keying ...

Page 49: ...4 Assemble Thermal Pad Gasket Hest sink then place contact DMD Fig 7 3 i Pre fastening Sequence 1 2 3 4 ii Fastening Sequence 2 1 4 3 iii Screw Torque must be confirmed to be 6 kg cm Fixed shafts of DMD HSG Fixed holes of DMD ...

Page 50: ...50 Fig 7 3 7 5 Assemble CW Module to DMD HSG and lock with screws well Fig 7 4 Fig 7 4 Gasket Screw Fixed shafts of DMD HSG Screw 1 2 3 4 ...

Page 51: ...51 7 6 Assemble Mylar Antidust well Fig 7 5 Fig 7 5 7 7 Assemble PL LENS and lock with screws well Follow MP522 assembly Fig 7 6 Fig 7 6 Fixed shafts of DMD HSG Mylar Antidust Screw ...

Page 52: ...52 7 8 Assemble Ring Zoom and lock with screws well Fig 7 7 Fig 7 7 7 9 Assemble Ring Focus Fig 7 8 Fig 7 8 Screws 2PCS Insert and push Ring Focus until fix on the pin of LENS ...

Page 53: ...53 7 10 Assemble Lamp Module to BKT Link Lamp and then lock with screw well Fig 7 10 Fig 7 11 Fig 7 10 Fig 7 11 Screw Fixed shafts ...

Page 54: ...54 Module Assembly Key Point Mechanical 1 Assemble Lower case This module includes LC 1pcs Sponge 1pcs SHD LC 1pcs Screw 3pcs Screw 3pcs Sponge pasted as lower case must closed to hook ...

Page 55: ...55 2 Lower case and Adjust foot 3 Blower module assemble with LC This step includes blower module 1pcs and screw2pcs 4 Ballast wire Alignment dressed It needs screw 2pcs Spring no bend Screw 2pcs ...

Page 56: ...56 The EMI cord will behind the mylar ballast Ballast to Lamp wire should align in to this groove screws 2 The wire needn t around this rib ...

Page 57: ...module assembly 6 Lamp box assemble with lower case Rib This step needs screw 2pcs to fix assembly lamp box with LC First assy Blower module Second assy Mylar Ballast Ballast to Lamp wire also should align in to Mylar Ballast groove ...

Page 58: ...58 ...

Page 59: ...eck connector and boss height A piece of screw 1pcs needs dress 8 The assembly of OPE and LC This step needs screw 8F VA564 7R0 3pcs to tighten And the sequence needs obey according to picture For EMI the rubber power is necessary This cord direction should like this Screw 1pc ...

Page 60: ...tween SHD PWR and LC Assemble SHD Power This assembly includes SHD 3K 0R501 031 1pcs saddle 4B 0R501 001 1pcs and a piece of mylar 4K 0R501 001 1pcs This step needs screw 4pcs to tighten parts Screw 3pcs Rubber Power ...

Page 61: ...61 Confirm the position of EMI cord right Screw Screw ...

Page 62: ...62 10 Main BD assembly and connector position Need check the connectors OK completely This step adds sponge 1pcs ...

Page 63: ...wire and CW FPC alignment Please align the CW FPC then put the sensor wire into the saddle together Second screw 4pcs will be done firstly The add screw 1pcs and clip 1pcs Finally assemble fan and fix the wire by clip Screw 1 pc First Screw 4pcs ...

Page 64: ...64 12 Front IR wire to MB alignment Front IR wire should align in to these grooves ...

Page 65: ...65 13 Stick the leakage Mylar Align IR holder side A and B paste mylar 14 Dress the Inlet case outlet case and rear case It is necessary to confirm the position of SHD when assembling the rear case A B ...

Page 66: ...66 Please attention a piece of Mylar on Rear case Refer to its assembly as follows Shield K LUCK light leakage Action add new Mylar at rear case No adhesive area Align this side Align this side ...

Page 67: ...67 15 Assembly side case Assy case inlet Assy case outlet For X1130PA X1230PK X1230P X1237 X1230PA It includes Case outlet 1pcs sponge 3pcs speaker 1pcs and screw 2pcs ...

Page 68: ...this module pay attention to the first position of sponge and the orientation of SPK 16 Assembling the case upper Align this side pasted sponge Push bkt key and key closed Add washer and screw to hold key bkt ...

Page 69: ...69 Add a piece of sponge for light leakage 17 Ballast to lamp wire alignment Lamp box should close up the opening of lower case Lamp connector assemble with rib ...

Page 70: ...70 18 Lamp Door screw assemble sequence 19 Protect firm at upper case must have no bubble Must use a scraper to removed the bubbles 20 Add a piece of Mylar for light leakage ...

Page 71: ...ck Input Cable 2 Check OSD Source set up 3 Check Main board YES YES Power Auto Turn Off Step 1 Check OSD Lamp Hours 2 Check Lamp Door 3 Check Lamp still light or not 4 Check Fan still spin or not 5 Check Thermal status YES NO IR Remote Control NG Step 1 Check Remote module battery 2 Check Remote module 3 Check IR wire between Main board and IR board 4 Check IR Reciver on IR board YES Pixel Fail St...

Page 72: ...lay 2 Check CW 50 point Replace CW if necessary 6 Color Uniformity 1 Change lamp 7 Blue Edge 1 Refer to next page 2 Change CM 3 Change SUB HSG 8 Blue Purple Border 1 Refer to next page 2 Change CM 3 Change SUB HSG 9 Focus 1 Change Projection Lens 2 Check PL datum and DMD parallel 10 Dust Clean DMD 11 Horizontal Vertical Strips 1 Check connector between chip BD and Main BD 2 Re install DMD with chi...

Page 73: ...nt Screws must be released for around 2 mm first ii Alignment Sequence a To adjust Horizontal Adjustment Screw firstly then Vertical Adjustment Screw b Refer to below Figure II Re assemble LP module include LP LP Baffle LP clip 2 Overfill Vertical Adjustment Screw 1 Overfill Horizontal Adjustment Screw ...

Page 74: ...74 Power Supply Problems Checking Flow ...

Page 75: ... ON to OFF Standby ON Power button ON ON Lamp retry 0 5 second H On 0 5 second L Off flashing Cooling state 0 5 second H ON 0 5 second L OFF flashing Power button OFF Cooling completed Standby Mode ON Firmware Download ON ON Thermal sensor error T2 8 5 Lamp Over Temperature OSD shows Projector Overheated ON ON Thermal sensor error T1 40 OSD shows Projector Overheated ON ON Fan lock error OSD shows...

Page 76: ...ensor 1 Open Error Main Board SENSOR ERROR DETECT Sensor 1 Sensor 2 Open Error Power board SENSOR ERROR DETECT Sensor 2 Sensor 1 Short Error Main Board SENSOR ERROR DETECT Sensor 1 Sensor 2 Short Error Power board SENSOR ERROR DETECT Sensor 2 Temperature 1 Error over limited temperature N A Temperature 2 Error over limited temperature N A FAN IC I2C ERROR I2C communication error N A Fan 1 Lamp Fan...

Page 77: ... before connection Power on the computer first and then plug the power cord of the projector It may cause Com port incorrect function if you do not follow this instruction Adapters may be necessary depending on the PC connected to this projector Please contact with your dealer for further details 2 Hardware connection download cable 1 pin assignment for this two end ...

Page 78: ...78 Interface Settings RS 232 protocol Baud Rate 115200 bps Data Length 8 bit Parity Check None Stop Bit 1 bit Flow Control None Command Category Refer to Appendix A ...

Page 79: ...79 Adjustment Alignment Procedure Content 1 Color Wheel Delay Alignment 2 Overfill adjustment 3 PC Alignment Procedure 4 Keystone Calibration ...

Page 80: ...80 1 Color Wheel Delay Alignment Procedure 1 Enter Factory Mode 2 Enter Block 1 3 Change CW Delay by adjusting the following gray pattern to smooth 32 Gray pattern ...

Page 81: ...l White Pattern is suggested for this alignment 2 Adjust 2 LP alignment Screws upper side lower front side of Optical Engine behind Color Wheel 3 Alignment Criteria is to adjust these 2 screws until No Dark Edges and No Shadows can be observed in image ...

Page 82: ...0PA X1237 1024 768 60Hz XGA 5 Pattern pattern 1 6 Press keypad Resync to confirm image frame is correct 7 Enter factory mode and select 3rd page in factory mode 8 Set Factory values to default 9 Change Timing and pattern of pattern generator 10 Timing For X1130P X1130PA 800 600 60Hz SVGA For X1230PK X1230P X1230PA X1237 1024 768 60Hz XGA 11 Pattern As Figure above A near white color 240 240 240 an...

Page 83: ...ke projector be horizontal 2 Enter factory menu 3 Enter into Block 3 in factory menu 4 Select item AutoKeystoneCal 5 Press key Left or Right to do auto calibration 6 Finish 0 calibration and bellow items will show data AutoKeystoneXCal 5 AutoKeystoneXOffset 20 ...

Page 84: ...84 Chapter 5 FRU List Exploded Diagram Module 1 Total Exploded View ...

Page 85: ...85 ...

Page 86: ...86 Module 2 ASSY UPPER CASE ...

Page 87: ...87 Module 3 ASSY LOWER CASE ...

Page 88: ...88 Module 4 ASSY FRONT CASE ...

Page 89: ...BOARD W KEYPAD BOARD 55 K060Q 001 X1130PA BOARD MAIN BOARD W KEYPAD BOARD 55 K090Q 001 X1230PK BOARD MAIN BOARD W KEYPAD BOARD 55 K030Q 001 X1230PA X1230 P X1237 BOARD MAIN BOARD W KEYPAD BOARD 55 K100Q 001 X1130P X1130P A X1230PK X12 30PA X1230P X 1237 BOARD BALLAST LAMP DRIVER 55 K060Q 002 X1130P X1130P A X1230PK X12 30PA X1230P X 1237 BOARD POWER BOARD 55 K060Q 003 X1130P X1130P A X1230PK X12 3...

Page 90: ...P X 1237 CABLE POWER CORD AUS 27 LBJ0Q 004 X1130P X1130P A X1230PK X12 30PA X1230P X 1237 CABLE POWER CORD CHINA 50 LE10Q 004 X1130P X1130P A X1230PK X12 30PA X1230P X 1237 CABLE POWER CORD THAILAND 27 J900Q 001 X1130P X1130P A X1230PK X12 30PA X1230P X 1237 CABLE POWER CORD INDIA 27 LCE0Q 001 X1130P X1130P A X1230PK X12 30PA X1230P X 1237 CABLE POWER CORD JP 27 LE20Q 001 X1130PA X1230 P X1237 CAB...

Page 91: ...30P X12 37 CASE COVER B RACKET ASSEMBLY REAR CASE 60 K090Q 001 X1130P X1130P A X1230PK X12 30PA X1230P X 1237 CASE COVER B RACKET ASSEMBLY INTEL CASE 60 K060Q 002 X1130P X1130P A X1230PK X12 30PA X1230P X 1237 CASE COVER B RACKET ASSEMBLY OUTLET CASE 60 J900Q 003 X1130P X1130P A X1230PK X12 30PA X1230P X 1237 CASE COVER B RACKET ASSEMBLY UPPER CASE W KEYPAD RUBBER BRACKET 60 K060Q 003 X1130P X1130...

Page 92: ...Module 189W DIT85 DDP2430 EC K0600 001 X1237 DIGITAL LIGHT DEVICE Lamp Module for X1237 Phillips UHP 185 163W E20 6 B EC K1200 001 X1130P X1130P A X1230PK X12 30PA X1230P X 1237 DIGITAL LIGHT DEVICE COLOR WHEEL MODULE W SENSOR BD CABLE 57 K060Q 001 X1130P X1130P A X1230PK X12 30PA X1230P X 1237 DIGITAL LIGHT DEVICE LIGHT PIPE 57 J900Q 002 X1130P X1130P A X1230PK X12 30PA X1230P X 1237 DIGITAL LIGH...

Page 93: ...P A X1230PK X12 30PA X1230P X 1237 FAN FAN BLOWER MODULE 23 K060Q 002 X1130PA X1230 PK X1230PA X1 230P X1237 SPEAKER SPEAKER 23 K030Q 001 X1130P X1130P A X1230PK X12 30PA X1230P X 1237 MISCELLANEO US FOOT ADJFOOT 47 J900Q 001 X1130P X1130P A X1230PK X12 30PA X1230P X 1237 MISCELLANEO US RUBBER ADJFOOT PAD 47 J900Q 002 X1130P X1130P A X1230PK X12 30PA X1230P X 1237 JIG BOARD TOOL KIT FOR EDID UPLOA...

Page 94: ...94 Appendix A Code List IR RS232 DDC Data 1 Remote Control Code IR setting value Frequency 38kHz Protocal NEC format b IR command code X1130P Customer code 0813 ...

Page 95: ...95 X1130PA X1230PK X1230P X1230PA X1237 Customer code 0813 ...

Page 96: ...deo support 19 0 IR 020 Source Component Video support 20 0 IR 021 Aspect ratio 16 9 support 21 0 IR 022 Aspect ratio 4 3 support 22 0 IR 023 Volume support 23 0 IR 024 Volume support 24 0 IR 025 Brightness support 25 0 IR 026 Contrast support 26 0 IR 027 Color Temperature support 27 0 IR 028 Source Analog RGB for DVI Port Unsupport 28 0 IR 029 Source Analog YPbPr for DVI Port Unsupport 29 0 IR 03...

Page 97: ... the Native display resolution support 3 Name XXXXXXXX Return the company name support Lamp command type Projector receives commands NO Code character Function feature Note 1 0 Lamp Query the lamp ON OFF support 2 0 Lamp Query the lamp hours support Lamp command type Projector transmits commands NO Code character Function feature Note 1 Lamp 0 Return Lamp OFF status support 2 Lamp 1 Return Lamp ON...

Page 98: ...01 11H Year of Manufacture __________________________ 2009 12H EDID Version Number __________________________ 1 13H EDID Revision Number _________________________ 3 14H VIDEO INPUT DEFINITION Analog Signal 0 700 0 300 1 000 Vp p Sync on Green Composite Sync Separate Syncs 15H Maximum Horizontal Image Size ________________ mm 16H Maximum Vertical Image Size __________________ mm 17H Display Gamma _...

Page 99: ...40 pixels Sync Pulse Width 128 pixels Border 0 pixels Frequency 37 88 kHz Vertical Active Count 600 lines Blanking Count 28 lines Sync Offset 1 lines Sync Pulse Width 4 lines Border 0 lines Frequency 60 32 Hz Digital Separate Horizontal Polarity Vertical Polarity ______________________________________________________________________ 48H 59H Detailed Timing Descriptor Block 2 Monitor Range Limits M...

Page 100: ...H EDID Version Number __________________________ 1 13H EDID Revision Number _________________________ 3 14H VIDEO INPUT DEFINITION Analog Signal 0 700 0 300 1 000 Vp p Sync on Green Composite Sync Separate Syncs 15H Maximum Horizontal Image Size ________________ mm 16H Maximum Vertical Image Size __________________ mm 17H Display Gamma ________________________________ 2 20 18H DPMS and Supported F...

Page 101: ...quency 37 88 kHz Vertical Active Count 600 lines Blanking Count 28 lines Sync Offset 1 lines Sync Pulse Width 4 lines Border 0 lines Frequency 60 32 Hz Digital Separate Horizontal Polarity Vertical Polarity ______________________________________________________________________ 48H 59H Detailed Timing Descriptor Block 2 Monitor Range Limits Min Vertical Freq 48 Hz Max Vertical Freq 120 Hz Min Horiz...

Page 102: ...___________ 2009 12H EDID Version Number __________________________ 1 13H EDID Revision Number _________________________ 3 14H VIDEO INPUT DEFINITION Analog Signal 0 700 0 300 1 000 Vp p Sync on Green Composite Sync Separate Syncs 15H Maximum Horizontal Image Size ________________ mm 16H Maximum Vertical Image Size __________________ mm 17H Display Gamma ________________________________ 2 20 18H D...

Page 103: ... Border 0 pixels Frequency 48 36 kHz Vertical Active Count 768 lines Blanking Count 38 lines Sync Offset 3 lines Sync Pulse Width 6 lines Border 0 lines Frequency 60 00 Hz Digital Separate Horizontal Polarity Vertical Polarity ______________________________________________________________________ 48H 59H Detailed Timing Descriptor Block 2 Monitor Range Limits Min Vertical Freq 48 Hz Max Vertical F...

Page 104: ...H EDID Version Number __________________________ 1 13H EDID Revision Number _________________________ 3 14H VIDEO INPUT DEFINITION Analog Signal 0 700 0 300 1 000 Vp p Sync on Green Composite Sync Separate Syncs 15H Maximum Horizontal Image Size ________________ mm 16H Maximum Vertical Image Size __________________ mm 17H Display Gamma ________________________________ 2 20 18H DPMS and Supported F...

Page 105: ...requency 48 36 kHz Vertical Active Count 768 lines Blanking Count 38 lines Sync Offset 3 lines Sync Pulse Width 6 lines Border 0 lines Frequency 60 00 Hz Digital Separate Horizontal Polarity Vertical Polarity ______________________________________________________________________ 48H 59H Detailed Timing Descriptor Block 2 Monitor Range Limits Min Vertical Freq 48 Hz Max Vertical Freq 120 Hz Min Hor...

Page 106: ... EDID Version Number __________________________ 1 13H EDID Revision Number _________________________ 3 14H VIDEO INPUT DEFINITION Analog Signal 0 700 0 300 1 000 Vp p Sync on Green Composite Sync Separate Syncs 15H Maximum Horizontal Image Size ________________ mm 16H Maximum Vertical Image Size __________________ mm 17H Display Gamma ________________________________ 2 20 18H DPMS and Supported Fe...

Page 107: ...requency 48 36 kHz Vertical Active Count 768 lines Blanking Count 38 lines Sync Offset 3 lines Sync Pulse Width 6 lines Border 0 lines Frequency 60 00 Hz Digital Separate Horizontal Polarity Vertical Polarity ______________________________________________________________________ 48H 59H Detailed Timing Descriptor Block 2 Monitor Range Limits Min Vertical Freq 48 Hz Max Vertical Freq 120 Hz Min Hor...

Page 108: ... EDID Version Number __________________________ 1 13H EDID Revision Number _________________________ 3 14H VIDEO INPUT DEFINITION Analog Signal 0 700 0 300 1 000 Vp p Sync on Green Composite Sync Separate Syncs 15H Maximum Horizontal Image Size ________________ mm 16H Maximum Vertical Image Size __________________ mm 17H Display Gamma ________________________________ 2 20 18H DPMS and Supported Fe...

Page 109: ...requency 48 36 kHz Vertical Active Count 768 lines Blanking Count 38 lines Sync Offset 3 lines Sync Pulse Width 6 lines Border 0 lines Frequency 60 00 Hz Digital Separate Horizontal Polarity Vertical Polarity ______________________________________________________________________ 48H 59H Detailed Timing Descriptor Block 2 Monitor Range Limits Min Vertical Freq 48 Hz Max Vertical Freq 120 Hz Min Hor...

Reviews: