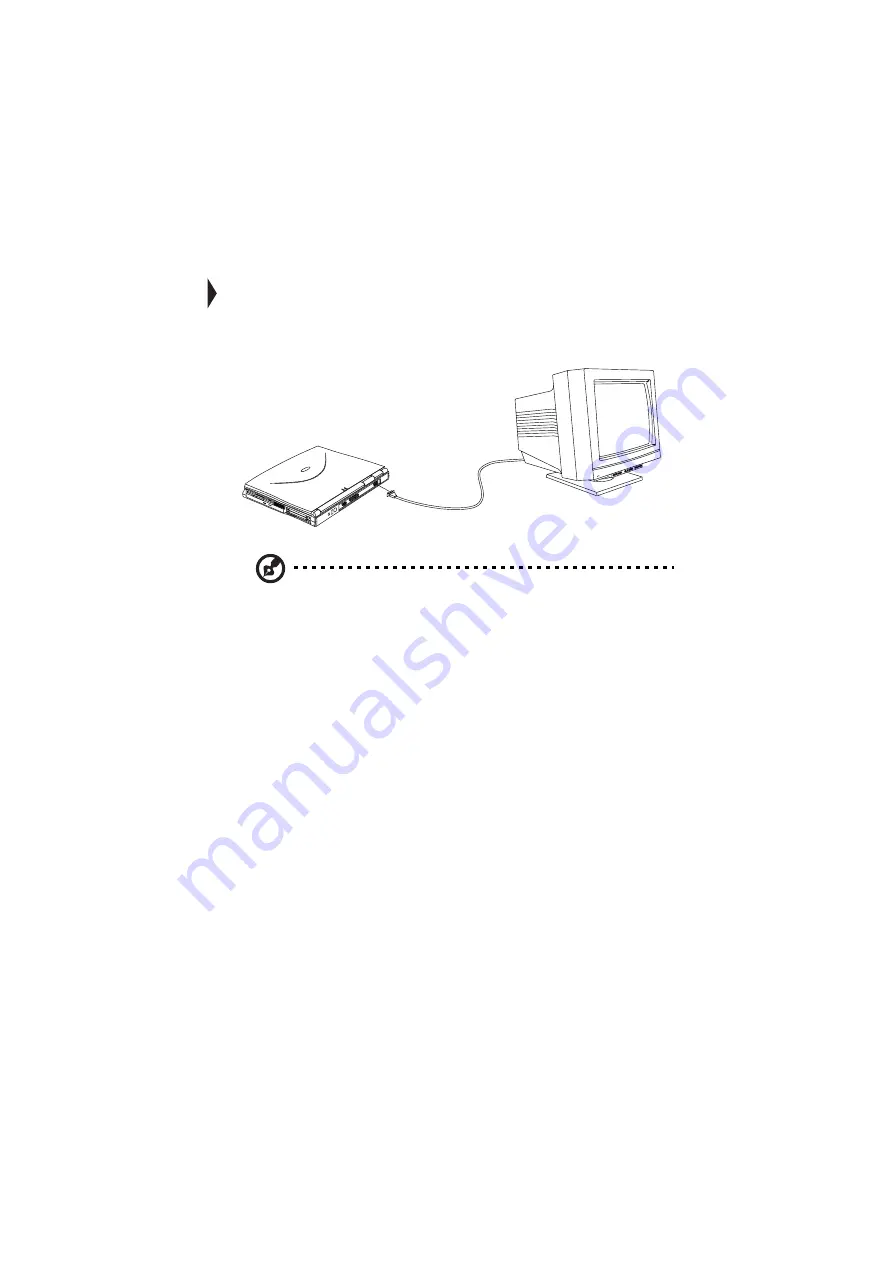
Acer 505 series User Manual Download Page 65

43

External monitor

To show graphical effects on a larger display, connect an external monitor to the 
CRT port.  Read the monitor manual for additional instructions.  

Note: If an external monitor is not connected, closing the display cover puts 
the computer into Standby mode.

Using simultaneous display

Your computer takes advantage of Windows 98 multi-display capability, allowing 
you to use your computer for presentation purposes.  So whatever is displayed in 
your computer will likewise be displayed on the other output display.

To use simultaneous display, you can choose to connect other output display 
devices to the computer through the CRT port.

Enabling simultaneous display

To enable and set simultaneous display options, follow these steps:

1.

Click on Start, Program, then Notebook Manager.

2.

Click on Notebook Manager.

3.

Click on the Display Device tab.

4.

Click on Both under the Boot Display Device.

5.

Click on Both under the Switching Display Device.

6.

Click on OK.

Summary of Contents for 505 series

Page 1: ...TravelMate 505 series User s guide ...

Page 2: ...mber and model number are recorded on the label affixed to your computer All correspondence concerning your unit should include the serial number model number and purchase information No part of this publication may be reproduced stored in a retrieval system or transmitted in any form or by any means electronic mechanical photocopy recording or otherwise without the prior written permission of Ace...

Page 3: ...are of your computer xx Taking care of your AC adapter xx Taking care of your battery pack xx Cleaning and servicing xxi xxii 1 Getting familiar with your computer 1 Features 3 Display 5 Indicators 7 Keyboard 9 Special keys 9 Lock keys 9 Embedded numeric keypad 10 Windows keys 11 The Euro symbol 11 Hotkeys 13 Keyboard ergonomics 15 Touchpad 16 Touchpad basics 16 Storage 18 Hard disk 18 Floppy driv...

Page 4: ...dvanced Configuration and Power Interface 36 Power management modes 36 Sleep mode ACPI 36 Display standby mode 37 Hard disk standby mode 37 Standby mode 37 Hibernation mode 38 3 Peripherals and options 41 External monitor 43 Using simultaneous display 43 Enabling simultaneous display 43 External keyboard 44 External keypad 45 External pointing device 46 External PS 2 mouse 46 External serial mouse...

Page 5: ...erations 59 Setting up a home office 60 Traveling with the computer 61 Preparing the computer 61 What to bring with you 61 Special considerations 61 Traveling internationally with the computer 62 Preparing the computer 62 What to bring with you 62 Special considerations 62 5 Software 63 System software 65 Sleep Manager 66 Accessing the Sleep Manager 66 Sleep Manager functions 68 Create 68 Remove 7...

Page 6: ...2 Onboard Device Configuration 84 System Security 85 Setting a password 86 Changing a password 87 Removing a password 87 Password icons 87 Load Default Settings 88 6 Troubleshooting 89 Frequently asked questions 91 Error messages 95 Troubleshooting tips 97 Using PC Doctor 97 Online services 98 Before you call 98 A Specifications 101 Index 107 ...

Page 7: ...ence by one or more of the following measures 1 Reorient or relocate the receiving antenna 2 Increase the separation between the device and receiver 3 Connect the device into an outlet on a circuit different from that to which the receiver is connected 4 Consult the dealer or an experienced radio television technician for help Notice shield cables All connections to other computing devices must be...

Page 8: ...istration Number and Ringer Equivalence Number REN for this equipment Upon request you must provide this information to your telephone company If your telephone equipment causes harm to the telephone network the telephone company may discontinue your service temporarily If possible they will notify you in advance But if advance notice is not practical you will be notified as soon as possible You w...

Page 9: ...king label If you are not sure of the type of power available consult your dealer or local power company 8 Do not allow anything to rest on the power cord Do not locate this product where persons will walk on the cord 9 If an extension cord is used with this product make sure that the total ampere rating of the equipment plugged into the extension cord does not exceed the extension cord ampere rat...

Page 10: ...mance indicating a need for service 13 Replace the battery with the same type as the product s battery we recommend Use of another battery may present a risk of fire or explosion Refer battery replacement to a qualified serviceman 14 Warning Batteries may explode if not handled properly Do not disassemble or dispose of them in fire Keep them away from children and dispose of used batteries promptl...

Page 11: ...OSITION AUX RAYONS LUOKAN 1 LASERLAITE LASER KLASSE 1 VORSICHT UNSICHTBARE LASERSTRAHLUNG WENN ABDECKUNG GEÖFFNET NICHT DEM STRAHLL AUSSETZEN PRODUCTO LÁSER DE LA CLASE I ADVERTENCIA RADIACIÓN LÁSER INVISIBLE AL SER ABIERTO EVITE EXPONERSE A LOS RAYOS ADVARSEL LASERSTRÅLING VEDÅBNING SE IKKE IND I STRÅLEN VARO LAVATTAESSA OLET ALTTINA LASERSÅTEILYLLE VARNING LASERSTRÅLNING NÅR DENNA DEL ÅR ÖPPNAD ...

Page 12: ...te av batteri Benytt samme batteritype eller en tilsvarende type anbefalt av apparatfabrikanten Brukte batterier kasseres i henhold til fabrikantens instruksjoner VARNING Explosionsfara vid felaktigt batteribyte Anvãnd samma batterityp eller en ekviva lent typ som rekommenderas av apparattillverkaren Kassera anvãnt batteri enligt fabrikantens instruktion VAROITUS Päristo voi räjähtää jos se on vir...

Page 13: ... NSTL Tested Year 2000 Compliant logo which certifies that this model has been tested by NSTL using the YMark2000 test and has been found to meet NSTL s standards for Year 2000 hardware compliance For more details check the Acer Year 2000 Resource Center at www acer com tw service y2k index htm ...

Page 14: ...e Public Switched Telephone Network PSTN However due to differences between the individual PSTNs provided in different countries the approval does not of itself give an unconditional assurance of successful operation on every PSTN termination point In the event of problems you should contact your equipment supplier in the first instance ...

Page 15: ...r most of the questions you have about the day to day operation of your TravelMate notebook computer Use the Just for Starters instructions that came with your computer to get your computer running for the first time You should also take advantage of the online help files that are available with almost all of the programs shipped with your computer We hope you enjoy your TravelMate computer With p...

Page 16: ...rge the battery then disconnect the adapter to use up the battery before recharging again Perform this action twice to condition the battery pack 2 Connect one end of the AC adapter to the DC in port on the computer s rear panel and the other end to a properly grounded power outlet 3 Slide the display cover latch to the left to open the display Slide the power switch towards the rear of the comput...

Page 17: ...e To turn off the power slide and hold the power switch for more than four seconds If you are using Windows 98 we recommend that you use the Shut Down command to turn off the computer If you turn off the computer and want to turn it on again wait at least two seconds before powering up ...

Page 18: ...ters are there to give you a helping hand An ITW passport comes with your computer This passport contains all you need to know about the ITW program A list of available authorized service centers are in this handy booklet Read this passport thoroughly Note Always have your ITW passport on hand especially when you travel to receive the benefits from our support centers Place your proof of purchase ...

Page 19: ...Support Information Note If you are connected to the Internet and have World Wide Web access visit our home page www acer com and get an updated list of our worldwide offices as well as information about our products ...

Page 20: ...ing care of your AC adapter Here are some ways to take care of your AC adapter Do not connect the adapter to any other device Do not step on the power cord or place heavy objects on top of it Carefully route the power cord and any cables away from all potential traffic When unplugging the power cord do not pull on the cord itself but pull on the plug The total ampere ratings of the equipment plugg...

Page 21: ...f the computer and remove the battery pack 2 Disconnect the AC adapter 3 Use a soft cloth moistened with water Do not use liquid or aerosol cleaners Contact your dealer or see your service technician if any of the following occurs The computer has been dropped or the body has been damaged Liquid has been spilled into the product The computer does not operate normally ...

Page 22: ...xxii ...

Page 23: ...1 Getting familiar with your computer ...

Page 24: ...y power management features and multimedia capabilities with a unique style and ergonomic design Work with unmatched productivity and reliability with your new power computing partner This chapter gives an in depth tour of the computer s many features ...

Page 25: ...wer management system with hibernation power saving modes Multimedia 16 bit high fidelity stereo audio with 3 D sound and wavetable synthesizer Built in dual speakers Ultra slim high speed CD ROM drive Connectivity High speed fax data software modem port USB Universal Serial Bus port Human centric design and ergonomics All in one design CD ROM FDD HDD Sleek smooth and stylish design Full sized key...

Page 26: ...1 Getting familiar with your computer 4 zoomed video port support Upgradeable memory and hard disk ...

Page 27: ... display devices such as LCD projection panels for large audience presentations Power management The power management system incorporates an automatic LCD dim feature that automatically dims the LCD when the computer is powered by a battery pack to conserve battery power See Power management on page 36 for more information on power management features Opening and closing the display To open the di...

Page 28: ...1 Getting familiar with your computer 6 Caution To avoid damaging the display do not slam it when you close it Also do not place any object on top of the computer when the display is closed ...

Page 29: ... the cover is closed Icon Function Description 1 Power Lights when the computer is on Blinks when a battery low condition occurs 2 Standby Lights when the computer enters Standby mode 3 Media Activity Lights when the floppy drive hard disk or CD ROM drive is active 4 Battery Charge Lights when the battery is being charged 5 Caps Lock Lights when Caps Lock is activated 6 Num Lock Fn F11 Lights when...

Page 30: ...all alphabetic characters typed are in uppercase Num Lock Fn F11 When Num Lock is on the embedded keypad is in numeric mode The keys function as a calculator complete with the arithmetic operators and Use this mode when you need to do a lot of numeric data entry A better solution would be to connect an external keypad See External keyboard on page 44 Scroll Lock Fn F12 When Scroll Lock is on the s...

Page 31: ...rnal keyboard or keypad is connected to the computer the numlock feature automatically shifts from the internal keyboard to the external keyboard or keypad Desired Access Num Lock On Num Lock Off Number keys on embedded keypad Type numbers in a normal manner Cursor control keys on embedded keypad Hold Shift while using cursor control keys Hold Fn while using cursor control keys Main keyboard keys ...

Page 32: ...ed Kingdom French German Italian Spanish Portuguese Key Description Windows logo key Start button Combinations with this key perform special functions Below are a few examples á Tab Activates next Taskbar button á E Explores My Computer á F Finds Document á M Minimizes All Shift á M Undoes Minimize All á R Displays Run dialog box Application key Fn Application key Opens the application s context m...

Page 33: ...le click on Keyboard 3 Click on the Language tab 4 Verify that the keyboard type used for En English United States is set to United States International 5 If not select and click on Properties then select United States International and click on OK 6 Click on OK To type the Euro symbol 1 Locate the Euro symbol on your keyboard 2 Open a text editor or word processor 3 Hold Alt Gr and press the Euro...

Page 34: ...notebook configuration utility See Notebook Manager on page 71 Fn F3 Power Scheme Toggle Switches between the different Power Management schemes Fn F4 Sleep Puts the computer in Sleep mode which can be defined via the advanced section of the Power Management Properties in the Windows Control Panel Fn F5 Display toggle Switches display output between the display screen external monitor if connected...

Page 35: ...use the computer automatically disables the touchpad Fn F8 Speaker on off Turns the speakers on and off mutes the sound Fn Contrast up Increases the screen contrast available only for models with HPA displays Fn Contrast down Decreases the screen contrast available only for models with HPA displays Fn Brightness up Increases the screen brightness Fn Brightness down Decreases the screen brightness ...

Page 36: ...familiar with your computer 14 Keyboard ergonomics Located below the keyboard the wide and curved palm rest is ergonomically designed to provide you with a very comfortable place to rest your hands while you type ...

Page 37: ...disables the internal touchpad Touchpad basics The following items teach you how to use the touchpad Move your finger across the touchpad to move the cursor Press the left and right buttons located on the edge of the touchpad to do selection and execution functions These two buttons are similar to the left and right buttons on a mouse Tapping on the touchpad produces similar results Function Left ...

Page 38: ...ence the lighter the touch the better the response Tapping too hard will not increase the touchpad s responsiveness Drag Click and hold then use finger to drag the cursor on the touchpad Tap twice at the same speed as double clicking the mouse button and hold finger to the touchpad on the second tap to drag the cursor Access context menu Click once Function Left Button Right Button Tap ...

Page 39: ...drive Hard disk The hard disk can be upgraded when you need more storage space Consult your dealer for details Floppy drive The ultra slim internal floppy drive reads and writes on standard 3 5 inch diskettes Ejecting a floppy disk Press the floppy disk eject button to eject a floppy disk from the floppy drive CD ROM drive A high speed CD ROM drive gives you portable multimedia access ...

Page 40: ...computer 18 Ejecting the CD ROM tray To eject the CD ROM drive tray when the computer is turned on press the CD ROM eject button Note When power is off you can eject the CD ROM drive tray using the emergency eject hole see page 93 ...

Page 41: ...connect external devices to the computer Front ports The front panel contains ports for external audio connections Icon Port Connects to 1 Speaker out jack Speakers or headphones 2 Audio line in jack Audio line in device with a 3 5mm minijack e g audio CD player stereo walkman 3 Microphone in jack 3 5mm minijack condenser microphone ...

Page 42: ...als without taking up precious system resources Icon Port Connects to 1 DC in jack AC adapter and power outlet 2 USB port USB devices e g USB mouse 3 PS 2 port PS 2 compatible devices e g PS 2 keyboard mouse keypad 4 Serial port Serial devices e g serial mouse 5 Parallel port Parallel devices e g parallel printer 6 External monitor port Display monitor up to 1024x768 resolution 64K colors ...

Page 43: ...cards include flash memory SRAM fax data modem LAN and SCSI cards Common type III cards are 1 8 inch ATA drives and cellular modems CardBus improves on the 16 bit PC card technology by expanding the data path to 32 bits ZV zoomed video port support allows your computer to support hardware MPEG in the form of a ZV PC card Note Refer to your card s manual for details on how to install and use the ca...

Page 44: ...ard Exit the application using the card Left click on the PC card icon on the taskbar and stop the card operation Press the slot eject button once to pop it out then press it again to eject the PC card Fax data modem The computer has a built in fax data modem available in select countries Caution This modem port is not compatible with digital phone lines Plugging this modem into a digital phone li...

Page 45: ...23 To use the fax data modem port connect a phone cable from the modem port to a telephone jack ...

Page 46: ...y stereo audio with further enhancements that include 3D sound for true audio immersion Front dual speakers direct sound towards you to further enhance sound output Use the volume control knob to adjust the volume level Turn the knob to the right to increase the volume turn it to the left to decrease the volume ...

Page 47: ...dle Insert the lock into the notch and turn the key to secure the lock Passwords A two level password scheme protects your computer from unauthorized access When set no one can access the computer without entering the correct password There are two types of passwords you can set Supervisor Password secures your computer against unauthorized entry to and use of the BIOS Utility User Password secure...

Page 48: ...1 Getting familiar with your computer 26 Setting a password You can set the password using Notebook Manager go to page 75 BIOS Utility go to page 86 ...

Page 49: ...27 ...

Page 50: ...1 Getting familiar with your computer 28 ...

Page 51: ...2 Operating on battery ...

Page 52: ...mputer operates on AC or battery power This chapter contains the information you need to know to operate the computer on battery power It also includes information on how your computer manages and saves power ...

Page 53: ...2 Operating on battery power 31 power ...

Page 54: ...the first time When using a battery pack for the first time follow these steps 1 Connect the AC adapter to a power source and to the computer and fully recharge the battery 2 Disconnect the adapter to use up the battery before recharging again You only need to do this once or twice with a new battery or with a battery that s been stored without being used for a long time If the computer is to be s...

Page 55: ...r is turned off and a powered AC adapter is connected to it In rapid mode a fully depleted battery gets fully charged in approximately two hours Charge in use mode When the computer is in use with the AC adapter plugged in the computer also charges the battery pack if installed This mode will take longer to fully charge a battery than rapid mode In charge in use mode a fully depleted battery gets ...

Page 56: ...ing Keep the battery pack in the computer powered by the AC adapter The constant trickle charge maintains the battery level to eliminate the battery self discharge effect The charge in use function also charges the battery pack Disable the parallel and serial ports if no devices are connected to these ports You can do this through the Setup Utility See Onboard Device Configuration on page 84 Eject...

Page 57: ...e The following table shows the recommended course of action to take when you encounter a battery low condition Situation Recommended Action AC adapter and power outlet available 1 Connect the AC adapter to the computer 2 Save all necessary files 3 Resume work Power off the computer if you wish to recharge the battery rapidly An extra fully charged battery pack available 1 Save all necessary files...

Page 58: ... Windows handles all power saving chores for your computer Advanced Configuration and Power Interface Advanced Configuration and Power Interface ACPI is a power management specification jointly developed by Intel Microsoft and Toshiba ACPI enables Windows to control the amount of power given to each device attached to the computer With ACPI Windows can turn off peripheral devices when they are not...

Page 59: ...d disk enters standby mode when there are no disk read write operations within the period of time determined by the power management system In this state the power supplied to the hard disk is reduced to a minimum The hard disk returns to normal once the computer accesses it Standby mode The computer consumes very low power in Standby mode Data remains intact in the system memory until the battery...

Page 60: ...ers Hibernation mode Once you turn on the power the computer restores this information and resumes right where you left off before entering Hibernation mode Before the computer can enter Hibernation mode the Hibernation file created by Sleep Manager must be present and valid See Sleep Manager on page 66 Then there are three ways to enter Hibernation mode Pressing the Sleep hotkey Fn F4 If the wait...

Page 61: ...39 Warning Do not change any devices such as add memory when the computer is in Hibernation mode ...

Page 62: ...2 Operating on battery power 40 ...

Page 63: ...3 Peripherals and options ...

Page 64: ...hat help you use your computer with ease When connecting peripherals read the manual included with the peripheral for operating instructions You can purchase most of these and other options directly from Acer This chapter also includes sections on how to upgrade key components Key component upgradeability helps keep your computer in step with the latest technology ...

Page 65: ...to use your computer for presentation purposes So whatever is displayed in your computer will likewise be displayed on the other output display To use simultaneous display you can choose to connect other output display devices to the computer through the CRT port Enabling simultaneous display To enable and set simultaneous display options follow these steps 1 Click on Start Program then Notebook M...

Page 66: ...omputer has a keyboard with full sized keys and an embedded keypad If you feel more comfortable using a desktop keyboard you can install a PS 2 compatible external keyboard To connect an external keyboard plug the external keyboard into the PS 2 connector ...

Page 67: ...45 External keypad You can also use a 17 key numeric keypad for number sensitive data entry applications To connect the keypad plug the keypad connector into the PS 2 port ...

Page 68: ...se to disable the internal touchpad by pressing Fn F7 External PS 2 mouse The built in touchpad works alternately with an external PS 2 mouse which is hot pluggable To use a PS 2 compatible mouse simply plug it into the PS 2 port External serial mouse If you use a serial mouse plug it into the serial port To enable the serial mouse use the Add New Hardware tool in the Windows Control Panel ...

Page 69: ...ter cable into the serial port For a parallel printer plug the printer cable into the parallel port See your printer manual for operating instructions Note If the printer does not function enter Setup and verify that the parallel port is enabled See Onboard Device Configuration on page 84 for assistance ...

Page 70: ...to connect with the audio ports accessible from the front of the computer You can plug an external microphone into the microphone in jack or an audio line in device into the audio line in jack Amplified speakers or headphones connect to the speaker headphone out jack ...

Page 71: ...C cards The computer has one CardBus PC card slot that can accommodate one type II I or one type III PC card Please consult your dealer for PC card options available that you can purchase for your computer ...

Page 72: ...B Universal Serial Bus port that allows you to connect peripherals without occupying too many resources Common USB devices include the mouse and keyboard Most USB devices also include a built in USB port connector which allows you to daisy chain other USB devices ...

Page 73: ...wer on the go AC adapter The compact AC adapter charges your battery pack and supplies power to your computer You can order a spare AC adapter so you do not need to carry it from the office to your home or destination Cables PS 2 Y bridge cable The PS 2 Y bridge cable allows you to simultaneously connect two PS 2 devices a mouse and a keyboard to your computer Note The keyboard must be connected t...

Page 74: ...d the double connector ends to the two PS 2 devices File transfer cable Besides using the infrared port you can also transfer files between computers using a file transfer cable Connect the file transfer cable between the parallel ports of the two computers and use your file transfer utility to perform the transfer ...

Page 75: ...B or 64 MB onboard system memory with one DIMM socket for upgrade use It supports 32 64 128 MB 64 bit 128 bit Synchronous Dynamic Random Access Memory SDRAM soDIMMs Small Outline Dual Inline Memory Modules Installing memory Follow these steps to install memory 1 Turn off the computer unplug the AC adapter if connected and remove the battery pack Then turn the computer over to access its base 2 Rem...

Page 76: ...tomatically detects and reconfigures the total memory size Hard disk upgrade It is possible to upgrade your hard disk with a higher capacity drive when you need more storage space The computer uses a 9 5mm 2 5 inch Enhanced IDE hard disk Please consult your dealer if you need to upgrade your hard disk ...

Page 77: ...4 Moving with your computer ...

Page 78: ...This chapter gives you tips and hints on things to consider when moving around or traveling with your computer ...

Page 79: ...ries 1 Save your work in progress 2 Shut down the operating system 3 Turn off the computer 4 Disconnect the cord from the AC adapter 5 Disconnect the keyboard pointing device printer external monitor and other external devices 6 Disconnect the Kensington lock if you are using one to secure the computer ...

Page 80: ...ery runs the computer for 2 3 hours under most circumstances If your meeting is shorter than that you probably do not need to bring anything with you other than the computer What to bring to long meetings If your meeting will last longer than 3 hours or if your battery is not fully charged you may want to bring the AC adapter with you to plug in your computer in the meeting room If the meeting roo...

Page 81: ...lowing items with you AC adapter and power cord The printed user s manual Special considerations Follow these guidelines to protect your computer while traveling to and from work Minimize the effect of temperature changes by keeping the computer with you If you need to stop for an extended period of time and cannot bring the computer with you leave the computer in the trunk of the car to avoid exp...

Page 82: ...er at home it may be worthwhile to purchase a second AC adapter for use at home With a second AC adapter you can avoid transporting the extra weight to and from home If you use your computer at home for significant periods of time you might also want to add an external keyboard monitor or mouse ...

Page 83: ...ea What to bring with you Bring the following items with you AC adapter Spare fully charged battery packs Additional printer driver files if you plan to use another printer Special considerations In addition to the guidelines for taking the computer home follow these guidelines to protect your computer while traveling Always take the computer as carry on luggage If possible have the computer inspe...

Page 84: ... in case you need to show it to customs officials International Traveler s Warranty passport Special considerations Follow the same special considerations as when traveling with the computer In addition these tips are useful when traveling internationally When traveling in another country check that the local AC voltage and the AC adapter power cord specifications are compatible If not purchase a ...

Page 85: ...5 Software ...

Page 86: ...This chapter discusses the important system utilities bundled with your computer ...

Page 87: ...compliant hardware BIOS utility System utilities drivers and application software Note To access Windows software applications click on the Start button and select the application folder Then click on the application icon to run the selected application To learn about the software and utility make use of the online help provided by the software ...

Page 88: ...reating the Hibernation file which contains the current state of the computer checking if the Hibernation file is valid saving and loading the contents of the Hibernation file when entering into and resuming from Hibernation mode The Hibernation file resides in a contiguous area on your hard disk Sleep Manager can automatically create recover and reallocate space for the Hibernation file If the sy...

Page 89: ...he icon changes to tell you if the feature is valid or not Resting your cursor on the icon also shows the status Start menu 1 Click on the Start button 2 Select Programs 3 Select Sleep Manager 4 Select the Sleep Manager program Sleep Manager displays the screen below Item Description Buttons Click to access the Sleep Manager functions Current Setting Displays the drive and size of the current rese...

Page 90: ...erent areas of system memory and their respective sizes These system resources need to be stored before the computer can enter Hibernation mode so that the computer can resume successfully These resources include On Board Memory DRAM or dynamic memory Video RAM VRAM or video memory SMRAM static memory and Others Recommended Size Displays the minimum size of the contiguous space you need for the Hi...

Page 91: ...space on your hard disk is less than the required size For example if the onboard memory is 32MB and the video memory is 2MB the total free disk space required will be around 34MB If the total free disk space is less than this the user has to free up space on his hard disk Another possible reason is that the hard disk has enough free space but this free space exists as small fragments The free dis...

Page 92: ...nimize button If the Enable indicator in the taskbar box is checked Sleep Manager will switch to the background by locating itself on the taskbar You can pop up Sleep Manager again by double clicking on this icon Exit Exit Sleep Manager by selecting the Exit button Sleep Manager will quit and disable the capability of auto adjusting the reserved space size Exiting Sleep Manager is NOT recommended ...

Page 93: ... Notebook Manager press Fn F2 or follow these steps 1 Click on Start Programs then Notebook Manager 2 Select the Notebook Manager application to run the program Note Changes made to most settings in the Notebook Manager take effect the next time the computer restarts If you make changes in the Power Management and Display Device screens these changes take effect immediately Notebook Manager consis...

Page 94: ...rand type and clock speed of the CPU Central Processing Unit Total Memory Total amount of main memory in megabytes Video RAM Total amount of video memory in megabytes Hard Disk Size of hard disk in megabytes CD ROM or DVD ROM Detects presence of the CD ROM or DVD ROM drive Serial port Resource settings of the serial port Parallel port Resource settings of the parallel port Internal Cache Detects p...

Page 95: ...ying the TravelMate computer logo Enable hotkey beep Select to enable the computer to emit a beep when a hotkey or key combination is pressed External Cache Detects presence and total amount of external cache memory in kilobytes TouchPad Detects the presence and setting of the internal pointing device Pointing Device Type s of the pointing device s detected internal and external Item Description ...

Page 96: ...e computer searches for a bootable diskette in the floppy drive If no bootable diskette is found the computer boots from the hard disk CD ROM DVD ROM Drive The computer searches for a bootable CD ROM in the CD ROM or DVD ROM drive and boots from there If no bootable CD is present the computer boots from the hard disk IDE Hard Drive The computer boots directly from the hard drive Make your selectio...

Page 97: ...mputer during system startup and at resume from Standby Hibernation modes or an elapsed system resume timer Setup Password The Setup Password prevents unauthorized access to the computer s BIOS Utility Setting the Power On Password To set the Power On Password follow these steps 1 Click on the Change Power On Password button The following dialog box displays 2 Click on the Enable Power On Password...

Page 98: ...elds blank Setting the Setup Password To set the Setup Password follow these steps 1 Click on the Change Setup Password button to display the following dialog box 2 Click on the Enable Setup Password checkbox 3 Click in the New Password textbox and type in up to seven alphanumeric characters A Z a z 0 9 which you want to be your Setup Password 4 Click in the Confirm Password textbox and retype the...

Page 99: ...wer Management Properties options The Advanced options in Power Management Properties enable you to assign a function to the Lid switch power button and sleep hotkey Fn F4 The options available for the Lid switch are No Action Standby Hibernate and Shutdown while the options available for the hotkey and power button are Standby Hibernate and Shutdown ...

Page 100: ...tor is connected before External monitor is selected Brightness for LCD Panel Click and drag to set the LCD screen brightness and contrast levels Note TFT active matrix LCDs have fixed and optimized contrast levels Click on the radio button of the desired item then click on Apply to activate the setting To modify the brightness and or contrast levels click and hold the slider control and move to t...

Page 101: ...o is being displayed Navigating the BIOS Utility There are six menu options System Information Basic System Settings Startup Configuration Onboard Device Configuration System Security and Load Default Settings To enter a menu highlight the item using the keys then press Enter Within a menu navigate through the BIOS Utility by following these instructions Press the cursor up down keys to move betwe...

Page 102: ...rameter Description CPU Describes the type of CPU installed in the system Floppy Disk Drive Shows the floppy disk drive type 1 44MB 3 5 inch Hard Disk MB Sets the hard disk type HDD Serial Number Shows the hard disk drive serial number System with Shows the high capacity disc drive installed System BIOS Version Shows the system BIOS version VGA BIOS Version Shows the video graphics accelerator BIO...

Page 103: ...creen Asset Tag Number Shows the asset tag number Product Name Shows the official name of the product Manufacturer Name Shows the name of the manufacturer UUID Shows the universally unique identifier number Parameter Description Date Sets the system date Format DDD MMM DD YYYY day of the week month day year Time Sets the system time Format HH MM SS hour minute second Parameter Description ...

Page 104: ...se the computer LCD is the boot display When set to Both the computer outputs to both the computer LCD and an external display device if one is connected Options Auto or Both Screen Expansion When set to enabled the screen will automatically adjust the display to fit the screen when the resolution is set 640 X 480 Options Enabled or Disabled Hotkey Beep When enabled the computer gives off a beep w...

Page 105: ...and so on Below are possible boot devices Bootfrom CD ROM Enables boot up from the CD ROM drive if selected as the first option The computer attempts to boot from the CD ROM drive looks for a bootable CD ROM before following the boot sequence specified in the Boot Drive Sequence Floppy Enables boot up from the floppy disk drive if selected as the first option The computer attempts to boot from the...

Page 106: ... interrupt request of the serial port Options 4 or 11 Parallel Port Enables or disables the parallel port Options Enabled or Disabled Base Address Sets the I O address of the parallel port Options 378h 278h or 3BCh IRQ Sets the interrupt request of the parallel port Options 7 or 5 Operation Mode Sets the operation mode of the parallel port Options ECP EPP Bidirectional or Standard ECP DMA Channel ...

Page 107: ... your notebook computer to your dealer to reset it Setting a password Follow these steps Parameter Description Setup Password When set this password protects the BIOS Utility from unauthorized entry Options None or Present Power on Password When set this password protects the computer from unauthorized entry during boot up or resume from Hibernation mode Options None or Present Hard Disk Password ...

Page 108: ...assword box appears 4 Retype the password to verify your first entry and press Enter After setting the password the computer automatically sets the chosen password parameter to Present 5 Press Esc to return to the main menu 6 Press Esc The following dialog box appears 7 Select Yes and press Enter to save the password and exit the BIOS Utility Changing a password To change a password follow the sam...

Page 109: ...cters of the password the screen displays this icon for each character instead of the actual password character Wrong password icon If the wrong password is entered this icon will be displayed beside the wrong password Successful password entry icon If the password is correctly entered this icon will be displayed beside the correctly entered password Password failure icon The system allows the use...

Page 110: ...e 88 Load Default Settings When you select this menu item the following dialog box displays To load factory default settings for all the parameters select Yes and press Enter Otherwise select No and press Enter ...

Page 111: ...6 Troubleshooting ...

Page 112: ... system problems Read it before calling a technician if a problem occurs Solutions to more serious problems require opening up the computer Do not attempt to open the computer by yourself Contact your dealer or an authorized service center for assistance ...

Page 113: ...ad to resume Is a non bootable non system diskette in the floppy drive Remove or replace it with a system diskette and press Ctrl Alt Del to restart the system The operating system files may be damaged or missing Insert the startup disk you created during Windows setup into the floppy drive and press Ctrl Alt Del to restart the system This will diagnose your system and make necessary fixes Nothing...

Page 114: ...n The speakers may be turned off Press Fn F8 to turn the speakers on this hotkey also turns the speakers off The volume level may be too low In Windows look at the volume control icon on the taskbar Click on the icon and adjust the level You can also use the volume control knob on the front panel of the computer to adjust the volume If headphones earphones or external speakers are connected to the...

Page 115: ...2 to access the Setup Utility Go to the Onboard Device Configuration screen and verify that the serial port is enabled see Onboard Device Configuration on page 83 for details I prefer using an external keyboard and mouse but both have PS 2 connectors and there is only one PS 2 port on the computer To connect two PS 2 type devices to the computer you need to use a PS 2 Y bridge connector see PS 2 Y...

Page 116: ...ur location 1 Open the Windows Control Panel and double click on the Modems icon 2 Click on Dialing Properties and begin setting up your location Refer to the Windows manual Why can t I charge my battery to 100 charged when it is 99 95 charged To preserve the life of the battery the system only lets you charge the battery when its capacity falls below 95 However it is recommended that you bring an...

Page 117: ...e Mismatch Press F2 during POST to enter the Setup Utility then press Esc to exit and reconfigure the computer Equipment Configuration Error Press F2 during POST to enter the Setup Utility then press Esc to exit and reconfigure the computer Hard Disk 0 Error Contact your dealer or an authorized service center Hard Disk 0 Extended Type Error Contact your dealer or an authorized service center I O P...

Page 118: ...any key when ready Insert a system bootable diskette in the floppy drive A then press Enter to reboot Pointing Device Error Contact your dealer or an authorized service center Pointing Device Interface Error Contact your dealer or an authorized service center Protected Mode Test Fail Contact your dealer or an authorized service center RAM BIOS Bad Contact your dealer or an authorized service cente...

Page 119: ... to take 1 Disconnect any external devices PC card external mouse etc 2 Open System Properties to make sure that the components you diagnose are enabled To open the properties window for the system click on Start Settings Control Panel then double click on System 3 Close all application programs i e fax or communication programs if you plan to diagnose the modem To run PC Doctor simply double clic...

Page 120: ...kes and help solve your problems efficiently 1 If there are error messages or beeps reported by your computer write them down as they appear on the screen or the number and sequence in the case of beeps 2 If you are able to run the PC Doctor diagnostic tests locate the log file by selecting Windows Test Log in the PC Doctor menu bar 3 If you haven t registered your notebook computer you will be re...

Page 121: ...99 ...

Page 122: ...6 Troubleshooting 100 ...

Page 123: ...A Specifications ...

Page 124: ...This appendix lists the general specifications of your computer ...

Page 125: ... and video 12 1 inch fast response high contrast high color High Performance Addressing HPA LCD or 12 1 inch high color Thin Film Transistor TFT LCD 800x600 SVGA resolution Integrated 128 bit PCI graphics accelerator and 2 MB video memory Simultaneous LCD and CRT display Audio 16 bit stereo audio 3 dimensional sound with built in wavetable synthesizer Dual speakers Sound Blaster Pro and Windows So...

Page 126: ... keyboard mouse port PS 2 compatible One speaker headphone out jack One audio line in jack One microphone in jack One USB port Weight and dimensions 2 67 kg 5 9 lbs 306 x 228 x 46 mm 12 x 10 12 x 1 81 in Temperature Operating 10 C 35 C Non operating 20 C 60 C Humidity non condensing Operating 20 80 RH Non operating 20 80 RH System Windows 98 Mobile PC99 compliant Battery pack 33 6 WattHour NiMH ba...

Page 127: ...pter 60 Watt Auto sensing 100 240Vac 50 60Hz Options 32 64 128 MB 64 128 bit SDRAM memory upgrade module PS 2 Y cable Additional AC adapter and battery pack Numeric keypad File transfer cable In Air Auto Adapter ...

Page 128: ...A Specifications 106 ...

Page 129: ...order setting in Notebook Manager 74 brightness hotkeys 14 setting in Notebook Manager 78 C caps lock 9 on indicator 7 care AC adapter xx battery pack xx computer xx CD ROM ejecting 19 ejecting manually 93 troubleshooting 93 charging checking level 33 modes 32 cleaning computer xxi computer bringing to meetings 58 caring for xx cleaning xxi connecting xvi disconnecting 57 features 3 information 72...

Page 130: ...ons 91 H hard disk 18 power management 37 upgrading 54 help Internet home page xix online manual xviii technical support xviii Hibernation mode 38 39 conditions 38 entering 38 hotkey 13 resuming from 38 utility 66 hotkeys 13 I indicator lights 7 ITW See warranty K keyboard 9 connecting externally 44 embedded numeric keypad 10 hotkeys 13 lock keys 9 troubleshooting 93 Windows keys 11 keypad connect...

Page 131: ...38 printer connecting 47 troubleshooting 93 problems 91 audio 92 CD ROM 93 display 91 92 keyboard 93 printer 93 serial mouse 93 startup 91 PS 2 mouse connecting 46 PS 2 Y bridge cable connecting 51 Q questions multiple PS 2 devices 93 setting location for modem use 94 S security keylock 26 passwords 26 serial mouse connecting 46 serial port setting in BIOS Utility 84 service when to call xxi simul...

Page 132: ...l Serial Bus 21 USB connecting 50 USB See Universal Serial Bus utility BIOS Setup 79 88 Notebook Manager 71 78 Sleep Manager 66 V volume adjusting 25 W warranty International Traveler s Warranty xviii Windows keys 11 ...

Reviews: