4 Upgrading your computer
72
2
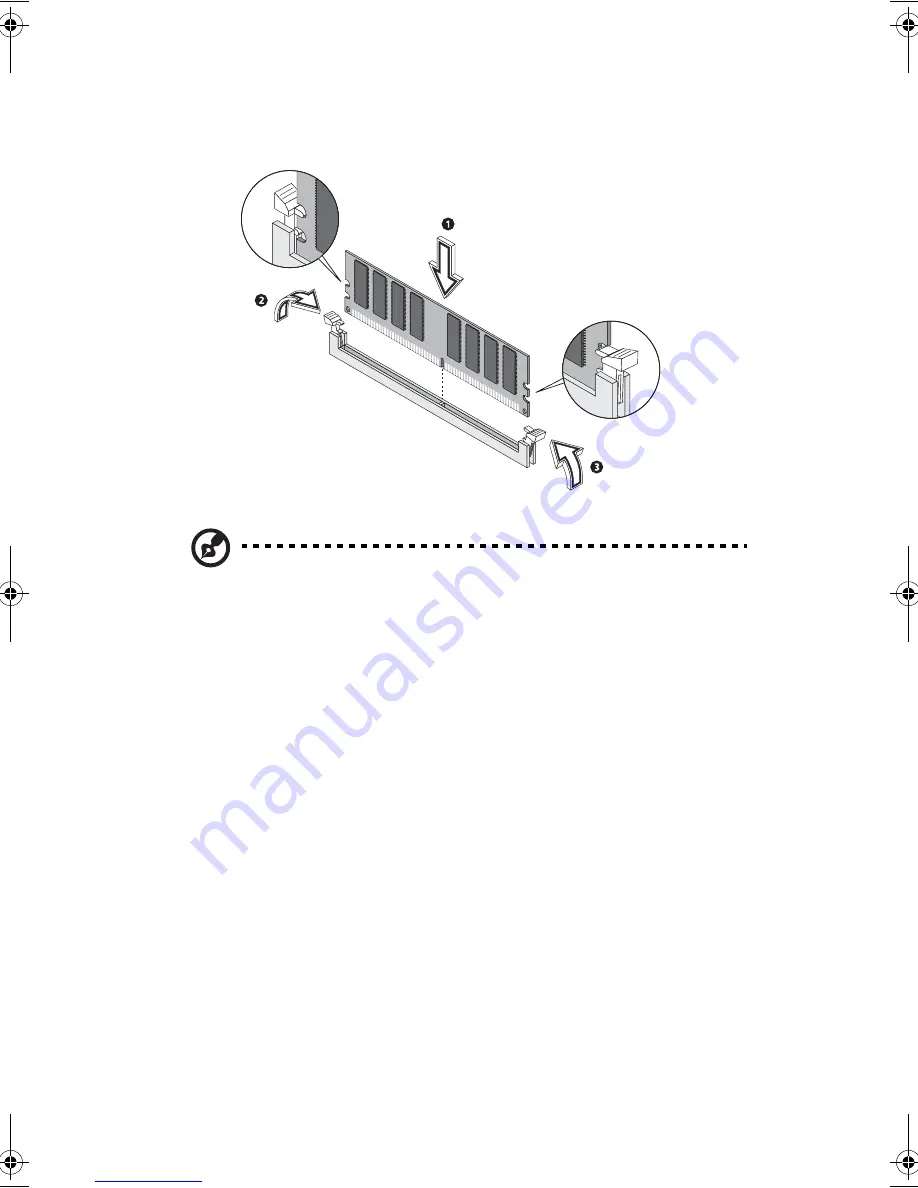
Align the DDR DIMM with the socket (1). Press the DDR DIMM into
the socket until the clips lock onto the DDR DIMM (2,3).
Note:
The DDR DIMM sockets are slotted to ensure proper
installation. If you insert a DDR DIMM but it does not fit easily
into the socket, you may have inserted it incorrectly. Turn the DDR
DIMM around and try to insert it again.
To reconfigure your computer
Your computer automatically detects the amount of memory installed.
Run the BIOS utility to view the new value for total system memory
and make a note of it.
Replacing the hard disk
Follow these steps to replace your computer’s hard disk:
1
Remove the computer cover (see page 62).
2
Detach all cables connected to the CD or DVD drive and the 3.5-
inch floppy drive.
WU4711tfsjft`FO/cppl!!Qbhf!83!!Uivstebz-!Bqsjm!4-!3114!!5;28!QN
Summary of Contents for 3600 Series
Page 1: ...Veriton 3600 series User s guide ...
Page 6: ...vi ...
Page 7: ...1 First things first ...
Page 8: ......
Page 9: ...This chapter describes the system specifications and the contents of your computer package ...
Page 14: ...1 First things first 8 ...
Page 15: ...2 System tour ...
Page 16: ......
Page 17: ...This chapter discusses the features and components of your computer ...
Page 38: ...2 System tour 32 ...
Page 39: ...3 Setting up your computer ...
Page 40: ...3 Setting up your computer 34 ...
Page 43: ...37 2 Attach the foot stands to the slots on the housing frame b as shown in the figure below ...
Page 63: ...4 Upgrading your computer ...
Page 64: ......
Page 72: ...4 Upgrading your computer 66 Veriton 3600G mainboard layout ...
Page 85: ...5 System utilities ...
Page 86: ......
Page 87: ...This chapter describes the applications that are preinstalled on your computer ...
Page 104: ...5 System utilities 98 ...
Page 105: ...6 Frequently asked questions ...
Page 106: ...6 Frequently asked questions 100 ...
Page 111: ...105 Appendix A Notices ...
Page 116: ...Appendix A Notices 110 ...
Page 117: ...111 Appendix B Taking care of your computer ...
Page 120: ...Appendix B Taking care of your computer 114 ...


