background image

15

U S E R   C O N T R O L S

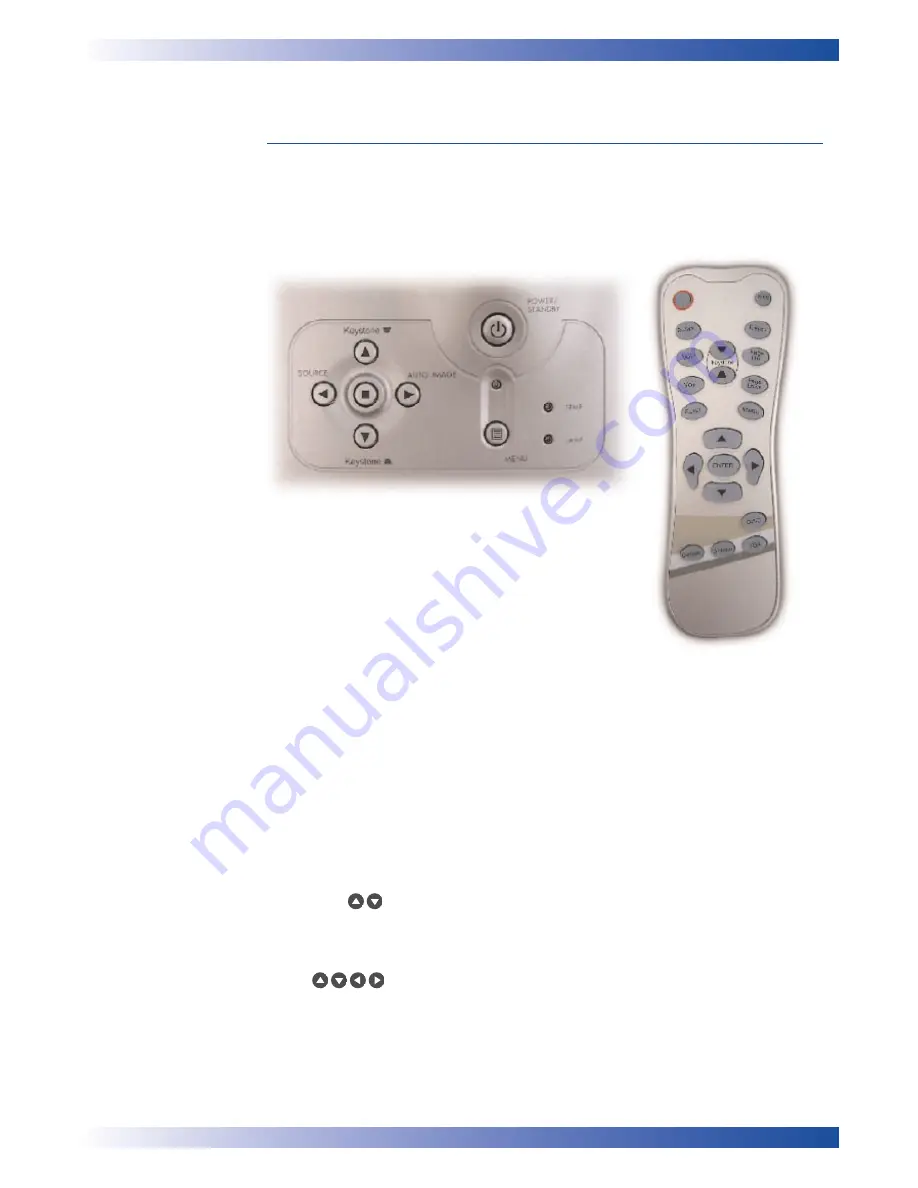
There are two ways for you to control the functions: Remote Control and
Control Panel.

CONTROL PANEL & REMOTE CONTROL

U

SING THE

C

ONTROL

P

ANEL

Power / Standby

n

Refer to the “Power On/Off the Projector” section on pages 11-12. 

Source

n

Press “Source” to choose RGB, Component-p, Component-i,
S-Video, Composite Video and HDTV sources.

Menu

n

Press “Menu” to launch the on screen display (OSD) menu.
To exit OSD, press “Menu” again.

Keystone 

n

Adjusts image distortion caused by tilting the projector (±16 degrees). 

Four Directional Select Keys

n

Use 

to select items or make adjustments to your selection.

Enter

n

Confirm your selection of items. 

Re-Sync

n

Automatically synchronises the projector to the input source. 

Control Panel

Remote Control


Summary of Contents for NOBO X23M

Page 1: ...User Manual X23M DLP Projector User Manual 3366 Oct04 UK...

Page 2: ...2...

Page 3: ...Warning Indicator 12 Adjusting the Projected Image 13 Adjusting the Projector Image Height 13 Adjusting the Projector Zoom Focus 14 Adjusting Projected Image Size 14 User Controls Control Panel Remote...

Page 4: ...upervised at all times when projector is in use To reduce the risk of fire or electric shock do not expose this product to rain or moisture Please do not open or disassemble the product as this may ca...

Page 5: ...625 576i p NTSC 525 480i p HD 720p 1080i n High tech DVI connection for digital signal with HDCP function and supports 480p 576p 720p and 1080i n Full function remote control n User friendly multilin...

Page 6: ...your unit is complete Contact your dealer immediately if anything is missing Projector with lens cap Power Cord 1 8m Composite Video Cable 2 0m Batteries x 2 Remote Control VGA Cable 1 8m Audio Cable...

Page 7: ...7 I N T R O D U C T I O N PRODUCT OVERVIEW MAIN UNIT Focus Ring Zoom Ring Elevator Button Elevator Foot Zoom Lens Control panel Power Connector Connection Ports Remote Control Receiver...

Page 8: ...nal Select Keys Auto Image Enter Source PC Analog Signal HDTV Component Video Input Connector Composite Video Input Connector Monitor Loop through Output Connector DVD Input Connector for Digital sign...

Page 9: ...O N REMOTE CONTROL Page Up Page Down Keystone Correction Menu Enter Four Directional Select Keys VGA Source Composite Video Source S Video Source Freeze Volume Reset Re Sync Hide Transmit Indicator Li...

Page 10: ...ompatible with the projector Refer to the Compatibility Modes section on page 30 Power Cord VGA Cable Composite Video Cable SCART RGB Adaptor For European Use Only Audio Cable Jack Jack S Video Cable...

Page 11: ...e the projector you can select your preferred language from the quick menu after the start up screen display 4 Turn on your source computer notebook video player etc The projector will detect your sou...

Page 12: ...nce in standby mode simply press Power Standby button to restart the projector 3 Disconnect the power cord from the electrical outlet and the projector 4 Do not turn on the projector immediately follo...

Page 13: ...e then release the button to lock the elevator foot into position 3 Use to fine tune the display angle To lower the image 1 Press the elevator button 2 Lower the image then release the button to lock...

Page 14: ...S ADJUSTING PROJECTED IMAGE SIZE Focus Ring Zoom Ring This graph is for User s reference only Screen Diagonal Screen Size Distance m Max cm Min cm 75 0 62 5 60 0 x 45 0 50 0 x 37 5 1 4 187 5 156 3 150...

Page 15: ...hoose RGB Component p Component i S Video Composite Video and HDTV sources Menu n Press Menu to launch the on screen display OSD menu To exit OSD press Menu again Keystone n Adjusts image distortion c...

Page 16: ...This function is only available when the projector is connected to a computer via an USB cable Page Down Computer mode only n Use this button to page down This function is only available when the pro...

Page 17: ...ile making a selection on a particular page press Enter key to enter sub menu 3 Use keys to select the desired item and adjust the settings by key 4 Select the next item to be adjusted in the sub menu...

Page 18: ...T R O L S Computer Video Mode LANGUAGE Choose the multilingual OSD menu n Use the or key to select your prefered language n Press Enter to finalise the selection Image I Image II Audio Language Manage...

Page 19: ...ress the to increase the contrast Keystone Keystone Correction Adjust image distortion caused by tilting projection 16 degrees Colour Press Enter to adjust the red green and blue colors White Peaking...

Page 20: ...allows you to choose a degamma table that has been fine tuned to bring out the best image quality for the input Aspect Ratio Use this function to choose your desired aspect ratio n 4 3 The input sour...

Page 21: ...n Press the to increase the sharpness Aspect Ratio Use this function to choose your desired aspect ratio n 4 3 The input source will be scaled to fit the projection screen n 16 9 The input source wil...

Page 22: ...the to decrease the volume n Press the to increase the volume Mute n Choose the left icon to turn mute on n Choose the right icon to turn mute off Computer Video Mode Language Management Lamp Setting...

Page 23: ...t screen with ceiling mounted projection Signal Type Select signal type RGB or Video sources Source Lock When source lock is turned off the projector will search for other signals if the current input...

Page 24: ...lamp message is displayed The message will show up 30 hours before end of life ECO Mode Choose On to dim the projector lamp which will lower power consumption and extend the lamp life by up to 130 Cho...

Page 25: ...p 2 Verify that your display resolution setting is less than or equal to 1024 x 768 For Windows 95 98 2000 XP 1 Open My Computer icon the Control Panel folder and then double click on the Display icon...

Page 26: ...projector lens Refer to page 14 n Make sure the projection screen is between the required distance 1 2 to 10 0 meters from the projector PROBLEM The image is outstretched when displaying 16 9 DVD The...

Page 27: ...lock fail Off Flashing Off Error Over Temp Off On Off Error Off Off On Lamp Breakdown PROBLEM Message Reminders n Lamp is approaching the end of its useful life in full power operation Replacement Su...

Page 28: ...ing the Power button 2 Allow the projector to cool down at least 30 minutes 3 Disconnect the power cord 4 Use a screwdriver to remove the screw from the cover 5 Push up and Remove the cover 6 Remove t...

Page 29: ...etres PAL SECAM 625 576i p NTSC 525 480i p HD 720p 1080i 31 5kHz 70kHz horizontal scan 43Hz 85Hz vertical refresh Universal AC input 100 240V Input Frequency 50 60Hz Power AC power input socket Comput...

Page 30: ...SVGA 800 x 600 85 53 7 85 53 7 VESA XGA 1024 x 768 60 48 4 60 48 4 VESA XGA 1024 x 768 70 56 5 70 56 5 VESA XGA 1024 x 768 75 60 0 75 60 0 VESA XGA 1024 x 768 85 68 7 85 68 7 VESA SXGA 1152 x 864 70 6...

Page 31: ...NSTALLATION 1 To prevent damaging your projector please use the ceiling mount package for installation 2 If you wish to use a third party ceiling mount kit please ensure the screws used to attached a...

Reviews: