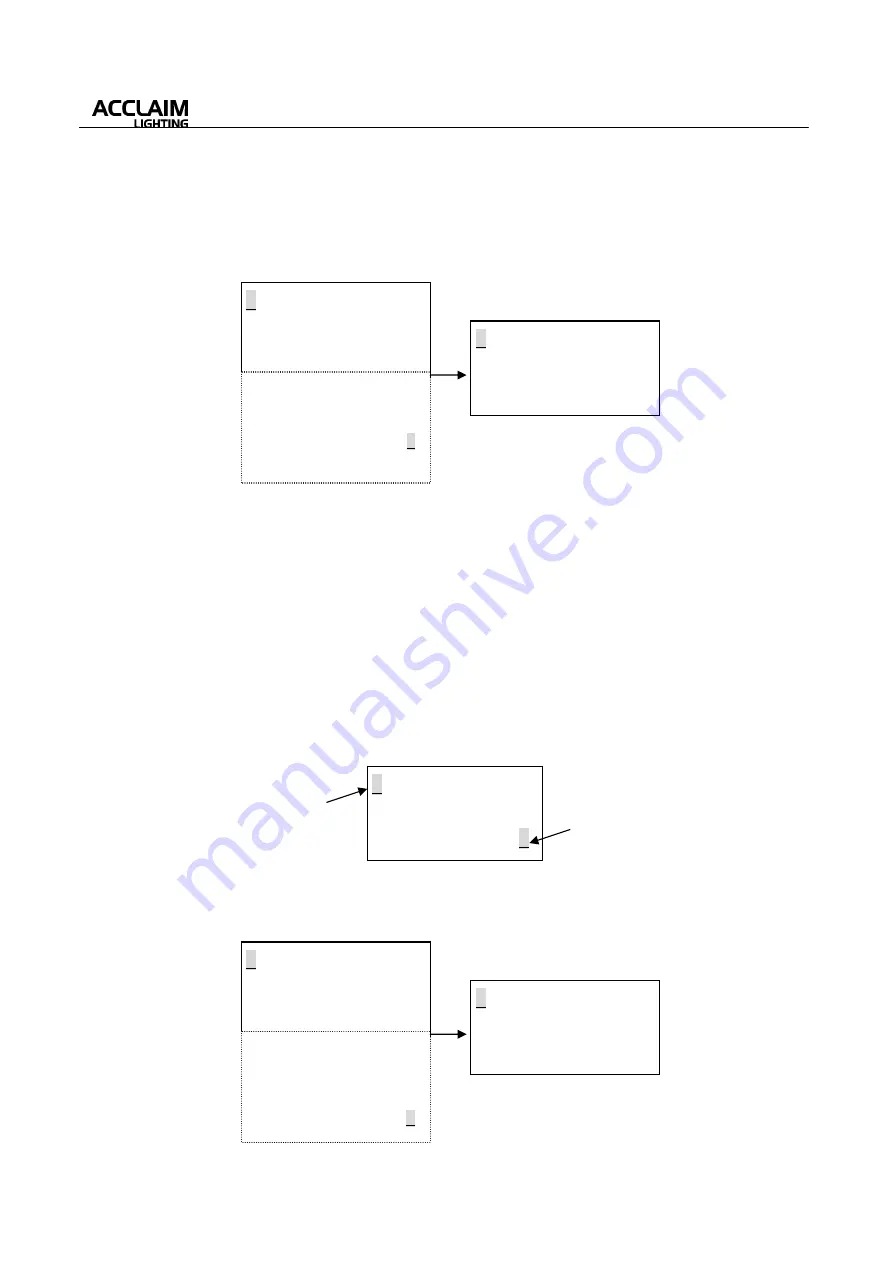
background image


User’s Manual


11


*

User can call up 

Semiautomatic Setup With Answer

 function by rotating the multi-selector and 

selecting the “Selective Copy”, then press the multi-selector, the LCD will show you as below:   


                    Page(I) 
 
 
                                                                                   Page(II) 


Unit Group

:1~100; 

Unit Number

:1~999; 

Total Channel

:1~48.  

  It is necessary to set the first LED properly in Setup With Answer Menu before entering. 

  DMX Addresses of LEDs depend on work modes. 

 Work Mode settings for all LEDs Unit should be compatible. If or not, the work mode is not 

compatible for one LED unit, it will return to the previous page automatically. 

 After confirmation, DMX address are the total of LEDs channels. And Unit Number will also 

increase one automatically. If the unit number over 999, unit number is beginning from 1 and 
increase one. And user can select the next desires LED unit according to ID, but can not select the 
same LED Unit twice. 

  User can set more LEDs Unit without connecting all LEDs at the same time in this function. In this 

menu, user may have to take out the current LED Unit and connect the desired one, and the setting 
can be continued by confirming and backing to this menu. the LCD will show you as below:


*

User can call up 

Automatic Setup With Answer

 function by rotating the multi-selector and selecting 

the “Copy to all”, then press the multi-selector, the LCD will show you as below:   


<


ID: 

XXXXXXXXXXX…  

>


Unit Group:   

 XXX


>


Unit Number:


XXX    

>

Work Mode:  RGB


Glide Effect:


XXX  

>


Address Set:


XXX


>


Confirm to send 


Selective Copy      > 

    Copy to all                 

>


<

ID: 

XXXXXXXXXXX… 

>


Total Channel:

XXX


>


Group:

XXX NO.XXX    

>


Addr: 

XXX           


When the cursor is at this position, 
pressing the multi-selector will return 
to the above main display page.   

<

Confirm


Selective Copy Mode


Please Connect LED!


Cancel


When the cursor is at this position, 
pressing the multi-selector will return 
to the above display page(I).     

<


ID: 

XXXXXXXXXXX…  

>


Unit Group:   

 XXX


>


Unit Number:


XXX    

>

Work Mode:  RGB


Glide Effect:


XXX  

>


Address Set:


XXX


>


Confirm to send 


Selective Copy      > 

    Copy to all                  > 

<

ID: 

XXXXXXXXXXX… 

>


Total Channel:

XXX


>


Group:

XXX NO.XXX    

>


Addr: 

XXX           


Summary of Contents for XB-R1

Page 1: ...LED Setup Controller XB R1 USER S MANUAL Rev 1 2 No 24 004 1656 00...

Page 2: ...g please check the unit is not damaged If something wrong happens to this product contact the local dealer immediately All rights reserved No part of this manual included with this product can be repr...

Page 3: ...For your convenient control of the connected LED product user should firstly set relevant Unit Number and Unit Group for the connected LED product in the Setup With Answer function mode If the connec...

Page 4: ...L modes are for Master control and the other modes are for Slave control This Mode is only available for the one way output device Glide Effect function can be set as Yes enabled or No disabled If thi...

Page 5: ...lect relevant item and then use the multi selector to adjust or confirm your setting In the AUTO Work Mode relevant parameters are as below Preset Programs Programs 1 10 and Program AUTO a sequence of...

Page 6: ...tomatic Setup No Answer function by rotating the multi selector and selecting the Selective Copy then press the multi selector the LCD will show you as below Unit Group 1 100 Unit Number 1 999 Total C...

Page 7: ...ing DMX Addresses of LEDs depend on work modes DMX Addresses are channel total of LEDs after confirmation And Unit Number would increase once automatically user can select the next LED by changing Uni...

Page 8: ...odes are for Master control and the other modes are for Slave control Glide Effect function can be set as Yes enabled or No disabled This mode is not available for the one way output device Each LED u...

Page 9: ...pond sensitively The LEDs will briefly flash for several seconds during data sending 2 AUTO Work Mode If you set the Work Mode as AUTO the LCD display will immediately show you as below You can rotate...

Page 10: ...Work Mode relevant parameters are as below Unit Group 1 100 Unit Number 1 999 Blue Duration 0 100 Red Speed 0 100 Green Dimmer 0 100 Select the Confirm item and press the multi selector LCD will show...

Page 11: ...nit without connecting all LEDs at the same time in this function In this menu user may have to take out the current LED Unit and connect the desired one and the setting can be continued by confirming...

Page 12: ...n mode then press the multi selector the LCD display will show you as below Page II Note In DMX Controller function Single Channel Mode 512 Channel Mode and Auto Chase Mode are available For your refe...

Page 13: ...s the multi selector LCD will show you like this To confirm DMX sequential channels numbers 1 48 when chasing the intensity output DMX channels is increased by changing jumps 1 48 when chasing And cha...

Page 14: ...essing or rotating the multi selector will make the backlight lit again ON the backlight always lights up unless the unit is powered off OFF the backlight always keeps in its off state no backlight al...

Reviews: