Record
101
Record
Setting up
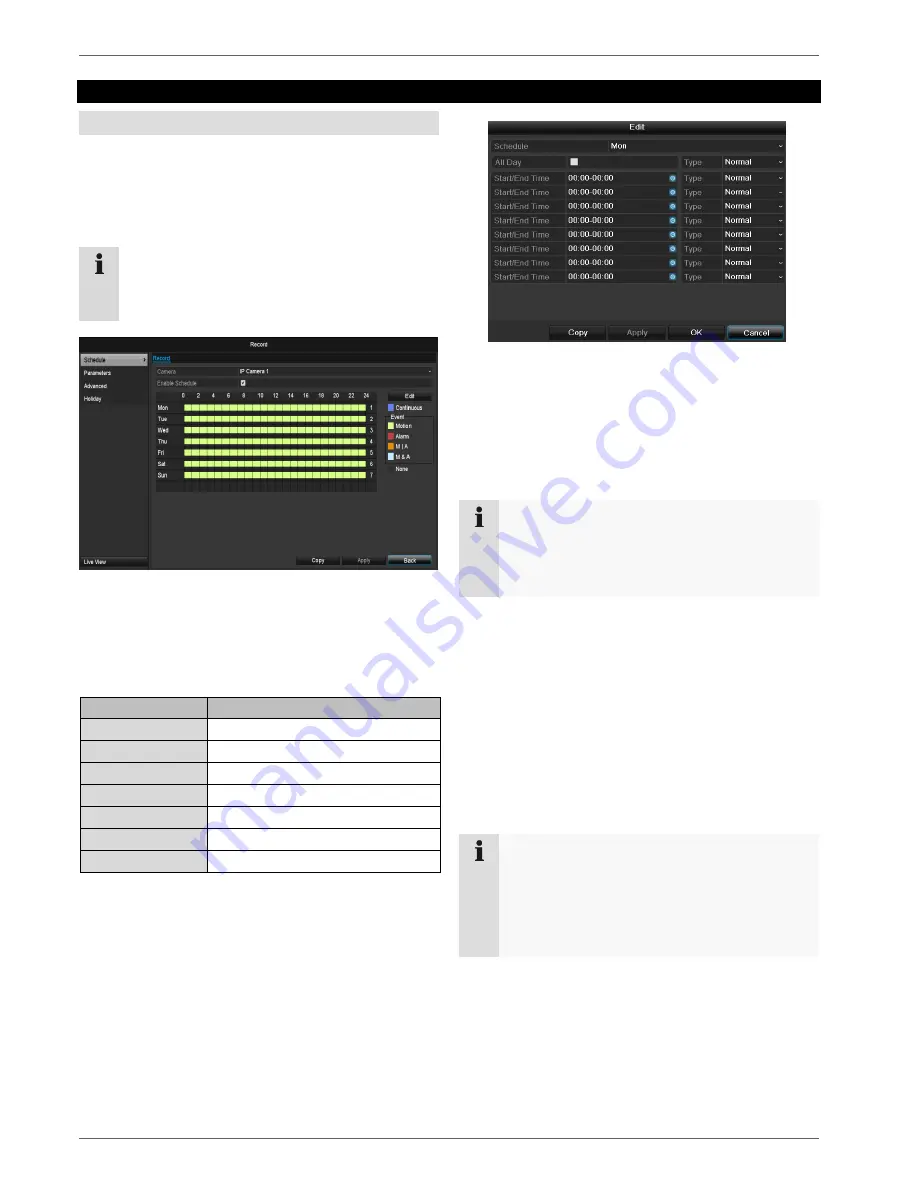
Open the main menu and click on record:
Schedule
The schedule is used to specify the recording times and
triggers (recording type) for the cameras. Click on the
“Schedule” tab:
Note
Because there is no difference between the set-
tings for the TABs record and instant image, these
are only listed once.
In the OSD, the hours of the respective days are listed
from left to right (the days are listed from top to bottom).
A colour key is shown underneath the days (i.e. the re-
cording periods in the schedule are shown in colour ac-
cording to the trigger (recording types).
Colour symbol
Key
Blue
Normal recording: Period in hours
Yellow
Motion detection
Red
Alarm
Orange
Motion or alarm
Light blue
Motion and alarm
Grey
No selection
Brown
Motion or alarm
Select the camera and click on the check box
Ena-
ble Schedule.
Click on
Edit
to specify the type and duration of the
time plan
1. Define the day to be set in the pull-down menu at
‘Schedule’.
2.
Activate/deactivate ‘All day’. If the full day is active, no
definite times can be entered as the setting is now val-
id for the whole day.
3.
To make specific time settings, deactivate the “All
D
ay” box.
4. Specify the recording type in the drop-down menu:
Time
Motion detection
Alarm
Motion detection or alarm
Motion detection and alarm
5. When making a specific time setting, you can define
up to 8 time periods (each from 00:00 to 24:00). The
times in the individual periods must not overlap.
Note
The “Time” recording type defines the time win-
dow where a recording is made.
The other events (e.g. motion detection and/or
alarm) only trigger the recording after the specific
event has occurred.
At
Copy
you can take on this setting for other days or
the whole week.
6. Finalize your settings in the record screen with
Apply
and then
OK.
Application example
Recording should run from 11:00 to 07:00. 2 time
zones must be set up for this:
1. 11:00 AM - 24:00PM
2. 00:00 AM - 7:00 AM
Summary of Contents for TVVR36000
Page 2: ......
Page 4: ...Geräteübersicht 4 Geräteübersicht Rückseite LED Beleuchtung Siehe S 5 ...
Page 62: ...ABUS 4 channel network recorder TVVR36000 User guide Version 1 0 ...
Page 64: ...Device overview 64 Device overview Rearside LED illumination See page 66 ...
Page 122: ...ABUS 4 kanaals netwerk videorecorder TVVR36000 Gebruikershandleiding Version 1 0 ...
Page 124: ...Overzicht 124 Overzicht Achterkant LED verlichting Zie p 125 ...
Page 183: ...Enregistreur vidéo réseau 4 canaux ABUS TVVR36000 Notice d utilisation Version 1 0 ...
Page 243: ...ABUS 4 kanal netværksvideooptager TVVR36000 Betjeningsvejledning Version 1 0 ...
Page 245: ...Oversigt over apparatet 245 Oversigt over apparatet Bagside LED belysning Se s S 247 ...
Page 303: ...Grabador de vídeo de red de 4 canales ABUS TVVR36000 Manual de instrucciones Versión 1 0 ...
Page 363: ...ABUS 4 kanałowa sieciowa nagrywarka wideo TVVR36000 Instrukcja obsługi Wersja 1 0 ...
Page 365: ...Przegląd urządzenia Przegląd urządzenia Widok z tyłu Oświetlenie LED Patrz str 369 ...
Page 424: ...ABUS 4 kanals nätverks videoinspelare TVVR36000 Bruksanvisning Version 1 0 ...
Page 426: ...Översikt 426 Översikt Baksida LED belysning Se s 430 ...
Page 485: ...ABUS Videoregistratore di rete a 4 canali TVVR36000 Istruzioni per l uso Versione 1 0 ...
Page 546: ...ABUS 4 канальный сетевой видеорегистратор TVVR36000 Инструкция по эксплуатации Version 1 0 ...
Page 547: ......
Page 549: ...Обзор устройства 549 Обзор устройства Обратная сторона Светодиодная подсветка См стр 552 ...


