background image

Network 


47 

Parameter 

Setting 

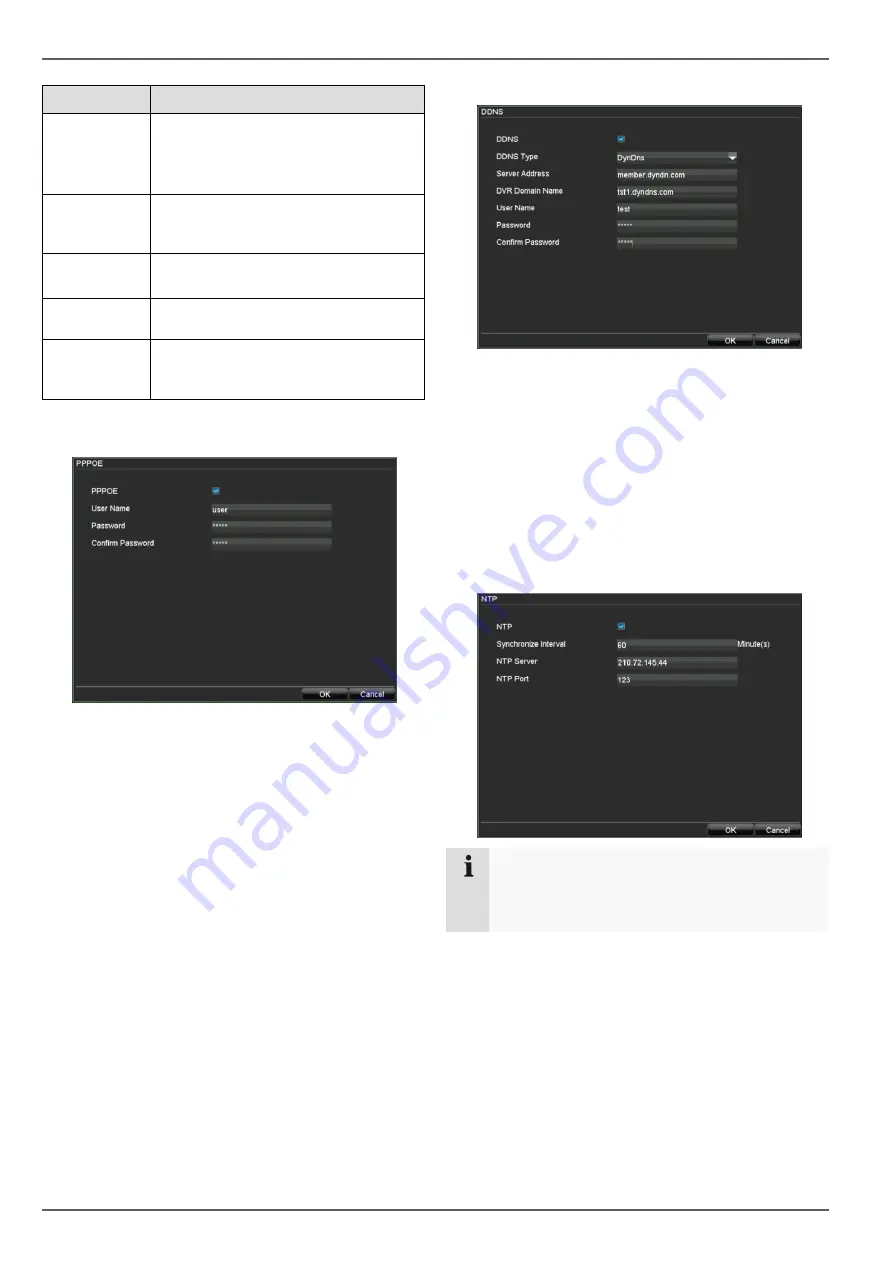
PPPOE 

PPPOE is used on ADSL connections 
and when using modems in Germany. 
Click on “Set” to enter the access data 
(ID and password) for your provider. 

DDNS 

Server for Dynamic Domain Name Sys-
tem management. Used for updating 
host names or DNS entries 

NTP 

Network Time Protocol 
Server for time synchronisation 

HOST / 
OTHERS 

Communication and HTTP port. 

Email 

Used to specify the e-mail settings 
which are sent as an e-mail to a spe-
cific address in the event of an alarm. 


Setting up PPPOE manually 

Legen Sie i 


1.  Tick the PPPOE box, enter the user name (Internet 

access ID) and password, then confirm the pass-
word. 

2.  Apply the settings by pressing 

OK


Setting up DDNS manually 

Legen Sie i 


1.  To use the ABUS DDNS function, you must first set 

up an account under www.eytronserver.com. Please 
note the FAQs on the website when doing this. 

2.  Tick the DDNS box, enter “ABUS DDNS” as the 

“DDNS Type”, then enter www.eytronserver.com or 
“62.153.88.107” under “Server Address”. 

3.  Apply the settings by pressing 

OK

. The IP address of 

your Internet connection is now updated on the 
server every minute. 


Setting up NTP manually 

Legen Sie i 


Note 

The recorder can synchronise the time with an ex-
ternal server. Several server addresses are avail-
able on the Internet for this purpose. 

1.  Tick the NTP box and then enter the interval at which 

the synchronisation should be made again. Enter the 
IP address of the NTP server and the NTP port. 

2.  Apply the settings by pressing 

OK


Summary of Contents for TVVR30002

Page 1: ...ABUS Digital Recorder TVVR30002 User manual Version 1 0 ...

Page 2: ...roduct is passed on to a third party Therefore look after these operating instructions for future reference A list of contents with the corresponding page number can be found in the index Pay attention to the information on the CD and in the accompanying documentation on Web server control and Clients Software These can be found on the Internet at www abus sc com ...

Page 3: ...Device overview 3 Device overview Front Rear See System operation on page 13 1 2 3 4 5 6 7 8 9 10 11 12 13 14 15 16 17 18 19 20 ...

Page 4: ...Device overview 4 Remote control ...

Page 5: ...2 Unpacking the device 12 Scope of delivery 12 System operation 13 General information 13 Operating elements on the device 13 Connections on the rear of the device 13 Operating elements on the remote control 14 Mouse operation 14 On screen keyboard 15 Starting the device 15 Switching off locking and rebooting the device 15 Setup wizard 16 Setting up the system 16 Setting up the administrator 16 HD...

Page 6: ...ch 30 Parameters for Video Search 30 Results 31 Video Export 32 Manual Alarm 33 HDDs 33 Installing the HDD 33 Initialising the HDD 34 HDD Management parameters 34 Setting the HDD 34 Checking the HDD status 35 Setting up the HDD alarm 35 System Settings 36 Overview 36 General Settings 36 System Settings Camera 37 Setting up of zones 38 Zones Schedule and notification 38 System Settings Record 39 Sy...

Page 7: ...put 52 IP alarm module 52 Troubleshooting 53 Device cleaning and care 53 Note 53 Index 54 Technical data 55 HDD storage capacity 56 Disposal 57 Information on the EU directive on waste electrical and electronic equipment 57 Information on handling batteries 57 Important information on disposing of batteries 57 Information on the European RoHS directive 57 Glossary 58 Overview of specialist terms 5...

Page 8: ...e 1 Connect the analogue cameras with BNC connec tions 1 to 4 2 Connect the audio connections 3 Connect the sensors to the alarm inputs 4 Connect the monitor to the VGA or BNC connection 5 Connect the mouse to the USB port 6 Establish a connection to the mains power supply 7 Switch on the device using the POWER switch on the rear The DVR status display on the front of the device lights up Configur...

Page 9: ...s even if you are already familiar with electronic de vices Warning All guarantee claims become invalid for damages caused by non compliance with these operating instructions We cannot be held liable for resulting damages Warning We cannot be held liable in the event of material or personal damage caused by improper opera tion or non compliance with the safety information All guarantee claims are ...

Page 10: ...cable from time to time Never modify or manipulate the mains cable or plug Do not use plug adapters or extension cables that do not conform to the applicable safety standards and do not make alterations to power supply cables or mains cables Installation location operating environ ment Position the device on a firm level surface and do not place any heavy objects on the device The device is not de...

Page 11: ... firms Improper repairs can expose device users to the risk of fatal injury Accessories Only connect devices that are suitable for the in tended purpose Otherwise hazardous situations or damage to the device can occur Putting into operation Observe all safety and operating instructions before putting the device into operation for the first time Only open the housing to install the HDD Warning When...

Page 12: ...ons at any time and without prior warning ABUS Se curity Center GmbH is not liable or responsible for direct or indirect damages resulting from the equipment performance and use of this product No forms of guarantee are accepted for the con tents of this document General information In order to use the device correctly read this user man ual carefully and keep it in a safe place for later use This...

Page 13: ...ghts up red in the event of an alarm Connections on the rear of the device Note Pay attention to the overview on page 3 No Name Function 8 VIDEO IN BNC inputs 9 VIDEO OUT 1 BNC monitor output VIDEO OUT 2 BNC spot monitor output 10 AUDIO IN Cinch audio input 11 LINE IN Cinch audio input for network transmis sion only Audio will not be recorded 12 AUDIO OUT Cinch audio output 13 LAN 10 100 MBit Ethe...

Page 14: ...In PTZ mode Brings the image section into focus 39 II Pause reverse playback 40 Stops playback 41 PTZ Switches on PTZ control 42 Enter fII Confirms the selection Ticks unticks the boxes During playback PLAY PAUSE Single play mode Advances by a single frame 43 MENU Calls up the main menu Switches the key tones on and off press and hold down for 5 seconds 44 REC Opens starts manual recording 45 INFO...

Page 15: ...terruptible power supply UPS After the device has been connected to the power supply and the main switch on the rear of the device is switched on the DVR status LED lights up 1 The device carries out a self test during the start up procedure 2 The setup wizard appears Exit the wizard to access the live view Switching off locking and rebooting the device Click on ShutDown in the main menu The overv...

Page 16: ...ld and select the desired language from the list Click on Next to continue The following query appears Click on Next to start the wizard Note After the system is set up you can untick the box The setup wizard is then no longer started auto matically Setting up the administrator Warning Note down the admin password The following password is preset 1 2 3 4 5 1 Click the entry field and enter your ad...

Page 17: ...verview 6 To transfer this schedule to other cameras first se lect the camera or All if all cameras should have the same settings and confirm by pressing Copy 7 Exit the setting by pressing OK then click on Next Network Settings 1 Click on Enter Note To check whether DHCP can be selected or if you have to set the IP address and other settings manually consult your network administrator 2 DHCP acti...

Page 18: ...ews The signals of the connected cameras are displayed on the main screen By double clicking the left mouse key you can dis play the camera image as a full screen view or switch back to the original view Status symbols The following symbols are displayed depending on the operating status of the device Symbol Meaning Event detected Motion detection alarm triggered by sen sor HDD error etc R R Red R...

Page 19: ... to playback mode Menu Opens the main menu Note Stop Auto switch Specify the delay in the image sequence in the display settings Digital Zoom This function opens an image which has been enlarged by four times Left click the mouse in the small image window and pull a frame around the image section to be zoomed in on whilst holding the button down The selected section is then digitally zoomed To exi...

Page 20: ...utomatically becomes the main monitor where the audio output is also assigned The BNC output Video Spot Out output displays the cameras in sequence and in full screen If during the boot process of the DVR the VGA cable is not connected the main video signal is displayed at BNC output MAIN Connect the VGA cable and reboot the DVR in order to display the main video signal at the VGA output No VGA mo...

Page 21: ...ate type More Settings Detailed settings Pre alarm Recording period before an alarm in seconds Post alarm Recording period after an alarm in seconds Expiration Period in days after which the re cording is deleted automatically at 00 00 The event remains in the log file 0 Recordings are not deleted automatically Record Audio Record audio yes no Copy To Copies the selected settings to other cameras ...

Page 22: ... the entire day 5 To make specific time settings untick the All Day box 6 Specify the recording type in the drop down menu Time Motion detection Alarm Motion detection or alarm Motion detection and alarm 7 When making a specific time setting you can define up to 8 time periods each from 00 00 to 00 00 The times in the individual periods must not overlap Note The Time recording type defines the tim...

Page 23: ...off 2 Defines the start and end point of a video for data backup 3 Previous recording day 4 Goes back 30 seconds 5 Play 6 Stop 7 Advances 30 seconds 8 Fast forward 9 Slow motion advance 10 Next recording day 11 Time bar Click on the time bar with the mouse to con tinue playback from another point To start playback from a specific time click on the slider and drag it to the required time 12 Recordi...

Page 24: ... Video Search screen click on the Event tab to search for specific recordings which were triggered either by an alarm or motion detection Enter the search criteria e g date time alarm in puts cameras to carry out the search Playback from the live view screen Click on playback whilst the live view screen is shown Playback is controlled on the control panel Note Playback starts with the recording of...

Page 25: ...TZ camera 2 Call presets 3 Call tours 4 Keypad 5 Speed 6 Zoom focus and iris adjustment 7 Exits the PTZ control Pop up menu for mouse operation Note Press the right mouse button when the cursor is positioned on a live image The following settings can be made The arrow pointing to the right indicates that a sub menu is opened for selec tion Camera PTZ camera selection Call Preset Selects the set pr...

Page 26: ...m era The cameras can then pan and tilt quickly to the cor responding locations Select the camera in the control panel then click on Preset Settings in the pop up menu 1 Pan tilt and zoom the camera to the desired posi tion 2 Select Preset 1 from the list 3 Click on Set The position is now set as Preset 1 4 Repeat steps 1 3 to define further presets 5 Exit the settings by pressing Apply and OK Not...

Page 27: ... steps 1 5 to define further patrols 7 Exit the settings by pressing OK Note A patrol consists of at least two preset positions You can set several patrols for one camera The set patrol can be tested as follows Click on Start and monitor the patrol You can stop the patrol at any time and repeat the patrol settings e g to make corrections Call a tour set in the PTZ Camera You can also configure tou...

Page 28: ...n Settings in the pop up menu 1 Select the pattern number 2 Click on Run Record to start the pattern recording 3 Using the control panel adjust the camera position and settings that you wish to record as a pattern 4 The recording is made until Stop Record is clicked Note Start the recorded pattern by calling up the pop up menu right click in the live view of the PTZ camera Click on Run Pattern and...

Page 29: ...search for recordings started by events e g alarms mo tion detection 30 Video Export Function for exporting saved recordings to USB media 32 Manual Alarm Manual switching of alarm outputs for testing functionality 33 HDD Used for initialising or managing installed HDDs assigning read write func tions cameras network HDD management etc 33 Settings Used for managing all device settings General Camer...

Page 30: ... Video Search General tab Analog Overview of analogue cameras Used for searching the selected cameras Video Type Continuous Motion detection Alarm Motion detection or alarm Motion detection and alarm Manual recording All File Type Unlocked Locked All Start Time Date and time End Time Date and time Event tab Event Type Alarm input motion detection Start Time Date and time End Time Date and time Ana...

Page 31: ...n move the green and blue markers with the mouse to view the recording at a specific time You can scroll through the recordings by day day af ter or day before 3 Start playback by pressing OK The playback screen opens 4 The control panel is used to control the process Note See also the description on page 23 Results After making a search the results screen is displayed Highlight the searched recor...

Page 32: ... on Export to access the export screen 1 Select the connected medium used for data storage from the drop down menu 2 If the medium is not displayed click on Refresh If the medium is still not displayed disconnect it from the device and reconnect the medium again See also the manufacturer s specifications 3 Click on Start to start the export process The pro gress of the export process is then displ...

Page 33: ...be used for recording The device only detects the HDD and its assignment after initiali sation has been made Warning All data is deleted from the HDD during initialisa tion Ensure a data backup has been made in good time beforehand Installing the HDD 1 Disconnect the device from the mains power and open the cover 2 Observe the applicable ESD guidelines when han dling electronic devices and ensure ...

Page 34: ...D group 1 is preset Recordings can be assigned to groups Set Cameras for HDD Group tab Analog Overview of cameras Used for accessing the selected camera group Data Backup on HDD Group 1 to 8 Note If the initialised HDD is not displayed check the connections 1 Select the HDD by ticking the corresponding box 2 Start the process by clicking on Init 3 Confirm the prompt by pressing OK 4 The status bar...

Page 35: ... the R W status Read Write Otherwise no recordings are possible Checking the HDD status The status of each HDD can be checked in the Mainte nance menu S M A R T information Self Monitoring Analysis and Reporting Technology is stored in the log data Call up the log file and search according to the infor mation S M A R T HDD see page 43 Setting up the HDD alarm You can specify alarms to inform you o...

Page 36: ...0 PTZ PTZ hardware parameters and assignment to camera inputs 25 Menu Setting Page RS232 No function 39 Display Display settings and assignment of the event output 20 Exception Behaviour of the device in excep tional cases HDD full network disconnected etc 40 User Adding and changing users as signing authorisation rights 40 Note Pay attention to the instructions in the correspond ing sections Gene...

Page 37: ...ation of the camera e g right car park front entry gate etc Display Cam era Name Box ticked not ticked Display Date Box ticked not ticked Display Week Box ticked not ticked Date Format Format of the displayed date Time Format 12 hour 24 hour display OSD Display OSD transparent flashing non transparent etc OSD Display Position Screen position of the OSD Copy To Selection of whether the settings sho...

Page 38: ... and motion detection are not displayed Zones Schedule and notification Note You can assign the surveillance parameters indi vidually and control the notification type for tamper monitoring motion detection and video loss detec tion Schedule 1 Select Schedule in the advanced camera settings 2 Select the day and enter the schedule Note You can define up to 8 time periods each from 00 00 to 00 00 Th...

Page 39: ...e 21 System Settings Network Note See separate section on page 45 System Settings Alarm Note See separate section on page 50 System Settings PTZ Note See description on page 25 System Settings RS232 No function System Settings Display Note See description on page 20 ...

Page 40: ...ion Password Access code for the device device man agement Note Change all passwords on a regular basis using a combination of letters and numbers Note down all passwords in a safe place Confirm Enter the access code again here Level IMPORTANT More access rights can be set on the Manager level than on the User level User s MAC MAC address of the network adapter on the PC of the corresponding user ...

Page 41: ...by clicking on the arrows in the tab bar Parameter Setting Local Per mission Local Log Search Local Configuration Local Camera Management Local Advanced Operation Local ShutDown Reboot Network Permission Network Log Search Network Configuration Network Camera Management Control Serial Connections Video Output Control Two way Audio Alarm Control Network Advanced Operation Network ShutDown Reboot Ca...

Page 42: ...n Device information serial number firmware status etc 44 Upgrading the device Note A device upgrade can be made from a USB de vice or over the network via FTP Copy the upgrade file mav format to the main directory of a USB stick Connect the USB stick to a USB port on the device 1 Select the USB port click on Refresh if neces sary 2 Select the upgrade file and click on Upgrade 3 Wait until the dev...

Page 43: ...pe Minor type sub parameter Operation All Switch On ShutDown Irregular ShutDown Local Reboot Local Login Local Logout Local Settings USB Local Recording Begin End Local PTZ Control Local File Locked Others Information All HDD Information HDD S M A R T Start Record Stop Record Delete Obsolete Recording Network HDD Information 1 Select the event you wish to search for in the log then select the sub ...

Page 44: ...rt Export Configuration Note The configuration data contains all settings made on the device since the start of operation This data can be saved on a USB medium You can then configure another device identically for ex ample Information Note The technical data of the device is displayed in the information menu This can be useful for support queries for exam ple ShutDown Note Select Lock to lock the...

Page 45: ...is can be the computer connected to the DSL modem or usually the router or access point within the network Parameter Setting Name server The name server is responsible for as signing a unique IP address to a web ad dress or URL e g www google de Also known as DNS Domain Name Server When a domain name is entered into a browser the DNS searches for the cor responding IP address of the server and for...

Page 46: ...ork Settings menus Parameter Setting NIC Type Set the transmission speed of the in stalled network card here Tip 10M 100M DHCP Tick the box if the IP addresses are assigned dynamically via DHCP in the network DHCP activated Subsequent entry fields are inactive parameters as signed via DHCP Note If the IP addresses are assigned manually ensure that DHCP is not ac tive box not ticked IP Address Addr...

Page 47: ... 2 Apply the settings by pressing OK Setting up DDNS manually Legen Sie i 1 To use the ABUS DDNS function you must first set up an account under www eytronserver com Please note the FAQs on the website when doing this 2 Tick the DDNS box enter ABUS DDNS as the DDNS Type then enter www eytronserver com or 62 153 88 107 under Server Address 3 Apply the settings by pressing OK The IP address of your ...

Page 48: ...en Sie i Parameter Setting Server Au thentication Tick the box when authentication is made on the server of the Internet pro vider User Name E mail account at the provider Password Password connected to the e mail ac count SMTP Server SMTP server address of the provider From Name Name of the sender From Email Address Corresponding e mail address for the e mail account Select Recipi ents Select thr...

Page 49: ... Network Status tab to see an overview of the current network configuration Legen Sie i Parameter Setting DHCP Status When DHCP is active the correspond ing parameters are shown N A is displayed when DHCP is inactive PPPOE Status Shows whether an Internet connection is established during manual set up Also displays the IP address subnet mask and defined default gateway Note If a router is used whi...

Page 50: ... alarm input to make the settings Alarm Name Enter a clear description here e g door contact on warehouse Type N O Normally open circuit N C Normally closed circuit Parameter Setting Setting Tick the box to make exception settings and notification settings see page Fehler Textmarke nicht definiert PTZ Camera Assignment of the PTZ camera to the camera input Preset Patrol Pattern Tick untick the box...

Page 51: ...led Triggered Camera Parameter Setting Record Using this parameter you can select which cameras should be used for re cording after the alarm input is trig gered Enable Sched ule Using this parameter you can select on which cameras the schedule should be activated For example if you have installed the ABUS IP alarm module then you can use the Secvest Key to activate guard mode in the recorder when...

Page 52: ...on page 33 IP alarm module You can add up to three ABUS IP alarm modules CASA10010 here After successfully connecting via the network two alarm inputs and two alarm outputs are added to each of the Alarm Input and Alarm Output tabs The short name of the inputs is U1 1 U1 2 whilst the short name of the outputs is U1 1 U1 2 Click on Add to configure an ABUS IP alarm module Parameter Setting UVM Name...

Page 53: ... devices connected over the audio cables Audio connection cable is damaged Replace the cable HDD is not working Connection cables not connected properly Connect the cables securely HDD defective or not system compatible Replace with a recommended HDD USB port not working Device not supported Connect a compatible USB medium USB 2 0 USB hub is in use Connect the USB medium directly Network access no...

Page 54: ...n 22 Motion Detection 37 Mouse Pop up menu 18 Mouse operation 14 N C 50 N O 50 Name server 45 Network 45 Advanced configuration 46 Configuration 46 Email 48 Status 49 Network Status 49 Notification 38 NTP 47 On screen keyboard 15 Operating elements 13 Playback 18 23 Advanced video search 24 Control panel 23 From live view screen 24 Screen 23 Video search 23 Pop up menu 18 Port 45 Post alarm 21 PPP...

Page 55: ...sec 5 900 sec Storage medium 1 x SATA HDD Data backup 2 x USB 2 0 Views 1 4 Recording modes Manual Schedule Motion detection Alarm Alarm Motion detection Alarm Motion detection Search modes By Event date and time Alarm inputs NO NC 4 Loading capacity 12VDC 1A Relay outputs 1 User levels 2 max 31 users Network connection RJ45 10 100 Mbps Parallel network access 24 camera connections Network functio...

Page 56: ... CIF 25 512 41 days 5 hours 4 CIF 16 384 54 days 23 hours 4 CIF 8 192 109 days 22 hours 4 4CIF 6 128 164 days 21 hours 4 4CIF 6 512 41 days 5 hours 30 days continuous recording Number of cameras Resolution FPS Recommended bit rate Number of HDDs 4 CIF 25 512 1 x 1 TB 4 CIF 16 384 1 x 1 TB 4 CIF 8 192 1 x 1 TB 4 4CIF 6 128 1 x 1 TB 4 4CIF 6 512 1 x 1 TB On the included CD you can find a program in ...

Page 57: ...l children Children may put batteries in their mouths and swallow them This can cause serious harm to their health If this happens consult a doctor immedi ately Do not charge normal batteries heat them up or throw them into naked flames they may explode Change low batteries in good time Always change all the batteries at the same time and use batteries of the same type Important Leaky or damaged b...

Page 58: ...on of websites on the Inter net e g www abus sc de Dual Stream Dual stream is a video transmission method A high resolution recording and lower resolution transmission are made over the network for example The main stream has a 4CIF resolution and the sub stream has a CIF resolution DVR Digital Video Recorder A device used for recording dif ferent video and audio sources analogue digital The data ...

Page 59: ...nsmission or display PIP Picture in Picture Where two signal sources are shown on the screen at the same time The second signal source is stored above the first PPPoE PPP over Ethernet point to point protocol Network transmission method used for establishing a connection over dial up lines Used in ADSL connections for example PROGRESSIVE Method for displaying storing or transmitting moving im ages...

Page 60: ...e device immediately after switching it off To move the device carry out the following steps 1 Wait until OFF has been shown on the display for at least two minutes 2 Remove the mains plug from the socket 3 Move the device Data on the HDD can be lost in the event of a power failure during operation Use an uninter ruptible power supply UPS The HDD is very sensitive Improper use or un suitable surro...

Page 61: ...ABUS Digital Recorder TVVR30002 Manufacturer ABUS Security Center GmbH Co KG Linker Kreuthweg 5 86444 Affing Germany ...

Reviews: