Absco Industries
Assembly Instruction Manual
ABSCO SIGNATURE GAZEBO
MODEL: ADGAZEBO33
3.11m W x 3.11m D x 2.60m H
Model: ADGAZEBO33
21/09/23
1.00
12
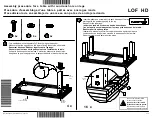
GUTTERING
6.
The gutter needs fall to drive water to a specific
end. At the end you’d like the downpipe, mark
the underside of the gutter onto the rear beam.
This will be used as a reference when mounting
the gutter brackets
RWG24
.
Take the gutter down for now.
7.
At the other end measure up another 10mm
from this reference line and make another mark
onto the rear beam at the point shown.
8.
Take a string line and make a line from the high
to low point, this is for the two middle brackets.
9.
Align the bottom of the gutter bracket with
the marks and fasten to rear beam using rivets
FAST102
.
Make sure they’re spaced evenly.
10.
Lift the gutter assembly and placed the rolled
top edge over the gutter bracket in the orientation
shown.
Roll the gutter around, make sure the side
flashings go inside.
11.
Lift so the bottom sits on the lower part of the
bracket.
Fold the tabs down by hand then rivet from below
as shown.
12.
Rivet the gutter end stop to the side flashing.
REAR VIEW - NOTE: Fall to left for illustrative purposes only.
6
7
8
12
11
10