American Beer Equipment
2001 SW 6
th
St.
Lincoln, NE 68522
10
a.
Double Seam Setup Procedures
1.
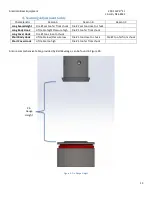
Ensure pin gauge height
(
Figure
6)
a.
Distance between top of lift table puck when cylinder is extended and seaming chuck, corresponds to your
double seam guide (from can end manufacturer)
b.
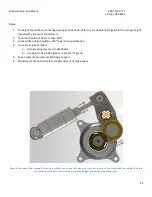
Adjust height using adjustment knob in Figure 7.
i.
Turning the knob clockwise limits the stroke of the cylinder (increases pin height).
ii.
Please have the cover on the back of the cylinder when running the line.
2.
Elevate roller lips
a.
operation 1 & operation 2, clear above chuck lip (see Figure 4) to avoid chuck from crashing into, and
damaging, the roll
3.
Bring 1
st
Op Roller in to chuck
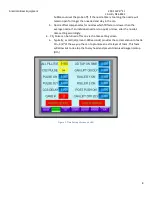
(Input/Output Screen-Figure 31) TIP: Use a piece of white paper as a background
a.
Adjust the stroke of the connected seaming cylinder
Figure 9. Chuck and
until it is 0.003”-0.005” away from
the chuck (x1 on Figure 4).
4.
Rotate 1
st
Op roller down
, manually with hand, until it touches chuck lip
a.
back off 1/8 turn (aprx .003” on Figure 4).
5.
Bring 2
nd
Op roller in to chuck
(Input/Output Screen-
Figure
31)
a.
Adjust the stroke of the connected seaming cylinder until it is 0.003”-0.005” away from the chuck (X
1
on Figure
4).
6.
Rotate 2
nd
Op roller down
, manually with hand, until it touches chuck lip
a.
back off 1/4 turn (aprx .009” - .015”,Figure 4).
7.
Check 1
st
Op roller width
a.
In Input/Output screen, select Roller 1, then select “test”
b.
Use your specific can double seam guide
c.
If width is too small, move roller away from seaming chuck (
Figure
9).
8.
Check for deadhead on first operation
a.
Did can stop spinning?
i.
Adjust flow control (decrease flow) closest to seamer cylinder rod
9.
Check 2
nd
Op width/height
a.
In Input/Output screen, select both Roller 1 & 2, then select “test”
b.
Check for tightness/wrinkles
10.
Check for deadhead on 2
nd
Op
a.
Adjust flow control (decrease flow) closest to seamer cylinder rod
11.
Check body/cover hook
a.
2
nd
Op Seam Thickness
b.
2
nd
Op Seam Height
c.
Body Hook
d.
Cover Hook
12.
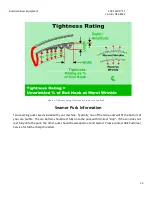
Check tightness rating
a.
Needs to be 90% or greater (See figure 5)
Summary of Contents for CraftCan 15
Page 38: ...American Beer Equipment 2001 SW 6th St Lincoln NE 68522 37 ...
Page 40: ...American Beer Equipment 2001 SW 6th St Lincoln NE 68522 39 ...
Page 42: ...American Beer Equipment 2001 SW 6th St Lincoln NE 68522 41 ...
Page 44: ...American Beer Equipment 2001 SW 6th St Lincoln NE 68522 43 ...
Page 47: ...American Beer Equipment 2001 SW 6th St Lincoln NE 68522 46 Figure 30 Timing Setup ...
Page 49: ...American Beer Equipment 2001 SW 6th St Lincoln NE 68522 48 Figure 32 Diagnostics Screen ...
Page 50: ...American Beer Equipment 2001 SW 6th St Lincoln NE 68522 49 Figure 33 Can Count ...
Page 53: ...American Beer Equipment 2001 SW 6th St Lincoln NE 68522 52 Figure3 5 Setting Menu ...
Page 59: ...American Beer Equipment 2001 SW 6th St Lincoln NE 68522 58 ...
Page 60: ...American Beer Equipment 2001 SW 6th St Lincoln NE 68522 59 ...
Page 61: ...American Beer Equipment 2001 SW 6th St Lincoln NE 68522 60 ...
Page 62: ...American Beer Equipment 2001 SW 6th St Lincoln NE 68522 61 ...
Page 63: ...American Beer Equipment 2001 SW 6th St Lincoln NE 68522 62 ...
Page 64: ...American Beer Equipment 2001 SW 6th St Lincoln NE 68522 63 ...
Page 65: ...American Beer Equipment 2001 SW 6th St Lincoln NE 68522 64 ...
Page 66: ...American Beer Equipment 2001 SW 6th St Lincoln NE 68522 65 ...
Page 67: ...American Beer Equipment 2001 SW 6th St Lincoln NE 68522 66 ...
Page 68: ...American Beer Equipment 2001 SW 6th St Lincoln NE 68522 67 ...


