background image

SOTOX A™ MOBILE ANALY ZER | USER GUIDE

 28  |  EN

10. SUPERVISOR M AIN MENU

10.1.4   Exporting diagnostics data

Diagnostics data can be exported from the SoToxa™ Mobile Analyzer to an SD card, if required and instructed to by Customer Service on behalf of the 
manufacturer. This data can be used to aid with troubleshooting of a particular issue or as part of routine monitoring of how the system is working.
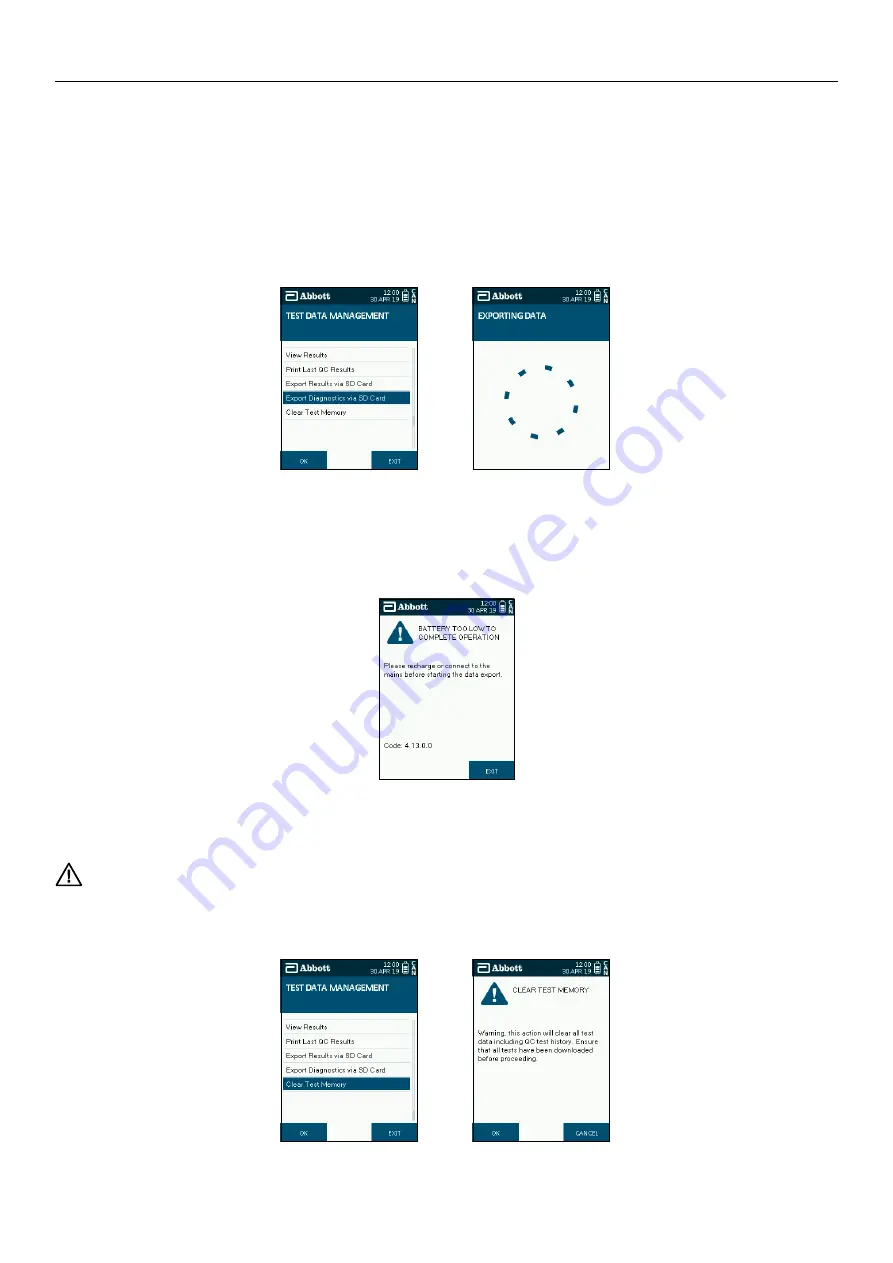
To export the diagnostics data to an SD card, follow these steps.

Step 1:   Insert the SD card into the analyzer before starting this procedure.
Step 2:   From the Test Data Management menu, select the Export Diagnostics via SD Card option.
Step 3:   A progress wheel will be displayed while the data is being exported. It may take several minutes to complete as it is dependent on the number 

of tests completed on the analyzer. 

Step 4:   On completion of the export the main menu will be displayed.
Step 5:   Turn the analyzer off and remove the SD card from the slot and return to Customer Service as instructed.
Step 6:   Re-screw the card cover into place.

Please note that if the battery is too low, then the warning message shown below will appear when you start to export the data. Either charge the 
analyzer or simply connect to the mains before starting the export again.

10.1.5  Clear test memory

The test memory of the SoToxa™ Mobile Analyzer can be cleared following data export as described in section 10.1.3 Exporting results or when 
the when storage capacity is reached on the analyzer. 


This action will clear all the test data including the QC test history which means the user will be locked out of completing any further 

subject tests until a successful QC check has been completed. See section 8.4 QC lockout for further information.

Step 1:  To clear the test memory, from the Test Data Management menu, select the Clear Test Memory option.
Step 2:  A warning screen will be shown to the user, to acknowledge select OK to continue with clearing the memory or cancel to return to the Test 

Data Management menu and export results as previously described.

Step 2

Step 3

Step 1

Step 2

Summary of Contents for SoToxa Oral Fluid

Page 1: ...FOR FORENSIC USE ONLY SoToxa USER GUIDE EN ...

Page 2: ...Charging the analyzer 11 2 9 On screen keyboard 12 2 10 Passcode setup 12 2 11 Tilt sensor 13 2 12 Silica gel packs 13 3 Printer 3 1 Connecting the printer 13 3 2 Loading paper 13 3 3 Charging the printer 13 4 Start up 4 1 Login 14 4 2 Login recovery 14 4 3 Operator name ID entry 15 4 4 Self tests 15 5 User Access Levels 16 6 Using the Help Function 16 7 Running a Drug Test 7 1 Initiating a drug t...

Page 3: ...e management 29 10 3 Analyzer summary 29 10 4 Analyzer settings 31 10 5 Installed cartridges and updating cartridge types 33 10 6 Installed questions 34 10 7 Log out 34 11 Shutdown Procedure 11 1 Turning the analyzer off 35 11 2 Automatic shutdown 35 12 Technical Support Codes and Troubleshooting 12 1 Technical support 35 12 2 Codes and troubleshooting 36 13 End of Operational Life 13 1 Return of ...

Page 4: ...anced image processing algorithms to accurately determine the line intensity on the test cartridge 1 2 3 The test cartridge is a chromatographic immunoassay This is a single use disposable cartridge that contains dried reagents and a liquid buffer solution 1 2 4 The test cartridge is inserted into the analyzer and is warmed by the analyzer to optimum testing temperature 1 2 5 Oral fluid is collect...

Page 5: ...NDITIONS Temperature 5 C to 35 C is the operational temperature for running a test Note the rated safe electrical operating temperature of the analyzer is 0 C to 40 C but tests must be run between 5 C to 35 C Relative humidity 10 to 90 Storage temperature 20 C to 45 C Environment Protect the analyzer from direct sunlight humidity and dust POWER SUPPLY Mains power Input 100 240V AC 50 60Hz 1 1A Out...

Page 6: ...lted out of the operational range the test may be abandoned Refer to section 2 11 Tilt sensor for more information The analyzer detects and monitors test cartridge temperature and uses a heating element to warm the test cartridge to optimum temperature for testing 1 7 Data handling The SoToxa Mobile Analyzer is capable of Operator ID and passcode entry via on screen keyboard SoToxa Test Cartridge ...

Page 7: ...ty control test cartridges provided with the SoToxa Mobile Test System see section 8 QC Tests 1 10 Maintenance and cleaning If required the exterior of the SoToxa Mobile Analyzer and its accessories can be wiped with a lint free cloth or a damp cloth with mild detergent Wipe away any spillages immediately Do not use abrasive cloths or other material and do not allow the unit to come into contact w...

Page 8: ...ned in the Carry Case for protection in transit 1 12 Warranty The SoToxa Mobile Analyzer is covered by an initial 12 month manufacturer s guarantee The guarantee covers all mechanical or electrical faults and firmware or hardware failures The manufacturer s guarantee does not cover the systems for loss theft or damage caused by the user Following the expiration of this warranty we recommend taking...

Page 9: ...EAKER SD CARD COVER PANEL RJ12 PRINTER CONNECTOR RUBBER FLAP USB CONNECTOR POWER SUPPLY CONNECTOR RESET BUTTON RIGHT SOFT KEY CHARGING STATUS LIGHT LCD SCREEN RIGHT SOFT KEY FIVE WAY NAVIGATION KEY LEFT SOFT KEY TEST CARTRIDGE SLOT POWER BUTTON 2 Getting started 2 1 SoToxa Mobile Analyzer at a glance ...

Page 10: ...d is switched on The analyzer must be returned to horizontal immediately and kept flat during testing If the analyzer is tilted beyond the acceptable range for too long this may result in a test error or damage to the analyzer Refer to section 2 11 Tilt sensor for more information Power connection symbol This symbol is shown when the internal battery is fully charged and the analyzer is connected ...

Page 11: ...and the left and right soft keys Please see section 2 1 SoToxa Mobile Analyzer at a glance which shows the location of these buttons The left and right soft keys can be used to select the corresponding on screen buttons which will appear at the bottom left and right hand corners of the screen when input is required from the user For example if the screen below appears pressing the left soft key wo...

Page 12: ...orm from one full battery charge will vary depending on the type of SoToxa Test Cartridge that is being used the environmental conditions the age of the analyzer whether results are printed and whether the questionnaire function is being used If the battery level reaches critically low level the screen will display a nearly empty battery symbol with the final bar red The battery symbol in the stat...

Page 13: ...he soft right button to proceed Step 2 Enter the passcode for the Supervisor using the five way navigation key and press Next Confirm the passcode and press Next Please note the supervisor passcode must be a combination of numbers and letters with a minimum length of six characters and maximum of 20 characters If the passcodes do not match or do not comply with these rules then the analyzer will p...

Page 14: ...of the beads within the pack are green the test cartridge should not be used 3 Printer 3 1 Connecting the printer To connect the SoToxa Mobile Analyzer to the printer use the RJ12 connector cable provided Attach this cable to the base of the printer and to the RJ12 printer connector on the top of the analyzer behind the rubber flap Refer to section SoToxa Mobile Analyzer at a glance for the locati...

Page 15: ...ill be able to change the operator and supervisor passcodes as needed see section 10 2 Passcode management If the passcode was not recognised the analyzer will remain on the secure login screen and a login failure message will be displayed A test will not be able to commence until the user is successfully logged in 4 2 Login recovery In the event of both the operator and supervisor passcodes being...

Page 16: ... will remain the same until a new user of the analyzer logs on The operator name ID will be displayed in the test details test printout and the analyzer summary screen 4 4 Self tests On successful completion of the user logging in the SoToxa Mobile Analyzer will perform a series of start up checks to make sure it is in a good operating condition During this testing the Abbott screen will be displa...

Page 17: ...ff or shuts down the user will automatically be logged out 6 Using the Help Function The SoToxa Mobile Analyzer will display instructions and prompts on the screen to guide the user through the test process When an action or user input has been completed these screens will update automatically to lead on to the next step The analyzer has an on board help function which provides additional guidance...

Page 18: ...ion and verification of the expiry date Following insertion of the SoToxa Test Cartridge the SoToxa Mobile Analyzer will read the barcode to identify the test cartridge and verify that it is within its expiry date The analyzer will also check that the test cartridge type is installed on the analyzer If the test cartridge has expired it must not be used and the testing process must be restarted wit...

Page 19: ...range this warning symbol will appear on the screen Correct the orientation of the analyzer immediately to prevent disruption to the test See section 2 11 Tilt sensor for more information about the tilt sensor 7 5 Test in progress and interpretation of results When the SoToxa Oral Fluid Collection Device has been inserted into SoToxa Test Cartridge in the SoToxa Mobile Analyzer the screen will dis...

Page 20: ...ed Step 3 To make a selection press OK Step 4 At the end of the questionnaire a summary of the information entered will be displayed Step 5 If the information is correct select OK using the right soft key or if something needs to be changed select Back with the left soft key to return to the questions Step 6 Selecting OK will accept the questionnaire and move on to the next screen 7 7 Printing res...

Page 21: ...ality Control NQC These two QC test cartridges are tested in sequence to check that the analyzer is interpreting test cartridge results correctly If the QC tests pass this means that the analyzer is working correctly 8 2 How often should the QC tests be carried out It is recommended that you carry out the QC tests once on each day that the SoToxa Mobile Analyzer is used If the QC tests have not be...

Page 22: ...g the results by selecting OK the analyzer will prompt you to print the QC results Refer to section 7 7 Printing results Step 7 After printing the analyzer will prompt you to remove the test cartridge to complete the QC testing 8 4 QC lockout If the PQC and NQC cartridges have not been successfully completed in the last 15 days no further drug tests can be initiated until the quality control check...

Page 23: ...dentified by a unique test ID number This number is also printed on the results printout From the Test Options screen highlight and select View Results to see test results this is an example test Step 3 Exit this screen to return to the Test Options screen Step 4 From the Test Options screen you can view the test details by selecting View Details and pressing OK The screen will then display the fo...

Page 24: ...s screen Step 8 To print the last result Ensure that the printer is connected and online see section 3 1 Connecting the printer From the Test Options screen select Print and press OK Printing will then start 9 2 Analyzer summary An overview of the key settings and dates that are important to the use of the SoToxa Mobile Analyzer can be viewed in the Analyzer Summary screen Step 1 From the Operator...

Page 25: ...cing Stated as either OK due or overdue with due meaning within a calendar month of the due date Next service due Date that the analyzer service is due Last PQC Date of the last successfully completed PQC test Last NQC Date of the last successfully completed NQC test 9 3 Print last QC result Step 1 To print the last QC result Ensure that the printer is connected and online see section 3 1 Connecti...

Page 26: ...ew Results option Step 2 The Stored Results screen will display the last 200 tests performed Select the test you wish to view using the five way navigation key to scroll up and down through the tests then press the Options button using the left soft key The most recent tests are at the top of the screen Tests are identified by a unique test ID number This number is also printed on the results prin...

Page 27: ...n display the following information about the selected test this is an example test Step 8 To print the results from the memory From the Test Options screen highlight and select Print Before selecting print ensure that the printer is connected and online See section 3 1 Connecting the printer Step 9 Printing will then start 10 1 2 Print last QC results Step 1 To print the last QC result Ensure tha...

Page 28: ...in the following information with the denoting what is included in the QC CSV file only Test ID Analyzer serial number Operator name ID Date and Time Overall Test Result Servicing status Error Code Cartridge type Cartridge ID Cartridge Lot Firmware version Bootloader version Individual drug result Step 1 To export the data ensure that a new SD card is inserted in the analyzer before starting this ...

Page 29: ...d from the slot and return to Customer Service as instructed Step 6 Re screw the card cover into place Please note that if the battery is too low then the warning message shown below will appear when you start to export the data Either charge the analyzer or simply connect to the mains before starting the export again 10 1 5 Clear test memory The test memory of the SoToxa Mobile Analyzer can be cl...

Page 30: ...e passcode to be corrected accordingly stating what rule has not been followed Step 1 To change the passcode for the operator From the passcode management menu select the Change Operator Passcode option Step 2 Enter the passcode for the Operator using the five way navigation key and press Next Confirm the passcode and press Next Step 3 To change the passcode for the supervisor From the passcode ma...

Page 31: ...ce due Date that the analyzer service is due Last PQC Date of the last successfully completed PQC test Last NQC Date of the last successfully completed NQC test 10 3 1 Updating firmware When firmware updates are available these may be provided by the manufacturer by way of a SD card Data may be lost during the updating process Where possible please ensure that data is backed up prior to completing...

Page 32: ...s on the SoToxa Mobile Analyzer select the Analyzer Settings option from the supervisor menu and then select the Language option Use the five way navigation key to highlight the language required and apply this to the analyzer by selecting OK 10 4 2 Setting the date and time SoToxa Mobile Analyzer time and date are set to Greenwich Mean Time GMT by the manufacturer To alter the date and time setti...

Page 33: ... menu then in the Analyzer Settings screen select the Backlight option The backlight menu provides options to adjust the brightness of the screen via Backlight Level and facilitates screen dimming after 15 seconds of inactivity via Backlight Power Saver Press OK to save the settings 10 4 5 Questionnaire To enable or disable the questionnaire select the Analyzer Settings option from the supervisor ...

Page 34: ... updating cartridge types To use a drug test cartridge on the SoToxa Mobile Analyzer the test cartridge type must be installed in order that the analyzer recognises the test cartridge New test cartridge types can be added to the analyzer via the SD card To add a new test cartridge type using the SD card follow these steps Step 1 Insert the SD card into the analyzer before starting this procedure S...

Page 35: ... Installed questions To view which questions are installed on the SoToxa Mobile Analyzer and will be available at the end of a subject test from the supervisors menu and select Installed Questions 10 7 Log out Once a subject testing session or QC test has been completed the user should log out of the analyzer Step 1 From the Supervisor menu screen select the Log out option The supervisor will now ...

Page 36: ...er to save power the SoToxa Mobile Analyzer can be set to automatically shutdown after a period of inactivity Refer to section 10 4 6 Automatic shutdown The analyzer will not automatically shutdown if a test is in progress or if a test cartridge is inserted 12 Technical Support Codes and Troubleshooting 12 1 Technical support In the event of an incomplete test or SoToxa Mobile Analyzer issue in mo...

Page 37: ...mplete test process Please contact Customer Service for assistance 3 3 X X Analyzer calibration required The analyzer appears not to be calibrated or has lost its calibration settings Tests cannot be completed until the analyzer is calibrated Contact Customer Service for assistance 3 4 X X and 3 5 X X Test result inconclusive Issue detected during the test analysis analyzer unable to interpret the...

Page 38: ...faulty Restart analyzer and reinsert the SD card 4 16 X X Cartridge analysis disrupted Analyzer was tilted beyond the acceptable range Retry using a new cartridge keeping the analyzer level 4 17 X X QC Lockout QC test has not been completed successfully in the last 15 days QC Lockout has occurred due to no successful QC test being completed in the last 15 days Please complete QC test before procee...

Page 39: ... electronic peripherals including the power supply units PSUs and printer should be returned to the manufacturer Please contact Customer Services to make arrangements for return No electrical or electronic equipment may be disposed of in conventional domestic or commercial waste systems 14 Customer Service For product technical support and advice please contact Customer Services roadside alere com...

Page 40: ...s condition may result in prosecution and will void analyzer warranty Disclaimer At Abbott we believe in the constant development and improvement of our products and services We reserve the right to alter modify and upgrade our software programs instrumentation and publications without notice and without incurring liability 2019 Abbott All rights reserved All trademarks referenced are trademarks o...

Reviews: