background image

m-PIMA™ ANALYSER 

USER GUIDE

19

2

The majority of screens displayed are Menu 

screens. Their header is blue. 

They display menus and sub menus, lists, 

actions in progress and results.

SETTINGS

14:56

Operator List

Date and Time

Language

Advanced Settings

2019-11-07

Screen Type Description

Throughout the m-PIMA™ Analyser menu structure different types of screens 

will be displayed.

You will find a brief overview in the following.

The different screen types can easily be distinguished by the color of their 
title/ status line (header). Examples for every screen type are shown below.

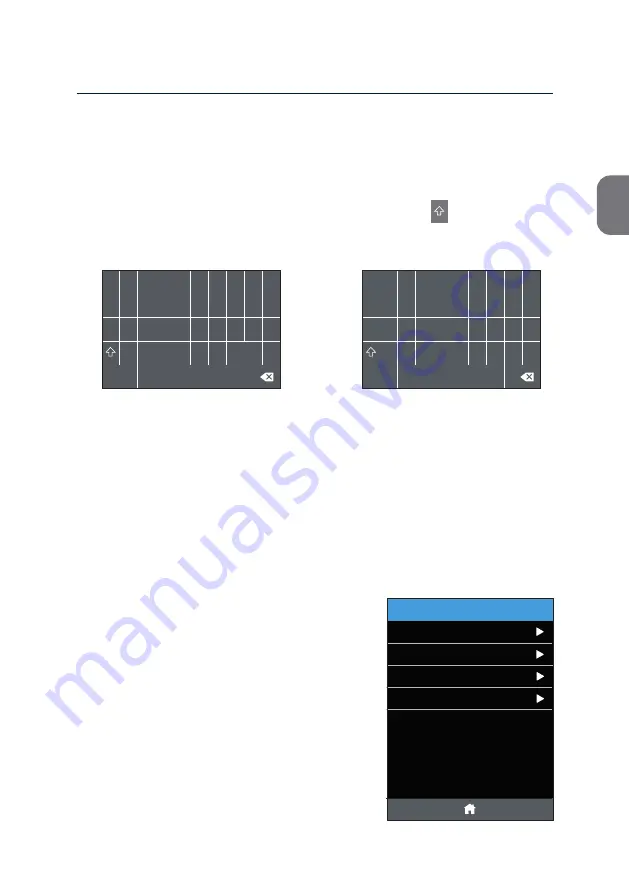
Data Entry

Use the alpha-numeric keypad to enter test related data, e. g. Sample IDs.

Switch between capital and lower case letters by pressing


or to special 

characters by pressing [#?+], respectively.

1


2


3


4


5


6


7


8


9


0


Q


W


E


R


T


Y


U


I


O


P


A


S


D


F


G


H


J


K


L


-


Z


X


C


V


B


N


M


.


_


#?+


1  2


3


4


5


6  7


8


9


0


=


/


~


+


{


}


<


>


@


*


#


%


&


§


^


[


]


-


\


,


(


)


:


!


?


.


_


ABC


$


Summary of Contents for m-PIMA

Page 1: ...m PIMA ANALYSER USER GUIDE EN ...

Page 2: ...ar patient testing For more product information about the m PIMA Analyser and available test cartridges please go to www abbott com poct m PIMA Analyser Index of Symbols CE Mark Manufacturer In vitro diagnostic medical device Serial number Catalogue number Direct current DC Lithium Ion Battery To keep dry This product must be recycled or discarded according to applicable local and national regulat...

Page 3: ...ANALYSER USER GUIDE 3 1 2 3 4 5 6 7 8 9 10 1 INTRODUCTION 2 GETTING STARTED 3 HOME 4 RUNNING A TEST 5 ARCHIVE 6 SETTINGS 7 DEVICE 8 POWER OFF STORAGE 9 TECHNICAL SUPPORT ERROR CODES 10 WARNINGS ERROR MESSAGES ...

Page 4: ...us Lights 15 Power Status Light 16 Charging Status Light 16 Process Status Light 17 m PIMA Analyser User Interface 17 m PIMA Analyser Display 18 Navigation 18 Explanation of Icons 19 Data Entry 19 Screen Type Description 21 The Battery Symbol 22 3 HOME 22 Menu Overview 23 4 RUNNING A TEST 23 How to initiate a Test 24 How to insert an m PIMA Test Cartridge 25 How to enter an Operator 27 How to ente...

Page 5: ...and Time 46 Languages 47 Advanced Settings 48 Connectivity 48 Calibrate Screen 50 Test Mode 53 Signal Tone 54 7 DEVICE 54 Device Info 56 Service Export 58 Software Update 59 8 POWER OFF STORAGE 60 Deinstallation 60 m PIMA Analyser Storage and Recharging Intervals 61 9 TECHNICAL SUPPORT ERROR CODES 61 Technical Support 62 Error Codes 66 10 WARNINGS ERROR MESSAGES 66 Archive Information 67 Power War...

Page 6: ...st cartridge used appropriate volumes of test sample are applied onto the cartridge During processing of the test data is recorded analysed and interpreted using software embedded within the instrument Upon completion of the test the cartridge is removed from the m PIMA Analyser and a test result is displayed For detailed information on the test principle of the individual assay please refer to th...

Page 7: ...n resistive Languages display English French German Portuguese Spanish Memory data storage capacity of 1000 tests Protection class III Degree of protection IP 20 Climate conditions Operating 10 40 C at max 85 humidity altitude 0 2000 m NN 0 6500 feet 800 1013 hPa Storage 2 50 C Transport 2 50 C at max 95 humidity Environment no direct sunlight humidity and dust Power Mains power 110 220 V A C at 4...

Page 8: ...ase use the device handle to lift the instrument considering the instrument weight If you transported or moved the m PIMA Analyser to areas with different climatic conditions allow temperature equilibration for at least 30 minutes before turning on the instrument Note Keep the original m PIMA Analyser box in case you need to transport the instrument Throw the main power switch on the back of the i...

Page 9: ...t it from any external power source and accessories before cleaning Follow the instructions on the clearance certificate included in the instrument box before shipping the m PIMA Analyser to a third party Components and optional items The following items are supplied with your m PIMA Analyser catalogue no 27030R001 Power transformer Power cord EU UK AUS ASIA SA m PIMA Analyser User Guide The follo...

Page 10: ...ockets Place the m PIMA Analyser where you can easily disconnect it from mains A C power at any time Turn the back of the m PIMA Analyser to the front for easy access to ports and main switch Do not tilt forward the instrument for better access since this may result in considerable damage to the front door and housing Do not open the m PIMA Analyser Any unauthorized opening of the instrument can c...

Page 11: ...ontrol guidelines for handling all human specimens and related items Do not dispose of the m PIMA Analyser with domestic waste For information regarding disposal of the m PIMA Analyser please contact your local distributor Operating the m PIMA Analyser at atmospheric pressures outside the specifications page 7 may result in increased numbers of instrument induced test terminations Please refer to ...

Page 12: ...12 m PIMA Analyser at a Glance Touch screen Device handle Power On m PIMA Analyser door Power Status Light Charging Status Light Process Status Light LAN port 8 9 10 11 Main power switch 2 USB ports Power connector port ...

Page 13: ...ources also refer to their respective handling instructions Insert the A C power cord into the power transformer Connect the power transformer to the power connector port located at the back of the instrument Please note that the power plug can only be inserted in one particular direction Make sure that the arrow on the flat side of the plug is facing the main power switch see graphic Connect the ...

Page 14: ...ialize an Error Code or an Error Message will be displayed Please refer to section 9 to learn more about Error Codes and respective actions The m PIMA Analyser is ready for use when the HOME screen is displayed Charging the m PIMA Analyser Your m PIMA Analyser is supplied with a partly charged battery secured within the instrument to cover power outages Once the m PIMA Analyser is set up and the b...

Page 15: ... of the solid green power status light confirms that the m PIMA Analyser is switched on m PIMA Analyser OFF Off m PIMA Analyser startup shut down Flashing m PIMA Analyser ON Solid m PIMA Power Status Light Charging Status Light Process Status Light m PIMA Analyser Status Lights Your m PIMA Analyser is equipped with a number of LED indicators to inform you about the current state of the instrument ...

Page 16: ...er to ensure maximum battery life charge the internal m PIMA Analyser battery whenever possible To recharge an empty battery takes approx 90 minutes When your m PIMA Analyser is running on battery power the battery status is indicated by the battery symbol within the display status line see page 21 Process Status Light On the right side of the m PIMA Analyser door you find the process status light...

Page 17: ...es and messages Navigation Line Provides access to the various test functions and menu options Please find a more detailed description of the icons on page 18 m PIMA Analyser User Interface Your m PIMA Analyser is equipped with a resistive touch screen for displaying information and to interact with the instrument The touch screen is precalibrated and you may use it with bare or gloved hands alike...

Page 18: ...o open a Test Report in the m PIMA Analyser archive to print m PIMA Test Reports to delete entries in the Operator List Home Cancel Up Action Down View Confirm Print Back Delete Navigation The touch screen user interface facilitates easy navigation between the various menu options Activate specific functions by pressing the respective field on the screen Use the scroll option for accessing data th...

Page 19: ...fferent types of screens will be displayed You will find a brief overview in the following The different screen types can easily be distinguished by the color of their title status line header Examples for every screen type are shown below Data Entry Use the alpha numeric keypad to enter test related data e g Sample IDs Switch between capital and lower case letters by pressing or to special charac...

Page 20: ... Analyser Information screens provide you with further details to continue with your processes As a precautionary measure your m PIMA Analyser will ask you to confirm certain decisions like cancelling active processes Confirmation screens are displayed with a yellow header Choose either z or y to continue Error screens are displayed completely in red They contain either Error Messages or Error Cod...

Page 21: ...e to supply the instrument with power A fully charged battery will provide you with electrical power for the completion of an already started test The total capacity of the internal battery will decrease with age of the m PIMA Analyser The m PIMA Analyser informs you about the change of supply mode with the following information and asks for your active confirmation The m PIMA Analyser runs on int...

Page 22: ...ions Pressing e will guide you directly to the initial HOME screen Note During an active test run the e option is not available Menu overview SETTINGS HOME Connectivity Date Time Language Advanced Settings Calibrate Screen ARCHIVE RUN TEST Test Report DEVICE Service Export Test Mode Signal Tone POWER OFF Device Info Operator List ...

Page 23: ...pplication and cartridge handling POWER OFF HOME 2019 11 07 14 51 ARCHIVE SETTINGS DEVICE RUN TEST RUN TEST 14 56 To start a test insert new cartridge and close door 2019 11 07 Check correct date and time on your m PIMA Analyser before running a test Please refer to page 45 to learn more about how to change the time settings according to your local time zone To initiate a test press the RUN TEST t...

Page 24: ...ally close you need to hold it open while inserting the cartridge Insert the cartridge in the direction indicated by an arrow on the cartridge label Insert the cartridge in a slightly downward angle and push it beyond the catch until it is locked in place Release the door which will then close by itself Upon inserting a m PIMA test cartridge the internal sensors will detect its presence and initia...

Page 25: ...display a result until you have entered the respective information How to enter an Operator The OPERATOR screen opens showing a list with all archived Operators You can choose an Operator directly from the Operator List or you can press the New Operator line to add a new entry You can enter an Operator of up to 16 characters Confirm your choice or your entry respectively with i to proceed to the S...

Page 26: ...een Press i to return to the Operator List The attempt to save an empty entry field will trigger the following Information screen Press i to return to the Operator entry field Note An isolated Space is not accepted as valid character INFORMATION 15 33 Operator already exists 2019 11 07 INFORMATION 15 33 Select or enter Operator 2019 11 07 ...

Page 27: ...characters Confirm your entry with i The attempt to save an empty entry field will trigger the following Information screen Press i to return to the Sample ID entry field Note An isolated Space is not accepted as valid character 07 11 2019 ABC SAMPLE ID 15 33 2019 11 07 1 2 3 4 5 6 7 8 9 0 Q W E R T Y U I O P A S D F G H J K L Z X C V B N M _ INFORMATION 15 33 Enter Sample ID 2019 11 07 ...

Page 28: ...artridge Release the door which will then close by itself ANALYSIS 14 56 2019 11 07 Test completed Remove cartridge and close door Discard the cartridge according to the institution s standard operating procedures and local or national guidelines for biohazard waste disposal The result screen will not be displayed until the cartridge is removed All m PIMA test cartridges are for single use only an...

Page 29: ...d by applying any force since this may lead to considerable damage of the m PIMA Analyser Follow the instructions given above or contact your local Technical Support for advice in case the cartridge got stuck in the instrument Once you removed the cartridge a m PIMA Test Report will be automatically displayed showing the test result and additional relevant test data example shown below Press w to ...

Page 30: ...M N HIV 1 O HIV 2 7425 cp mL Undetected Undetected Result No 107 Date Time 2019 11 07 15 50 Cartridge ID Operator Device Serial Software QC Sample Detection Device HIV 1 Positive Control HIV 2 Positive Control Negative Control Analysis Signature 0123456789 SAM MILLER NAT 04000035 0 26 3 Pass Pass Pass Pass Pass Pass The m PIMA Test Report example The m PIMA Test Report contains all information dis...

Page 31: ... ID screen Confirm Operator and Sample ID to return to the ANALYSIS screen Note You can change your entries as long as the test run continuous Once the analysis is finished changing of data entries is no longer possible Result in 45minutes m PIMA HIV 1 2 VL Sample ID 07 11 2019 ABC ANALYSIS 14 56 2019 11 07 During Analysis During an active test run you can change the Operator and Sample ID or abor...

Page 32: ...ing procedure or press z to return to the ANALYSIS screen Abort current analysis CONFIRMATION 15 33 2019 11 07 YES NO Note m PIMA test cartridges are single use devices and CANNOT be reused after you aborted an analysis The m PIMA Analyser will prompt you to remove the cartridge see details at Analysis completed on page 28 ABORT ANALYSIS 14 56 2019 11 07 Aborting completed Remove cartridge and clo...

Page 33: ...n the TEST REPORT screen Press i to return to the initial RUN TEST screen and to start the next analysis Press e to continue with other menu options Press g to print an m PIMA Test Report TEST REPORT 2019 11 07 14 51 m PIMA HIV 1 2 VL Sample ID 123400089 ABF Result No 123 Error Code 18006 ...

Page 34: ...19 11 06 123456789 ABD 576123 12345 ABG 123 2019 11 05 106 105 107 06 11 2019 ABC 123456789 ABF 2019 11 05 75 89 FG 2019 11 04 32 1 AH 35 2019 11 02 15 62 GU 1 2019 10 30 8 To open the list with all results archived press the ARCHIVE tile in the upper right corner of the HOME screen All available results are displayed in chronological order with the last result on top Use the v and w keys to scrol...

Page 35: ...pective line once again Alternatively you can choose the SELECT ALL option in the Action Menu to select all results currently stored in the archive see next page for details ARCHIVE 14 51 32 15 8 2019 11 06 89 FG 1 AH 35 62 GU 1 Sample ID View Date 2019 11 06 2019 11 05 2019 11 05 2019 11 04 2019 11 02 2019 10 30 123456789 ABD 576123 106 105 75 107 06 11 2019 ABC 2019 11 07 12345 ABG 123 123456789...

Page 36: ...le ID View Date ARCHIVE 2019 11 07 14 51 2019 11 06 107 06 11 2019 ABC 106 105 2019 11 06 123456789 ABD 576123 12345 ABG 123 2019 11 05 Sample ID View Date 2019 11 06 107 06 11 2019 ABC 106 105 INFORMATION 15 33 Select result 2019 11 07 Action Menu Pressing h will open the Action Menu Here you will find the respective action items and the SELECT ALL option Action Menu Print You need to attach the ...

Page 37: ...activity is indicated by a row of moving squares Print 3 selected results CONFIRMATION 15 33 2019 11 07 YES NO ARCHIVE 15 33 Printing 2019 11 07 in progress If you print more than one result the printing process can be aborted at any time this screen is shown The printed m PIMA Test Report contains all information displayed on the result screen of the m PIMA Analyser After successful print the dis...

Page 38: ...ta to a remote server the respective infrastructure needs to be established Please contact your local distributor about available Connectivity options for the m PIMA Analyser Please also refer to the respective mobile modem product information Local Network LAN The m PIMA Analyser is equipped with a LAN port on the back of the instrument If you want to transfer result data into a local network or ...

Page 39: ...e As a default option the export of data via USB Storage Device is available Depending on the configuration your m PIMA Analyser can also provide data export via Mobile Network and or to a Local Network and the CONNECT Universal Gateway respectively EXPORT MENU 14 56 Storage Device Mobile Network Local Network 2019 11 07 SELECT ALL DELETE 2019 11 06 123456789 ABD 576123 12345 ABG 123 2019 11 05 PR...

Page 40: ...u about the successful export of your data You can go back to the HOME screen or return to the result list by pressing i ARCHIVE 15 33 Exporting 2019 11 07 in progress ARCHIVE 14 56 2019 11 07 Export completed Note The storage medium does not need to be removed to continue however removal is recommended especially when the m PIMA Analyser operates on the integrated battery ...

Page 41: ...n Menu Delete If you want to delete results from the archive you can either select the results of interest by pressing the respective line or press SELECT ALL in the Action Menu Selected results are highlighted in mint ARCHIVE 14 51 32 15 8 2019 11 06 89 FG 1 AH 35 62 GU 1 Sample ID View Date 2019 11 06 2019 11 05 2019 11 05 2019 11 04 2019 11 02 2019 10 30 123456789 ABD 576123 106 105 75 107 06 1...

Page 42: ...available setting options is displayed Operator List All Operator entries are saved and archived in the Operator List Here you can enter a new Operator or delete an already existing entry Press Operator List to open the list POWER OFF HOME 2019 11 07 14 51 ARCHIVE SETTINGS DEVICE RUN TEST SETTINGS 14 56 Date and Time Language Advanced Settings 2019 11 07 Operator List ...

Page 43: ...ted OPERATOR LIST Operators are displayed in alphabetical order with the last active Operator on top Press b to return to the OPERATOR LIST without saving any changes New Operator LOTTE MUELLER OPERATOR LIST 2019 11 07 14 51 ELVIRA KLAWITTER FIONA KUNZ HENRY HONG SAM MILLER PAUL GONZALES NEW OPERATOR 15 33 2019 11 07 1 2 3 4 5 6 7 8 9 0 Q W E R T Y U I O P A S D F G H J K L Z X C V B N M _ ...

Page 44: ...respective line which will then be highlighted in mint Press d and a Confirmation screen will open prompting you to actively confirm the deletion process Select y to initiate the deletion process and to subsequently return to the OPERATOR LIST The selected entries are now ultimately deleted from the Operator List Select z to cancel the deletion process and to return to the unchanged OPERATOR LIST ...

Page 45: ...00 hours As a consequence time adjustment may also lead to a change of date by 1 day Use the up and down arrows to adjust the numbers Confirm with i to return to the SETTINGS list Press b to return to the SETTINGS list without saving any changes 2019 11 07 Year Month Day Hour Minute 14 56 DATE AND TIME 14 56 2019 11 07 SETTINGS 14 56 Operator List Language Advanced Settings 2019 11 07 Date and Tim...

Page 46: ...es Select the language of interest by pressing the respective language line Your selection is highlighted in mint Press i and the m PIMA Analyser will ask for an active confirmation Languages The m PIMA Analyser provides you with different language options for the User Interface The default language setting is English LANGUAGE 14 56 English Deutsch 2019 11 07 Português Español Français ...

Page 47: ... SETTINGS list To return directly to the SETTINGS list without saving any changes press z Advanced Settings This sub menu provides you with additional setting options Change language to Français CONFIRMATION 15 33 2019 11 07 YES NO SETTINGS 14 56 Operator List Date and Time Language 2019 11 07 Advanced Settings ...

Page 48: ...nation with the respective hardware For further information please refer to the respective product information or contact your local distributor Calibrate Screen The screen of your m PIMA Analyser was calibrated at manufacturing To provide proper functionality and sensitivity of the keys an occasional recalibration of the screen may be advisable Open this sub menu to activate the recalibration mod...

Page 49: ...SETTINGS list Use a stub pen or the like and carefully press the centre of all calibration marks which will be displayed consecutively starting in the left upper corner Note If you miss to consecutively press the calibration marks in a time period of 15 sec the calibration process will be canceled without saving any changes Calibrate screen CONFIRMATION 15 33 2019 11 07 YES NO ...

Page 50: ... a significantly shorter simulated test run for demonstration purposes A Demo Mode run takes approx 5 minutes Choose Test Mode from the ADVANCED SETTINGS list to switch between Demo Mode and Regular Mode respectively Press the respective line which will then be highlighted in mint Confirm your choice with i ADVANCED SETTINGS 14 56 Calibrate Screen Test Mode Signal Tone 2019 11 07 Connectivity TEST...

Page 51: ...ing any changes Note The m PIMA Analyser will reboot to change the Test Modes This may take a couple of minutes during which the screen will finally turn completely black for a while before the next screen is displayed After successful reboot your m PIMA Analyser will display a respective warning screen Press i to enter the HOME screen of the Demo Mode Demo Mode activated WARNING 15 33 2019 11 07 ...

Page 52: ...lar Mode Test Reports in Demo Mode resemble those in Regular Mode for the respective assay though no diagnostic results are given see example Your m PIMA Analyser remains in Demo Mode until manually switched back to Regular Mode Note With every switch from Demo to Regular Mode the Demo Archive and the Demo Operator List will be cleared TEST REPORT 2019 11 07 14 51 DEMO m PIMA HIV 1 2 VL Demo Sampl...

Page 53: ... SETTINGS list Note This option is only available with m PIMA Analyser software version 0 24 or higher As a default setting all acoustic signals are activated By turning off the Signal Tone the following signals will be deactivated a signal alerting the operator of a successfully finished test run b signal indicating the insertion of a test cartridge before a test run has been properly initiated b...

Page 54: ... Device Info The Device Info screen provides you with a quick overview of some important characteristics of your m PIMA Analyser Select Device Info from the DEVICE screen to view the status data of the m PIMA Analyser POWER OFF HOME 2019 11 07 14 51 ARCHIVE SETTINGS DEVICE RUN TEST DEVICE 14 56 Service Export 2019 11 07 Software Update Device Info ...

Page 55: ...n the m PIMA Analyser Total tests Number of total test runs performed on this instrument Battery status Approximate charging state of the internal battery Atm pressure Atmospheric pressure measured in hPa DEVICE INFO 14 56 SN Software Total tests 2019 11 07 NAT 04000987 Battery status Atm pressure 0 26 3 45 65 1013 hPa IP address 82 126 134 0 The following information can be obtained ...

Page 56: ...the last 100 analyses Select the results of interest by pressing the respective lines in the list Marked results are highlighted in mint To initiate the Service Export process press h This sub menu also provides you with options to select all results and all errors DEVICE 14 56 2019 11 07 Software Update Device Info Service Export Result Date 2019 11 06 2019 11 06 2019 11 05 106 104 107 valid SERV...

Page 57: ...Error 23023 Press EXPORT to send selected results to a previously connected storage device Note Service Exports may take up to a couple of minutes depending on the number of files needed to be exported and the USB storage device used Successful export will be indicated by the following screen For more information about exporting data please refer to Action Menu Export on page 38 SERVICE EXPORT ARC...

Page 58: ...be done via USB storage device or LAN connection CONNECT Universal Gateway Software updates must only be installed in cooperation with qualified and authorized technical support personnel Further information about using the CONNECT Universal Gateway in the context of software updates can be found in the m PIMA Analyser Annex document AN 03 UG m PIMA 01 ...

Page 59: ...ollowing screen will indicate that the m PIMA Analyser is shutting down This may take up approximately one minute during which the power status light will be flashing green LED see page 15 After the shutdown sequence is completed the m PIMA Analyser will turn itself off the screen will turn black and the power status light goes off It is recommended to throw the main power switch on the back of th...

Page 60: ...s not possible and therefore the instrument is turned off by pressing the grey button the EP mode for the internal battery is NOT being activated Deinstallation To disconnect the power transformer pull back the outer sleeve of the plug DO NOT pull on the cord Follow instructions on the cable tag thoroughly see below Violation of the described workflow may cause serious damage to the instrument Ple...

Page 61: ...over an error the test will be aborted automatically and an error code displayed on the screen an example is shown to the right Technical Support For Technical Support please contact your local distributor or call the respective number for your region Europe Russia CIS 44 161 483 5884 EME techsupport alere com Africa 27 21 5315 999 Afrisupport alere com Asia Pacific 61 7 3363 7166 au techsupport a...

Page 62: ... type Repeat test with valid cartridge Contact your local distributor or your regional Technical Support if the error persists 15004 Analysis aborted due to controlled shut down See pages 67 68 and recharge your m PIMA Analyser 18004 18007 DMC information not available Check cartridge label for damage or marks Repeat test with new cartridge 18006 Check cartridge expiry date Check correct date on y...

Page 63: ...heric pressure Do not continue with testing until you have reached altitudes that are within specifications 21503 Too high atmospheric pressure Do not continue with testing until you have reached altitudes that are within specifications 23020 Cartridge or sample related errors Please refer to the test cartridge guides PI m PIMA 04 or PI m PIMA 05 for further information about sample storage and ha...

Page 64: ...th new cartridge Contact your local distributor or your regional Technical Support if the error persists 52005 Repeat test with new cartridge Contact your local distributor or your regional Technical Support if the error persists 53004 Analysis aborted by Operator No further action required 60001 60002 60003 Invalid system set up Contact your local distributor or your regional Technical Support 10...

Page 65: ...r persists restart your m PIMA Analyser Contact your local distributor or your regional Technical Support if the error persists 20001 20003 23209 24001 24002 24006 24305 Repeat test with new cartridge If the error persists restart your m PIMA Analyser Contact your local distributor or your regional Technical Support if the error persists 12001 18010 18012 19001 19002 51021 51256 51286 51287 51291 ...

Page 66: ...reached no further analyses can be performed by the m PIMA Analyser The RUN TEST tile on the HOME screen will remain inactive until the archive was cleared Pressing the inactive RUN TEST tile results in the following Information screen Make sure to save download or export all required data before you delete results from your m PIMA Analyser archive Even if the storage capacity of the archive is re...

Page 67: ...ecommend connecting the m PIMA Analyser to A C power as soon as possible When the following Warning is displayed the internal battery of your m PIMA Analyser is almost empty It may appear at any time while the instrument is running on battery power Connect the m PIMA Analyser to A C power immediately Menu functions are still active at this point We recommend to finish all ongoing processes and to ...

Page 68: ...IMA Analyser to A C power to completely recharge the internal battery before you continue to work with the m PIMA Analyser Export Errors If the EXPORT FAILED screen appears an unspecified error has occurred during the export of results This may have been caused by either the storage device or the m PIMA Analyser Press i and repeat the export of results Should this fail a second time insert a diffe...

Page 69: ... the storage device and attempt to export again If during export the storage capacity of the storage device is reached the following screen appears Press i and remove the storage device Insert another storage device with adequate storage capacity and repeat export ERROR 15 33 STORAGE DEVICE FULL 2019 11 07 ERROR 15 33 STORAGE DEVICE LOST 2019 11 07 ...

Page 70: ...ng printing of an m PIMA Test Report the last report will be printed again For more information on the USB Printer please refer also to the USB Printer User Guide Printer Error If the PRINTING FAILED screen appears an unspecified error has occurred during printing of m PIMA Test Reports This may have been caused by either the Printer or the m PIMA Analyser Press i and repeat printing Should the er...

Page 71: ...71 10 m PIMA ANALYSER USER GUIDE ...

Page 72: ...ate 28 Jan 2020 Abbott Rapid Diagnostics Jena GmbH Orlaweg 1 D 07743 Jena Germany www abbott com poct 2020 Abbott All rights reserved All trademarks referenced are trademarks of either the Abbott group of companies or their respective owners ...

Reviews: