background image

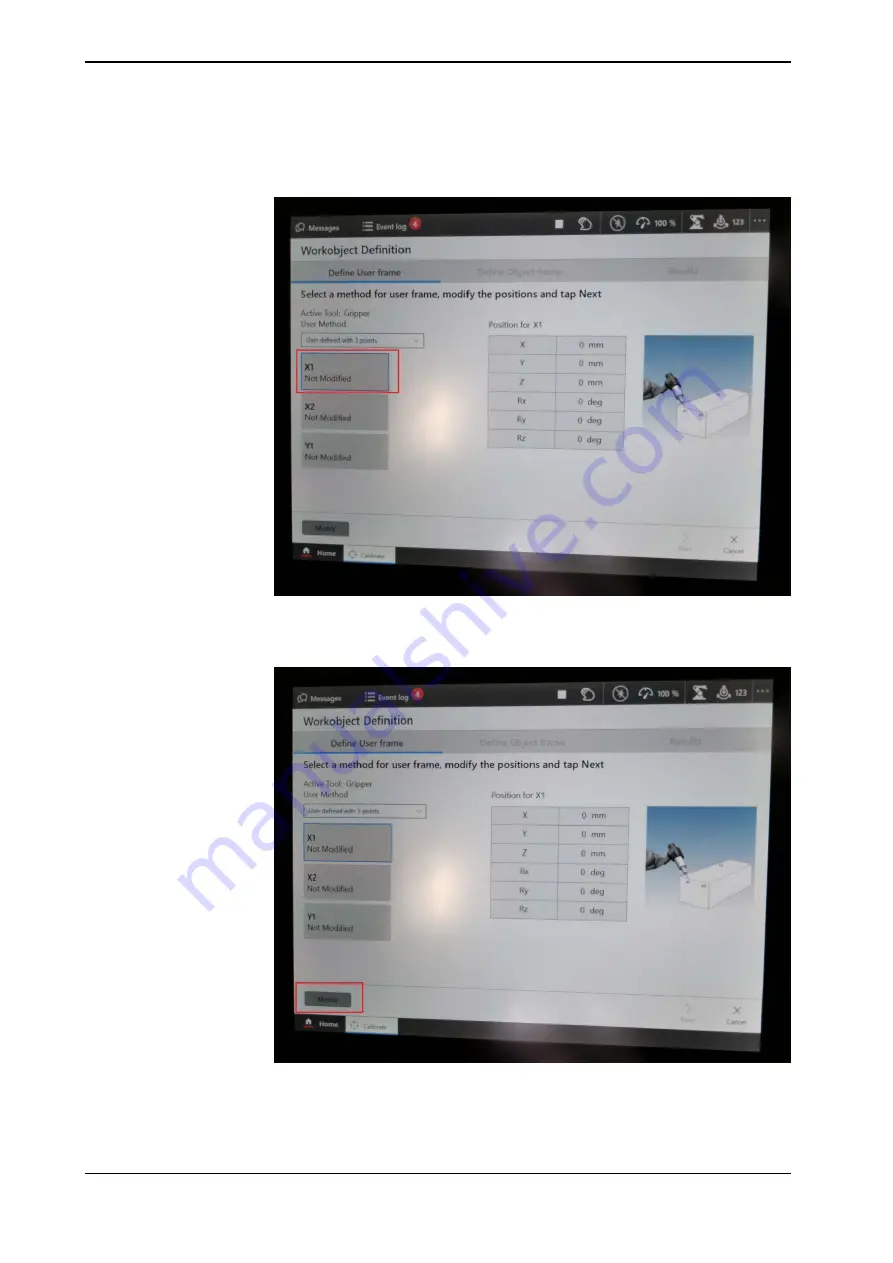
6 Select

X1

. Point out a location on the x-axis close to the origin with the robot's

TCP.

xx2100000383

7 Press

Modify

.

xx2100000384

8 Select

X2

. Move the TCP a distance in the direction the x-axis. Point out a

location on the x-axis with the robot's TCP.

Continues on next page

228

Application manual - PickMaster® Twin - PowerPac

3HAC064218-001 Revision: B

© Copyright 2021 ABB. All rights reserved.

4 Working with PickMaster PowerPac

4.3.6 Calibrating indexed work area

Continued

Summary of Contents for PickMaster Twin - PowerPac

Page 1: ...ROBOTICS Application manual PickMaster Twin PowerPac ...

Page 2: ...Trace back information Workspace Main version a394 Checked in 2021 03 25 Skribenta version 5 4 005 ...

Page 3: ...Application manual PickMaster Twin PowerPac IRC5 and OmniCore Document ID 3HAC064218 001 Revision B Copyright 2021 ABB All rights reserved Specifications subject to change without notice ...

Page 4: ...ranty by ABB for losses damage to persons or property fitness for a specific purpose or the like In no event shall ABB be liable for incidental or consequential damages arising from use of this manual and products described herein This manual and parts thereof must not be reproduced or copied without ABB s written permission Keep for future reference Additional copies of this manual may be obtaine...

Page 5: ... 2 6 6 Optional robot and process configuration 44 2 6 7 Six axes robot configuration 45 3 Navigating PickMaster PowerPac 45 3 1 Start page 46 3 2 Main window 47 3 3 Ribbon tab 47 3 3 1 Introduction 56 3 4 Tree view browser 56 3 4 1 Cell 68 3 5 Status view 69 4 Working with PickMaster PowerPac 69 4 1 Overview 71 4 2 Setting up Solution and Recipe in virtual Runtime VRT 71 4 2 1 Creating Solution 7...

Page 6: ... from indexed work area and one place work area 336 5 3 Example Mixing one pick work area and two place work areas 361 6 RAPID reference 361 6 1 Instructions 361 6 1 1 AckItmTgt Acknowledge an item target 363 6 1 2 FlushItmSrc Flush an item source 364 6 1 3 GetItmTgt Get the next item target 370 6 1 4 NextItmTgtType Get the type of the next item target 372 6 1 5 QStartItmSrc Start queue in item so...

Page 7: ...a 421 7 Troubleshooting 421 7 1 Introduction to troubleshooting 422 7 2 Safety during troubleshooting 423 7 3 Administering the log 424 7 4 Fault symptoms or errors 424 7 4 1 Warnings 4326 4329 428 7 4 2 The camera does not take pictures 429 7 4 3 Robot does not move 430 7 4 4 Bad or varying position accuracy 431 7 4 5 Positions are used twice 432 7 4 6 Problem with camera resolution in PickMaster...

Page 8: ...This page is intentionally left blank ...

Page 9: ... of mechanical and electrical installation repair maintenance work Cybersecurity This product is designed to be connected to and to communicate information and data via a network interface It is your sole responsibility to provide and continuously ensure a secure connection between the product and to your network or any other network as the case may be You shall establish and maintain any appropri...

Page 10: ...ystem parameters i This manual contains all safety instructions from the product manuals for the manipulators and the controllers External references Description Reference For configuring camera networks Cognex Ethernet Camera Tool For camera communication Gigabit Ethernet Performance Driver Information about Basler Ace Gigabit Ether net cameras and the switch for Gigabit Ether net cameras aca1440...

Page 11: ... Runtime connection Added description for new time sync service Added note for RW7 2 about the firewall settings on WAN Updated Job Tab option to Recipe Added a note that the PickMaster 3 and PickMaster Twin are not recommended to be installed on a same PC Updated the operation of editing users in PickMaster PowerPac Updated the definition of Adjustment speed in section Six axes robot configuratio...

Page 12: ...This page is intentionally left blank ...

Page 13: ...ality inspection and product categorization alone or together with the position recognition PickMaster Twin is a modular product for controlling ABB robots in picking applications through the robot controller It is a configurable to perform pick and place operations of items A vision system is used to find randomly placed items on conveying belts PickMaster PowerPac is the engineering software aim...

Page 14: ...10 PowerPac RobotStudio PCIE NIC board GigE Conveyors Encoders Ethernet Modbus Profinet Cell Line PLC xx1900001746 Note PickMaster Twin is delivered with different hardware configurations For more information see Product specification PickMaster Twin Note Http protocol is uesd between PickMaster PowerPac PickMaster Operator and PickMaster Runtime This could be unsafe if the user has specific safet...

Page 15: ...l Runtime and PickMaster Runtime PickMaster Twin Client The installation package which contains PickMaster Operator and PickMaster Runtime PickMaster Twin Host A defined picking and placing areas for the robots Work area A conveyor that is in a circular type Circular Conveyor The generic term for a specific object to be picked or placed in a PickMaster PowerPac application Item Defines how to gene...

Page 16: ...This page is intentionally left blank ...

Page 17: ...ration simulation and testing is named as PickMaster Twin Client It installs the following softwares PickMaster PowerPac PickMaster Virtual Runtime PickMaster Real Runtime Note This package is only intended for engineering and not for the final factory production installation The ability to switch to real runtime on the same computer is only intended for test purposes and it can be used for creati...

Page 18: ...re available in the installation folder Documentation Note Any old version of PickMaster PowerPac must be uninstalled before installing a newer version of PickMaster PowerPac 18 Application manual PickMaster Twin PowerPac 3HAC064218 001 Revision B Copyright 2021 ABB All rights reserved 2 Installation 2 1 PickMaster package Continued ...

Page 19: ...igher is required Display settings 1920 x 1080 pixels or higher resolution is recommended Dots per inch DPI Only Normal size supported for Integrated Vision Mouse Three button mouse 3D Mouse optional Any 3D mouse from 3DConnexion See http www 3dconnexion com Note When running the software close other software that consumes a lot of memory otherwise it will affect the software normal use CAUTION If...

Page 20: ...strial switch with a communication speed of 100 Mbit s or higher Switches that implement the 1588 PTP protocol have been known to interfere with the robot controller communication and should not be used 20 Application manual PickMaster Twin PowerPac 3HAC064218 001 Revision B Copyright 2021 ABB All rights reserved 2 Installation 2 2 2 Ethernet switch ...

Page 21: ... Cognex USB license is required for the Gigabit Ethernet vision system The USB stick must be connected when Runtime is running The maximum number of cameras that can be used is ten Insert the vision network card in a free compatible PCI express slot PCI express x4 x8 or x16 Color vision Color vision is available as a standard function and has the following features connectivity for color cameras w...

Page 22: ...uration Some cameras will need manual configuration to fulfill the above conditions For detailed information about camera settings see Cognex manual and PickMaster Release Notes For specific information about Basler Gigabit Ethernet cameras see References on page 10 Recommendation for lenses When planning a cell it is important to choose a suitable camera lens setup that gives an appropriate field...

Page 23: ...he image area is most important f D W Cw If the length of the image area is most important f D H Ch xx0900000565 The table below lists the width and height of some common sensor chip sizes expressed in millimeters Cw mm Ch mm Sensor chip size inch 3 2 2 4 1 4 4 8 3 6 1 3 6 4 4 8 1 2 8 8 6 6 2 3 A shorter focal length gives a wider field of view that is the returned value is the maximum focal lengt...

Page 24: ...H of the FOV is calculated as H D CH f 800 4 8 10 24 375 mm Alternative with increased height To increase the height of the FOV H the camera can be rotated 90 so that the height dimension of the sensor chip 4 8 mm is aligned with the width dimension of the conveyor The width dimension 6 4 mm is aligned with the x axis of the conveyor f 800 500 4 8 7 68 mm The resulting height H of the FOV is now H...

Page 25: ... Comparison between license options The following table lists the main application scenarios and differences between two license options Premium Basic PickMaster cell ready PickMaster cell ready RobotWare option Activated Unactivated RobotStudio requirment Virtual default Real default Runtime Create Save Adjust Save Solution layout Create Save Create Save Recipe Offline simulation Offline simulati...

Page 26: ...edure to activate a PickMaster PowerPac license manually Action To start the licensing application either use In the PickMaster PowerPac on the Options menu click Verify License 1 In the licensing application click PickMaster License Activation Wizard 2 Under Automatic Activation select Step 1 Create a license request file and click Next 3 Enter your 25 character Activation Key xxxxx xxxxx xxxxx x...

Page 27: ...e activated for the PickMaster PowerPac and the Runtime and the PickMaster installation ready to use 13 Application manual PickMaster Twin PowerPac 27 3HAC064218 001 Revision B Copyright 2021 ABB All rights reserved 2 Installation 2 3 PickMaster PowerPac license Continued ...

Page 28: ...s over UDP IP and requires that UDP port 319 and 320 are available for both incoming and outgoing traffic It is therefore necessary that any firewall is not blocking these ports Please contact your system administrator to make sure that the proper configurations are performed PTP was originally defined in the IEEE 1588 2002 standard officially entitled Standard for a Precision Clock Synchronizatio...

Page 29: ...t must be trained by ABB and have the required knowledge of mechanical and electrical installation work Continues on next page Application manual PickMaster Twin PowerPac 29 3HAC064218 001 Revision B Copyright 2021 ABB All rights reserved 2 Installation 2 5 Software installation ...

Page 30: ...e detailed RobotStudio installation procedure see Operating manual RobotStudio 3HAC032104 001 30 Application manual PickMaster Twin PowerPac 3HAC064218 001 Revision B Copyright 2021 ABB All rights reserved 2 Installation 2 5 1 Installing RobotStudio ...

Page 31: ...dio on your computer before installing PickMaster Twin Client For the installation procedure of RobotStudio see Operating manual RobotStudio Use the following procedure to install the PickMaster Twin Client 1 Browse to the PickMaster Twin Client installation package and double click Setup exe The installation starts xx1900001752 2 Click Next 3 Read the license agreement and accept the terms 4 Clic...

Page 32: ...onfigured in the PickMaster Runtime RRT in the following cases Previous IP configuration during installation is wrong The network interface currently used for connecting the real controller has been changed Start Runtime click File Options to open a pop up dialog Select the corresponding interface in the list box and click OK Note that the network interface configurated in Runtime must be the IP a...

Page 33: ...IP address in the list box and click OK xx2100000347 Application manual PickMaster Twin PowerPac 33 3HAC064218 001 Revision B Copyright 2021 ABB All rights reserved 2 Installation 2 5 2 Installing PickMaster Twin Client Continued ...

Page 34: ...r Twin Hardware connection illustration Example xx2100000349 34 Application manual PickMaster Twin PowerPac 3HAC064218 001 Revision B Copyright 2021 ABB All rights reserved 2 Installation 2 6 1 PickMaster Twin Hardware connection illustration ...

Page 35: ...e used for the Gigabit Ethernet cameras And the cameras cannot use the same network card with the controller Or the pictures will be affected The jumbo packet function of the network card is to be turned on when using with the camera The schematics of how the trigger strobe and power wires from the camera must be connected to the robot controller I O board can be seen in the circuit diagrams see C...

Page 36: ...ed connect the switch to the PC 4 Connect the power wires of the power trig strobe cable to the external power supply accordingly In case no external power supply is used connect to the controller 5 Connect the trig strobe wires of the power trig strobe cable to the robot controller Note If Runtime is shut down and restarted quickly and with several Gigabit Ethernet cameras the Gigabit Ethernet pe...

Page 37: ...e power trig strobe cables from the cameras to the robot controller 3 Connect the I O cables from any external tool signals to the robot controller 4 Connect the I O cables for other external devices such as sensors to the robot controller 5 Connect the encoders see Application manual Conveyor tracking I O connections The trigger strobe loop enables very precise synchronization between the robot c...

Page 38: ...r Twin 3HAC024480 020 I O signals on page 177 Predefined I O signals on page 177 38 Application manual PickMaster Twin PowerPac 3HAC064218 001 Revision B Copyright 2021 ABB All rights reserved 2 Installation 2 6 3 Connecting I O signals Continued ...

Page 39: ...e Ethernet card configured with an IP address 192 168 125 1 Therefore the same subnet 192 168 125 X must not be used for the standard LAN Ethernet card For more information see the Windows documentation and the product manual for the robot controller to set up the IP configuration Note It s not allowed to use any of the following IP addresses which are allocated for other functions 192 168 127 0 2...

Page 40: ...hanged thenRuntimer must be restarted to function properly Therefore Runtime and the Ethernet camera tool program should not be run simultaneously to avoid unpredictable behavior Instead shut down Runtime before making changes then start Runtime after changes are saved Configuring the vision network Use this procedure to configure the vision network 1 Assign each camera with its own IP address The...

Page 41: ... traffic on the same network can cause serious communication failure Configuring the Runtime network If a new local area network LAN is created specifically for Runtime the following settings can be used Use static IP numbering with different addresses for the PickMaster PowerPac and the robot controller IP addresses 192 168 1 X where X is between 1 and 253 Select Connect to RRT the Sign in window...

Page 42: ... conveyors must be specified in the system parameters Some other parameters must also be defined such as motion process and encoder I O parameters for the conveyors System parameters can be changed using the FlexPendant or RobotStudio I O signals How to configure I O signals and boards is described in the section I O signals on page 177 The predefined I O signals are described in the section Prede...

Page 43: ... tracking distance of a conveyor work object before it is switched to a new work object This is by default set to 20000mm The work object switch is done automatically and fast but may steal some process time for a high speed picking application Increasing the value may improve the cycle time slightly maximum distance Application manual PickMaster Twin PowerPac 43 3HAC064218 001 Revision B Copyrigh...

Page 44: ...p ramp Tune this parameter to eliminate manipulator jerks when leaving the moving object A lower value gives better accuracy when leaving the conveyor The speed in mm s at which the robot should catch up to the conveyor The general recommended value is 130 of the conveyor speed As minimum the value should be more than 100 with some margin If the robots speed is very fast compared to the conveyor s...

Page 45: ...verview This chapter describes about the start page of the PickMaster PowerPac xx1800001744 Application manual PickMaster Twin PowerPac 45 3HAC064218 001 Revision B Copyright 2021 ABB All rights reserved 3 Navigating PickMaster PowerPac 3 1 Start page ...

Page 46: ...nizes the programmable objects for example robots sensors and conveyors of the picking application in a tree structure It is separated into line and job tabs For more de tails see the section Tree view browser on page 56 Tree view browser 2 Realistic 3D display of the picking application The objects in the station view are highlighted when selected or edited using the tree view browser Station vie...

Page 47: ...eate a new empty solution New Recent allows you to open the last solution which has been opened on this computer Open Local folder allows you to open other solutions or any solutions saved in your local folder Allows you to save the changes for the solution at present Note If the solution will be used in the PickMaster PowerPac it must have been connected to a real controller with the same config ...

Page 48: ...er used in the solution and 3D models Pack As Template allows you to pack your present solution as a template in your local folder Language allows you to choose the applied language Options License allows you to choose a license type Disable licensing check box allows you to disable the license function Verify License icon allows you to verify your license is valid or not Apply icon allows you to ...

Page 49: ...available in the section Adding an I O sensor on page 90 Allows you to create a work area Workarea More details about creating a work area is available in the sec tion Adding work area on page 93 Allows you to create a circular conveyor work area Circular Conveyor Work area More details about creating a circular conveyor work area is available in the section Adding a circular conveyor work area on...

Page 50: ...e created solution is available in the section Calibration on page 157 Allows you start or pause a simulation Start Allows you stop the simulation Stop Allows you reset the station view from objects temporarily cre ated in the previously run simulation Reset PRODUCTION xx1800001174 Description Button Allows you start a production Production More details about how to run the production is available...

Page 51: ...h user has a use group and each use group is associated with an ability Users groups and abilities are all defined in auth conf This file is located in the Pickmaster Runtime installation folder under RIS RIS2 auth The groups administrator technicist and operator are provided The administrator has the ability to manage and the operator has the ability to operate A default user and password have be...

Page 52: ...sword Note The Username and Password are case sensitive Adding a new user to a group is done in two steps that is by creating a user and then assigning it to a group xx1900000565 Continues on next page 52 Application manual PickMaster Twin PowerPac 3HAC064218 001 Revision B Copyright 2021 ABB All rights reserved 3 Navigating PickMaster PowerPac 3 3 1 Introduction Continued ...

Page 53: ...nager xx1900000564 The User Manager window is displayed xx1900000565 Continues on next page Application manual PickMaster Twin PowerPac 53 3HAC064218 001 Revision B Copyright 2021 ABB All rights reserved 3 Navigating PickMaster PowerPac 3 3 1 Introduction Continued ...

Page 54: ...type the password in the Confirm Password field 6 Select the role to assign to the user in the Role list 7 Click OK The user is created and added to the user list with the selected role assigned Continues on next page 54 Application manual PickMaster Twin PowerPac 3HAC064218 001 Revision B Copyright 2021 ABB All rights reserved 3 Navigating PickMaster PowerPac 3 3 1 Introduction Continued ...

Page 55: ...he Users list 3 Cick Delete user A confirmation window to delete the selected user is displayed xx1900000672 4 Click Yes The selected user is deleted and removed from the Users list Note Restart the Runtime to deactivate the deleted user Application manual PickMaster Twin PowerPac 55 3HAC064218 001 Revision B Copyright 2021 ABB All rights reserved 3 Navigating PickMaster PowerPac 3 3 1 Introductio...

Page 56: ...e objects such as robots cameras conveyors and recipes Following are the objects and configurations saved in the Cell tab xx1800001383 RunTime Controllers Grippers Conveyors Sensors Items Containers Continues on next page 56 Application manual PickMaster Twin PowerPac 3HAC064218 001 Revision B Copyright 2021 ABB All rights reserved 3 Navigating PickMaster PowerPac 3 4 1 Cell ...

Page 57: ...u to enter the user name of your account in the Runtime UserName Allows you to enter the password of your account in the Runtime Password Enter your PC admin user name and password Allows you to enter the user name of the administrator account for the computer which the Runtime is installed UserName Allows you to enter the password of the administrator account for the computer which the Runtime is...

Page 58: ...ete the selected controller Delete Allows you to change the name of the selected controller Rename The following figure and table provides details about the Edit controller window xx1800001390 Description Displays the name of the selected controller Controller Name Displays the name of the system System Name Displays the IP address of the selected controller IP Address Displays the version of the ...

Page 59: ...ion the Set Robot Pose window is displayed See the following section for more details about managing the position of a selected robot Allows you to examine the robot in the Station view Examine Allows you to change the name of the selected robot Rename Set pose The following figure and table provides details about the Set Pose configuration window xx1800001392 Description Allows you to select a co...

Page 60: ...in the section Adding Gripper on page 81 Allows you to delete the selected gripper Delete Allows you to change the name of the selected gripper Rename Allows you to examine the selected gripper in the Station view Examine Conveyor Managing conveyor Right click on a Conveyor icon The following window is displayed xx1800001394 Continues on next page 60 Application manual PickMaster Twin PowerPac 3HA...

Page 61: ...hotspot is a saved location on the conveyor A hotspot is used to define where on the conveyor the flow shall be generated There is always a default hotspot Hotspot0 located at the beginning of the conveyor If the flow appears at a wrong location modify the hotspot location to adjust it Allows you to examine the selected conveyor in the Station view Examine The following figure and table provides d...

Page 62: ...WA Setting window is displayed More details about managing an indexed work area is available in the section Adding a indexed work area on page 98 When you right click on an indexed work area and select Settings the Indexed WA Setting window is displayed More details about managing an indexed work area is available in the section Adding a indexed work area on page 98 Allows you to delete the select...

Page 63: ...camera is available in the section Configuring camera on page 181 Allows you to calibrate the selected camera Calibration When you right click on a camera and select Calibration the Camera Calibration window is displayed More details about managing a camera is available in the section Calibrating camera on page 234 Continues on next page Application manual PickMaster Twin PowerPac 63 3HAC064218 00...

Page 64: ...d select Setting the Camera Setting window is displayed More details about managing a camera is available in the section Adding Sensor on page 88 Allows you to delete the selected camera Delete Allows you to change the name of the selected camera Rename Allows you to examine the selected camera in the Station view Examine Continues on next page 64 Application manual PickMaster Twin PowerPac 3HAC06...

Page 65: ...vailable in the section Adding an I O sensor on page 90 Allows you to delete the selected I O sensor Delete Allows you to change the name of the selected I O sensor Rename Allows you to examine the selected I O sensor in the Station view Examine Items Managing item Right click on an item icon The following window is displayed xx1800001399 Continues on next page Application manual PickMaster Twin P...

Page 66: ...n The following window is displayed xx1800001400 Description Allows you to manage the settings of the selected conveyor Setting When you select Setting the Container Setting window is displayed More details about managing a selected container is available in the section Adding Container on page 105 Allows you to delete the selected container Delete Allows you to change the name of the selected con...

Page 67: ...s displayed More details about managing a selected recipe is available in the section Adding Recipe on page 119 Allows you to delete the selected recipe Delete Allows you to copy the selected recipe Copy Allows you to change the name of the selected recipe Rename Application manual PickMaster Twin PowerPac 67 3HAC064218 001 Revision B Copyright 2021 ABB All rights reserved 3 Navigating PickMaster ...

Page 68: ...d Controller is stopped Green Controller is started and auto running Yellow Controller is started and under manual controlling or just connected Controller Grey No solution is opened Runtime Red The connection to the virtual Runtime fails VRT Green The connection to the virtual Runtime successes Yellow The connection to the virtual Runtime is progressing Red The connection to the real Runtime fail...

Page 69: ...rkflow you can perform these task in any order Note The controller contains at least one robot system should be set up in RobotStudio environment before starting PickMaster PowerPac as the PickMaster PowerPac provides only a method for creating paths but not functions for creating a virtual controller Note If any firewall or antivirus software is installed add pickmasteru exe sshd exe and visioncl...

Page 70: ...tion 11 For detailed information see Switching to real Runtime on page 171 Switch to real Runtime 12 R R T For detailed information see Configuring camera on page 181 Configure the cameras 13 For detailed information see Calibrating robot on page 185 Calibrate the robots 14 For detailed information see Calibrating linear conveyor on page 186 Calibrate the linear conveyors 15 For detailed informati...

Page 71: ...create an empty solution 1 Run the PickMaster PowerPac as administrator The PickMaster PowerPac opens xx1800000839 2 Click New xx1800000840 Continues on next page Application manual PickMaster Twin PowerPac 71 3HAC064218 001 Revision B Copyright 2021 ABB All rights reserved 4 Working with PickMaster PowerPac 4 2 1 Creating Solution ...

Page 72: ...to chose one predefined vertical template Vertical Conveyors Circular Conveyors allows you to choose one predefined cir cular template Circular Conveyors User defined allows you to choose one template which saved by the users in the local computer folder User defined 1 On the PickMaster PowerPac ribbon tab click Layout xx1800001171 Continues on next page 72 Application manual PickMaster Twin Power...

Page 73: ... template shows up Opening a recent solution If you have opened a solution before use this procedure to open a recent solution 1 Run the PickMaster PowerPac as administrator The PickMaster PowerPac opens xx1800000839 Continues on next page Application manual PickMaster Twin PowerPac 73 3HAC064218 001 Revision B Copyright 2021 ABB All rights reserved 4 Working with PickMaster PowerPac 4 2 1 Creatin...

Page 74: ...lease wait window shows up The main window for the chosen recent file shows up You can also open a recent file from the Open when a solution is opened xx1800001461 74 Application manual PickMaster Twin PowerPac 3HAC064218 001 Revision B Copyright 2021 ABB All rights reserved 4 Working with PickMaster PowerPac 4 2 1 Creating Solution Continued ...

Page 75: ...ating manual RobotStudio WARNING When creating an OmniCore controller the Remote Start and Stop in Auto must be selected Or the PickMaster PowerPac CANNOT run simulation or production xx2100000051 Continues on next page Application manual PickMaster Twin PowerPac 75 3HAC064218 001 Revision B Copyright 2021 ABB All rights reserved 4 Working with PickMaster PowerPac 4 2 2 Adding Controller ...

Page 76: ...u pre defined in the RobotStudio Remove icon allows you to remove the folder system from the list that you pre defined in the RobotStudio Allows you to create or work with a robot system Manage System Lists the systems found in the selected system folder System Found The controller will restart when this is selected Reset system I start Add the predefined robot to the PickMaster PowerPac Import ne...

Page 77: ...controller in the system to the solution For more information about create controller see Create a controller on page 75 Note The controller must be created before this step 1 On the ribbon tab click Controller xx1800000845 Continues on next page Application manual PickMaster Twin PowerPac 77 3HAC064218 001 Revision B Copyright 2021 ABB All rights reserved 4 Working with PickMaster PowerPac 4 2 2 ...

Page 78: ...k Add and then browse and select the folder to be added To remove a folder from the list click Remove Continues on next page 78 Application manual PickMaster Twin PowerPac 3HAC064218 001 Revision B Copyright 2021 ABB All rights reserved 4 Working with PickMaster PowerPac 4 2 2 Adding Controller Continued ...

Page 79: ...ystem Builder must be restarted with the Reset System option for the changes to take effect 5 In the dialog box click OK to add the selected controller to the solution The selected controller is added into the solution The new added controller shows up in the Cell window Controller list xx1800000848 Continues on next page Application manual PickMaster Twin PowerPac 79 3HAC064218 001 Revision B Cop...

Page 80: ... xx1800000849 7 Click OK Note The pose can be adjusted when the other parts are added Right click on the Robot1 in the Cell window Controller list xx1800000850 80 Application manual PickMaster Twin PowerPac 3HAC064218 001 Revision B Copyright 2021 ABB All rights reserved 4 Working with PickMaster PowerPac 4 2 2 Adding Controller Continued ...

Page 81: ...1900000573 Adding a gripper The Gripper window opens as illustrated below xx1800000854 Continues on next page Application manual PickMaster Twin PowerPac 81 3HAC064218 001 Revision B Copyright 2021 ABB All rights reserved 4 Working with PickMaster PowerPac 4 2 3 Adding Gripper ...

Page 82: ...ipper Reference Coordinate Allows you to set the position of the gripper Position XYZ mm Allows you to set the orientation of the gripper Orientation XYZ deg For more details see following section Mass Setting For more details see following section Activator Setting Description Mass Setting Use default setting for the mass setting Use Default Type the mass of the tool in the Mass kg field Mass Typ...

Page 83: ... pick single place on page 407 Rapid tooldata Type the coordinates of the tool center point The tool center point defines the location on the tool where an item is attached Note The coordinates are applied to the selected tooldata during the simulation TCP Position Type the orientation of the tool center point The TCP orienta tion defines the desired orientation of the tool while picking up an ite...

Page 84: ...Gripper window enter a name in the Gripper Name text box or use the default one 3 In the Gripper window use default for the Mass Setting and Activator Setting 4 Click OK 84 Application manual PickMaster Twin PowerPac 3HAC064218 001 Revision B Copyright 2021 ABB All rights reserved 4 Working with PickMaster PowerPac 4 2 3 Adding Gripper Continued ...

Page 85: ...ew conveyor Conveyor Name Make sure the name is unique in the current task Allows you to select the a liner conveyor or a circular conveyor Conveyor Type Allows you to define the size of the conveyor LWH Size mm Continues on next page Application manual PickMaster Twin PowerPac 85 3HAC064218 001 Revision B Copyright 2021 ABB All rights reserved 4 Working with PickMaster PowerPac 4 2 4 Adding Conve...

Page 86: ...used Controller Procedure On the PickMaster PowerPac ribbon tab click Layout Use this procedure to add conveyors 1 On the ribbon tab click Conveyor xx1800000855 The Conveyor window opens xx1800000856 2 In the Conveyor window enter a name in the Conveyor Name text box or use the default one 3 In the Conveyor window select a type as liner or circular in the Conveyor Type drop down list Continues on ...

Page 87: ... 6 Click Preview the conveyor preview appears in the station view The conveyor position setting text box is activated 7 In the Conveyor window enter numbers in the Position X Y Z mm text box and Orientation deg text boxes to define the location of the conveyor according to your requirements 8 In the Conveyor window use default for the Conveyor Signal and Controller 9 Click OK Application manual Pi...

Page 88: ...pens as illustrated below xx1800001413 Description Item The name of the new camera Camera Name Make sure the name is unique in the current task Continues on next page 88 Application manual PickMaster Twin PowerPac 3HAC064218 001 Revision B Copyright 2021 ABB All rights reserved 4 Working with PickMaster PowerPac 4 2 5 Adding Sensor ...

Page 89: ...Type a limit value for the right side of the visible area A positive value is used if the visible area ends on the right side of the camera location from an upstream viewpoint Right mm Allows you to select the reference coordinate for the camera Reference Coordinate Allows you to set the position of the camera Position XYZ mm Allows you to set the orientation of the camera Orientation XYZ deg Note...

Page 90: ...conveyor the new camera is attached to according to your requirements 4 In the Camera window use default for the other settings 5 Click OK Adding an I O sensor The I O sensor window opens as illustrated below xx1800001416 Continues on next page 90 Application manual PickMaster Twin PowerPac 3HAC064218 001 Revision B Copyright 2021 ABB All rights reserved 4 Working with PickMaster PowerPac 4 2 5 Ad...

Page 91: ...m Allows you to set the orientation of the I O sensor Orientation XYZ deg Note To function correctly an I O sensor must not be in contact with other stationary objects for example the conveyor Procedure On the PickMaster PowerPac ribbon tab click Layout Use this procedure to add conveyors 1 On the ribbon tab click I O sensor xx1800001414 The I O sensor window opens xx1800001415 2 In the I O sensor...

Page 92: ... define the length of the I O sensor according to your requirements or use default settings 5 In the I O sensor window choose a conveyor in the Attached to Conveyor Index box to define which conveyor the new camera is attached to according to your requirements 6 Click OK 92 Application manual PickMaster Twin PowerPac 3HAC064218 001 Revision B Copyright 2021 ABB All rights reserved 4 Working with P...

Page 93: ...veyor work area A robot usually has only one conveyor work area on each related conveyor but there is no restriction The Conveyor Workarea window opens as illustrated below xx1800001419 Description Type a name for the conveyor work area Workarea Name Continues on next page Application manual PickMaster Twin PowerPac 93 3HAC064218 001 Revision B Copyright 2021 ABB All rights reserved 4 Working with...

Page 94: ...gnal goes high when the last item is retrieved from the queue Queue idle Digital output signal This signal is high when there is one or more items between the enter and exit limits for the work area Position available Digital input signal that tells that it is time to generate a new vision image or generate new predefined positions This signal is ignored if a distance triggered conveyor is used Po...

Page 95: ...Layout Use this procedure to a work area 1 On the ribbon tab click Workarea xx1800001417 The Conveyor Workarea window opens xx1800001418 2 In the Conveyor Workarea window enter a name in the Workarea Name text box or use the default one 3 Select the required work area type and configure the settings 4 Click OK Continues on next page Application manual PickMaster Twin PowerPac 95 3HAC064218 001 Rev...

Page 96: ... example 2 indicates that this is the second most upstream work area on this conveyor Workarea Order Select work area type from the available options Pick Select this if the work area is a picking area Place Select this if the work area is a placing area Workarea Type Select an index to specify the pick or place order in the RAPID program when using more than one pick work area and one place work ...

Page 97: ...ut signal must be connected directly to the start input on the conveyor encoder board This is best done using the doManSyncX signal If predefined positions are distributed only to this work area For instance Runtime with a single robot the encoder signal cXSoftSyncSig can be used instead of doManSyncX that is without the need of connecting a signal to the start input of the encoder board Trig This...

Page 98: ...ork area An indexed work area is a fixed area where a robot picks or places items without conveyor tracking The Indexed Workarea window opens as illustrated below xx1800001428 Description Type a name for the indexed work area Workarea Name Continues on next page 98 Application manual PickMaster Twin PowerPac 3HAC064218 001 Revision B Copyright 2021 ABB All rights reserved 4 Working with PickMaster...

Page 99: ...nal digital input I O signal is used to indicate that it is allowed for the robot to execute an item target in the RAPID program Execution starts when the signal is high and stops when the signal goes low If the signal goes low all remaining items in the currently executing scene is dropped so when the signal goes high again the item targets for the next scene is executed The signal must also go l...

Page 100: ...s the same one And a sensor from the customer is needed to trigger the cycle Procedure On the PickMaster PowerPac ribbon tab click Layout Use this procedure to add a indexed work area 1 On the ribbon tab click Indexed Workarea xx1800001426 The Conveyor window opens xx1800001427 2 In the Indexed Workarea window enter a name in the Workarea Name text box or use the default one 3 Select the required ...

Page 101: ...location of an item defines the pick place position relative to the item position This section describes how to add an item xx1900000591 Adding an item The New Item window opens as illustrated below xx1800001432 Continues on next page Application manual PickMaster Twin PowerPac 101 3HAC064218 001 Revision B Copyright 2021 ABB All rights reserved 4 Working with PickMaster PowerPac 4 2 7 Adding Item...

Page 102: ... the item Label Location Allows you to select an image file for the label picture Label Picture Allows you to use a texture image file for the item or container Use Texture Allows you to choose to show the contour or not Show Contour Allows you to choose to show the orientation maker or not Show Orientation Marker Allows you to define the values for accepted or rejected item types The values for t...

Page 103: ...age246 In addition the relative positions of the found items and the corresponding alignment hit must be trained Allows you to add a blob vision model Blob A blob sub inspection model is configured in the same way as a blob model See Configuring blob models on page 257 In addition the number of required hits must be configured Allows you to add an inspection vision model Inspection A blob sub insp...

Page 104: ...e in the Item Configuration dialog are sent to the RAPID program and are processed there See Configuring inspection models on page 264 3 In the RH Size part define the item s size The height of the item defines the pick height and is always added to items found by a vision model or a position defined by a predefined position source 4 Click OK Related information Configuring inspection models on pa...

Page 105: ...tion describes how to add a container xx1900000591 Prerequisites At least one item must be defined in the solution before configuring the container Adding a container The Container window opens as illustrated below xx1800001437 Continues on next page Application manual PickMaster Twin PowerPac 105 3HAC064218 001 Revision B Copyright 2021 ABB All rights reserved 4 Working with PickMaster PowerPac 4...

Page 106: ...ete your templates Allows you to change the color of the new item Color Allows you to set the location of the label on the item Label Location Allows you to select an image file for the label picture Label Picture Allows you to use a texture image file for the item or container Use Texture Allows you to choose to show the contour or not Show Contour Allows you to choose to show the orientation mak...

Page 107: ...cessed in the X direction for each layer that is in the order they travel along a conveyor Strict options The items shall be used in the same order as they are defined in the layout for each layer If a robot cannot access the next item position in a layer that robot does not use any more item positions in the container pattern Allows you to add a new layer Add Layer For more information regarding ...

Page 108: ...con allows you to align all the items in this layer at from top Bottom icon allows you to align all the items in this layer from the bot tom Allows you to define the distribution style when you have more than one item in the layer Distribute Style Horizontally icon allows you to distribute all the items in the horizontal direction Vertically icon allows you to distribute all the items in the verti...

Page 109: ...the corresponding alignment hit must be trained Allows you to add a blob vision model Blob A blob sub inspection model is configured in the same way as a blob model See Configuring blob models on page 257 In addition the number of required hits must be configured Allows you to add an inspection vision model Inspection A blob sub inspection model is configured in the same way as a blob model See Co...

Page 110: ...opens xx1800001437 2 Define the container with your requirements in the Container Properties tab 3 Define the container pattern with your requirements in the Container Pattern tab Continues on next page 110 Application manual PickMaster Twin PowerPac 3HAC064218 001 Revision B Copyright 2021 ABB All rights reserved 4 Working with PickMaster PowerPac 4 2 8 Adding Container Continued ...

Page 111: ...000000294 A Select all items on the layer xx2000000295 Continues on next page Application manual PickMaster Twin PowerPac 111 3HAC064218 001 Revision B Copyright 2021 ABB All rights reserved 4 Working with PickMaster PowerPac 4 2 8 Adding Container Continued ...

Page 112: ...t to align all items on the left edge according to the base item xx2000000297 Continues on next page 112 Application manual PickMaster Twin PowerPac 3HAC064218 001 Revision B Copyright 2021 ABB All rights reserved 4 Working with PickMaster PowerPac 4 2 8 Adding Container Continued ...

Page 113: ...dge according to the base item xx2000000298 Continues on next page Application manual PickMaster Twin PowerPac 113 3HAC064218 001 Revision B Copyright 2021 ABB All rights reserved 4 Working with PickMaster PowerPac 4 2 8 Adding Container Continued ...

Page 114: ...ertically according to the base item xx2000000299 Continues on next page 114 Application manual PickMaster Twin PowerPac 3HAC064218 001 Revision B Copyright 2021 ABB All rights reserved 4 Working with PickMaster PowerPac 4 2 8 Adding Container Continued ...

Page 115: ...00000300 Click Top to align all items on the top edge according to the base item xx2000000301 Continues on next page Application manual PickMaster Twin PowerPac 115 3HAC064218 001 Revision B Copyright 2021 ABB All rights reserved 4 Working with PickMaster PowerPac 4 2 8 Adding Container Continued ...

Page 116: ...edge according to the base item xx2000000302 Continues on next page 116 Application manual PickMaster Twin PowerPac 3HAC064218 001 Revision B Copyright 2021 ABB All rights reserved 4 Working with PickMaster PowerPac 4 2 8 Adding Container Continued ...

Page 117: ...3 Click Vertically to set all items tangent in vertical direction xx2000000304 Continues on next page Application manual PickMaster Twin PowerPac 117 3HAC064218 001 Revision B Copyright 2021 ABB All rights reserved 4 Working with PickMaster PowerPac 4 2 8 Adding Container Continued ...

Page 118: ...ainer is saved and the window is closed 118 Application manual PickMaster Twin PowerPac 3HAC064218 001 Revision B Copyright 2021 ABB All rights reserved 4 Working with PickMaster PowerPac 4 2 8 Adding Container Continued ...

Page 119: ...o on in this solution can be added to any recipes with no limits Adding a recipe The Recipe window opens as illustrated below xx1800001439 Properties xx1800001440 Continues on next page Application manual PickMaster Twin PowerPac 119 3HAC064218 001 Revision B Copyright 2021 ABB All rights reserved 4 Working with PickMaster PowerPac 4 2 9 Adding Recipe ...

Page 120: ...ined name Robot Setting Rapid Editor allows you specify the editor to open Rapid Speed allows you to change the speed of the robot Rapid allows you to import export edit the rapid of the robot Note To do multiple pick import the Multiple Pick rapid file in the in stallation package for the required robots Speed allows you to change the speed of the conveyor Conveyor Setting Acceleration allows you...

Page 121: ...eas xx1800001442 Continues on next page Application manual PickMaster Twin PowerPac 121 3HAC064218 001 Revision B Copyright 2021 ABB All rights reserved 4 Working with PickMaster PowerPac 4 2 9 Adding Recipe Continued ...

Page 122: ...efore the half place time in the place position when the blow I O should be set If a negative value is entered the blow I O will be set the time after the half place time in the place position This value is only valid for work areas of type Place or Other Note Vacuum reversion does not affect the placing of items in simu lation Items are detached from the picking tool using SimDetach events for ex...

Page 123: ...ch of the robot The robot must be able to reach this position from an arbitrary position in the ro bot s working area before the position is out of reach Select the Use Start Stop checkbox if the work area should supervise the start and stop limits This is handled by the Conveyor start stop signal see Adding work area on page 93 Select the Start on production start checkbox if the work area should...

Page 124: ...r of Robot I UpperLimit J LowerLimit K Allows you to record the position of the items and containers in simulation and production Record Setting Continues on next page 124 Application manual PickMaster Twin PowerPac 3HAC064218 001 Revision B Copyright 2021 ABB All rights reserved 4 Working with PickMaster PowerPac 4 2 9 Adding Recipe Continued ...

Page 125: ...tion Trigger Filter Setting For more information regarding Trigger Filter Setting see the following section Allows you to define the distribution setting for the operation Distribution Setting For more information regarding Distribution Setting see the following section Main Setting Description Allows you to rename the operation Operation Name Continues on next page Application manual PickMaster T...

Page 126: ...d related items will be listed in the Available Camera Predefined If the source type is set to Predefined the positions generated by the position source are statically defined and no camera is used Available Camera allows you to select the camera with your requirements for this operation Detection Setting Available Objects allows you to select the objects with your requirements for this operation ...

Page 127: ...e entered value is the distance the conveyor should move between consecutive triggers If the trigger type is set to I O the trigger distance are pre defined CAUTION If the Predefined and IO sensor are selected in the recipe tune the pick location in the Tuning for a radial distance to make up the offset Continues on next page Application manual PickMaster Twin PowerPac 127 3HAC064218 001 Revision ...

Page 128: ...entify the same object there might be one hit for each model at about the same location If the two positions for the same item are closer in either X or Y direction the given minimum item distance only the position with the highest sort value is sent to the robot controller The sort value can be set for each vision model For more details see Adding vision model on page245 If Same level only is sel...

Page 129: ...llection of ordered work areas that will get the same item positions The first robot accesses as many positions as possible The other robots in the ATC group will access any missed positions If the last work area in the group is a conveyor work area with start and stop it is guaranteed that all positions will be accessed To use either load balancing or ATC the work areas must be arranged in the or...

Page 130: ...number of item distributors and a single distributor can appear several times The ratio between the number of times a single distributor is added and the total number of distributors defines the ratio of the item positions that are sent by that particular distributor Item positions are arranged to the distributors in the group in an optimal way to avoid adjacent positions to be sent to the same wo...

Page 131: ...p Show you the available distributor for this operation Available Distributor Allows you to create a load balance group Create Group Allows you to delete a load balance group Delete Group Continues on next page Application manual PickMaster Twin PowerPac 131 3HAC064218 001 Revision B Copyright 2021 ABB All rights reserved 4 Working with PickMaster PowerPac 4 2 9 Adding Recipe Continued ...

Page 132: ...with start and stop it is guaranteed that all item positions will be accessed by one of the robots in the ATC group xx1800001447 Description Show you the created adaptive task completion group Adaptive Task Completion Group Show you the available distributor for this operation Available Distributor Allows you to create a adaptive task completion group Create Group Allows you to delete a adaptive t...

Page 133: ...your requirements Note Predefined in the Source Type and Flow cannot be selected together 4 If need click to select the cameras in Available Camera 5 If need click to select the applicable flow in Select Flow 6 Click to select the item in Available Objects 7 Click to select the work area in Available Workareas Continues on next page Application manual PickMaster Twin PowerPac 133 3HAC064218 001 Re...

Page 134: ...ive Task Completion in the ATC tab drag a work area from the Available work areas list to the Adaptive Task Completion groups list 12 Click OK The window is closed Redistributing items from one robot to downstream robots It is possible to modify the distribution of alredy distributed item positions when they enter a conveyor work area of a robot The Rapid program that controls the robot based on c...

Page 135: ...egarding the locations of items or containers and the availability of them The layout may consists of different items or container patterns Recorded A recorded flow is a recording of a sensor from a real solution in operation The recording is exported from PickMaster PowerPac as an xml file having information of all the detected items and containers during a time interval When the file is imported...

Page 136: ...ties see the following section Item Containers xx1900000580 Description Allows you to rename the flow Name Allows you to add an item for the flow Add item Allows you to add pattern for the flow Add pattern Allows you to delete the selected item or pattern in the flow Delete Continues on next page 136 Application manual PickMaster Twin PowerPac 3HAC064218 001 Revision B Copyright 2021 ABB All right...

Page 137: ...ou can only choose one from Conveyor Speed and Throughput Throughput If set to 100 all the items in the layout are generated on every trigger without losses A lower value defines the probability that an item in the layout is generated Stability If set to 100 the generated items always have correct position A lower value defines the probability that an item gets the correct po sition Position Stabi...

Page 138: ...ign style when you have more than one item in the layer Align Style Left icon allows you to align all the items in this layer from the left Right icon allows you to align all the items in this layer from the right Center icon allows you to align all the items in this layer from the center Middle icon allows you to align all the items in this layer from the middle Top icon allows you to align all t...

Page 139: ...f the items Allows you to define the location and position of each items Selected Item s Add a rectangle flow procedure On the PickMaster PowerPac ribbon tab click Recipe xx1800001438 Use this procedure to add a rectangle flow 1 On the ribbon tab click Recipe xx1800001721 The Create Sim Flow window is opened xx1800001722 Continues on next page Application manual PickMaster Twin PowerPac 139 3HAC06...

Page 140: ...dd a rectangle flow xx1900000581 Continues on next page 140 Application manual PickMaster Twin PowerPac 3HAC064218 001 Revision B Copyright 2021 ABB All rights reserved 4 Working with PickMaster PowerPac 4 2 10 Adding Flow Continued ...

Page 141: ...an item for the flow 4 Click Add Pattern in the Item Container tab to add a pattern for the flow Continues on next page Application manual PickMaster Twin PowerPac 141 3HAC064218 001 Revision B Copyright 2021 ABB All rights reserved 4 Working with PickMaster PowerPac 4 2 10 Adding Flow Continued ...

Page 142: ...ck the Edit Layout icon to open the dialog 7 Click the Add icon in the Edit Layout dialog to add an item xx1800001726 Continues on next page 142 Application manual PickMaster Twin PowerPac 3HAC064218 001 Revision B Copyright 2021 ABB All rights reserved 4 Working with PickMaster PowerPac 4 2 10 Adding Flow Continued ...

Page 143: ...rl and select the base item at the same time xx2000000296 Continues on next page Application manual PickMaster Twin PowerPac 143 3HAC064218 001 Revision B Copyright 2021 ABB All rights reserved 4 Working with PickMaster PowerPac 4 2 10 Adding Flow Continued ...

Page 144: ... edge according to the base item xx2000000297 Continues on next page 144 Application manual PickMaster Twin PowerPac 3HAC064218 001 Revision B Copyright 2021 ABB All rights reserved 4 Working with PickMaster PowerPac 4 2 10 Adding Flow Continued ...

Page 145: ... edge according to the base item xx2000000298 Continues on next page Application manual PickMaster Twin PowerPac 145 3HAC064218 001 Revision B Copyright 2021 ABB All rights reserved 4 Working with PickMaster PowerPac 4 2 10 Adding Flow Continued ...

Page 146: ... vertically according to the base item xx2000000299 Continues on next page 146 Application manual PickMaster Twin PowerPac 3HAC064218 001 Revision B Copyright 2021 ABB All rights reserved 4 Working with PickMaster PowerPac 4 2 10 Adding Flow Continued ...

Page 147: ...2000000300 Click Top to align all items on the top edge according to the base item xx2000000301 Continues on next page Application manual PickMaster Twin PowerPac 147 3HAC064218 001 Revision B Copyright 2021 ABB All rights reserved 4 Working with PickMaster PowerPac 4 2 10 Adding Flow Continued ...

Page 148: ...m edge according to the base item xx2000000302 Continues on next page 148 Application manual PickMaster Twin PowerPac 3HAC064218 001 Revision B Copyright 2021 ABB All rights reserved 4 Working with PickMaster PowerPac 4 2 10 Adding Flow Continued ...

Page 149: ...303 Click Vertically to set all items tangent in vertical direction xx2000000304 Continues on next page Application manual PickMaster Twin PowerPac 149 3HAC064218 001 Revision B Copyright 2021 ABB All rights reserved 4 Working with PickMaster PowerPac 4 2 10 Adding Flow Continued ...

Page 150: ...or more information regarding Flow properties see the following section Item Containers xx1900000580 Description Allows you to rename the flow Name Allows you to add an item for the flow Add item Allows you to add pattern for the flow Add pattern Allows you to delete the selected item or pattern in the flow Delete Continues on next page 150 Application manual PickMaster Twin PowerPac 3HAC064218 00...

Page 151: ...You can only choose one from Conveyor Speed and Throughput Throughput If set to 100 all the items in the layout are generated on every trigger without losses A lower value defines the probability that an item in the layout is generated Stability If set to 100 the generated items always have correct position A lower value defines the probability that an item gets the correct position Position Stabi...

Page 152: ... a predefined pattern template Pattern Template The drop down list allows you to select one item you have created for this system Available Objs Add icon allows you to add the selected item onto the layer Rotate icon allows you to rotate the selected items Else Functions Delete icon allows you to delete the selected items Select All icon allows you to select all the items in the layer Show Item Na...

Page 153: ...o add a sector flow 1 On the ribbon tab click Flow xx1800001721 The Create Sim Flow window is opened xx1800001722 Continues on next page Application manual PickMaster Twin PowerPac 153 3HAC064218 001 Revision B Copyright 2021 ABB All rights reserved 4 Working with PickMaster PowerPac 4 2 10 Adding Flow Continued ...

Page 154: ...dd a sector flow xx1900000582 Continues on next page 154 Application manual PickMaster Twin PowerPac 3HAC064218 001 Revision B Copyright 2021 ABB All rights reserved 4 Working with PickMaster PowerPac 4 2 10 Adding Flow Continued ...

Page 155: ...em for the flow 4 Click Add Pattern in the Item Container tab to add a pattern for the flow Continues on next page Application manual PickMaster Twin PowerPac 155 3HAC064218 001 Revision B Copyright 2021 ABB All rights reserved 4 Working with PickMaster PowerPac 4 2 10 Adding Flow Continued ...

Page 156: ... the dialog 7 Click the Add icon in the Edit Layout dialog to add an item xx1800001726 8 Click OK to apply the configuration 9 Click OK to close the Create Sim Flow dialog 156 Application manual PickMaster Twin PowerPac 3HAC064218 001 Revision B Copyright 2021 ABB All rights reserved 4 Working with PickMaster PowerPac 4 2 10 Adding Flow Continued ...

Page 157: ...conveyor overlaps the hot spot Indexed work area calibration is consistent with linear conveyor s calibration The calibrated base coordinate system of the circular conveyor belt is located at the center of the conveyor belt and the x direction points directly below the camera or along the IO sensor If the circular conveyor uses a predefined point the x direction points to a predefined coordinate p...

Page 158: ...the created solution automatically xx1800001448 The calibration runs automatically xx1800001449 158 Application manual PickMaster Twin PowerPac 3HAC064218 001 Revision B Copyright 2021 ABB All rights reserved 4 Working with PickMaster PowerPac 4 2 11 Calibration Continued ...

Page 159: ...llows you to adjust the parameters of the item work area and robot Tuning For more information regarding Tuning see the following section Allows you to adjust the speed of the conveyor Flow Control For more information regarding Flow Control see the following section Allows you to see the live video of the camera Vision This function is only available in the real production and emulation For more ...

Page 160: ...rror in the calibration of either the camera or the work area It is possible to adjust the positions while running a project This is called tuning Description Allows you to control the status of the production Recipe Status Allows you to choose the objects in the solution and change their paramet ers Type Continues on next page 160 Application manual PickMaster Twin PowerPac 3HAC064218 001 Revisio...

Page 161: ...he robot will not work nor mally For example trying to rotate the gripper of an IRB 360 robot in X or Y direction will cause an error Redo the simulation after the error occurred GripAngleX Allows you to set the angle of the gripper when doing the picking and placing operation in Y direction Note The angle cannot be out of the physical limits Or the robot will not work nor mally For example trying...

Page 162: ...model grip point C Item height D Angle X E Angle Y F Conveyor direction G 3 Define the Euler orientation in degrees for the grip orientation on the item A four axes robot that is IRB 360 can only rotate around the z axis and therefore only GripAngleZ can be used Six axes robots can pick place 3D items by defining Euler orientation GripAngleX GripAngleY and the item height The grip orientation has ...

Page 163: ...long the Z direction is equivalent to offsetting the conveyor base frame along the Z direction Enter is the limit from where the robot starts to execute item targets on the work area The distance is calculated in millimeters from the center of the robot The range is positive if the limit is beyond the center of the robot relative to the moving direction of the conveyor Make sure that the enter lim...

Page 164: ...target as lost on the work area in End Y The distance is calculated in milli meters from the center of the robot The range is positive if the limit is beyond the center of the robot relative to the moving vertical direction of the convey or Make sure that the enter limit can be reached by the robot Continues on next page 164 Application manual PickMaster Twin PowerPac 3HAC064218 001 Revision B Cop...

Page 165: ...nter of the robot The range is positive if the limit is beyond the center of the robot relative to the moving vertical direction of the conveyor If the y coordinate value of the item s position is greater than the UpperLimit the robot will not grab the item So when the tracked item passes beyond this limit it will be dropped This limit must be chosen well within the maximum reach of the robot Cont...

Page 166: ...ddle of the corner path This value is only valid for work areas of type Pick or Other Note Vacuum activation does not affect the picking of items in simulation Items are attached to the picking tool using SimAttach events for example in the Pick Routine VacuumActiva tion Vacuum reversion is the time in seconds before the half place time in the place position when the blow I O should be set If a ne...

Page 167: ...ing tool using SimDetach events for example in the Place Routine VacuumOff Tuning the robot xx1900000596 Description Allows you to tune the speed of the selected robot Speed The robot settings can be tuned when a production is running using the Tuning the robot window Limitations All tunings including robot tuning item tuning and work area tuning are only valid while the simulation or production i...

Page 168: ...he value in the tuning into the recipe Otherwise the data will not be saved to the recipe xx1900000685 Continues on next page 168 Application manual PickMaster Twin PowerPac 3HAC064218 001 Revision B Copyright 2021 ABB All rights reserved 4 Working with PickMaster PowerPac 4 2 12 Simulation Continued ...

Page 169: ...ou to adjust the speed of the conveyor Conveyors Simulation On the PickMaster PowerPac ribbon tab click Simulation Continues on next page Application manual PickMaster Twin PowerPac 169 3HAC064218 001 Revision B Copyright 2021 ABB All rights reserved 4 Working with PickMaster PowerPac 4 2 12 Simulation Continued ...

Page 170: ... Then it will start the simulation of created solution xx1900000586 The simulation runs automatically 3 Click Stop on the ribbon tab Then it will stop the simulation 170 Application manual PickMaster Twin PowerPac 3HAC064218 001 Revision B Copyright 2021 ABB All rights reserved 4 Working with PickMaster PowerPac 4 2 12 Simulation Continued ...

Page 171: ...nt PC are identical but the one on Host is for production Robot controllers and cameras should also be connected to this one Right click on RunTime to switch to the Runtime from Virtual Runtime Click Start Local RRT to start the RunTime on the computer Select Connect to RRT the Sign in window is displayed The following figure and table provide more details about the window xx1800001387 xx180000138...

Page 172: ...e Password Enter your PC admin user name and password Allows you to enter the user name of the administrator account for the computer which the Runtime is installed UserName Allows you to enter the password of the administrator account for the computer which the Runtime is installed Password A default user and password have been created for each role Administrator Username admin with Password pass...

Page 173: ...n in window is opened xx1800001388 3 In the Sign in dialog enter the correct information Note A default admin user with full access is provided with the following credentials User admin Password password Continues on next page Application manual PickMaster Twin PowerPac 173 3HAC064218 001 Revision B Copyright 2021 ABB All rights reserved 4 Working with PickMaster PowerPac 4 3 1 Switching to real R...

Page 174: ...d or down or stuck Occasionally due to computer environment the SSH exe cannot be installed successfully 5 Host IP address incorrect or not in the same IP segment as the client port Select a real controller Use this procedure to select a real controller 1 Right click the Controller in the tree view Cell and select Edit Controller xx1800001712 Continues on next page 174 Application manual PickMaste...

Page 175: ... the following functions must be enabled syslog EnableOnPublicNet Bonjour EnableOnPublicNet RobICI EnableOnPublicNet EtherNetIP EnableOnPublicNet RapidSockets EnableOnPublicNet RobotWebServices EnableOnPublicNet IEEE1588 EnableOnPublicNet Netscan EnableOnPublicNet RobAPI EnableOnPublicNet Continues on next page Application manual PickMaster Twin PowerPac 175 3HAC064218 001 Revision B Copyright 202...

Page 176: ...Studio on public network is enabled xx2100000506 xx1800001714 Continues on next page 176 Application manual PickMaster Twin PowerPac 3HAC064218 001 Revision B Copyright 2021 ABB All rights reserved 4 Working with PickMaster PowerPac 4 3 1 Switching to real Runtime Continued ...

Page 177: ... to when configuring the line The encoder signals are described in Application manual Conveyor tracking Description I O signal name Digital input signals for custom use such as generating I O triggered position or checking a gripper pressure switch diX_1 Digital output for starting stopping conveyors doStartCnvX Digital output for triggering an image acquisition This signal is used by Runtime to o...

Page 178: ... shall be detached from the tool Note The Release signal is controlled from the RAPID program In simulation the RAPID triggdata SimDetachX controls when the signal is set On a real robot the RAPID triggdatas VacuumRevX and VacuumOffX controls when the signal is set pulsed doBlowX Digital I O group containing doVacuumX and doBlowX goVacBlowX Modify I O signals in work area Use this procedure to cre...

Page 179: ...l Type tab xx1800001735 3 Enter the required data into the I O signal setting table Continues on next page Application manual PickMaster Twin PowerPac 179 3HAC064218 001 Revision B Copyright 2021 ABB All rights reserved 4 Working with PickMaster PowerPac 4 3 1 Switching to real Runtime Continued ...

Page 180: ...ecipe setting window 5 Repeat step1 4 to the other Conveyor WA 180 Application manual PickMaster Twin PowerPac 3HAC064218 001 Revision B Copyright 2021 ABB All rights reserved 4 Working with PickMaster PowerPac 4 3 1 Switching to real Runtime Continued ...

Page 181: ... to any physical camera This must be done manually in the camera configuration dialog box The camera in the tree view is configured to use one specific physical camera The camera should also be configured to give an optimal image To configure a camera 1 Right click the camera in the tree view Cell and select Configuration xx1800001463 The Camera Configuration dialog and the Image dialog are opened...

Page 182: ... the Video format list select the type of the connected camera xx1900000645 The image in Image dialog shows up Continues on next page 182 Application manual PickMaster Twin PowerPac 3HAC064218 001 Revision B Copyright 2021 ABB All rights reserved 4 Working with PickMaster PowerPac 4 3 2 Configuring camera Continued ...

Page 183: ...ce part click Calculate This will calculate the white balance calibration parameters d Click Apply This will modify the camera s internal settings e Click Save on camera This will store the settings in the camera For more information about color vision see Using color vision on page 289 6 If needed adjust Exposure Brightness and Contrast and click Apply in the Camera settings part Adjust the expos...

Page 184: ...ntrast parameters The effect of changing these parameter values is not seen until clicking Apply 7 Click OK Related information Using color vision on page 289 Calibrating camera on page 234 184 Application manual PickMaster Twin PowerPac 3HAC064218 001 Revision B Copyright 2021 ABB All rights reserved 4 Working with PickMaster PowerPac 4 3 2 Configuring camera Continued ...

Page 185: ...tion about how to calibrating the robot are described in the robot product manual Application manual PickMaster Twin PowerPac 185 3HAC064218 001 Revision B Copyright 2021 ABB All rights reserved 4 Working with PickMaster PowerPac 4 3 3 Calibrating robot ...

Page 186: ...cipe in that solution could share the same calibration If you need to re calibrate a camera all recipes in the solution will be updated with the new calibration The camera calibration and the work area calibration can be performed independently of each other but it is very hard to make an accurate new camera calibration after the work area is calibrated The work area calibration is stored in the r...

Page 187: ...Defining Counts Per Meter Use the following procedure to define Counts Per Meter for the conveyor encoder 1 Put a mark on the conveyor belt for example draw a line or attach a piece of tape and a mark on the side of the conveyor at the same location 2 In the FlexPendant Program Editor load and run the program ppacal prg This sets the current position of the conveyor to zero The value is shown as C...

Page 188: ...r parameter Counts Per Meter 9 Tap OK 10 Restart the controller Related information Application manual Conveyor tracking Technical reference manual System parameters 188 Application manual PickMaster Twin PowerPac 3HAC064218 001 Revision B Copyright 2021 ABB All rights reserved 4 Working with PickMaster PowerPac 4 3 4 1 Defining the parameter Counts Per Meter DSQC 377 Continued ...

Page 189: ...r Meter Use the following procedure to define Counts Per Meter for the conveyor encoder 1 Put a mark on the conveyor belt for example draw a line or attach a piece of tape and a mark on the side of the conveyor at the same location 2 In the FlexPendant Program Editor load and run the program ppacal prg This sets the current position of the conveyor to zero The value is shown as CNV value in the Po...

Page 190: ...r of the conveyor and update the value for parameter Counts Per Meter 9 Tap OK 10 Restart the controller Related information Application manual Conveyor tracking Technical reference manual System parameters 190 Application manual PickMaster Twin PowerPac 3HAC064218 001 Revision B Copyright 2021 ABB All rights reserved 4 Working with PickMaster PowerPac 4 3 4 2 Defining the parameter Counts Per Met...

Page 191: ...ing procedure to calibrate all the base frames for a conveyor in the line with IRC5 controller 1 Make sure the reference point for calibration is marked accurately on the conveyor belt If a camera is used the reference point is the local origin of the camera view If the camera has been just calibrated the reference point is already marked by the origin of the camera calibration pattern that is att...

Page 192: ...lect the robot for example T_ROB1 This step is required for MultiMove robots 10 Select the first point Point 1 11 Jog or move the robot by hand Point out the reference point on the conveyor accurately with the calibration tool TCP 12 Modify the selected point Point 1 by tapping the Modify Position function key 13 Move the conveyor belt forward a distance where the reference point still can be reac...

Page 193: ...nt 2 Point 3 and Point 4 If the conveyor belt cannot be moved backward start over from step 1 17 If there are more robots to calibrate along the conveyor continue from step 3 18 Restart the controllers to activate the new base frames Application manual PickMaster Twin PowerPac 193 3HAC064218 001 Revision B Copyright 2021 ABB All rights reserved 4 Working with PickMaster PowerPac 4 3 4 3 Defining t...

Page 194: ...a on page234 After calibrating the camera keep the camera calibration pattern attached to the conveyor Procedure Use the following procedure to calibrate all the base frames for a conveyor in the line with OmniCore controller 1 Make sure the reference point for calibration is marked accurately on the conveyor belt If a camera is used the reference point is the local origin of the camera view If th...

Page 195: ...exPendant click Calibrate xx2100000362 Click Option Tab on the up left corner xx2100000363 Continues on next page Application manual PickMaster Twin PowerPac 195 3HAC064218 001 Revision B Copyright 2021 ABB All rights reserved 4 Working with PickMaster PowerPac 4 3 4 4 Defining the base frame OmniCore Continued ...

Page 196: ...areCalibration xx2100000365 Continues on next page 196 Application manual PickMaster Twin PowerPac 3HAC064218 001 Revision B Copyright 2021 ABB All rights reserved 4 Working with PickMaster PowerPac 4 3 4 4 Defining the base frame OmniCore Continued ...

Page 197: ...0000366 xx2100000367 Continues on next page Application manual PickMaster Twin PowerPac 197 3HAC064218 001 Revision B Copyright 2021 ABB All rights reserved 4 Working with PickMaster PowerPac 4 3 4 4 Defining the base frame OmniCore Continued ...

Page 198: ...utton to motors on the controller xx2100000369 Continues on next page 198 Application manual PickMaster Twin PowerPac 3HAC064218 001 Revision B Copyright 2021 ABB All rights reserved 4 Working with PickMaster PowerPac 4 3 4 4 Defining the base frame OmniCore Continued ...

Page 199: ... Linear Conveyor xx2100000371 Continues on next page Application manual PickMaster Twin PowerPac 199 3HAC064218 001 Revision B Copyright 2021 ABB All rights reserved 4 Working with PickMaster PowerPac 4 3 4 4 Defining the base frame OmniCore Continued ...

Page 200: ...reference point is just inside the working range of the next robot to calibrate The conveyor positions for all the conveyor work areas in the jogging window should indicate the same total travel distance for the reference point The Continues on next page 200 Application manual PickMaster Twin PowerPac 3HAC064218 001 Revision B Copyright 2021 ABB All rights reserved 4 Working with PickMaster PowerP...

Page 201: ...en calibrated 4 Mount the calibration tool on the robot 5 Open the Calibration window in Calibrate on the FlexPendant xx2100000373 Continues on next page Application manual PickMaster Twin PowerPac 201 3HAC064218 001 Revision B Copyright 2021 ABB All rights reserved 4 Working with PickMaster PowerPac 4 3 4 4 Defining the base frame OmniCore Continued ...

Page 202: ...Tap Define Base Frame xx2100000375 Continues on next page 202 Application manual PickMaster Twin PowerPac 3HAC064218 001 Revision B Copyright 2021 ABB All rights reserved 4 Working with PickMaster PowerPac 4 3 4 4 Defining the base frame OmniCore Continued ...

Page 203: ... Point 1 11 Jog or move the robot by hand Point out the reference point on the conveyor accurately with the calibration tool TCP Continues on next page Application manual PickMaster Twin PowerPac 203 3HAC064218 001 Revision B Copyright 2021 ABB All rights reserved 4 Working with PickMaster PowerPac 4 3 4 4 Defining the base frame OmniCore Continued ...

Page 204: ...paced distances between the four calibration points Point 1 4 are preferred since this increases the accuracy of the calibration 14 Repeat the steps 10 13 for the points Point 2 Point 3 and Point 4 Continues on next page 204 Application manual PickMaster Twin PowerPac 3HAC064218 001 Revision B Copyright 2021 ABB All rights reserved 4 Working with PickMaster PowerPac 4 3 4 4 Defining the base frame...

Page 205: ...ated error is acceptable tap Finish to confirm and store the new base frame Note A mean error of less than 1 mm is acceptable in most cases Continues on next page Application manual PickMaster Twin PowerPac 205 3HAC064218 001 Revision B Copyright 2021 ABB All rights reserved 4 Working with PickMaster PowerPac 4 3 4 4 Defining the base frame OmniCore Continued ...

Page 206: ...1 Point 2 Point 3 and Point 4 If the conveyor belt cannot be moved backward start over from step 1 17 If there are more robots to calibrate along the conveyor continue from step 3 18 Restart the controllers to activate the new base frames 206 Application manual PickMaster Twin PowerPac 3HAC064218 001 Revision B Copyright 2021 ABB All rights reserved 4 Working with PickMaster PowerPac 4 3 4 4 Defin...

Page 207: ...on could share the same calibration If you need to re calibrate a camera all recipes in the solution will be updated with the new calibration The camera calibration and the work area calibration can be performed independently of each other but it is very hard to make an accurate new camera calibration after the work area is calibrated The work area calibration is stored in the robot controller To ...

Page 208: ...Per Meter for the conveyor encoder 1 Put a mark on the conveyor belt for example draw a line or attach a piece of tape and a mark on the side of the conveyor at the same location 2 In the FlexPendant Program Editor load and run the program ppacal prg This sets the current position of the conveyor to zero The value is shown as CNV value in the Position part of the FlexPendant Jogging window 3 Rotat...

Page 209: ...r parameter Counts Per Meter 9 Tap OK 10 Restart the controller Related information Application manual Conveyor tracking Technical reference manual System parameters Application manual PickMaster Twin PowerPac 209 3HAC064218 001 Revision B Copyright 2021 ABB All rights reserved 4 Working with PickMaster PowerPac 4 3 5 1 Defining the parameter Counts Per Meter DSQC 377 Continued ...

Page 210: ... For an IRC5 system this value is 20 000 This value can be used to start the calibration with old_counts_per_meter The manually measured radians that the conveyor has been moved measured_radians Defining Counts Per Meter Use the following procedure to define Counts Per Meter for the conveyor encoder 1 Put a mark on the conveyor belt for example draw a line or attach a piece of tape and a mark on t...

Page 211: ...g the read and measured values For example 30000 0 5 60000 7 In RobotStudio click Configuration and select topic Process and type Conveyor Ici 8 Edit the unit ICIx where x is the number of the conveyor and update the value for parameter Counts Per Meter 9 Tap OK 10 Restart the controller Related information Application manual Conveyor tracking Technical reference manual System parameters Applicati...

Page 212: ...for the calibration tool in the rapid program for each robot Update the TCP offset with the measured values In the FlexPendant Jogging Window select the tooldata for the robot If a camera is used calibrate the camera see Calibrating camera on page234 After calibrating the camera keep the camera calibration pattern attached to the conveyor Recommendation This section describes how to use TCP measur...

Page 213: ...d y positions for the base frame Use this procedure to calculate the x and y positions for the base frame 1 Use Wobj0 on the FlexPendant Pick out a reference point on the circular conveyor jog the TCP to this point and record p_0 2 Run the conveyor to another position Jog the TCP to the reference point and record p_1 3 Run the conveyor to a third position jog the TCP to the reference point and rec...

Page 214: ...recorded angle in step 5 when calculating the x and y positions for the base frame This is angle see example measurement points in Defining the base frame orientation and start window start calibration on page 213 2 Calculate P from the XP1 and YP1 coordinates of P0 and the atan function If the point is at first quartile or frouth quartile Pθ arctan YP1 XP1 Continues on next page 214 Application m...

Page 215: ...to account the direction of rotation Counter clockwise rotation q1 cos Base 2 q2 0 0 q3 0 0 q4 sin Base 2 Clockwise rotation q1 0 0 q2 cos Base 2 q3 sin Base 2 q4 0 0 5 Enter the value for z in meters from p_0 and the values for the quaternions q1 q2 q3 and q4 into the base frame for the conveyor Application manual PickMaster Twin PowerPac 215 3HAC064218 001 Revision B Copyright 2021 ABB All right...

Page 216: ... projection point of the camera on the conveyor belt from the center of the circle Note The distance for Sensor offset is measured manually xx2100000066 Mechanics defines the moving trajectory of the conveyor The default value is EXT_LIN linear conveyor So when the circular conveyor is used this parameter must be set as EXT_ROT xx2100000067 Continues on next page 216 Application manual PickMaster ...

Page 217: ...r So when the circular conveyor is used this parameter must be set as Yes xx2100000068 Application manual PickMaster Twin PowerPac 217 3HAC064218 001 Revision B Copyright 2021 ABB All rights reserved 4 Working with PickMaster PowerPac 4 3 5 4 Type configuration for circular conveyor Continued ...

Page 218: ... calibration pattern attached to the conveyor Make sure the reference x and y axes for work object calibration is marked accurately on the indexed work area Three reference points are needed for the calibration two points on the x axis and one point on the y axis If a camera is used the reference x and y axes should be marked with respect to the local origin of the camera view If the camera just h...

Page 219: ... on the x axis with the robot s TCP Press Modify Position 6 Select User Point Y 1 Point out a point on the positive y axis with the robot s TCP Press Modify Position 7 Tap OK 8 Restart the RAPID program without moving the PP to save the selected work object definition The definition is saved in the rapid data array NonCnvWOData located in the ppaUser system module Procedure OmniCore 1 Make sure th...

Page 220: ...the robots having work areas that needs to be calibrated along the conveyor In the FlexPendant click Calibrate xx2100000362 Continues on next page 220 Application manual PickMaster Twin PowerPac 3HAC064218 001 Revision B Copyright 2021 ABB All rights reserved 4 Working with PickMaster PowerPac 4 3 6 Calibrating indexed work area Continued ...

Page 221: ... Click Service Routines xx2100000364 Continues on next page Application manual PickMaster Twin PowerPac 221 3HAC064218 001 Revision B Copyright 2021 ABB All rights reserved 4 Working with PickMaster PowerPac 4 3 6 Calibrating indexed work area Continued ...

Page 222: ...n the popped up dialog xx2100000366 Continues on next page 222 Application manual PickMaster Twin PowerPac 3HAC064218 001 Revision B Copyright 2021 ABB All rights reserved 4 Working with PickMaster PowerPac 4 3 6 Calibrating indexed work area Continued ...

Page 223: ...nual mode xx2100000368 Continues on next page Application manual PickMaster Twin PowerPac 223 3HAC064218 001 Revision B Copyright 2021 ABB All rights reserved 4 Working with PickMaster PowerPac 4 3 6 Calibrating indexed work area Continued ...

Page 224: ... xx2100000369 Click Play xx2100000370 Continues on next page 224 Application manual PickMaster Twin PowerPac 3HAC064218 001 Revision B Copyright 2021 ABB All rights reserved 4 Working with PickMaster PowerPac 4 3 6 Calibrating indexed work area Continued ...

Page 225: ...r for example Idxwobj1 Then click OK xx2100000397 Continues on next page Application manual PickMaster Twin PowerPac 225 3HAC064218 001 Revision B Copyright 2021 ABB All rights reserved 4 Working with PickMaster PowerPac 4 3 6 Calibrating indexed work area Continued ...

Page 226: ... now be displayed as 0 mm xx2100000398 3 Select the Workobject in the Option Tab xx2100000380 Continues on next page 226 Application manual PickMaster Twin PowerPac 3HAC064218 001 Revision B Copyright 2021 ABB All rights reserved 4 Working with PickMaster PowerPac 4 3 6 Calibrating indexed work area Continued ...

Page 227: ...e window set the User Method as User defined with 3 points xx2100000382 Continues on next page Application manual PickMaster Twin PowerPac 227 3HAC064218 001 Revision B Copyright 2021 ABB All rights reserved 4 Working with PickMaster PowerPac 4 3 6 Calibrating indexed work area Continued ...

Page 228: ...elect X2 Move the TCP a distance in the direction the x axis Point out a location on the x axis with the robot s TCP Continues on next page 228 Application manual PickMaster Twin PowerPac 3HAC064218 001 Revision B Copyright 2021 ABB All rights reserved 4 Working with PickMaster PowerPac 4 3 6 Calibrating indexed work area Continued ...

Page 229: ...dify 12 Tap Next xx2100000385 13 In the Define Object frame window tap Next xx2100000386 Continues on next page Application manual PickMaster Twin PowerPac 229 3HAC064218 001 Revision B Copyright 2021 ABB All rights reserved 4 Working with PickMaster PowerPac 4 3 6 Calibrating indexed work area Continued ...

Page 230: ... store the new user frame xx2100000391 15 Click OK on the popped up dialog xx2100000392 16 Enable the Thumb button to motors on the controller Continues on next page 230 Application manual PickMaster Twin PowerPac 3HAC064218 001 Revision B Copyright 2021 ABB All rights reserved 4 Working with PickMaster PowerPac 4 3 6 Calibrating indexed work area Continued ...

Page 231: ...x2100000394 19 The definition is saved in the rapid data array NonCnvWOData located in the ppaUser system module Application manual PickMaster Twin PowerPac 231 3HAC064218 001 Revision B Copyright 2021 ABB All rights reserved 4 Working with PickMaster PowerPac 4 3 6 Calibrating indexed work area Continued ...

Page 232: ...ld be recalibrated Tuning the camera and base frame calibrations Use this procedure to tune the camera and base frame calibrations 1 Place the calibration verification paper on the conveyor under the camera The center column of object should be placed close to the center of the camera view Align the paper with the conveyor as accurately as possible 2 Use one of the objects on the calibration verif...

Page 233: ...900000650 If the holes are off center of the objects too much which affects the accuracy of the grasp then recalibrate the base frame of the conveyor Application manual PickMaster Twin PowerPac 233 3HAC064218 001 Revision B Copyright 2021 ABB All rights reserved 4 Working with PickMaster PowerPac 4 3 7 Verifying conveyor calibrations Continued ...

Page 234: ...at the center of the original image Multi view calibration The camera can be calibrated using one or several images Multi view calibration can compensate for parallax error The accuracy of the multi view calibration increases with the number of input images Use at least three images at different tilt angles and altitudes Using multiple images of calibration plates in parallel planes does not incre...

Page 235: ... is opened xx1800001468 2 Select the default calibration from the list and click Edit The Camera Calibration Feature and Calibration dialog are opened Continues on next page Application manual PickMaster Twin PowerPac 235 3HAC064218 001 Revision B Copyright 2021 ABB All rights reserved 4 Working with PickMaster PowerPac 4 3 8 Calibrating camera Continued ...

Page 236: ...1800001470 Continues on next page 236 Application manual PickMaster Twin PowerPac 3HAC064218 001 Revision B Copyright 2021 ABB All rights reserved 4 Working with PickMaster PowerPac 4 3 8 Calibrating camera Continued ...

Page 237: ...ration When calibrating a camera with multiple images it is important that the origin image is still in place after finishing the camera calibration This is because the origin image is used to define the coordinate system of the robot There are two ways of achieving this One way is to acquire additional views first click Acquire and Add and acquire the origin image last click Acquire and Set origi...

Page 238: ...eeded click Calib Image to show the original image used to calibrate the camera Warp Live to show continuously acquired and corrected images Warp Image to correct the current image 10 If needed click Show features to show the checkerboard vertices used during the calibration The features are only shown in the calibration images Show origin to show the origin of the resulting coordinate system The ...

Page 239: ...ual The time required correcting an image This time has to be considered when calculating the total time for the image ana lysis Warp time The resulting size in pixels of the corrected image Image size The resulting size of the camera view calculated with the new calibration Camera view The position of the camera in relation to the origin of the origin calibration plate Camera location Continues o...

Page 240: ...els are used Showing live images To show images click Production The camera images are shown in the Vision tab The found objects are shown as green or blue crosses depending on if they are marked as accepted or rejected by the vision model See Vision modeling on page 245 240 Application manual PickMaster Twin PowerPac 3HAC064218 001 Revision B Copyright 2021 ABB All rights reserved 4 Working with ...

Page 241: ...to file for later analysis with the Vision Analyzer program see Vision Analyzer on page 243 One dialog can be opened for each vision defined position source the name of the camera and the solution is shown in the title bar You can continue working with the solution while the dialog is opened Reduce the window size if the window is blocking other information The maximum size of the buffer depends o...

Page 242: ...ugh the image buffer when recording is paused ALT LEFT or RIGHT ARROW can also be used to step Click Export to save he current image to file bmp format Image in forma tion The list view at the bottom shows information about all the hits When an indi vidual model is selected the columns change depending on its type The pan and zoom buttons can be used to analyze the image more closely Note Only ove...

Page 243: ... installation folder or from Windows Start menu xx0800000342 Click Load to open a pmv file Click Vision to see detailed information about the camera that took the images Other settings in Vision are identical to settings in Detailed Vision Information Application manual PickMaster Twin PowerPac 243 3HAC064218 001 Revision B Copyright 2021 ABB All rights reserved 4 Working with PickMaster PowerPac ...

Page 244: ...ter To zoom using the keyboard and mouse place the pointer over the image press CTRL and scroll the mouse wheel The current zoom level and the world coordinate of the mouse pointer is shown in the status bar When live images are shown the current frame rate is also shown in the status bar xx1800001469 244 Application manual PickMaster Twin PowerPac 3HAC064218 001 Revision B Copyright 2021 ABB All ...

Page 245: ...distributed to different work areas and be given different item type values accessible from the RAPID program Item classification can be done by PatMax Blob and the Inspection tool Vision model parameters in item targets Item targets identified by a vision model can store a selection of upto 5 vision model parameters in the components Val1 Val2 Val3 Val4 and Val5 These parameters can be accessed i...

Page 246: ...ernal program to erase noise Larger patterns will provide greater accuracy because they contain more boundary points to resolve at run time High frequency features are more significant at the outer edges of the pattern Models can be classified with the function Inspection I A model can either be defined as accepted or rejected see Item Properties on page 102 To increase the contrast in images wher...

Page 247: ...0560 Continues on next page Application manual PickMaster Twin PowerPac 247 3HAC064218 001 Revision B Copyright 2021 ABB All rights reserved 4 Working with PickMaster PowerPac 4 3 9 2 Configuring a geometric model with PatMax Continued ...

Page 248: ...The Item Setting window is opened xx1800001705 2 In the Item Source dialog click Geometric The Image Dialog and Geometric dialog are opened Continues on next page 248 Application manual PickMaster Twin PowerPac 3HAC064218 001 Revision B Copyright 2021 ABB All rights reserved 4 Working with PickMaster PowerPac 4 3 9 2 Configuring a geometric model with PatMax Continued ...

Page 249: ...Select the calibration that has set in the Camera Calibration from Continues on next page Application manual PickMaster Twin PowerPac 249 3HAC064218 001 Revision B Copyright 2021 ABB All rights reserved 4 Working with PickMaster PowerPac 4 3 9 2 Configuring a geometric model with PatMax Continued ...

Page 250: ...ttern 4 If color filtering should be used select the Color filter checkbox to enable the filter Click Set to configure the filter See Using color vision on page289 Continues on next page 250 Application manual PickMaster Twin PowerPac 3HAC064218 001 Revision B Copyright 2021 ABB All rights reserved 4 Working with PickMaster PowerPac 4 3 9 2 Configuring a geometric model with PatMax Continued ...

Page 251: ...test accuracy the pick place position should be placed close to the center of the trained pattern xx1800001708 b Click Train to train the pattern c Select Show Model to show the features of the trained models in the search image d If needed click Advanced to access more model settings e Increase the value of Elasticity to allow for any expected non linear shape distortion for example for organic p...

Page 252: ...s hover the mouse pointer over the corresponding control Click Adjust Granularity to define the levels in the Fine and Coarse boxes 6 In the Search parameters part set parameters to limit the search procedure and the analysis time Score Limit indicates how closely the found item matches the trained model A score of 1 indicates a perfect match while a score of 0 indicates that the pattern does not ...

Page 253: ... verify that items are identified as expected 7 In the Post search filters part define the score values for each pattern in the search image Fit Error Limit is a measure of the variance between the shape of the trained pattern and the shape of the pattern found in the search image If the found pattern in the search image is a perfect fit for the trained pattern the fit error is 0 Coverage Limit is...

Page 254: ...as normal Object found outside this area will be discarded Click Advanced to open the Advanced Post Search Settings dialog To define an item region select the Activate checkbox and click Define Adjust the polygon showed around the found object using vertices Then click Train The polygon can have 2 to 16 vertices 8 In the Display options part select the type of information to display in graphics It...

Page 255: ...r accepted or rejected See Item Properties on page102 Hits that do not fulfill all the requirements or hits with overlapping regions will not be accessed by any robot and are classified as discarded The hits shown in the result list are marked with an icon identifying its classification Continues on next page Application manual PickMaster Twin PowerPac 255 3HAC064218 001 Revision B Copyright 2021 ...

Page 256: ...age in 10 Click OK Note Items located after a search operation in the PatMax configuration window is presented as discarded due to item region overlap even if they are actually rejected due to another parameter fit error clutter and so on This happens only if the item region is activated and the item regions overlap with each other in Runtime However the discarded items are removed before applying...

Page 257: ... of gray not found in the background Blob analysis works best with images that can be easily segmented into foreground and background pixels Typically strong lighting of scenes with opaque objects of interest produces images suitable for an analysis like this To increase the contrast in images where parts have similar grayscale tone it is possible to use color filtering See Using color vision on p...

Page 258: ...e used select the Color filter checkbox to enable the filter and click Set to configure the filter See Using color vision on page 289 In the histogram the horizontal axis represents the pixel values of the image from black to white 0 to 255 The vertical axis indicates the number of pixels at each value There are also a number of statistical values representing various properties of the histogram s...

Page 259: ...ray values to divide blob pixels and background pixels All pixels with a grayscale value below the threshold are assigned as object pixels while all pixels with values above the threshold are assigned as background pixels Relative method uses a relative threshold expressed as the percentages of the total pixels between the left and right tail to divide blob pixels and background pixels Tails repre...

Page 260: ... found item is sent to the controller No Orientation means that the found item is sent to the controller with angle 0 zero First Principal Axis means that the found item is sent down with the angle around the first principal axis The angle is relative to the x axis and can be 90 degrees Use boundary box center defines if the position of a blob will be at the center of its boundary box instead of a...

Page 261: ...g D Closing E Morphological settings Erode reduces or eliminates object features increases the thickness of holes within an object This operation replaces each pixel in the image with the maximum value of the pixels and each of its eight vertical and horizontal neighbors Dilation reduces or eliminates holes within an object increases the thickness of an object s features This operation replaces ea...

Page 262: ...s used as the fill value for that row Connectivity defines the minimum size in pixels that a blob can have to be considered Is used with either prune or fill 7 In the Item region part select the Activate checkbox and click Define Adjust the polygon showed around the found object using vertices Then click Train The polygon can have 2 to 16 vertices 8 Click Search in the Display Options Tip If the s...

Page 263: ... parameters in item targets The blob parameters Area perimeter circularity and elongation can be selected for the target storage Related information Using color vision on page 289 Histogram on page 272 Item Properties on page 102 RAPID programs on page 391 Application manual PickMaster Twin PowerPac 263 3HAC064218 001 Revision B Copyright 2021 ABB All rights reserved 4 Working with PickMaster Powe...

Page 264: ...sified as accepted all inspection areas and the alignment model must be classified as accepted If one of the inspection areas does not fulfill the given conditions the corresponding item is classified as rejected Tip A more advanced accept or reject decision can be implemented with a user hook By adding a selection of upto 5 vision parameters for storage in the item targets a user hook can impleme...

Page 265: ...tion on the alignment model configuration dialog see Vision modeling on page 245 Sub inspection model adds inspection areas to an alignment model See Sub inspection models on page 271 Edit opens the configuration dialog for the selected model When an existing alignment model is modified the relations to the inspection areas must be retrained Delete is used to delete the selected model and correspo...

Page 266: ... create the main model in the Select Model Type dialog and click OK button For detail procedures on Continues on next page 266 Application manual PickMaster Twin PowerPac 3HAC064218 001 Revision B Copyright 2021 ABB All rights reserved 4 Working with PickMaster PowerPac 4 3 9 4 Configuring inspection models Continued ...

Page 267: ...PatMax on page 246 or Configuring blob models on page 257 xx1900000956 Continues on next page Application manual PickMaster Twin PowerPac 267 3HAC064218 001 Revision B Copyright 2021 ABB All rights reserved 4 Working with PickMaster PowerPac 4 3 9 4 Configuring inspection models Continued ...

Page 268: ...pe dialog xx1900000957 Continues on next page 268 Application manual PickMaster Twin PowerPac 3HAC064218 001 Revision B Copyright 2021 ABB All rights reserved 4 Working with PickMaster PowerPac 4 3 9 4 Configuring inspection models Continued ...

Page 269: ...ct Model Type dialog and click OK button xx1900000958 9 Click Edit Areas xx1900000959 Continues on next page Application manual PickMaster Twin PowerPac 269 3HAC064218 001 Revision B Copyright 2021 ABB All rights reserved 4 Working with PickMaster PowerPac 4 3 9 4 Configuring inspection models Continued ...

Page 270: ...a blob model see Configuring a geometric model with PatMax on page 246 Configuring blob models on page 257 Histogram on page 272 and Caliper on page 277 xx1900000961 Continues on next page 270 Application manual PickMaster Twin PowerPac 3HAC064218 001 Revision B Copyright 2021 ABB All rights reserved 4 Working with PickMaster PowerPac 4 3 9 4 Configuring inspection models Continued ...

Page 271: ...fines where the sub model is to perform its analysis relative the alignment model The areas are shown in the image and should be moved and resized to cover the area to analyze Sub inspection models are configured in their own dialogs When testing a sub inspection model the alignment hit is shown in the image window together with the corresponding inspection area Sub inspection models only analyze ...

Page 272: ...b inspection model is configured in the same way as a blob model See Configuring blob models on page257 In addition the number of required hits must be configured Required hits defines the number of hits with the sub inspection model within the inspection area that are required for the result to be considered as accepted Blob subinspection parameters in item targets The parameter Number of hits ca...

Page 273: ...n monochrome mode the Histogram dialog displays a graph of the pixel distribution of the acquired image The horizontal axis represents the pixel values of the image from black to white 0 to 255 The vertical axis indicates the number of pixels at each value While using color vision three graphs each representing the contents of the different color channels RGB or HSI are displayed For more informat...

Page 274: ...o it covers the pattern xx1900000952 Continues on next page 274 Application manual PickMaster Twin PowerPac 3HAC064218 001 Revision B Copyright 2021 ABB All rights reserved 4 Working with PickMaster PowerPac 4 3 9 4 Configuring inspection models Continued ...

Page 275: ...ogram or by simply entering values into the text boxes For a product to be accepted both the standard deviation and the mean value have to be within the specified limits When using color vision the histograms for all channels must fall within the limits xx1900000954 Continues on next page Application manual PickMaster Twin PowerPac 275 3HAC064218 001 Revision B Copyright 2021 ABB All rights reserv...

Page 276: ... dev is a statistical measure that illustrates how closely all the various pixel values are clustered around the mean value An even color tone gives a narrow histogram with low standard deviation while a speckled pattern gives a wide histogram and a high value for Std dev Histogram subinspection parameters in item targets The Mean and standard deviation parameters can be selected for the target st...

Page 277: ...lor filtering For more information see Using color vision on page 289 xx1900000932 1 On the Sub Inspection Model in the Select Model Type dialog box select Caliper in the drop down list and click OK button xx1900000933 Figure 4 2 Continues on next page Application manual PickMaster Twin PowerPac 277 3HAC064218 001 Revision B Copyright 2021 ABB All rights reserved 4 Working with PickMaster PowerPac...

Page 278: ...0000934 Continues on next page 278 Application manual PickMaster Twin PowerPac 3HAC064218 001 Revision B Copyright 2021 ABB All rights reserved 4 Working with PickMaster PowerPac 4 3 9 4 Configuring inspection models Continued ...

Page 279: ...o open the inspection model creating window xx1900000936 Continues on next page Application manual PickMaster Twin PowerPac 279 3HAC064218 001 Revision B Copyright 2021 ABB All rights reserved 4 Working with PickMaster PowerPac 4 3 9 4 Configuring inspection models Continued ...

Page 280: ... in the Search Parameters according to the Defined Distance in the Analyze Area xx1900000938 7 Click Search xx1900000939 Continues on next page 280 Application manual PickMaster Twin PowerPac 3HAC064218 001 Revision B Copyright 2021 ABB All rights reserved 4 Working with PickMaster PowerPac 4 3 9 4 Configuring inspection models Continued ...

Page 281: ...Analyze Area Length 2 Delta Length Defined Distance Delta Width defines the width of the analyze area Analyze Area Width 2 Delta Width From the analyze area a production image is created The operation sums all the information in the analyze area accentuating the strength of edges that lie parallel to the Analyze Area Width and reducing the effects of noise Edge Properties defines the polarity of t...

Page 282: ...amters in term targets The Distance parameter can be selected for the target storage External This function is reserved for next version 282 Application manual PickMaster Twin PowerPac 3HAC064218 001 Revision B Copyright 2021 ABB All rights reserved 4 Working with PickMaster PowerPac 4 3 9 4 Configuring inspection models Continued ...

Page 283: ... 160 Allows you to adjust the parameters of the item work area and robot Tuning For more information regarding Tuning see Tuning on page 160 Allows you to adjust the speed of the conveyor Flow Control For more information regarding Flow Control see Flow Control on page 169 Allows you to see the live video of the camera Vision For more information regarding Vision see Vision on page 284 Continues o...

Page 284: ... 1 On the Production ribbon tab click Production xx1800001717 Continues on next page 284 Application manual PickMaster Twin PowerPac 3HAC064218 001 Revision B Copyright 2021 ABB All rights reserved 4 Working with PickMaster PowerPac 4 3 10 Starting production Continued ...

Page 285: ...cipe and Start to run the production xx1800001719 Continues on next page Application manual PickMaster Twin PowerPac 285 3HAC064218 001 Revision B Copyright 2021 ABB All rights reserved 4 Working with PickMaster PowerPac 4 3 10 Starting production Continued ...

Page 286: ...to be adjusted according to the actual dimension to make the emulation as close to the actual system as possible If the item is missing during the emulation it may be caused by that the size of the PickMaster PowerPac station is not exactly the same with the real station The item is hidden in the conveyor model Adjust the height of the conveyor model to show the item normally 286 Application manua...

Page 287: ...be configured to start production The recipe must be open and active Pick rate The pick rate is shown as icons in the Production tab when a robot is running The following values are shown Number of pick during the last minute Total number of picks since the production was started Continues on next page Application manual PickMaster Twin PowerPac 287 3HAC064218 001 Revision B Copyright 2021 ABB All...

Page 288: ...n the production tab and select Restart Robots Stopping one robot will also stop the other robots on the same robot controller Emergency stop In case of emergency 1 Press the emergency stop button on the robot controller or the FlexPendant to stop the robot immediately This sets the controller in emergency state and a warning is displayed on the FlexPendant and in PickMaster PowerPac and Runtime 2...

Page 289: ...the image Color spaces When working with RGB the color of each pixel is represented by its content of red green and blue The numerical representation is straightforward for the three base colors red 255 0 0 green 0 255 0 and blue 0 0 255 However it can be difficult to understand the composition of other mixed colors HSI is a color space that is more easily translated to the human perception of col...

Page 290: ...olor vision in PickMaster PowerPac PickMaster PowerPac provides color vision in the form of a filter except the histogram This filter is accessible from the PatMax Blob and Caliper configuration dialogs both as standalone alignment and sub inspection models The filter is a pre processing step which takes place before the object recognition or measurement Every model can have its own individual fil...

Page 291: ...ifferent temperatures color content and the camera needs to be color calibrated in order to compensate for this light The basic concept is to present the camera with a gray scene that is a scene that has equal contents of red green and blue The most accurate method is to take a sheet of white paper and adjust the light settings of the camera in order to make the scene appear gray Use this procedur...

Page 292: ...ax and Blob configuration dialogs contain a checkbox to enable color filtering Color filter and a button to display the filter settings Set Use this procedure to configure color vision 1 In the Image part of the PatMax or Blob configuration dialog select Color Filter This will enable the filter xx1900000941 The Color Filter Settings dialog is opened together with a second video window showing the ...

Page 293: ...the color dialog xx1900000942 b Move resize the rectangle to indicate what color should pass through the filter The indicated color range will be converted to white in the Continues on next page Application manual PickMaster Twin PowerPac 293 3HAC064218 001 Revision B Copyright 2021 ABB All rights reserved 4 Working with PickMaster PowerPac 4 4 Using color vision Continued ...

Page 294: ...lor range that will translate into white pixels in the output image Minimum is 0 and maximum is 255 except for Hue which has no boundary Fuzzy specifies how colors outside the minimum and maximum thresholds should be filtered to the output grayscale image A value of 0 indicates that colors outside the range specified by Low and High will be completely removed by the filter the result is a black an...

Page 295: ...m an image quality perspective it is often better to select small homogeneously colored samples and add several ranges to the list of colors Tip Try to filter with both RGB and HSI Sometimes one may work significantly better than the other Example 1 This example describes how to locate a part with PatMax and inspect the color with Blob 1 Create an inspection model see Configuring inspection models...

Page 296: ...er Settings dialog d Adjust the Blob settings so as to find the white blob e If necessary adjust the settings of the color filter and the Blob analysis 4 Test the result in the Inspection Configuration dialog Example 2 xx1900000946 Color image before filter xx1900000947 Black and white image after filter 296 Application manual PickMaster Twin PowerPac 3HAC064218 001 Revision B Copyright 2021 ABB A...

Page 297: ...ost picking flow Use this procedure to create a ghost picking flow 1 Open the solution need to do the ghost picking 2 Right click Recipe in the tree view Cell and select Setting xx1800001727 The Recipe setting window is opened xx1900000676 3 Click the Conveyor WA in the Available worarea which need to be recorded to open the work area setting window Continues on next page Application manual PickMa...

Page 298: ...is stored in the Documents RobotStudio PickMaster PowerPac folder xx1900000548 Adding a ghost picking flow to a solution Use this procedure to add a ghost picking flow 1 On the PickMaster PowerPac ribbon tab click Recipe 2 On the ribbon tab click Flow xx1800001721 Continues on next page 298 Application manual PickMaster Twin PowerPac 3HAC064218 001 Revision B Copyright 2021 ABB All rights reserved...

Page 299: ...dow is opened xx1800001722 Continues on next page Application manual PickMaster Twin PowerPac 299 3HAC064218 001 Revision B Copyright 2021 ABB All rights reserved 4 Working with PickMaster PowerPac 4 5 Ghost Picking Continued ...

Page 300: ...Add Item in the Item Container tab to add an item for the flow 5 Click to open the Flow Properties window Continues on next page 300 Application manual PickMaster Twin PowerPac 3HAC064218 001 Revision B Copyright 2021 ABB All rights reserved 4 Working with PickMaster PowerPac 4 5 Ghost Picking Continued ...

Page 301: ...k OK to close the Create Sim Flow dialog Select ghost picking flow Modify recipe Use this procedure to select a ghost picking flow 1 Right click on one Recipe in the tree view Cell and select Setting xx1800001727 Continues on next page Application manual PickMaster Twin PowerPac 301 3HAC064218 001 Revision B Copyright 2021 ABB All rights reserved 4 Working with PickMaster PowerPac 4 5 Ghost Pickin...

Page 302: ...for the pick operation 3 In the Select Flow under Main Setting select Flow1 in the drop down list xx1800001729 Continues on next page 302 Application manual PickMaster Twin PowerPac 3HAC064218 001 Revision B Copyright 2021 ABB All rights reserved 4 Working with PickMaster PowerPac 4 5 Ghost Picking Continued ...

Page 303: ... Vision in the Source Type 6 Select Distance in the Trigger Filter Setting tab xx1800001731 Continues on next page Application manual PickMaster Twin PowerPac 303 3HAC064218 001 Revision B Copyright 2021 ABB All rights reserved 4 Working with PickMaster PowerPac 4 5 Ghost Picking Continued ...

Page 304: ...t picking the work area signals need to be set as predefined signals Use this procedure to run a ghost picking flow 1 On the PickMaster PowerPac ribbon tab click Production xx1800001737 Continues on next page 304 Application manual PickMaster Twin PowerPac 3HAC064218 001 Revision B Copyright 2021 ABB All rights reserved 4 Working with PickMaster PowerPac 4 5 Ghost Picking Continued ...

Page 305: ...e recorded position data to the real controller until the Stop icon is clicked If the Loop checkbox is not selected the ghost picking will send the recorded position data to the real controller for just one time and stopped automatically Continues on next page Application manual PickMaster Twin PowerPac 305 3HAC064218 001 Revision B Copyright 2021 ABB All rights reserved 4 Working with PickMaster ...

Page 306: ...he production xx1800001741 5 Click the Stop icon to stop the ghost picking in the production 306 Application manual PickMaster Twin PowerPac 3HAC064218 001 Revision B Copyright 2021 ABB All rights reserved 4 Working with PickMaster PowerPac 4 5 Ghost Picking Continued ...

Page 307: ...tainers on the second liner conveyor xx1900000667 Creating the solution Opening the solution Note Illustration Action xx1900000470 Double click to open the PickMaster PowerPac 1 xx1800000840 Click the New to create a new solution 2 Continues on next page Application manual PickMaster Twin PowerPac 307 3HAC064218 001 Revision B Copyright 2021 ABB All rights reserved 5 Production examples 5 1 Exampl...

Page 308: ... a system to select it for the new solution in the Systems Found table lists 3 xx1900000472 In the Set Robot1 Pose window enter numbers 0 0 1600 in the Position X Y Z mm text box and 180 0 0 in the Orient ation deg text box 4 Click OK to finish the adding of the con troller 5 Continues on next page 308 Application manual PickMaster Twin PowerPac 3HAC064218 001 Revision B Copyright 2021 ABB All rig...

Page 309: ...x 2 Click OK to finish the adding of the grip per 3 Adding the conveyor Note Illustration Action xx1800000855 On the ribbon tab click Conveyor under Layout 1 Continues on next page Application manual PickMaster Twin PowerPac 309 3HAC064218 001 Revision B Copyright 2021 ABB All rights reserved 5 Production examples 5 1 Example One pick work area and one place work area Continued ...

Page 310: ... the Position X Y Z mm text box and 0 0 0 in the Orientation deg text boxes to define the location of the conveyor 6 Click OK to finish the adding of the con veyor 7 xx1800000855 On the ribbon tab click Conveyor under Layout 8 xx1900000655 In the Conveyor window enter Linear2 in the Conveyor Name text box 9 In the Conveyor window select the type as Linear in the Conveyor Type drop down list 10 Con...

Page 311: ...m text box and 0 0 0 in the Orientation deg text boxes to define the location of the conveyor 13 Click OK to finish the adding of the con veyor 14 Adding the sensor Note Illustration Action xx1800001411 On the ribbon tab click Sensor under Layout 1 Continues on next page Application manual PickMaster Twin PowerPac 311 3HAC064218 001 Revision B Copyright 2021 ABB All rights reserved 5 Production ex...

Page 312: ...list 3 Click OK to finish the adding of the sensor 4 Adding the work area Note Illustration Action xx1800001417 On the ribbon tab click Workarea under Layout 1 Continues on next page 312 Application manual PickMaster Twin PowerPac 3HAC064218 001 Revision B Copyright 2021 ABB All rights reserved 5 Production examples 5 1 Example One pick work area and one place work area Continued ...

Page 313: ...eyor are defined by users 3 In the Conveyor drop down list select the Linear1 conveyor 4 In the Workarea Type radio box select the Pick option 5 Click OK to finish the adding of the linear 1 conveyor work area 6 xx1800001417 On the ribbon tab click Workarea under Layout 7 Continues on next page Application manual PickMaster Twin PowerPac 313 3HAC064218 001 Revision B Copyright 2021 ABB All rights ...

Page 314: ... OK to finish the adding of the linear 2 conveyor work area 12 Adding the item Note Illustration Action xx1800001429 On the ribbon tab click Item under Re cipe 1 xx1900000660 In the Item Type part under Item Proper ties select the Cylinder radio box 2 In the RH Size part under Item Proper ties define the item s size as 50 5 3 xx1900000485 In the Color part under Item Properties define the item s c...

Page 315: ... On the ribbon tab click Container under Recipe 1 xx1900000491 Use the default settings in the Container Properties 2 xx1900000492 Click on the Container Pattern tab 3 Click Add layer 4 Continues on next page Application manual PickMaster Twin PowerPac 315 3HAC064218 001 Revision B Copyright 2021 ABB All rights reserved 5 Production examples 5 1 Example One pick work area and one place work area C...

Page 316: ...r Container Source tab select the Predefined radio box 7 Click OK to finish the adding of the con tainer 8 Adding the recipe Note Illustration Action xx1800001438 On the ribbon tab click Recipe under Recipe 1 xx1900000505 Continues on next page 316 Application manual PickMaster Twin PowerPac 3HAC064218 001 Revision B Copyright 2021 ABB All rights reserved 5 Production examples 5 1 Example One pick...

Page 317: ...ailable Items and drag LinearWA1 from the Available distributors list to the Distribu tion Accept list 7 xx1900000663 Click on the Place Operation1 to open the setting window for the place operation 1 8 In the Source Type under Detection Setting select the Predefined radio box 9 Click to select the PContainer1 in Avail able Objects 10 Click to select the LinearWA2Available Workareas in Available W...

Page 318: ...nearWA2 from the Available distributors list to the Distribu tion Accept list 14 Click OK to finish the adding of the re cipe 15 Calibration Note Illustration Action xx1900000520 On the ribbon tab click Calibration under Simulation 1 xx1900000666 The Calibration runs automatically 2 Continues on next page 318 Application manual PickMaster Twin PowerPac 3HAC064218 001 Revision B Copyright 2021 ABB ...

Page 319: ...ction xx1800001387 Right click the RunTime in the tree view Cell and select Start Local RRT 1 xx2000000314 Right click the RunTime in the tree view Cell and select Connect to RRT 2 xx1800001388 In the Sign in dialog enter the correct information Note A default admin user with full access is provided with the following credentials User admin Password password 3 Click OK 4 Continues on next page App...

Page 320: ...ialog 6 xx1800001715 In the dialog box choose the real control ler to be connected 7 Click OK to apply the configuration 8 xx1800001713 Click Close to close the Edit Controller dialog 9 Continues on next page 320 Application manual PickMaster Twin PowerPac 3HAC064218 001 Revision B Copyright 2021 ABB All rights reserved 5 Production examples 5 1 Example One pick work area and one place work area C...

Page 321: ... Signal Type tab 11 xx1900000668 Enter the required data into the I O signal setting table 12 Click OK to close the Recipe setting window 13 Continues on next page Application manual PickMaster Twin PowerPac 321 3HAC064218 001 Revision B Copyright 2021 ABB All rights reserved 5 Production examples 5 1 Example One pick work area and one place work area Continued ...

Page 322: ...d data into the I O signal setting table 16 Click OK to close the Recipe setting window 17 xx1900000670 Right click the Test1 in the tree view Sensor and select Configuration 18 Continues on next page 322 Application manual PickMaster Twin PowerPac 3HAC064218 001 Revision B Copyright 2021 ABB All rights reserved 5 Production examples 5 1 Example One pick work area and one place work area Continued...

Page 323: ...p Select the type is to choose the color of the camera 20 Click OK to finish the configuration of the camera 21 xx1900000529 Right click the Test1 in the tree view Sensor and select Calibrate 22 Continues on next page Application manual PickMaster Twin PowerPac 323 3HAC064218 001 Revision B Copyright 2021 ABB All rights reserved 5 Production examples 5 1 Example One pick work area and one place wo...

Page 324: ...the grid pitch if the squares on the printed calibration paper differs from 10 0 mm Enter an ap propriate name for the calibration 24 Continues on next page 324 Application manual PickMaster Twin PowerPac 3HAC064218 001 Revision B Copyright 2021 ABB All rights reserved 5 Production examples 5 1 Example One pick work area and one place work area Continued ...

Page 325: ...ire an image and click Set Origin in the Calibra tion images part This stores the image and marks it as the origin image the ori gin of this image will be the physical ori gin of the camera s coordinate system 26 xx1900000647 In the Calibration part click Calibrate to start calibration 27 Continues on next page Application manual PickMaster Twin PowerPac 325 3HAC064218 001 Revision B Copyright 202...

Page 326: ...1 in the Vision Models and click Geometric to open the geomet ric window 31 xx1900000649 In the Image part click Live to get and show new images continuously or click Acquire to get one new image To use an image from file or save the current image click Import or Export 32 Continues on next page 326 Application manual PickMaster Twin PowerPac 3HAC064218 001 Revision B Copyright 2021 ABB All rights...

Page 327: ... the PatMax model 36 Click Ok to close and save the Item1 setting 37 Production Note Illustration Action xx1800001716 Click to select the Recipe in the tree view Cell 1 xx1800001717 On the Production ribbon tab click Pro duction 2 Continues on next page Application manual PickMaster Twin PowerPac 327 3HAC064218 001 Revision B Copyright 2021 ABB All rights reserved 5 Production examples 5 1 Example...

Page 328: ... click triangle mark Start to run the production 3 Click Stop to stop the production 4 328 Application manual PickMaster Twin PowerPac 3HAC064218 001 Revision B Copyright 2021 ABB All rights reserved 5 Production examples 5 1 Example One pick work area and one place work area Continued ...

Page 329: ... uses the previous example as a basis to do the subsequent operations xx1900000680 Changing the solution Opening the solution For detail procedure in opening the solution see Opening the solution on page307 Deleting the linear conveyor from the solution Note Illustration Action xx1900000532 Right click on the Recipe under Recipes in the tree view browser and click Delete 1 Continues on next page A...

Page 330: ...x1900000534 Right click on the Linear WA1 under Conveyors in the tree view browser and click Delete Tip The linear WA1 is for the picking opera tion 5 xx1900000535 Click Yes in the pop up window to delete the Linear WA1 6 Continues on next page 330 Application manual PickMaster Twin PowerPac 3HAC064218 001 Revision B Copyright 2021 ABB All rights reserved 5 Production examples 5 2 Example One pick...

Page 331: ...lect the Pick option 3 In the Work Object drop down list select the correct object Tip The connection between the conveyor board and the conveyor are defined by users 4 xx1900000539 Enter numbers 200 400 500 in the Po sition X Y Z mm text box and 0 0 0 in the Orientation deg text boxes to define the location of the conveyor 5 Click OK to finish the adding of the in dexed work area 6 Continues on n...

Page 332: ...Note Illustration Action xx1800001438 On the ribbon tab click Recipe under Recipe 1 xx1900000540 Click on the Pick Operation1 to open the setting window for the pick operation 2 In the Associated Conveyor under Main Setting select IndexWA in the drop down list 3 Continues on next page 332 Application manual PickMaster Twin PowerPac 3HAC064218 001 Revision B Copyright 2021 ABB All rights reserved 5...

Page 333: ... 1 8 xx1900000543 In the Associated Conveyor under Main Setting select Linear 2 in the drop down list 9 In the Source Type under Detection Setting select the Predefined radio box 10 Click to select the PContainer1 in Avail able Objects 11 Click to select the Linear WA2 in Avail able Workareas 12 xx1900000544 In the Trigger Filter Setting tab click to select the Distance radio button 13 In the Trig...

Page 334: ...vironment and configuration Note Illustration Action For more details see Switching to Online environment and configuration on page 319 Connect to the real RunTime 1 For more details see Switching to Online environment and configuration on page 319 Select the real controller 2 xx1900000673 Right click on one Linear WA2 in the tree view Cell and select Setting 3 xx1800001735 Select the Customized S...

Page 335: ...lect the Customized Settings in the Signal Type tab 8 Enter the required data into the I O signal setting table 9 Click OK to close the Recipe setting window 10 Production For detail procedure on production see Production on page 327 Application manual PickMaster Twin PowerPac 335 3HAC064218 001 Revision B Copyright 2021 ABB All rights reserved 5 Production examples 5 2 Example One pick from index...

Page 336: ...ating the solution Opening the solution For detail procedure in opening the solution see Opening the solution on page307 Adding the controller For detail procedure in adding the controller see Adding the controller on page308 Adding the gripper For detail procedure in adding the controller see Adding the gripper on page 309 Adding the conveyor Note Illustration Action xx1800000855 On the ribbon ta...

Page 337: ...tion X Y Z mm text box and 0 0 90 in the Orientation deg text boxes to define the location of the conveyor 6 Click OK to finish the adding of the con veyor 7 xx1800000855 On the ribbon tab click Conveyor under Layout 8 xx1900000476 In the Conveyor window enter Linear1 in the Conveyor Name text box 9 In the Conveyor window select the type as Linear in the Conveyor Type drop down list 10 Continues o...

Page 338: ... select the type as Linear in the Conveyor Type drop down list 17 xx1900000479 Click on the Preview button to set the preference of the conveyor 18 Enter numbers 3000 300 500 in the LWH Size mm text box to define the size of the conveyor 19 In the Conveyor window enter numbers 1200 500 0 in the Position X Y Z mm text box and 0 0 0 in the Orientation deg text boxes to define the location of the con...

Page 339: ...nnection between the conveyor board and the conveyor are defined by users 3 In the Conveyor drop down list select the Circular conveyor 4 In the Workarea Type radio box select the Pick option 5 Click OK to finish the adding of the circu lar conveyor work area 6 xx1800001417 On the ribbon tab click Workarea under Layout 7 Continues on next page Application manual PickMaster Twin PowerPac 339 3HAC06...

Page 340: ...Workarea under Layout 13 xx1900000483 In the Conveyor Workarea window enter LinearWA2 in the Workarea Name text box 14 In the Conveyor Board drop down list select the correct conveyor board which has been connected to the second liner conveyor Tip The connection between the conveyor board and the conveyor are defined by users 15 In the Conveyor drop down list select the Linear2 conveyor 16 In the ...

Page 341: ...e the item s color as RGB 255 128 128 4 xx1900000486 In the Rapid Properties part under Item Properties define the item s Accepted Type as 1 Tip The Accepted Type defines the class of different items 5 xx1900000487 In the Source Type under Item Source select the Vision radio box 6 Continues on next page Application manual PickMaster Twin PowerPac 341 3HAC064218 001 Revision B Copyright 2021 ABB Al...

Page 342: ... xx1900000489 In the Color part under Item Properties define the item s color as RGB 128 255 255 11 xx1900000490 In the Rapid Properties part under Item Properties define the item s Accepted Type as 2 Tip The Accepted Type defines the class of different items 12 Continues on next page 342 Application manual PickMaster Twin PowerPac 3HAC064218 001 Revision B Copyright 2021 ABB All rights reserved 5...

Page 343: ... the ribbon tab click Container under Recipe 1 xx1900000491 Use the default settings in the Container Properties 2 xx1900000492 Click on the Container Pattern tab 3 Click Add layer 4 Continues on next page Application manual PickMaster Twin PowerPac 343 3HAC064218 001 Revision B Copyright 2021 ABB All rights reserved 5 Production examples 5 3 Example Mixing one pick work area and two place work ar...

Page 344: ...ect the Predefined radio box 7 Click OK to finish the adding of the con tainer 8 xx1800001433 On the ribbon tab click Container under Recipe 9 xx1900000495 Use the default settings in the Container Properties 10 Continues on next page 344 Application manual PickMaster Twin PowerPac 3HAC064218 001 Revision B Copyright 2021 ABB All rights reserved 5 Production examples 5 3 Example Mixing one pick wo...

Page 345: ...in the Available Objs drop down list 14 xx1900000498 Click Add to add item2 to the container2 15 In the Add Layer View window enter numbers 100 100 0 0 1 in the Selected Item s text box 16 Click OK to finish the adding of the new layer 17 Continues on next page Application manual PickMaster Twin PowerPac 345 3HAC064218 001 Revision B Copyright 2021 ABB All rights reserved 5 Production examples 5 3...

Page 346: ...00500 Click the Add Sector Flow button to open the preference of Flow 1 window 2 Click the Add item in the Item Containers tab to add Item1 and Item2 to this flow 3 xx1900000501 Click Edit Layout button on the right corner of Flow Properties tab 4 Continues on next page 346 Application manual PickMaster Twin PowerPac 3HAC064218 001 Revision B Copyright 2021 ABB All rights reserved 5 Production exa...

Page 347: ... click Add to add the Item1 into the flow 7 xx1900000504 In the Edit Layout window enter numbers 150 120 0 0 2 in the Selected Item s text box 8 Click OK to finish the editing layout 9 Click OK to finish the adding of the flow 10 Continues on next page Application manual PickMaster Twin PowerPac 347 3HAC064218 001 Revision B Copyright 2021 ABB All rights reserved 5 Production examples 5 3 Example ...

Page 348: ...apid Editor under Robot Setting and change the file Tip Replace the old code PROC PickPlaceSeq Pick PickWorkArea 1 Pick PickWorkArea 2 Place PlaceWorkArea 1 Place PlaceWorkArea 2 ENDPROC with the new code PROC PickPlaceSeq Pick PickWorkArea 1 IF PickTarget Type 1 THEN Place PlaceWorkArea 1 ELSEIF PickTarget Type 2 THEN Place PlaceWorkArea 2 ENDIF ENDPROC 5 xx1900000507 Continues on next page 348 A...

Page 349: ...tting select the Vision radio box 10 xx1900000511 Click to select the Test1 in Available Camera 11 Click to select the CircularWA in Avail able Workareas 12 xx1900000512 In the Distribution tab under Distribution Setting click on Item1 in the Available Items and drag CircularWA from the Available distributors list to the Distribu tion Accept list 13 Continues on next page Application manual PickMa...

Page 350: ... 17 Click to select the LinearWA1 in Avail able Workareas 18 xx1900000515 In the Trigger Filter Setting tab click to select the Distance radio button 19 In the Trigger Filter Setting tab define the Trigger Distance as 300 mm 20 xx1900000516 In the Distribution tab under Distribution Setting click on Item1 in the Available Items and drag LinearWA1 from the Available distributors list to the Distrib...

Page 351: ...ble distributors list to the Distribu tion Accept list 28 Click OK to finish the adding of the re cipe 29 Calibration For detail procedure on calibrating the solution see Calibration on page 318 Simulation For detail procedure on simulating the solution see Simulation on page 319 Switching to Online environment and configuration Note Illustration Action For more details see Switching to Online env...

Page 352: ...uired data into the I O signal setting table 5 Click OK to close the Recipe setting window 6 xx1900000524 Right click on one LinearWA1 in the tree view Cell and select Setting 7 Continues on next page 352 Application manual PickMaster Twin PowerPac 3HAC064218 001 Revision B Copyright 2021 ABB All rights reserved 5 Production examples 5 3 Example Mixing one pick work area and two place work areas C...

Page 353: ...900000527 Select the Customized Settings in the Signal Type tab 12 Enter the required data into the I O signal setting table 13 Click OK to close the Recipe setting window 14 xx1900000528 Right click the Test1 in the tree view Sensor and select Configuration 15 Continues on next page Application manual PickMaster Twin PowerPac 353 3HAC064218 001 Revision B Copyright 2021 ABB All rights reserved 5 ...

Page 354: ...ect the type is to choose the color of the camera 17 Click OK to finish the configuration of the camera 18 xx1900000529 Right click the Test1 in the tree view Sensor and select Calibration 19 Continues on next page 354 Application manual PickMaster Twin PowerPac 3HAC064218 001 Revision B Copyright 2021 ABB All rights reserved 5 Production examples 5 3 Example Mixing one pick work area and two plac...

Page 355: ...grid pitch if the squares on the printed calibration paper differs from 10 0 mm Enter an ap propriate name for the calibration 21 Continues on next page Application manual PickMaster Twin PowerPac 355 3HAC064218 001 Revision B Copyright 2021 ABB All rights reserved 5 Production examples 5 3 Example Mixing one pick work area and two place work areas Continued ...

Page 356: ...an image and click Set Origin in the Calibra tion images part This stores the image and marks it as the origin image the ori gin of this image will be the physical ori gin of the camera s coordinate system 23 xx1900000647 In the Calibration part click Calibrate to start calibration 24 Continues on next page 356 Application manual PickMaster Twin PowerPac 3HAC064218 001 Revision B Copyright 2021 AB...

Page 357: ... the Vision Models and click Geometric to open the geomet ric window 28 xx1900000649 In the Image part click Live to get and show new images continuously or click Acquire to get one new image To use an image from file or save the current image click Import or Export 29 Continues on next page Application manual PickMaster Twin PowerPac 357 3HAC064218 001 Revision B Copyright 2021 ABB All rights res...

Page 358: ... of the item1 32 Click OK to close and save the PatMax model 33 Click Ok to close and save the Item1 setting 34 Right click on the Item2 in the tree view Cell and select Setting 35 Continues on next page 358 Application manual PickMaster Twin PowerPac 3HAC064218 001 Revision B Copyright 2021 ABB All rights reserved 5 Production examples 5 3 Example Mixing one pick work area and two place work area...

Page 359: ...ntinuously or click Acquire to get one new image To use an image from file or save the current image click Import or Export 37 xx1900000650 Click Define to finish the train 38 Continues on next page Application manual PickMaster Twin PowerPac 359 3HAC064218 001 Revision B Copyright 2021 ABB All rights reserved 5 Production examples 5 3 Example Mixing one pick work area and two place work areas Con...

Page 360: ...OK to close and save the PatMax model 41 Click Ok to close and save the Item2 setting 42 Production For detail procedure on production see Production on page 327 360 Application manual PickMaster Twin PowerPac 3HAC064218 001 Revision B Copyright 2021 ABB All rights reserved 5 Production examples 5 3 Example Mixing one pick work area and two place work areas Continued ...

Page 361: ...SrcData Index ItemSource PlaceItem FALSE Skip TRUE Arguments AckItmTgt ItemSource ItemTarget Acknowledge Skip Type ItemSource Data type itmsrc The item source from where the item target has been received with GetItmTgt ItemTarget Data type itmtgt The item target to acknowledge Acknowledge Data type bool The status of acknowledge TRUE if the itmtgt has been handled picked or placed by the robot and...

Page 362: ...ombined with Acknowledge TRUE type change will have no effect Error handling The following recoverable errors can be generated The errors can be handled in an error handler The system variable ERRNO will be set to Description Error code itmsrc undefined ERR_ITMSRC_UNDEF Limitations The itmtgt must be received with the instruction GetItmTgt Syntax AckItmTgt ItemSource variable VAR of itmsrc ItemTar...

Page 363: ...rce Error handling The following recoverable errors can be generated The errors can be handled in an error handler The system variable ERRNO will be set to Description Error code itmsrc undefined ERR_ITMSRC_UNDEF Limitations To avoid potential problems this instruction should be executed only when the last item target definitely has been acknowledged Syntax FlushItmSrc ItemSource variable VAR of i...

Page 364: ...on FRAME_COORD_DIR neg_y_sort Offset OffsetPose trans x 0 neg_y_sort Offset OffsetPose trans y 500 neg_y_sort Offset OffsetPose trans z 0 neg_y_sort Offset OffsetPose rot q1 1 neg_y_sort Offset OffsetPose rot q2 0 neg_y_sort Offset OffsetPose rot q3 0 neg_y_sort Offset OffsetPose rot q4 0 IF pick_type 2 THEN pick_type 1 ELSE pick_type 2 ENDIF GetItmTgt PickSource PickItem ItemType pick_type Limit ...

Page 365: ...Val4Min Val4Max Val5Min Val5Max ItemSource Data type itmsrc The item source from which the item target should be received ItemTarget Data type itmtgt The received item target MaxTime Data type num The maximum waiting time permitted expressed in seconds If this time runs out before the item target is retrieved and no TimeOut flag is given the error handler Continues on next page Application manual ...

Page 366: ... millimeters from the center of the robot The value is positive if the limit is beyond the center of the robot in the moving direction of the feeder This argument is only valid when a conveyor is used SortData Data type sortdata This data structure defines how the items shall be sorted Selection Data type selectiondata This data structure defines how the items are selected Val1Min Data type num Sp...

Page 367: ...The instruction waits until an item target fulfilling this condition is available for execution Program execution If there is no item target in buffer or any item targets available in the working area the program execution waits in this instruction until an item is considered as inside the working area If the MaxTime argument is specified then the wait time is supervised If the waiting time exceed...

Page 368: ...d to avoid collisions If values are specified for the optional arguments Va1Xmin or Va1Xmax the instruction will return an item target that fulfills the required maximum and minimum values for Va1X Error handling The following recoverable errors can be generated The errors can be handled in an error handler The system variable ERRNO will be set to Description Error code itmsrc undefined ERR_ITMSRC...

Page 369: ...selectiondata Selection data on page 387 The data type selectiondata sortdata Sort data on page 390 The data type sortdata Application manual PickMaster Twin PowerPac 369 3HAC064218 001 Revision B Copyright 2021 ABB All rights reserved 6 RAPID reference 6 1 3 GetItmTgt Get the next item target Continued ...

Page 370: ...of the next item target above the exit limit The distance is calculated in millimeters from the center of the robot The value is positive if the limit is beyond the center of the robot in the moving direction of the conveyor This argument is only valid when a conveyor is used MaxTime Data type num The maximum waiting time permitted expressed in seconds If this time runs out before the item target ...

Page 371: ...ling The following recoverable errors can be generated The errors can be handled in an error handler The system variable ERRNO will be set to Description Error code itmsrc undefined ERR_ITMSRC_UNDEF Timeout without any error flag ERR_PPA_TIMEOUT Syntax NextItmTgtType ItemSource variable VAR of itmsrc ItemType var or pers INOUT of num Limit expression IN of num MaxTime expression IN of num TimeFlag...

Page 372: ...ource Error handling The following recoverable errors can be generated The errors can be handled in an error handler The system variable ERRNO will be set to Description Error code itmsrc undefined ERR_ITMSRC_UNDEF Syntax QStartItmSrc ItemSource variable VAR of itmsrc Related information See For information about QStopItmSrc Stop queue in item source on page 373 The instruction QStopItmSrc 372 App...

Page 373: ...rable errors can be generated The errors can be handled in an error handler The system variable ERRNO will be set to Description Error code itmsrc undefined ERR_ITMSRC_UNDEF Syntax QStopItmSrc ItemSource variable VAR of itmsrc Related information See For information about QStartItmSrc Start queue in item source on page 372 The instruction QStartItmSrc Application manual PickMaster Twin PowerPac 37...

Page 374: ...Source ItemSource Data type itmsrc The item source Error handling The following recoverable errors can be generated The errors can be handled in an errorhandler The system variable ERRNO will be set to Description Error code itmsrc undefined ERR_ITMSRC_UNDEF Syntax ResetFlowCount ItemSource variable VAR of itmsrc Related information See For information about GetFlowCount Get number of passed items...

Page 375: ...a 1 ItemSource Resets the maximum usage time for an item source Arguments ResetMaxUsageTime ItemSource Item Source ItemSource Data type itmsrc The item source Error handling The following recoverable errors are generated They are handled in an error handler The system variable ERRNO will be set to The itmsrc is undefined ERR_ITMSRC_UNDEF Syntax ResetMaxUsageTime ItemSource variable VAR of itmsrc A...

Page 376: ... will be the intersection of the optimal target release zone and the enter exit region The recommended exit enter values to avoid any impact on the optimal target zone are as follows Enter 10000 mm this signifies a distance well outside the robot reach in an upstream direction Exit 10000 mm this signifies a distance well outside the robot reach in a downstream direction The following figure shows ...

Page 377: ...The drawback of having a large safety margin is an unnecessary reduction of the target release zone which may decrease the pick rate ReleaseTime Release Time Data type num The ReleaseTime defines the time when the targets enter the release zone before entering robot reach If the value is negative targets enter the release zone after they enter robot reach A value of 0 1 or less is recommended to a...

Page 378: ...dicular to the conveyor moving direction may be retrieved by the GetItmTgt instruction A work around to avoid the outside reach errors is to put an extra check on the Y value of the itemtarget before moving towards it 378 Application manual PickMaster Twin PowerPac 3HAC064218 001 Revision B Copyright 2021 ABB All rights reserved 6 RAPID reference 6 1 9 UseReachableTargets Use reachable targets Rob...

Page 379: ...rting production or since executing ResetMaxUsageTime Return value Data type num The maximum measured usage time since starting production or since executing ResetMaxUsageTime Arguments GetMaxUsageTime ItemSource Item Source ItemSource Data type itmsrc The item source Error handling The following recoverable errors can be generated They can be handled in an error handler The system variable ERRNO ...

Page 380: ... item will be counted A negative value indicates that the limit is upstreams from the robot center A positive value indicates that the limit is downstreams The parameters does not affect indexed work areas MaxLimit Data type num Defines the maximum distance to the robot center from where an item will be counted A negative value indicates that the limit is upstreams from the robot center A positive...

Page 381: ...inLimit expression IN of num MaxLimit expression IN of num A function with a return value of the data type num Application manual PickMaster Twin PowerPac 381 3HAC064218 001 Revision B Copyright 2021 ABB All rights reserved 6 RAPID reference 6 2 2 GetQueueLevel Get queue level Continued ...

Page 382: ...source Arguments GetQueueTopLevel ItemSource ItemSource Data type itmsrc The item source that the current number of item targets should be retrieved from Error handling The following recoverable errors can be generated The errors can be handled in an error handler The system variable ERRNO will be set to Description Error code itmsrc undefined ERR_ITMSRC_UNDEF Syntax GetQueueTopLevel ItemSource va...

Page 383: ...ems that has passed the exit limit since ResetFlowCount was executed Arguments GetFlowCount ItemSource ItemSource Data type itmsrc The item souce Error handling The following recoverable errors can be generated The errors can be handled in an errorhandler The system variable ERRNO will be set to Description Error code itmsrc undefined ERR_ITMSRC_UNDEF Syntax GetFlowCount ItemSource variable VAR of...

Page 384: ... the vision system robtgt Data type robtgt The pick or place position val1 Data type num Optional Can be used to carry additional item specific information for example from a user hook It is of data type float val2 Data type num Optional Can be used to carry additional item specific information for example from a user hook It is of data type float val3 Data type num Optional Can be used to carry a...

Page 385: ...stating 9E 9 Example if you have two conveyors set the two last external axis positions to zero Structure dataobject of itmtgt tag of num type of num scene of num val1 of num val2 of num val3 of num val4 of num val5 of num dataobject of robtarget trans of pos x of num y of num z of num rot of orient q1 of num q2 of num q3 of num q4 of num robconf of confdata cf1 of num cf4 of num cf6 of num cfx of...

Page 386: ...chnical reference manual RAPID Over view Handling configuration data Technical reference manual System para meters Configuration of external axes Technical reference manual RAPID Over view What is a quaternion 386 Application manual PickMaster Twin PowerPac 3HAC064218 001 Revision B Copyright 2021 ABB All rights reserved 6 RAPID reference 6 3 1 itmtgt Item target data Continued ...

Page 387: ...eration when selecting ITEMS_TO_USE specifies that only items marked for use by this queue are considered in the selection ITEMS_BYPASS specifies that only items marked to pass by this queue are considered in the selection ITEMS_PICKED specifies that only items marked as already picked by this queue or by a former queue in the line are considered in the selection ITEMS_PLACED specifies that only i...

Page 388: ... that the rotation in the OffsetPose is relative to the workobject or conveyor frame coordinate system ITEM_COORD_DIR indicates that the rotation in the OffsetPose is relative to the item coordinate system of the item to check The OffsetPose is used to move the center of the shape away from the item position for example if the grip position of the item is not at the center of real object to pick E...

Page 389: ...rence manual RAPID Instruc tions Functions and Data types The function BitOr Technical reference manual RAPID Over view What is a quaternion Example Selecting item depending on clearance zone on page 412 Example using selectiondata Application manual PickMaster Twin PowerPac 389 3HAC064218 001 Revision B Copyright 2021 ABB All rights reserved 6 RAPID reference 6 3 2 selectiondata Selection data Co...

Page 390: ...ion of the work area CheckBoundary Data type num The clearance distance for sorting in millimeters The distance is defined as the minimum distance to the next item in the sorting direction SortDirOffset Data type num An offset distance beyond the item target in the sort direction Is used to define the inner limit for the corridor in which no other item targets are allowed Examples VAR sortdata y_s...

Page 391: ...Ware 6 02 PMppa360_IRC5_6_02 prg Four axes FlexPicker IRB 360 Adapted for double pick single place To be used with RobotWare 6 02 PMppa360_IRC5_6_02_DoublePick prg Six axes robots of articulated arm type for example IRB 120 PMppa_6Axes_IRC5 prg Six axes robots of articulated arm type for example IRB 120 To be used with RobotWare 6 09 PMppa_6Axes_IRC5_6_02 prg Customized for Template Four axes Flex...

Page 392: ...ion gives the location of the next empty place location for the item to be placed Movements The RAPID program is built with six different movements For a six axis robot the following two intermediate points must be used Between position 3 and position 4 Between position 6 and the next loop s position 1 xx0800000326 The following six movements are included Description Approach position above the pi...

Page 393: ...arget cannot be a fine point Note When running a pick and place cycle over moving conveyors the RAPID program pointer runs in advance and picks out a target long before it is going to be used By the time the robot uses the target it may already have moved past the exit limit RAPID moves the program pointer in advance about 100ms In a coordinated fine point the running in advance is triggered at th...

Page 394: ...Source Type of source PICK_TYPE PLACE_TYPE or UNDEFINED_TYPE itmsrctype SourceType Triggdata for acknowledging the item targets triggdata Ack Triggdata for negative acknowledging the item targets triggdata Nack Triggdata for attaching a nearby item to activator 1 in simulation triggdata SimAttach1 Triggdata for attaching a nearby item to activator 2 in simulation triggdata SimAttach2 Triggdata for...

Page 395: ... structure Description Alias Name Flag to indicate that the array index is used bool Used Name of the work area string NonCnvWobjName The stored work object data wobjdata Wobj AlwaysClearPath Clear path The robot path is cleared before the restart when a stop occurs during a motion that is coordinated to a moving work object Otherwise the coordinated motion continues the stored path but the positi...

Page 396: ...ooldata is used for pick and place operations Note The direction of tool must fit the direction of items that are retrieved from the queue The target positions of the items which are retrieved from the queue are rotated 180 degrees around their x axis from the defined direction In an installation with a hanging IRB 360 and items lying on a horizontal conveyor the tool s z direction will point out ...

Page 397: ...2 has the second lowest selection index VAR itmtgt PickTarget Used to retrieve a pick target from a pick item source VAR itmtgt PlaceTarget Used to retrieve a place target from a place item source TASK PERS wobjdata WObjPick Holds the wobjdata for the work area The information is moved from ItmSrcData to WObjPick in the Pick routine because the motion instructions need to have the wobjdata as PERS...

Page 398: ...types are used declare one loaddata for each type It is important that correct loaddata is used to get the best performance of the robot The default loaddata is the same as tooldataload0 398 Application manual PickMaster Twin PowerPac 3HAC064218 001 Revision B Copyright 2021 ABB All rights reserved 6 RAPID reference 6 4 2 Variables Continued ...

Page 399: ...ion reversion and turning off The default program only sets up events for one vacuum ejector on the I O group goVacBlow1 If more than one vacuum ejector is used the new vacuum ejector I O group must be setup for the correct work area and the default routine must be edited to get the right vacuum ejector to each work area PROC InitSpeed Sets the robot speed used in the program The instruction VelSe...

Page 400: ...b PROC Pick num Index Executes one pick The index defines which work area the item will be picked from PROC Place num Index Executes one place The given index defines which work area the item will be placed on PROC GoInterMidP robtarget Pos Executes a motion to the intermediate position Pos Used only for six axes robots TRAP SafeStopTrap Trap routine to catch the stop I O signal This is executed i...

Page 401: ...This routine is called when the project is stopped PROC PickRateInit Initiates the pick rate calculation PROC PickRateReset Resets the pick rate calculation PROC CheckAx4Rev Checks if it is necessary to reset the fourth axis on the IRB340 PROC ResetAx4 VAR mecunit MechUnit Resets the fourth axis PROC NotifyClearAll Tells PickMaster that ClearAll is executed PROC NotifySafeStop Tells PickMaster tha...

Page 402: ...tion manual Conveyor tracking for more information PROC WalkTheData Traces the content of the array variables ItmSrcData and NonCnvWOData which can be useful when trying to find an error It prints the file TheData log on the system directory on the controller TRAP PickRateTrap Trap routine to calculate the correct pick rate for the robot 402 Application manual PickMaster Twin PowerPac 3HAC064218 0...

Page 403: ...odule can be executed as service routines All service variable names must be set in a ServiceVarX The service variables can only be of type num Maximum number of service variables is ten Application manual PickMaster Twin PowerPac 403 3HAC064218 001 Revision B Copyright 2021 ABB All rights reserved 6 RAPID reference 6 4 4 Service routines ...

Page 404: ...m 1 Pick item from pick work area 2 Define type of item 3 Place on out work area Example code PROC PickPlaceSeq Pick PickWorkArea 1 IF PickTarget Type 1 THEN Place PlaceWorkArea 1 ELSEIF PickTarget Type 2 THEN Place PlaceWorkArea 2 ENDIF ENDPROC 404 Application manual PickMaster Twin PowerPac 3HAC064218 001 Revision B Copyright 2021 ABB All rights reserved 6 RAPID reference 6 5 1 Example Mixing on...

Page 405: ...o pick from 3 Pick item from pick work area 4 Place on out work area Example code PROC PickPlaceSeq VAR num PlaceType 0 NextItmTgtType ItmSrcData PlaceWorkArea 1 ItemSource PlaceType IF PlaceType 1 THEN Pick PickWorkArea 1 ELSEIF PlaceType 2 THEN Pick PickWorkArea 2 ENDIF Place PlaceWorkArea 1 ENDPROC Application manual PickMaster Twin PowerPac 405 3HAC064218 001 Revision B Copyright 2021 ABB All ...

Page 406: ...rkArea 1 ItemSource PlaceType TEST PlaceType CASE 4 PickType 1 CASE 5 PickType 2 CASE 6 PickType 3 ENDTEST GetItmTgt ItmSrcData Index ItemSource PickTarget ItemType PickType TriggL Conc RelTool PickTarget RobTgt 0 0 ItmSrcData Index OffsZ MaxSpeed ItmSrcData Index VacuumAct1 z20 PickAct1 WObj WObjPick MoveL Conc PickTarget RobTgt LowSpeed z5 Inpos ItmSrcData Index TrackPoint PickAct1 WObj WObjPick...

Page 407: ...lowing example code Procedure PickPlaceSeq The Pick and Place sequence Edit this routine to specify how the robot shall execute the movements PROC PickPlaceSeq Pick PickWorkArea 1 1 Pick PickWorkArea 1 2 Place PlaceWorkArea 1 ENDPROC For the Pick routine see the following example code Note the usage of PickAct2 and VacuumAct2 for the second pick Procedure Pick Executes a pick movement Edit this ro...

Page 408: ...area RL2 Please check configuration SafeStop ENDIF ENDPROC The tooldata PickAct1 is used at the first pick The tooldata PickAct2 is used at the second pick Update PickAct1 and PickAct2 defined in module ppaUser sys Define the tool center point in the center of the controlled vacuum ejector Update also the weight and the center of mass Save the updates of the RAPID program close the editor and appl...

Page 409: ...nter point in the center of the controlled vacuum ejectors Update also the weight and the center of mass Save the updates of the RAPID program close the editor and apply the updates Note Use the same method to setup a tool with more than two activators However a few additional setup steps are required For example using a tool with 3 4 activators requires the following additional steps 1 Select two...

Page 410: ...nect the trigger and strobe signal and the position generator signals For example EIO_CROSS Res diSIMPosGen Act1 doSIMPosGen Res diSIMStrobe Act1 doSIMTrig In the RAPID code create a control of the place queue If the queue is empty all positions in the pattern are used set the signal doSIMPosGen high in the RAPID code This signal is cross connected with the diSIMPosGen and an event will be sent to...

Page 411: ... Inpos ItmSrcData Index TrackPoint PickAct1 WObj WObjPlace GripLoad load0 TriggL RelTool PlaceTarget RobTgt 0 0 ItmSrcData Index OffsZ LowSpeed ItmSrcData Index Ack z20 PickAct1 WObj WObjPlace ENDPROC Application manual PickMaster Twin PowerPac 411 3HAC064218 001 Revision B Copyright 2021 ABB All rights reserved 6 RAPID reference 6 5 5 Example Placing a predefined pattern on indexed work area Cont...

Page 412: ...between the check limit and the exit limit into consideration when checking for the nearest objects Therefore the distance between the check limit and the exit limit will be at least the diameter of the largest item The illustration below shows how the items are selected depending on the position and the orientation The robot will first pick item 4 and then item 3 The other two will never be picke...

Page 413: ...ata GeometricData x 60 sel_data GeometricData y 70 sel_data GeometricData z 10 sel_data GeometricData radius 0 sel_data Offset OffsetRelation ITEM_COORD_DIR sel_data Offset OffsetPose trans x 0 sel_data Offset OffsetPose trans y 0 sel_data Offset OffsetPose trans z 0 sel_data Offset OffsetPose rot q1 1 sel_data Offset OffsetPose rot q2 0 Continues on next page Application manual PickMaster Twin Po...

Page 414: ...Data Index VacuumAct1 z20 PickAct1 WObj WObjPick MoveL Conc PickTarget RobTgt LowSpeed z5 Inpos ItmSrcData Index TrackPoint PickAct1 WObj WObjPick GripLoad ItemLoad TriggL RelTool PickTarget RobTgt 0 0 ItmSrcData Index OffsZ LowSpeed ItmSrcData Index Ack z20 PickAct1 WObj WObjPick ENDPROC 414 Application manual PickMaster Twin PowerPac 3HAC064218 001 Revision B Copyright 2021 ABB All rights reserv...

Page 415: ...e must be a clear corridor to the right of every item before it is shuffled The algorithm will check both upwards and downwards the production flow for other items Use the check limit in the x direction as a parameter to the GetItmTgt instruction to define the starting point from where the first item will be shuffled The instruction will try to shuffle the first item between the check and enter li...

Page 416: ...t VAR num check_limit y_sort ShapeType BOX y_sort ConsiderType BitOr ITEMS_TO_USE ITEMS_BYPASS y_sort GeometricData x 41 y_sort GeometricData y 160 y_sort GeometricData z 5 y_sort GeometricData radius 0 y_sort Offset OffsetRelation FRAME_COORD_DIR Continues on next page 416 Application manual PickMaster Twin PowerPac 3HAC064218 001 Revision B Copyright 2021 ABB All rights reserved 6 RAPID referenc...

Page 417: ...Conc RelTool PickTarget RobTgt 0 0 ItmSrcData Index OffsZ MaxSpeed ItmSrcData Index VacuumAct1 z20 Gripper WObj WObjPick MoveL Conc PickTarget RobTgt LowSpeed z5 Inpos ItmSrcData Index TrackPoint Gripper WObj WObjPick GripLoad ItemLoad draw_target PickTarget RobTgt draw_target trans y 200 draw_target rot 0 1 0 0 TriggL draw_target LowSpeed ItmSrcData Index Ack z20 Gripper WObj WObjPick ENDPROC App...

Page 418: ...e signal configurations by adding the two signals EIO_SIGNAL Name doTrigSignal SignalType DO Unit PPASIM UnitMap 6 Access ALL Name diStrobeSignal SignalType DI Unit PPASIM UnitMap 6 Access ALL The trigger and strobe signals are cross connected since there is no vision system that can send back a strobe signal EIO_CROSS Res diStrobeSignal Act1 doTrigSignal The Position generator signal in this case...

Page 419: ...ignal Modify the signal configurations by adding the two signals EIO_SIGNAL Name doPosGenSignal SignalType DO Unit PPASIM UnitMap 7 Access ALL Name diPosGenSignal SignalType DI Unit PPASIM UnitMap 7 Access ALL The position generator signals are cross connected EIO_CROSS Res diPosGenSignal Act1 doPosGenSignal diPosGenSignal is defined in the line as the position generator signal and doPosGenSignal ...

Page 420: ...This page is intentionally left blank ...

Page 421: ...or displaying mechanical disturbances The system can not be started or displays irrational behavior during start Indications on the hardware such as LEDs Other types of symptoms The robot system is complex and has a large number of functions and function combinations Related information Generic troubleshooting and all error messages in the robot system are listed in Operating manual Troubleshootin...

Page 422: ...m may be connected Dangers during troubleshooting This implies that special considerations unconditionally must be taken when troubleshooting All electrical parts must be considered as live The manipulator must at all times be expected to perform any movement Since safety circuits may be disconnected or strapped to enable normally prohibited functions the system must be expected to perform accordi...

Page 423: ...LOG ribbon 2 If you need to view the event log in the PickMaster PowerPac select Viewer The event log will show up 3 If you need to view the event log without the PickMaster PowerPac select Save The event log will be saved as xlsx file Application manual PickMaster Twin PowerPac 423 3HAC064218 001 Revision B Copyright 2021 ABB All rights reserved 7 Troubleshooting 7 3 Administering the log ...

Page 424: ...elded and properly attached Check that the right IP address default gateway and subnet mask is defined on both PC and robot controller Note that all three values must be defined even if there is only one computer and one robot controller on the network For more information see Configuring networks on page 39 Action 4 See Configuring networks on page 39 Action 5 Check that the IP address goto File ...

Page 425: ...obable causes of the warning 4326 Verfication actions Probable cause If work area is conveyor Action 1 on page 424 Action 2 on page 424 The conveyor board does not receive any strobe pulses on the start input Action 1 on page 424 The strobe signal is not configured as cXNewObjStrobe Action 3 on page 424 PickMaster has no connection with the robot controller If work area is indexed Action 1 on page...

Page 426: ...nnection with the robot controller Warning 4328 and 4329 received together Error description Typically a pair of 4328 and 4329 is received for one several or every trigger strobe related to a work area 4328 Trigger strobe time mismatch 1f s Item positions from s to s lost See Application manual 4329 Trigger strobe time mismatch 1f s Strobe from s was ignored See Application manual Probable causes ...

Page 427: ... signal is not stable Warning 4329 received without 4328 Error description 4329 Trigger strobe time mismatch 1f s Strobe from s was ignored See Application manual Probable causes The following table provides the probable causes of the warning 4328 and 4329 Verfication actions Probable cause Action 2 on page 424 The strobe signal is not stable Application manual PickMaster Twin PowerPac 427 3HAC064...

Page 428: ... the camera cable is connected to the correct port If the camera is distance trigged the encoder might not be recording any conveyor movement due to bad encoder connection or wrong conveyor selected in the work area If the camera is I O trigged the photo eye might not be sensing any part due to Wrong connection Bad reflection 428 Application manual PickMaster Twin PowerPac 3HAC064218 001 Revision ...

Page 429: ...bution in the Position Source Check the AI c Speed in the I O list if any speed is detected If not check encoder signals Check the AI c Position in the I O list if any position is tracked If not check the distribution in the Position Source Check the direction of travel on the DI c DirOfTravel Monitor the signal Queue Idle to see if the queue gets any positions Monitor the Position Available signa...

Page 430: ... shaft encoders since belt slippage between roller and belt can vary Check the camera calibration Poor quality of calibration grid will give inaccurate calibration result Check if there are differences between calibration paper height and product height Check if there are parallax errors when identifying high products Make sure that the camera is not mounted on robot frame because this can cause c...

Page 431: ...sed set the SyncSeparation filter distance to avoid double and ghost triggers If vision is used increase the overlap and position filter Clear the checkbox Same level only in the Position Source If a robot downstream in an ATC group tries to use an already used item then the Work Area order in the Position Source is incorrect Application manual PickMaster Twin PowerPac 431 3HAC064218 001 Revision ...

Page 432: ... is decreased To check all the possible causes the following must be verified Is the factory default configuration is active There could be custom configuration activated Verify if the custom configuration is having reduced ROI region of interest 432 Application manual PickMaster Twin PowerPac 3HAC064218 001 Revision B Copyright 2021 ABB All rights reserved 7 Troubleshooting 7 4 6 Problem with cam...

Page 433: ...r or the file is corrupt Error 4199 The PickMaster program failed to access the Windows registry when writing or reading its configuration Error 4200 The project is not designed on the current line When trying to open a project there is already a project open that is built upon a different line Warning 4202 Reason Only one line can be used at the same time Solution Close any open projects and try ...

Page 434: ...mera is currently in use by another project Error 4300 Reason When starting a project one of the position sources is configured with a camera that is currently in use by another project Solution A camera can only be used in production in one project at the same time Reconfigure one project or run them one at a time Failed to start project execution Error 4301 Reason Internal error probably caused ...

Page 435: ...ea Error 4314 The work area that triggers a Position Source has changed This occurs at project startup or when the robot controller with the previous trigger work area has stopped Status 4315 Received item acknowledgment from an unknown work area Warning 4319 A project that used load balancing has been upgraded and a work area order was generated The work area order must be verified in the Positio...

Page 436: ...ke sure not to use more camera distribu tion than allowed or request a new license Attempt to start a project with ATC without an appropriate li cense Error 4805 Solution Request a new license including the ATC option or remove ATC from the project The licence will expire in less than 14 days Warning 4806 Solution Request a new license More External Sensors are used than allowed by the currently i...

Page 437: ...activated Emergency stop Warning 8203 Reason The robot has been stopped because of an activation of the emergency stop Solution Remove the reason for the stop and reset the emergency stop Restart the robot can be done without stopping the project Rapid program stopped Status 8204 Rapid program has been restarted Status 8205 Robot controller is in system failure Status 8209 Reason See event log on ...

Page 438: ...tring type Solution Ensure that the variable exists and is of the string type The system failed to apply a new work area tune because the work area ID does not exist Internal Er ror 8303 The system failed to apply new work area settings because the work area ID does not exist Internal Er ror 8304 The system failed to apply a new work area setting Internal Er ror 8305 Failed to set DO signal doSafe...

Page 439: ...Num SourceIndex Num TunePosX Num TunePosY Num TunePosZ Failed to load the RAPID program Error 8318 Solution Verify that there are no errors in the RAPID program otherwise it will fail to load Failed to download the RAPID program to the controller Error 8319 Failed to stop execution of the RAPID program Error 8320 Failed to delete the RAPID program Error 8321 Failed to reset emergency stop Error 83...

Page 440: ...urce queue ItmSrcCnvxx C0040403 No response from the controller Error 8337 Reason For large robots where working range is large CPU takes more time for indexing it because of GetReachableTarget functionality Solution The accuracy of the release zone indexed working range associated with the function UseReachableTargets can be adjusted from 0 to 100 with a new process system parameter Reach Zone Ac...

Page 441: ... area with that ID exists An operation was executed on a non existing work area The work area has probably been removed Error 8398 Settings on the work area failed due to a bad work area ID Error 8399 The system failed to apply new work area settings due to a bad work area ID Error 8400 The system failed to set a new work area because the work area ID does not exist Error 8401 The system failed to...

Page 442: ... if applicable Failed to get an image from a camera when running a project Error 12309 Reason This error probably occurred because the system is too heavily loaded or the frame grabber is triggered way too fast Solution Verify system load and make sure the robot control ler does not send faulty vision triggers Failed to create a geometric model Internal Er ror 12310 Reason See error message for mo...

Page 443: ...Warning 12329 Reason Bad Ethernet connection or excessive Ethernet communication Images are triggered too frequently Warning 12330 Solution Adjust vision models to be less time consuming or decrease trigger frequency Connection to camera is lost attempting to reconnect Warning 12331 Reason Ethernet cable or power cable has been disconnec ted Image Buffer Full More information is provided in the lo...

Page 444: ...This page is intentionally left blank ...

Page 445: ... part list Type Description Spare part number USB dongle small 3HAC072139 001 USB dongle large 3HAC073341 001 USB dongle sim 3HAC039556 001 The dongle can be connected to any USB interface on host computer GigE Network card parts Spare part list Type Description Spare part number GigE network card 3HAC069300 001 Application manual PickMaster Twin PowerPac 445 3HAC064218 001 Revision B Copyright 20...

Page 446: ...This page is intentionally left blank ...

Page 447: ...024480 011 Circuit diagram IRC5 3HAC049406 003 Circuit diagram IRC5 Compact 3HAC026871 020 Circuit diagram IRC5 Panel Mounted Con troller 3HAC024120 004 Circuit diagram Euromap 3HAC057185 001 Circuit diagram Spot welding cabinet RobotWare options Article numbers for circuit diagrams Product 3HAC024480 020 Circuit diagram PickMaster Twin Application manual PickMaster Twin PowerPac 447 3HAC064218 00...

Page 448: ...This page is intentionally left blank ...

Page 449: ...272 grip locations 162 histogram sub inspection model 272 inspection models 264 networks 39 vision network 40 connecting cameras 35 I O 37 container definition 15 controller I O boards 37 IP address 39 RobotWare 42 settings 42 conveyor start stop signal 94 97 counts_per_meter system parameter 187 189 208 210 D data types itmtgt 384 selectiondata 387 sortdata 390 diodes 37 DSQC 37 E emergency stop ...

Page 450: ...aster Host definition 15 PickMaster Operator definition 15 PickMaster PowerPac definition 15 PickMaster Runtime definition 15 pick rate 287 position available signal 94 97 99 positions bad accuracy 430 used twice 431 precision time protocol PTP 28 PROC cfg system parameters 44 Process system parameters 44 Q QStartItmSrc instruction 372 QStopItmSrc instruction 373 queue idle signal 94 97 99 R recip...

Page 451: ...ncronization service 28 trigger signal 94 97 100 troubleshooting 421 U UDP IP 28 V vision color 289 vision models blob 257 concept 245 external 245 geometric model PatMax 246 PatMax 246 vision system Gigabit Ethernet 21 maximum number of cameras 21 requirements 21 W Warning 4326 425 4327 425 4328 426 4329 426 white balance calibrating 291 work area definition 15 Z zoom 244 Application manual PickM...

Page 452: ......

Page 453: ......

Page 454: ...ne 47 22 87 2000 ABB Engineering Shanghai Ltd Robotics Discrete Automation No 4528 Kangxin Highway PuDong District SHANGHAI 201319 China Telephone 86 21 6105 6666 ABB Inc Robotics Discrete Automation 1250 Brown Road Auburn Hills MI 48326 USA Telephone 1 248 391 9000 abb com robotics 3HAC064218 001 Rev B en Copyright 2021 ABB All rights reserved Specifications subject to change without notice ...

Reviews: