background image

44

ACH580 Installation, Operation and Maintenance Manual

ACH580-01 Installation

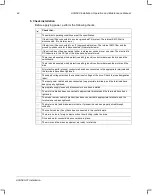
5. Check installation

Before applying power, perform the following checks.

Check that …

The ambient operating conditions meet the specification.
If the drive will be connected to a corner-grounded TN system: The internal EMC filter is 

disconnected. (No metal screws.)
If the drive will be connected to an IT (ungrounded) system: The internal EMC filter and the 

ground-to-phase varistor is disconnected. (No metal screws.)
If the drive has not been powered (either in storage or unused) over one year: The electrolytic 

DC capacitors in the DC link of the drive have been reformed. 
There is an adequately sized protective earth (ground) conductor between the drive and the 

switchboard.
There is an adequately sized protective earth (ground) conductor between the motor and the 

drive.
All protective earth (ground) conductors have been connected to the appropriate terminals and 

the terminals have been tightened.
The supply voltage matches the nominal input voltage of the drive. Check the type designation 

label.
The input power cable has been connected to appropriate terminals, and the terminals have 

been properly tightened. 
Appropriate supply fuses and disconnector have been installed.
The motor cable has been connected to appropriate terminals and the terminals have been 

tightened. 
The brake resistor cable (if present) has been connected to appropriate terminals, and the 

terminals have been tightened. 
The motor cable (and brake resistor cable, if present) have been properly wired through 

conduits.
The control cables (if any) have been connected to the control board.
There are no tools, foreign objects or dust from drilling inside the drive.
Drive and motor connection box covers are in place.
The motor and the driven equipment are ready for start-up.

ACH580_Inst_Op_Maint_Rev G.book  Page 44  

Summary of Contents for ACH580-01 Series

Page 1: ...C ACH580 01 drives Installation Operation and Maintenance Manual I O M ACH580 01 HVAC Drives 1 350 HP 0 75 250 kW ACH580 BCR BDR 1 350 HP 0 75 250 kW ACH580 PCR PDR 1 350 HP 0 75 250 kW ACH580 VCR VDR...

Page 2: ...drive carefully Frames R5 R9 Lift the drive with a lifting device Use the lifting eyes of the drive Frames R5 R9 Do not tip the drive over The drive is heavy and its center of gravity is high An over...

Page 3: ...ype and 20 07 Ext2 start trigger type in ACH580 HVAC control program firmware manual 3AXD50000027537 English When the control location is not set to Local text Hand is not shown on the top row of the...

Page 4: ...drive will be connected on a corner grounded TN system make sure the EMC filter is not connected metal screws should not be installed Connections with metal screws in these systems can cause danger or...

Page 5: ...he supply if the protective earth conductor breaks Additional instructions for Safety Functions WARNING Bypass configurations ACH580 VxR ACH580 BxR do not support Safe Torque Off STO functionality in...

Page 6: ...ore you activate automatic fault reset functions of the drive control program make sure that no dangerous situations can occur These functions reset the drive automatically and continue operation afte...

Page 7: ...top mounting plate between the mounting holes Type code label attached to the base frame on the side of the enclosure 2 According to the construction code proceed to your drive s installation operati...

Page 8: ...2 Beside c 3 mm in mm in mm in R1 200 7 87 150 5 91 150 5 91 R2 200 7 87 150 5 91 150 5 91 R3 200 7 87 200 7 87 150 5 91 R4 53 2 09 200 7 87 150 5 91 R5 100 3 94 200 7 87 150 5 91 R6 155 6 10 300 11...

Page 9: ...r any damage and notify the shipper immediately if damaged components are found 3 Check the contents against the order and the shipping label to verify that all parts have been received 1 Free space a...

Page 10: ...installing the ACH580 ensure the input power supply to the drive is off WARNING Metal shavings or debris in the enclosure can damage electrical equipment and create a hazardous condition Where parts...

Page 11: ...holes and start the bolts into the anchors or plugs Use long enough bolts to make them carry the weight of the drive 4 Position the drive onto the bolts on the wall 5 Tighten the bolts in the wall sec...

Page 12: ...te under the drive The drive dimensions and hole locations are also shown in the drawings in the ACH580 Hardware manual publication number 3AXD50000044839 2 Drill the mounting holes 3 Insert anchors o...

Page 13: ...screws 7b 8 Put the tabs at the top of the front cover in their counterparts on the housing and then press at the bottom 8a and tighten the retaining screws 8b IP21 UL NEMA Type 1 IP55 UL NEMA Type 1...

Page 14: ...e holes and start the bolts into the anchors or plugs Use a sufficient number of bolts that are long enough to make them carry the weight of the drive 4 Position the drive onto the bolts on the wall L...

Page 15: ...3 8c IP55 UL NEMA Type 12 9 Remove the front cover Remove the fastening screws a with a T20 Torx screwdriver move the cover to the top side b and then up c Note Install the hood on UL NEMA Type 12 dri...

Page 16: ...NOT to the drive output terminals T1 U T2 V and T3 W measure the insulation resistance between the phase conductors and between each phase conductor and the Protective Earth PE conductor using a meas...

Page 17: ...d S Separate I Isolated TN S Tera Neutral Separate Earth and Neutral have separate conductors 3 wire single phase L N E IT Isolated Neutral Earth is either ungrounded or high resistive 30 ohms non sym...

Page 18: ...n for various electrical power networks The following describes the purpose of the EMC filter and the varistor VAR and how to configure based on the electrical power systems the drive will be connecte...

Page 19: ...be not used 2 Optional for greater noise filtering Qty Description Location Bit size Torque 1 Screw M4x12 COMBI Torx T20 Steel EMC VAR T20 1 5 Nm 1 Screw M4x12 PZ1 Nylon EMC VAR PZ1 Hand tighten Qty...

Page 20: ...ise filtering 3 Frames R4 and R5 are evaluated for use on corner grounded delta networks by UL standards R4 and R5 frames may not be used on IEC installations with corner grounded networks TN system I...

Page 21: ...7 45 14 2 1 2 10 70 2 2 R6 1 1 77 45 4 25 300 MCM 150 2 2 R7 1 2 13 54 3 0 95 500 MCM 240 2 2 R8 2 1 77 45 2 1 0 2 50 2 300 MCM 2 150 2 2 R9 2 2 13 54 2 3 0 2 95 2 500 MCM 2 240 2 2 1 Screwdrivers R1...

Page 22: ...cable length 4 kHz1 2 Scalar control Vector control m ft m ft Standard drive without external options R1 100 330 100 330 R2 200 660 200 660 R3 300 990 300 990 R4 300 990 300 990 R5 300 990 300 990 R6...

Page 23: ...24 14 0 4 26 14 0 4 R4 4 0 67 24 14 0 4 26 14 0 4 R5 3 0 67 24 14 0 4 26 14 0 4 R6 4 0 67 26 14 0 4 26 14 0 4 R7 4 0 67 26 14 0 4 26 14 0 4 R8 4 0 67 26 14 0 4 26 14 0 4 R9 4 0 67 26 14 0 4 26 14 0 4...

Page 24: ...H580 01 114A 2 114 835 82 R5 ACH580 01 143A 2 143 1035 256 R6 ACH580 01 169A 2 169 1251 265 R7 ACH580 01 211A 2 211 1521 265 R7 ACH580 01 273A 2 273 2061 324 R8 Type Output ratings Heat dissipation Ai...

Page 25: ...580 01 011A 6 11 228 59 R2 ACH580 01 017A 6 17 322 59 R2 ACH580 01 022A 6 22 430 105 R3 ACH580 01 027A 6 27 525 105 R3 ACH580 01 032A 6 32 619 105 R3 ACH580 01 041A 6 41 835 82 R5 ACH580 01 052A 6 52...

Page 26: ...protection can be used Refer to local codes and regulations 208 240 volt fuse requirements ACH580 01 Input curren t A UL Maximu m current Voltag e rating Bussmann type 1 UL class 3 phase UN 208 V 04A6...

Page 27: ...00 JJS 30 T 023A 4 23 0 30 600 JJS 30 T 027A 4 27 0 40 600 JJS 40 T 034A 4 34 0 60 600 JJS 60 T 044A 4 44 0 60 600 JJS 60 T 052A 4 52 0 80 600 JJS 80 T 065A 4 62 0 100 600 JJS 100 T 077A 4 77 0 100 60...

Page 28: ...T 011A 6 11 15 600 KTK R 15 or JJS 15 Class CC or T 017A 6 17 30 600 KTK R 30 or JJS 30 Class CC or T 022A 6 22 40 600 JJS 40 T 027A 6 27 40 600 JJS 40 T 032A 6 32 40 600 JJS 40 T 041A 6 41 100 600 JJ...

Page 29: ...1 Analog inputs and outputs X2 Aux voltage output X3 Programmable digital inputs X4 Safe torque off connection X5 Embedded fieldbus X6 Relay output 3 X7 Relay output 2 X8 Relay output 1 X10 Auxiliary...

Page 30: ...ion X1 Analog inputs and outputs X2 Aux voltage output X3 Digital inputs X4 Safe torque off connection X5 Connection to embedded EIA 485 fieldbus adapter module X6 Relay output 3 X7 Relay output 2 X8...

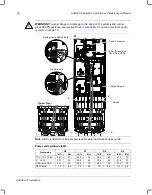
Page 31: ...uit box Ensure grommets pointing down are inserted into all unused holes 3 Route the input power and motor wiring through separate conduits 4 Strip wires 5 Connect the motor and ground wires to the dr...

Page 32: ...to 0 4 lb ft 0 5 0 6 Nm WARNING To avoid danger or damage to the drive on IT systems and corner grounded TN systems see section Drive compatibility for various electrical power systems on page 16 Powe...

Page 33: ...ctors for IP55 UL NEMA Type 12 not supplied Type 12 has a Pressfit gasket 2 Connect conduit runs for input power motor and control cables to the conduit box Ensure grommets pointing down are inserted...

Page 34: ...us electrical power systems on page 16 Power wiring torque table Frame size R3 lb ft Nm T1 U T2 V T3 W 2 6 3 5 L1 L2 L3 2 6 3 5 R R 2 6 3 5 PE Ground 1 1 1 5 BREAKERS INPUT PE MOTOR R R UDC W 3 T V 2...

Page 35: ...conduit clamps for IP21 UL NEMA Type 1 or liquid tight conduit connectors for IP55 UL NEMA Type 12 not supplied Type 12 has a Pressfit gasket 2 Connect conduit runs for input power motor and control...

Page 36: ...ve compatibility for various electrical power systems on page 16 Note UDC and UDC terminals are used for external brake chopper units Power wiring torque table Frame size R4 lb ft Nm T1 U T2 V T3 W 3...

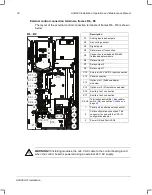
Page 37: ...Type 1 or liquid tight conduit connectors for IP55 UL NEMA Type 12 not supplied Type 12 has a Pressfit gasket 2 Connect conduit runs for input power motor and control cables to the conduit box Ensure...

Page 38: ...ive on IT systems and corner grounded TN systems see section Drive compatibility for various electrical power systems on page 16 Note UDC and UDC terminals are used for external brake chopper units Po...

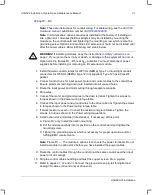
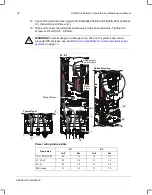
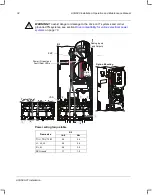
Page 39: ...own in the Power wiring torque table Note Frames R8 R9 If you connect only one conductor to the connector we recommend that you put it under the upper pressure plate 6 Connect the input power and grou...

Page 40: ...and UDC terminals are used for external brake chopper units Power wiring torque table Frame size R6 R7 R8 R9 lb ft Nm lb ft Nm lb ft Nm lb ft Nm T1 U T2 V T3 W 22 1 30 29 5 40 29 6 40 51 6 70 L1 L2 L3...

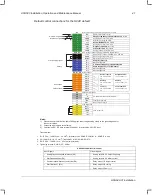
Page 41: ...reen 2 AI1 Output frequency speed reference 0 to 10 V 3 AGND Analog input circuit common 4 10V Reference voltage 10 V DC 5 AI2 Actual feedback 0 to 20 mA 6 AGND Analog input circuit common 7 AO1 Outpu...

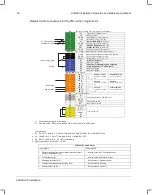
Page 42: ...g input 1 3 AGND Analog input circuit common 4 10V Reference voltage 10 V DC 5 AI2 Actual feedback 0 to 20 mA 6 AGND Analog input circuit common 7 AO1 Output frequency 0 to 10 V 8 AO2 Motor current 0...

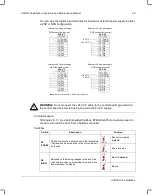
Page 43: ...or last unit on the link Bus not terminated default Bus terminated S5 BIAS Switches on the biasing voltages to the bus One and only one device preferably at the end of the bus must have the bias on Bi...

Page 44: ...ctor between the motor and the drive All protective earth ground conductors have been connected to the appropriate terminals and the terminals have been tightened The supply voltage matches the nomina...

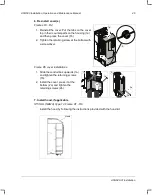
Page 45: ...cover 1b 2 Tighten the retaining screw at the bottom with a screwdriver Frame R5 cover installations 1 Slide the conduit box upwards 1a and tighten the retaining screws 1b 2 Install the cover press i...

Page 46: ...ng on page 52 The ACH580 can be controlled by two default configurations HVAC default direct I O control Used for typical I O controlled BMS applications In the Auto mode this configuration uses a dir...

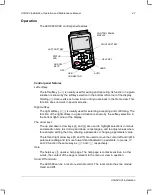
Page 47: ...ht corner of the display The arrow keys The up and down arrow keys and are used to highlight selections in menus and selection lists to scroll up and down on text pages and to adjust values when for e...

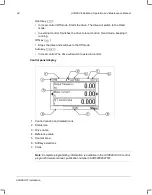
Page 48: ...it running Off key Stops the drive and switches to the Off mode Auto key In local control The drive will switch to external control Control panel display 1 Control location and related icons 2 Status...

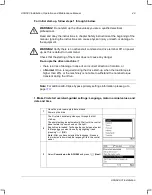
Page 49: ...n or a Normal ID run is required during the drive start up when the load torque is higher than 20 or the machinery is not able to withstand the nominal torque transient during the ID run Note For addi...

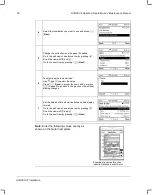
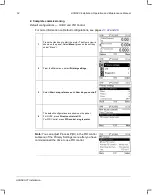
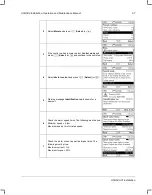
Page 50: ...ed row by pressing Scroll the view with and Go to the next view by pressing Next 6 To select a value in an edit view Use and to select the value Press Save to accept the new setting or press Cancel to...

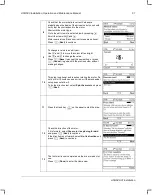
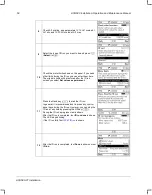
Page 51: ...change the value Press Save to accept the new setting or press Cancel to go back to the previous view without making changes 10 This step is optional and requires rotating the motor Do not do this if...

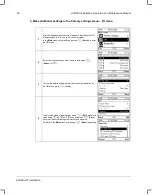
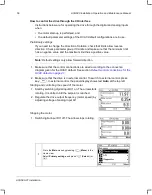
Page 52: ...D control submenu of the Primary Settings menu after you have commissioned the drive to use PID control 1 Press the Hand key to start the motor The Home view is shown on the panel Select Menu press on...

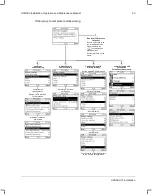
Page 53: ...the two assistants Go through the items on the menu Set the start stop and reference Commissioning with Primary settings Set the ramps Commissioning with parameters For advanced users only 5 Set the...

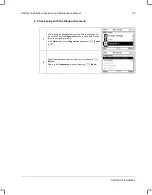
Page 54: ...he control program In the Main menu select a I O and press Select to enter the I O menu 2 Select the connection you want to check and press Select or 3 To view the details of a parameter that cannot b...

Page 55: ...After making the additional adjustments and checking the I O connections use the Diagnostics menu to make sure that the setup is functioning correctly In the Main menu select Diagnostics and press Se...

Page 56: ...y allow forward direction 1 Make sure that the control connections are wired according to the connection diagram given for the HVAC default See section Default control connections for the HVAC default...

Page 57: ...ess Select or and continue to the next step 4 Select Vector control and press Select or 5 Warning message Identification run is shown for a moment 6 Check the motor speed limits The following must be...

Page 58: ...r them here The originals limits will be restored after the ID run unless you select Set values as permanent 11 Press the Hand key to start the ID run In general it is recommended not to press any con...

Page 59: ...cable including phasing and delta star connection Check for an earth fault in motor or motor cables by measuring the insulation resistances of motor and motor cable See Checking the insulation of the...

Page 60: ...ly or may overload the brake chopper or resistor Check the supply voltage If the problem persists contact your local ABB representative A3A2 DC link undervoltage Intermediate circuit DC voltage too lo...

Page 61: ...of the drive Check drive module cooling air flow and fan operation Check inside of cabinet and heatsink of drive module for dust pick up Clean whenever necessary A4B0 Excess temperature Power unit mo...

Page 62: ...the drive Contact your local ABB representative A5EB PU board powerfail Power unit power supply failure Contact your local ABB representative A5ED Measurement circuit ADC Measurement circuit fault Co...

Page 63: ...time is not set Timed functions cannot be used and fault log dates are not correct Set the system time manually or connect the panel to the drive to synchronize the clock If basic panel is used synchr...

Page 64: ...corresponding underload point 37 21 37 25 0003 Overload point below underload point A780 Motor stall Programmable warning 31 24 Stall function Motor is operating in stall region because of e g excessi...

Page 65: ...munication between drive and fieldbus adapter module A or between PLC and fieldbus adapter module A is lost Check status of fieldbus communication See user documentation of fieldbus interface Check se...

Page 66: ...Relay output 2 Select a different signal with parameter 10 27 RO2 source 0003 Relay output 3 Select a different signal with parameter 10 30 RO3 source A8B0 ABB Signal supervision 1 Editable message t...

Page 67: ...or current is being monitored Check the definition of the load curve parameter group 37 User load curve A981 External warning 1 Editable message text Programmable warning 31 01 External event 1 sourc...

Page 68: ...onfigured a season which starts before the previous season Configure the seasons with increasing start dates see parameters 34 60 Season 1 start date 34 63 Season 4 start date AF8C Process PID sleep m...

Page 69: ...verride active Drive is in override mode Informative warning B5A0 STO event Programmable event 31 22 STO indication run stop Safe torque off function is active ie safety circuit signal s connected to...

Page 70: ...ncy control Also check parameters 46 01 Speed scaling 46 02 Frequency scaling and 46 03 Torque scaling Check motor and motor cable including phasing and delta star connection Check there are no contac...

Page 71: ...23 Wiring or earth fault Incorrect input power and motor cable connection ie input power cable is connected to drive motor connection Check input power connections 3210 DC link overvoltage Excessive...

Page 72: ...ry 42F1 IGBT temperature Drive IGBT temperature is excessive Check ambient conditions Check air flow and fan operation Check heatsink fins for dust pick up Check motor power against drive power 4310 E...

Page 73: ...connections For more information see chapter The Safe torque off function in the Hardware manual of the drive and parameter 31 22 STO indication run stop Check the value of parameter 95 04 Control boa...

Page 74: ...problem persists contact your local ABB representative 6487 Stack overflow Internal fault Reboot the control unit using parameter 96 08 Control board boot or by cycling power If the problem persists c...

Page 75: ...ersists contact your local ABB representative 64B2 User set fault Loading of user parameter set failed because requested set does not exist set is not compatible with control program drive was switche...

Page 76: ...n mismatch between EFB protocol firmware and drive firmware 6685 EFB fault 2 Fault reserved for the EFB protocol application Check the documentation of the protocol 6686 EFB fault 3 Fault reserved for...

Page 77: ...ged Check the electrical specifications of the brake resistor against chapter Resistor braking in the Hardware manual of the drive Replace brake chopper if replaceable 7192 BC IGBT excess temperature...

Page 78: ...group 06 Control and status words Check settings of parameter group 60 DDCS communication Check the corresponding settings in the control program of the supply unit Check cable connections If necessar...

Page 79: ...ervision function 3 Check the source of the fault parameter 32 27 Supervision 3 signal 80B3 Signal supervision 4 Editable message text Programmable fault 32 36 Supervision 4 action Fault generated by...

Page 80: ...connections For more information see chapter The Safe torque off function in the Hardware manual of the drive and parameter 31 22 STO indication run stop Check the value of parameter 95 04 Control bo...

Page 81: ...al ABB representative 0005 0008 Internal error Contact your local ABB representative 0009 Asynchronous motors only Acceleration did not finish within reasonable time Contact your local ABB representat...

Page 82: ...e same as in the motor nameplate Contact your local ABB representative FF63 STO diagnostics failure SW internal malfunction Reboot the control unit using parameter 96 08 Control board boot or by cycli...

Page 83: ...escription I Inspection visual inspection and maintenance action if needed P Performance of on off site work commissioning tests measurements or other work R Replacement Action Description P Quality o...

Page 84: ...olled and the speed of the fan matches the cooling needs When the drive is stopped the main fan is kept running at a low speed to cool the control board Replacement fans are available from ABB Do not...

Page 85: ...the fan cable 4 Install the fan in reverse order 5 Restore power Frame Sizes R5 R8 To replace the fan 1 Remove power from drive 2 Remove the 2 screws attaching the fan mounting plate at the bottom of...

Page 86: ...er 8 Restore power Auxiliary cooling fan replacement Auxiliary cooling fans are not speed controlled and run all the time that the control board is powered Replacement fans are available from ABB Do n...

Page 87: ...e cover 2b Press the retaining clip of the control panel at the top 2c and pull it forward from the top edge 2d 3 Remove the front cover Loosen the retaining screws with a screwdriver 3a and lift the...

Page 88: ...Remove the control panel Press the retaining clip of the IP55 panel cover 2a and open the cover 2b Press the retaining clip of the control panel at the top 2c and pull it forward from the top edge 2d...

Page 89: ...ps 6 Pull off the fan 7 Install the fan in reverse order Note Make sure that the arrow on the fan points up 8 Restore power Second auxiliary cooling fan replacement IP55 UL NEMA Type 12 Frame Sizes R8...

Page 90: ...in storage or unused for a year or more See label on page 7 for how to find out the manufacturing date from the serial number For information on reforming the capacitors see Converter module capacito...

Reviews: