


33
1
8
4
3
2
6
5
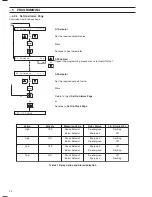
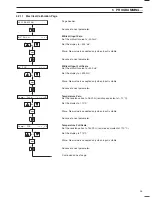
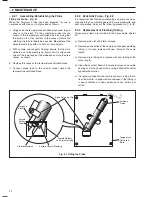
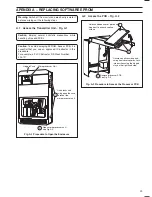
Remove the pump platen by applying
gentle downward force to the platen
while turning the catch mechanism
to the vertical position and pulling the
catch forward.
Lower the pump platen, only from
directly above, on to the pump tubes
until the catch mechanism locates in
the hole in the case, and turn the
catch lever to the horizontal position.
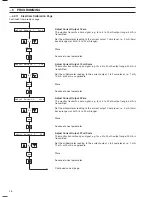
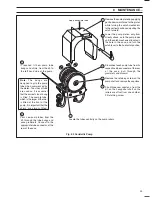
Disconnect each pump tube from its
respective tube connector at the rear
of the case, pull through the
grommets and discard.
Remove the retaining screw on the
pump shaft and remove the capstans.
Fit all three new capstans, from the
kit, on the hexagonal shaft so the
rollers are offset from one another.
Fit retaining screw.
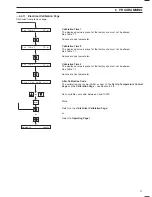
If required, fit new pump tube
bungs and shims, from the kit, to
the left hand side of the pump.
Pass new pump tubes, from the
kit, through the tube bungs and
case grommets. Connect to the
appropriate tube connector at the
rear of the case.
N o t e .
T h e b u n g s a r e
designed to grip the pump
tube when compressed by
the platen. Two sizes of tube
are used so it is essential
that the correct size of bung
is fitted. The sample tube,
which is the larger of the two,
is fitted at the front of the
pump. It is important that the
shims are always fitted.
Locate the tubes centrally on the pump rollers.
7
Apply downward force.
8
MAINTENANCE…
Fig. 8.2 Peristaltic Pump


