background image


30 

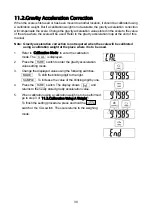
11.2.Gravity Acceleration Correction   

When the scale is first used or has been moved to another location, it should be calibrated using 
a calibration weight. But if a calibration weight is not available, the gravity acceleration correction 
will compensate the scale. Change the gravity acceleration value stored in the scale to the value 
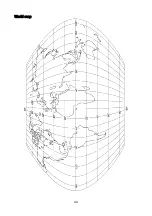
of the area where the scale will be used. Refer to the gravity acceleration map at the end of this 
manual. 

Note:  Gravity acceleration correction is not required when the scale will be calibrated 

using a calibration weight at the place where it is to be used.   

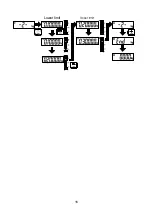
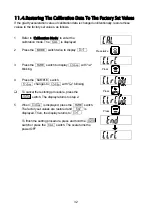
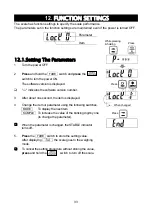
1. 

Refer to "

Calibration Mode

" to enter the calibration 

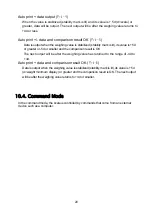
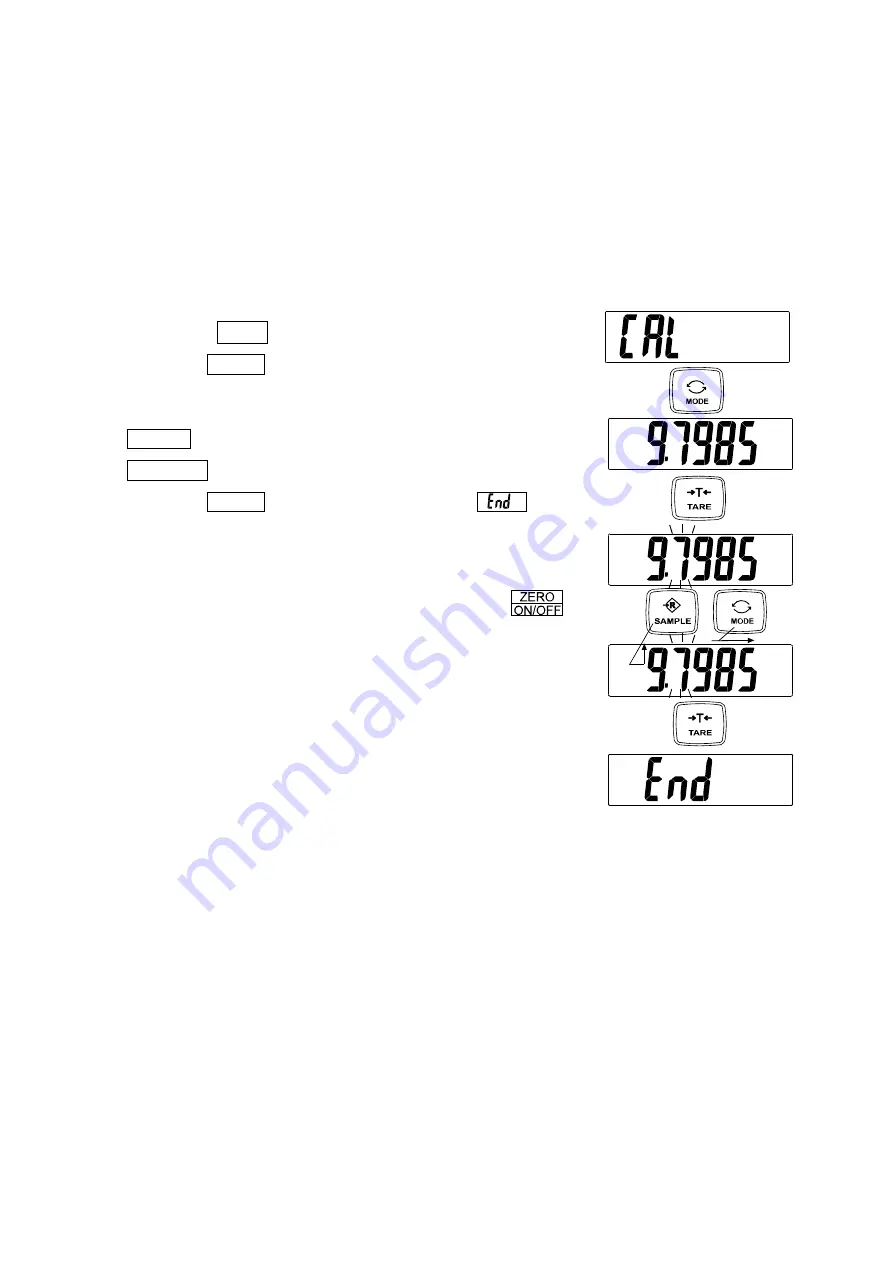
mode. The    CAL    is displayed. 

2. 

Press the 

  TARE 

  switch to enter the gravity acceleration 

value setting mode. 

3. 

Change the displayed value using the following switches. 

  MODE 

    To shift the blinking digit to the right. 

  SAMPLE 

   To increase the value of the blinking digit by one. 

4. 

Press the 

  TARE 

  switch. The display shows 

  and 

returns to the newly stored gravity acceleration value.   

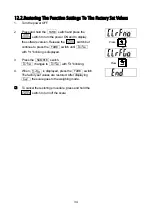
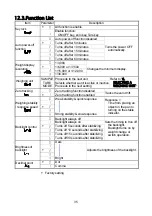
5. 

When calibration using a calibration weight is to be performed, 
go to step 3 of "

11.3.Calibration Using A Weight

".


To finish the setting procedure, press and hold


the 


switch or the CAL switch. The scale returns to the weighing 
mode. 

Summary of Contents for SJ-15KWP

Page 1: ...SJ 3000WP BT SJ 6000WP BT SJ 15KWP BT SJ 30KWP BT 1WMPD4003567B ...

Page 2: ...oduced transmitted transcribed or translated into any language in any form by any means without the written permission of A D Company Limited The contents of this manual and the specifications of the instrument covered by this manual are subject to change for improvement without notice ...

Page 3: ... Values 14 9 AUTO TARE 17 10 WIRELESS COMMUNICATION FUNCTION SJ WP BT model only 18 10 1 Wireless Communication Initial Setting 18 10 2 SJ WP BT Wireless Communication Specification 18 10 3 Data output mode prt refer to 12 FUNCTION SETTINGS 19 10 4 Command Mode 20 11 CALIBRATION 28 11 1 Calibration Mode 28 11 2 Gravity Acceleration Correction 30 11 3 Calibration Using A Weight 31 11 4 Restoring Th...

Page 4: ...he following safety precautions should always be followed WARNING Internal service or adjustment to this product should be performed by a qualified person CAUTION Avoid installing the scale in direct sunlight which may cause discoloration or malfunctions Do not mix battery types or new and old batteries Replace with all new batteries at the same time If the scale is not to be used for a long perio...

Page 5: ...an support can be removed at times such as when the scale is cleaned Battery cover To maintain waterproof performance close completely this cover and secure by screws Weight sensor Load cell Screw to fix the pan support Display and switch Leveling foot Switch cover When this cover is opened the CAL switches inside are revealed Keep the cover closed to maintain waterproof performance Weighing pan S...

Page 6: ...screws for securing the battery cover CAUTION Do not mix used and new batteries Do not mix the different types of batteries That may cause damage to the batteries or the scale Take care of the polarity of batteries The polarity marks are shown in the battery compartment 3 2 Setting Up The Scale CAUTION Avoid installing the scale in direct sunlight that may cause discoloration or malfunctions Place...

Page 7: ...ns on when zero is displayed Comparator LEDs Turns on when the comparator results are displayed Weighing units Ib oz ozt Ib oz tI s tI h tI t t pcs N g and kg are available A selected unit is displayed Battery indicator The battery indicator changes as the battery capacity decreases as shown below New Replace the batteries Wireless communication Turns on when the connection with the wireless commu...

Page 8: ... switch to select the function item During measurement Press the switch to tare the scale and display zero net weight display In the function setting mode to set the parameters Other than at the item unit Press the switch to store new parameters and return to the weighing mode At the item unit Press the switch to select active inactive for the displayed unit When the scale is turned off Press and ...

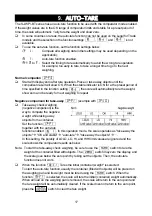
Page 9: ...ABLE indicator to turn on and read the value 6 Remove the object from the weighing pan 7 Press and hold the switch to turn the power off 5 2 Notes About Operations Power on zero If the weight is unstable at power ON the scale displays Check anything touches the weighing pan or check if there is strong wind or vibration The range for power on zero is within 50 10 for Legal for Trade models of the w...

Page 10: ...s the auto power off function is enabled LCD backlight The LCD backlight is controlled by the functions and If no switch is prssed and the weight display continues to be stable for a certain period of time the LCD backlight will automatically turn off The elapsed time to turn off is set by the function setting The backlight always on or off is also selectable The function setting adjusts the brigh...

Page 11: ...the selection 6 Press the TARE switch to store new units The scale returns to the weighing mode Unit Symbol Conversion to gram Gram 1 00000 g Kilogram 1000 00 g Pound UK 453 59237 g Ounce avoir 28 349523125 g Troy ounce 31 1034768 g Pound Ounce Tael Hong Kong general Singapore 37 7994 g Tael Hong Kong jewelry 37 4290 g Tael Taiwan 37 5 g Tola 11 6638038 g Counting unit Newton See below Newtons is ...

Page 12: ...he count display 4 When appears at the right side of the number of samples press the switch to zero the scale If necessary place a container on the weighing pan and press the TARE switch Confirm that the right side of the number of samples shows zero 5 Place the correct number of samples on the weighing pan or in the container 6 Confirm that the STABLE indicator is turned on Press the MODE switch ...

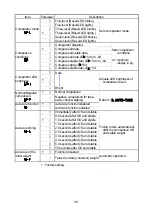
Page 13: ...OLO level 2 LO Level 3 OK level 4 HI level 5 HIHI and outside the highest limit To use the comparator modes the function settings and must be specified and the comparator values must be set Using the function setting select a comparator mode 0 Five level comparator mode Result LED blinks 1 Five level comparator mode Result LED lights 2 Three level comparator mode Result LED blinks 3 Three level co...

Page 14: ...ed LED on LO LOLO limit Displayed value LO limit Yellow LED on OK LO limit Displayed value HI limit Green LED on HI HI limit Displayed value HIHI limit Yellow LED on HIHI HIHI limit Displayed value or Red LED on Three level comparator mode Results Comparison formula LED display LO Displayed value LO limit or Red LED on OK LO limit Displayed value HI limit Green LED on HI HI limit Displayed value o...

Page 15: ... limit Displayed value or No LEDs on The comparator values are common to the weighing and counting mode Ignore the decimal point when setting the comparator values Example for SJ 6000WP BT when the setting value is 001000 Display mode Limit value Capacity Minimum display Normal resolution kg 1 000 kg 6 000 kg 0 001 kg High resolution kg 0 1000 kg 6 0000 kg 0 0005 kg Maximum resolution g 100 0 g 60...

Page 16: ...er After displaying end the device returns to weighing mode 6 Start comparing using the memory number changed to Confirming the Upper and Lower Limit Value 4 Press the SAMPLE switch to display the memory number to be confirmed 5 By pressing the MODE switch LO is lit and the lower limit value of the memory number selected is displayed 6 By pressing the SAMPLE switch HI is lit and the upper limit va...

Page 17: ...AMPLE switch alternates the minus sign on and off The blinking shows minus and no sigh shows plus 8 Press the TARE key to store the lower limit value The scale then displays the upper limit value after displaying end 9 Set the upper limit value by using the following keys MODE To change which digit is blinking SAMPLE To increase by 1 the value of the blinking digit The minus sign can be set at the...

Page 18: ...16 Lower limit Upper limit ...

Page 19: ... comparison for take away example with Take away check weighing negative comparison is the way to compare the negative weight while taking away objects from a container Set the function together with the auto tare function enabled In this operation mode the scale operates as take away the objects OK and stable auto tare take away the objects In this setting the polarity of LOLO LO HI and HIHI limi...

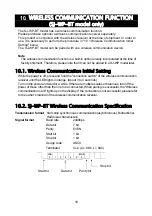
Page 20: ...nitial Setting While the power is off press and hold the connection switch of the wireless communication receiver until the LED lights in orange About 3 to 4 seconds Turn on the power and wait for a while If there are multiple scales or balances turn off the power of those other than the one to be connected When pairing is successful the Wireless communication mark lights up on the display If the ...

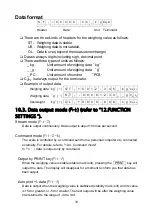
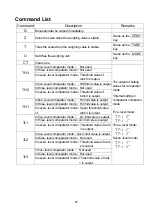
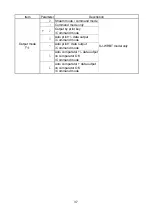
Page 21: ...weight kg O L 9 9 9 9 9 9 9 _ k g CR LF 10 3 Data output mode prt refer to 12 FUNCTION SETTINGS Stream mode prt 0 Data is output continuously Data output is abput 10 times per second Command mode prt 0 6 The scale is controlled by a command sent from a personal computer etc connected externally For details refer to 10 4 Command mode In ptr 1 data is output only by command Output by PRINT key prt 2...

Page 22: ...r greater or 5d or smaller and the comparison result is OK The next output will be after the weighing value has returned to the range of 4d to 4d Auto print data and comparison result OK prt 6 Data is output when the weighing value is stabilized stability mark is lit its value is 5d d weight minimum display or greater and the comparison result is OK The next output will be after the weighing value...

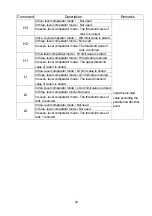
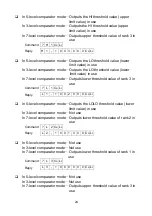
Page 23: ... level comparator mode HIHI limit value is output In three level comparator mode Not used In seven level comparator mode Threshold value of rank 4 is output H1 In five level comparator mode HI limit value is output In three level comparator mode HI limit value is output In seven level comparator mode Upper threshold value of rank 3 is output L1 In five level comparator mode LO limit value is outpu...

Page 24: ... value is stored In three level comparator mode HI limit value is stored In seven level comparator mode The upper threshold value of rank 3 is stored L1 In five level comparator mode LO limit value is stored In three level comparator mode LO limit value is stored In seven level comparator mode The lower threshold value of rank 3 is stored L2 In five level comparator mode LOLO limit value is stored...

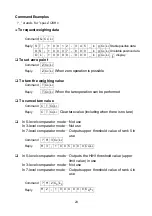
Page 25: ...hen the tare operation can be performed To cancel tare value Command C T CR LF Reply C T CR LF Clear tare value including when there is no tare In 5 level comparator mode Not use In 3 level comparator mode Not use In 7 level comparator mode Outputs upper threshold value of rank 5 in use Command H 3 CR LF Reply H 3 0 0 5 0 0 0 CR LF In 5 level comparator mode Outputs the HIHI threshold value upper ...

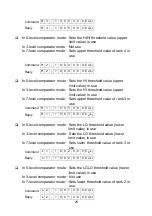
Page 26: ...tor mode Outputs lower threshold value of rank 3 in use Command L 1 CR LF Reply L 1 0 0 2 0 0 0 CR LF In 5 level comparator mode Outputs the LOLO threshold value lower limit value in use In 3 level comparator mode Not use In 7 level comparator mode Outputs lower threshold value of rank 2 in use Command L 2 CR LF Reply L 2 0 0 1 0 0 0 CR LF In 5 level comparator mode Not use In 3 level comparator m...

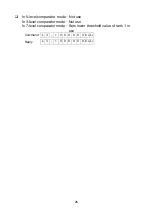
Page 27: ...se In 7 level comparator mode Sets upper threshold value of rank 3 in use Command H 1 0 0 3 0 0 0 CR LF Reply H 1 0 0 3 0 0 0 CR LF In 5 level comparator mode Sets the LO threshold value lower limit value in use In 3 level comparator mode Sets the LO threshold value lower limit value in use In 7 level comparator mode Sets lower threshold value of rank 3 in use Command L 1 0 0 2 0 0 0 CR LF Reply L...

Page 28: ...26 In 5 level comparator mode Not use In 3 level comparator mode Not use In 7 level comparator mode Sets lower threshold value of rank 1 in use Command L 3 0 0 0 0 0 0 CR LF Reply L 3 0 0 0 0 0 0 CR LF ...

Page 29: ...ent in a residential area is likely to cause harmful interference in which case the user will be required to correct the interference at his own expense IC IC RADIATION EXPOSURE STATEMENT FOR CANADA This device complies with Industry Canada license exempt RSS standards Operation is subject to the following two conditions 1 this device may not cause interference and 2 this device must accept any in...

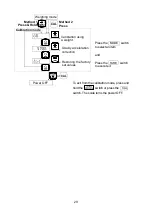
Page 30: ...ons Gravity acceleration correction Calibration using a weight Restoring the factory set values How to enter the calibration mode Method 1 1 Make sure that the scale is in the weighing mode 2 Press and hold the SAMPLE switch until the CAL appears and release the switch Note The above operation is disabled for the Legal for Trade models Method 2 1 Make sure that the scale is in the weighing mode 2 ...

Page 31: ...xit from the calibration mode press and hold the switch or press the CAL switch The scale turns the power OFF Gravity acceleration correction Calibration using a weight Restoring the factory set values Method 1 Method 2 Calibration mode or Press Weighing mode Power OFF CAL CAL Press Hold ...

Page 32: ...alibrated using a calibration weight at the place where it is to be used 1 Refer to Calibration Mode to enter the calibration mode The CAL is displayed 2 Press the TARE switch to enter the gravity acceleration value setting mode 3 Change the displayed value using the following switches MODE To shift the blinking digit to the right SAMPLE To increase the value of the blinking digit by one 4 Press t...

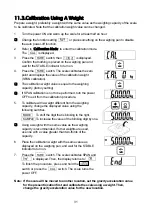
Page 33: ...not to be performed turn the power OFF to exit from the calibration procedure 5 To calibrate with a weight different from the weighing capacity change the displayed value using the following switches MODE To shift the digit that is blinking to the right SAMPLE To increase the value of the blinking digit by one Using a weight with the same value as the weighing capacity is recommended If other weig...

Page 34: ... Press the MODE switch twice to display 3 Press the TARE switch to display with blinking 4 Press the SAMPLE switch changes to with blinking To cancel the restoring procedure press the switch The display returns to step 2 5 When is displayed press the TARE switch The factory set values are restored and is displayed Then the display returns to To finish the setting procedure press and hold the switc...

Page 35: ...on number 3 After about one second the item is displayed 4 Change the item or parameter using the following switches MODE To display the next item SAMPLE To increase the value of the blinking digit by one to change the parameter When the parameter is changed the STABLE indicator turns off 5 Press the TARE switch to store the setting value After displaying the scale goes to the weighing mode To can...

Page 36: ...software version Release the switch but continue to press the TARE switch until with blinking is displayed 3 Press the SAMPLE switch changes to with blinking 4 When is displayed press the TARE switch The factory set values are restored After displaying the scale goes to the weighing mode To cancel the restoring procedure press and hold the switch to turn off the scale Press Press ...

Page 37: ... a unit is active or inactive MODE Proceeds to the next setting Zero tracking Zero tracking function disabled Tracks the zero drift Zero tracking function enabled Weighing stability response speed Weak stability quick response Response Time from placing an object on the pan to turning on the stable indicator Strong stability slow response Backlight control Backlight always off Sets the timing to t...

Page 38: ...s of comparison result Bright Normal Negative comparison Normal comparison Refer to 9 AUTO TARE Negative comparison for take away check weighing Auto tare function Auto tare function disabled Auto tare function enabled Auto tare timing Immediately after OK and stable Timing to tare automatically after the comparison OK and stable weight 0 5 second after OK and stable 1 0 second after OK and stable...

Page 39: ...e SJ WP BT model only 1 Command mode only 2 Output by print key Command mode 3 Auto print data output Command mode 4 Auto print data output Command mode 5 Auto comparator data output on comparator OK Command mode 6 Auto comparator data output on comparator OK Command mode ...

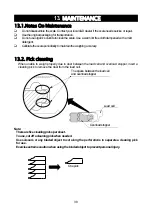
Page 40: ...hingaccuracy 13 2 Pick cleaning When unable to weigh properly due to dust between the load cell and overload stopper insert a cleaning pick to remove the dust from the load cell Loadcell Note Therearefivecleaningpickspersheet Touse cutoffacleaningpickwhenneeded Use scissors or any bladed object to cut along the perforations to separate a cleaning pick for use Exerciseextremecautionwhenusingtheblad...

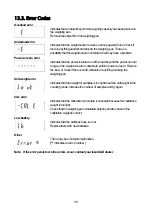
Page 41: ...ghtvaluetoounstabletoperformpower onzero Remove theload orcheckifthereiswind vibrationoranythingtouchingthe weighingpan Unitweighterror Indicatesthattotalweightofsamplesistoolighttosettheunitweightinthe countingmode Increasethenumberofsamplesandtryagain CALerror Indicatesthatthecalibrationprocedureiscanceledbecausethecalibration weightistoolight Checkthattheweighingpanisinstalledproperlyandthemass...

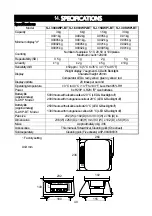
Page 42: ...s red yellow green yellow red Displayupdate 20timespersecond Operatingtemperature 10 Cto40 C 14 Fto104 F Lessthan85 RH Power 6xR20P LR20 D sizebatteries Batterylife Approximately SJ WP Model 5000hourswithalkalinecellsat 20 C LED Backlightoff 2000hourswithmanganesecellsat20 C LED Backlightoff Batterylife Approximately SJ WP BT Model 2500hourswithalkalinecellsat 20 C LED Backlightoff 1300hourswithma...

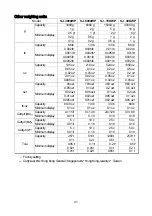
Page 43: ...acity 96 ozt 193 ozt 480 ozt 960 ozt Minimumdisplay 0 05 ozt 0 1 ozt 0 2 ozt 0 5 ozt 0 02 ozt 0 05 ozt 0 1 ozt 0 2 ozt 0 01 ozt 0 02 ozt 0 05 ozt 0 1 ozt 0 005 ozt 0 01 ozt 0 02 ozt 0 05 ozt lb oz Capacity 6 lb 9 oz 13 lb 33 lb 66 lb Minimumdisplay 0 1 oz 0 1 oz 0 1 oz 0 1 oz Catty tl HG Capacity 4 c 15 tl 9 c 14 tl 24c 12tl 49 c 9 tl Minimumdisplay 0 01 tl 0 1 tl 0 1 tl 0 1 tl Catty tl HJ Capacit...

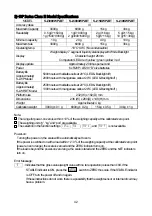
Page 44: ...klightoff 1300hourswithmanganesecellsat20 C LED Backlightoff Platformsize 232 W x192 D mm Dimensions 236 W x260 D x148 H mm Weight Approximately4kg Calibrationweight 3000g 0 1g 6000g 0 2g 15kg 0 5g 30kg 1g Note Therangeforpower onzeroiswithin 10 oftheweighingcapacityatthecalibratedzeropoint Theweighingunits g kg and pcs areavailable Theselectioninthefunctionsettings re5o at at t and at f isnotavai...

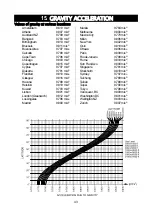
Page 45: ...is 9 809m s2 CapeTown 9 796m s2 RiodeJaneiro 9 788m s2 Chicago 9 803m s2 Rome 9 803m s2 Copenhagen 9 815m s2 SanFrancisco 9 800m s2 Cyprus 9 797m s2 Singapore 9 781m s2 Djakarta 9 781m s2 Stockholm 9 818m s2 Frankfurt 9 810m s2 Sydney 9 797m s2 Glasgow 9 816m s2 Taichung 9 789m s2 Havana 9 788m s2 Tainan 9 788m s2 Helsinki 9 819m s2 Taipei 9 790m s2 Kuwait 9 793m s2 Tokyo 9 798m s2 Lisbon 9 801m s...

Page 46: ...44 World map ...

Page 47: ......

Page 48: ...treet Thebarton South Australia 5031 AUSTRALIA Telephone 61 8 8301 8100 Fax 61 8 8352 7409 A D KOREA Limited 한국에이 엔 디 주 서울특별시 영등포구 국제금융로6길33 여의도동 맨하탄빌딩 817 우편 번호 07331 817 Manhattan Bldg 33 Gukjegeumyung ro 6 gil Yeongdeungpo gu Seoul 07331 Korea 전화 82 2 780 4101 팩스 82 2 782 4264 OOO A D RUS OOO ЭЙ энд ДИ РУС 121357 Российская Федерация г Москва ул Верейская дом 17 Business Center Vereyskaya Plaza...

Reviews: